Ever since I was a kid, I’ve been taking things apart and putting them back together; sometimes right, sometimes wrong, blowing fuses, and generally being intensely curious. I would always brag that there was nothing I owned which I didn't take apart to see how it worked. I never had much help or support, so I started teaching myself, finding unique ways to overcome problems for my builds through the years. About a year ago, I decided it was time to crawl out from under my rock and show the world what I was making ...
So, without further adieu, I introduce my Steampunk-inspired Rock Golem from the depths of middle Earth (a.k.a., my basement work room). This colossus measures in at 12 feet tall and weighs around 300 pounds. He is primarily built out of mattress foam over a PVC pipe skeleton.
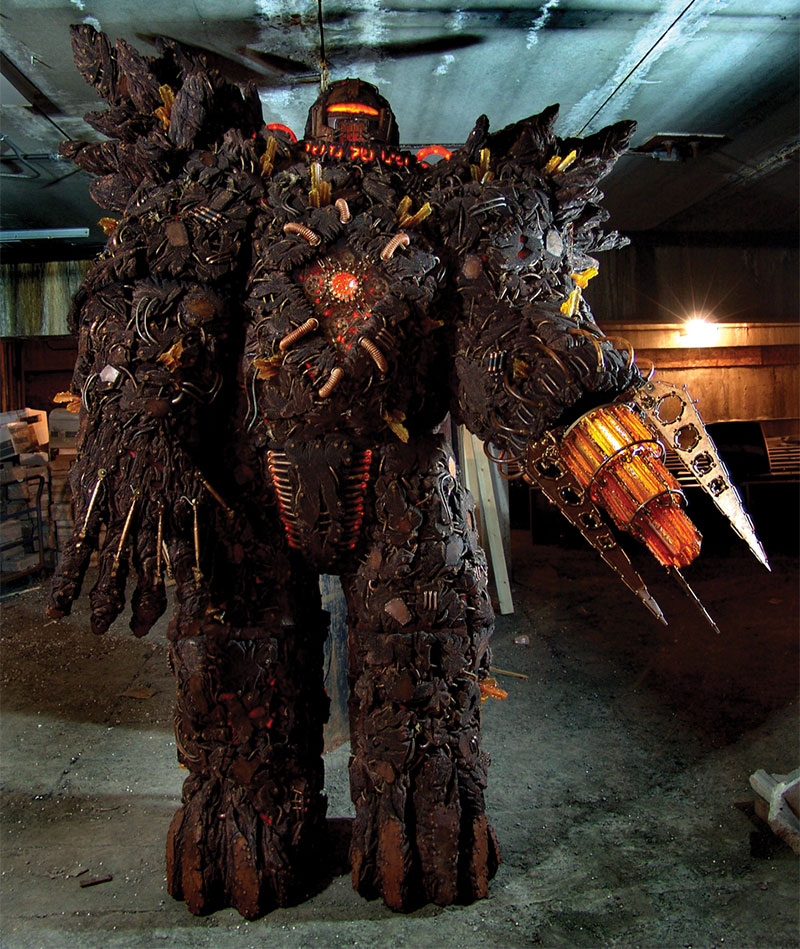
My Golem has an impressive list of features:
- Articulated head with servo-actuated/smoke-spewing jaws, and Larson Scanner eyes.
- Right limb hand manipulator.
- Left limb dynamically-controlled spinning energy weapon.
- A working intricate chest cavity geartrain.
- Several hundred LEDs split among several lighting effect systems.
- Fully autonomous; powered by a 12V8Ahr SLA battery in each foot.
- Wearable as a fully walking costume. An operator enters via the back panel, locks into ski boot stilts, and assumes (almost) full control of this 100% self-sufficient costume.
Sketches, Designs, and the Unknown
I’d like to say I have 3D models with accurate measurements and blueprints, but I just kind of do things on the fly. So, in the instance of my Golem, I knew what I wanted as far as the height and rock-like appearance. Other than that, I made it up as I went along. The first step was to take a physical outline of the person who would be piloting it (not me) by having them stand on buckets against a wall. Tracing this general shape onto on old bed sheet gave me an initial height of approximately 10’6”, so I started building a skeleton to this size (Figure 1). As with any adolescent, my Golem grew a bit during his youth, adding another 18 inches to make an adult size of 12’ tall. I would do some general drawings, mainly so I wouldn’t forget ideas I came up with the night before.
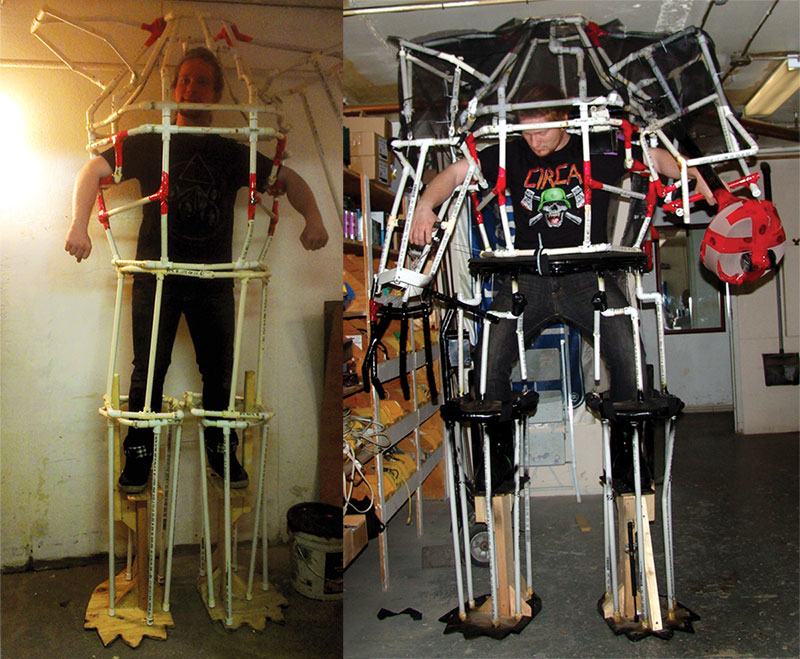
FIGURE 1. A very early stage in the process of making the skeleton and how it evolved.
What it Takes to Make a Golem
Lots and lots of stubbornness! You will need this as you spend weeks on end, up to the wee hours cutting up mattress after mattress into rocks, shaping them, painting them, and decorating them (Figure 2).
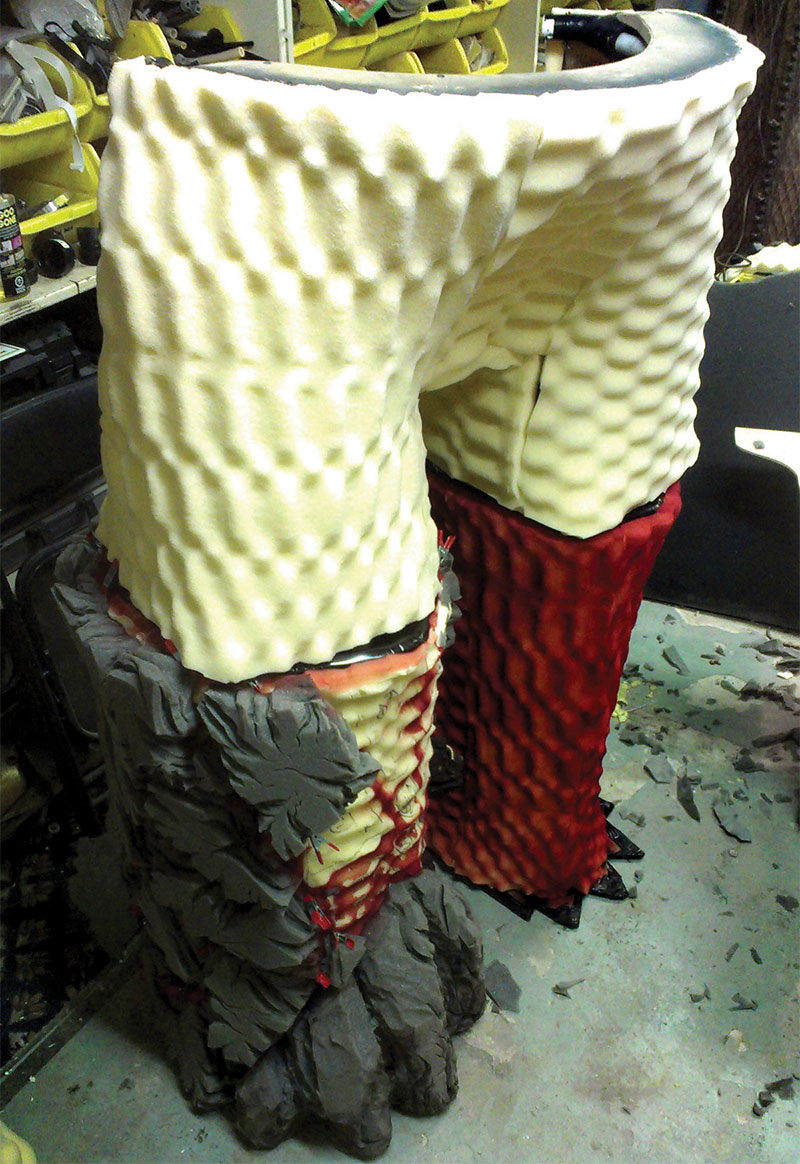
FIGURE 2. Cutting the foam rocks and fitting them together.
Leaving the artistic stuff aside, just learning the electronics to make him come alive was quite a task for me. I am a novice when it comes to electronics, but I do have a very strong desire to learn. Most of what I know comes from years of taking things apart, hacking kid’s toys, owning a copy of Forrest Mims’ Getting Started in Electronics, and plenty of trial and error.
So, this is basically my story of how I hacked the Golem’s electronics to life. Although I got it working with tenacity and determination, I knew I wanted to make it better and more reliable. So, I got some help from Solarbotics Ltd., who is also here in Calgary with us.
To make Rock Golem what I envisioned, I needed a gameplan. I sat down with Solarbotics, and we documented all the systems I had put together — including power systems and labelling all the wiring (see Figure 3) — and what my wish list was for improvements.
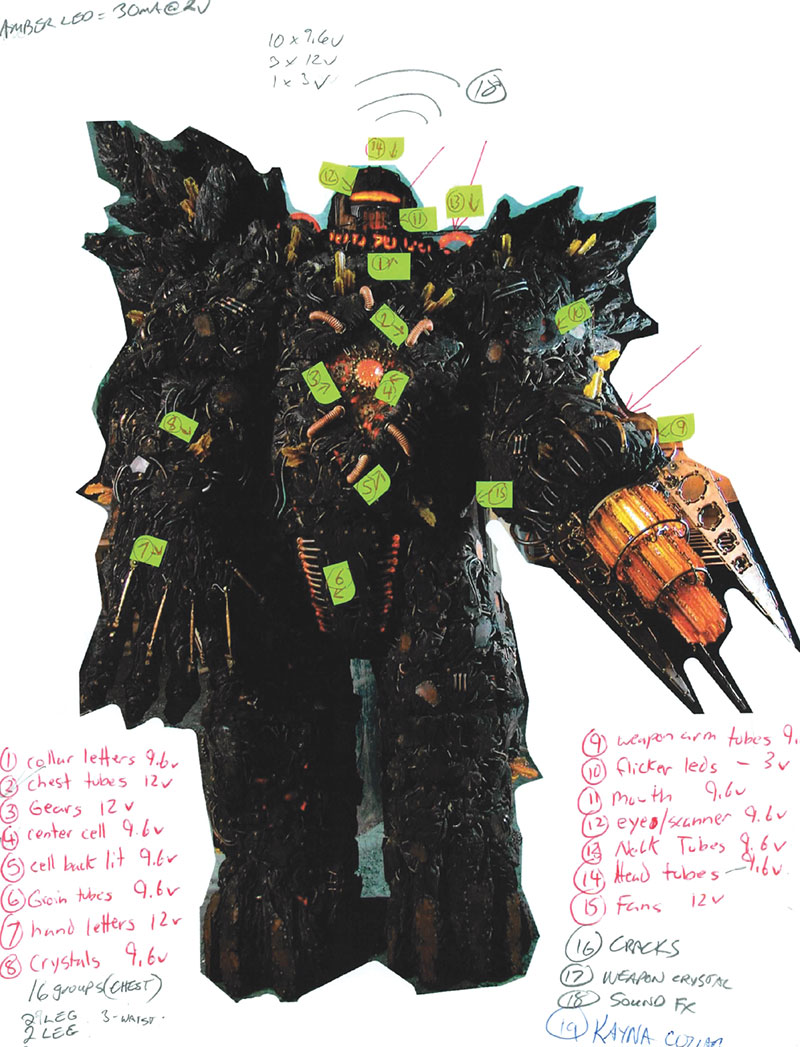
FIGURE 3. Breaking down the electrical systems for Solarbotics.
After prioritizing these upgrades (we were on a tight time schedule), Solarbotics’ president, Dave Hrynkiw pinned down the new control structure and what the features were (Figure 4).
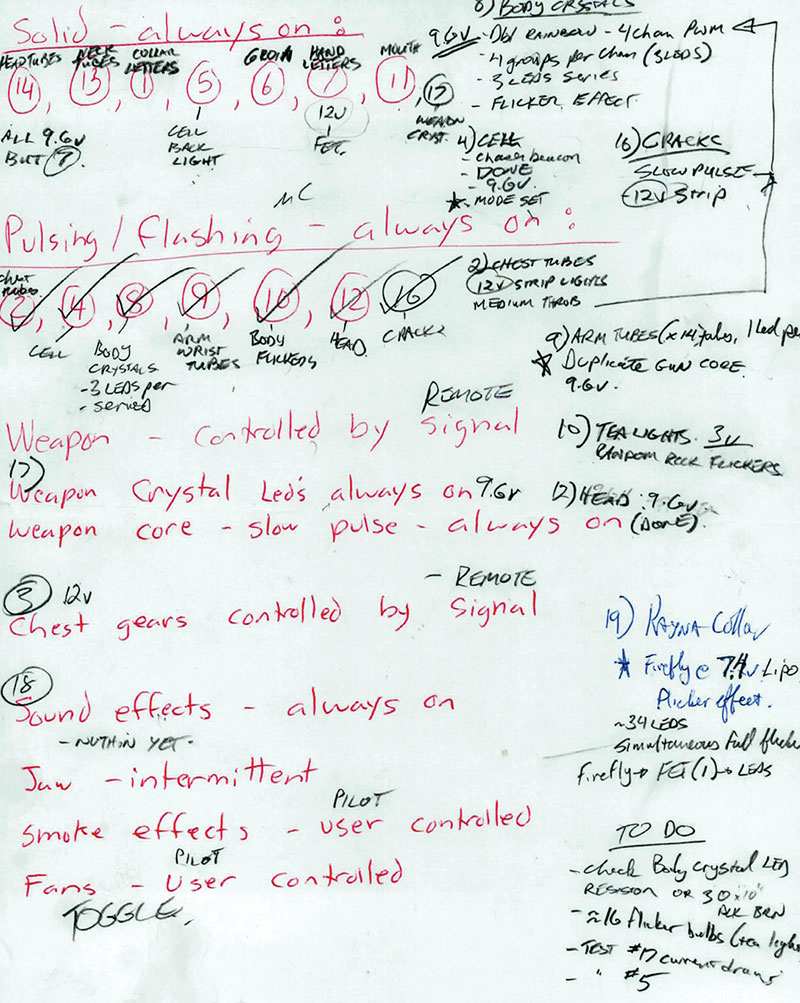
FIGURE 4. Figuring out what systems to tie together, what voltages to make common, and what subsystems were a priority.
Although my hacked electronics worked, they were twitchy and untunable. We decided on splitting the 15 lighting effects between two of Solarbotics’ Ardweeny/Double Rainbow controllers and three SparkFun Pro Minis.
What it Takes to Make a Golem Walk
The best place to start is at the very foundation: the skeleton. Engineering a 12 foot, 300 pound costume to walk with no mechanical aid was a “feat” to say the least Figure 5). (I’m proud to report that the Golem never fell once.) For the frame, I had to come up with something strong, yet light and malleable. Being that my background is in building maintenance, I decided PVC pex pipe would be the best to use.
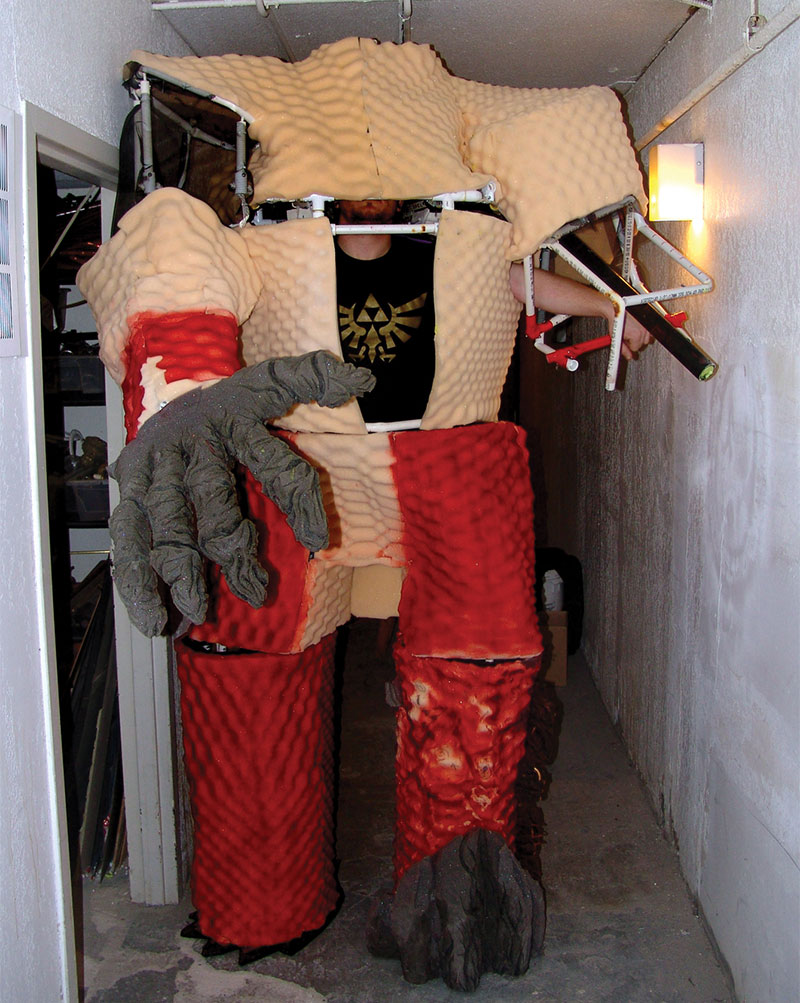
FIGURE 5. Walking down the hallway. The walls helped keep the Golem from falling.
This led to many days of bending, shaping, gluing, and screwing together pieces of pipe until I had the full skeleton of the Golem created (see Figure 6).
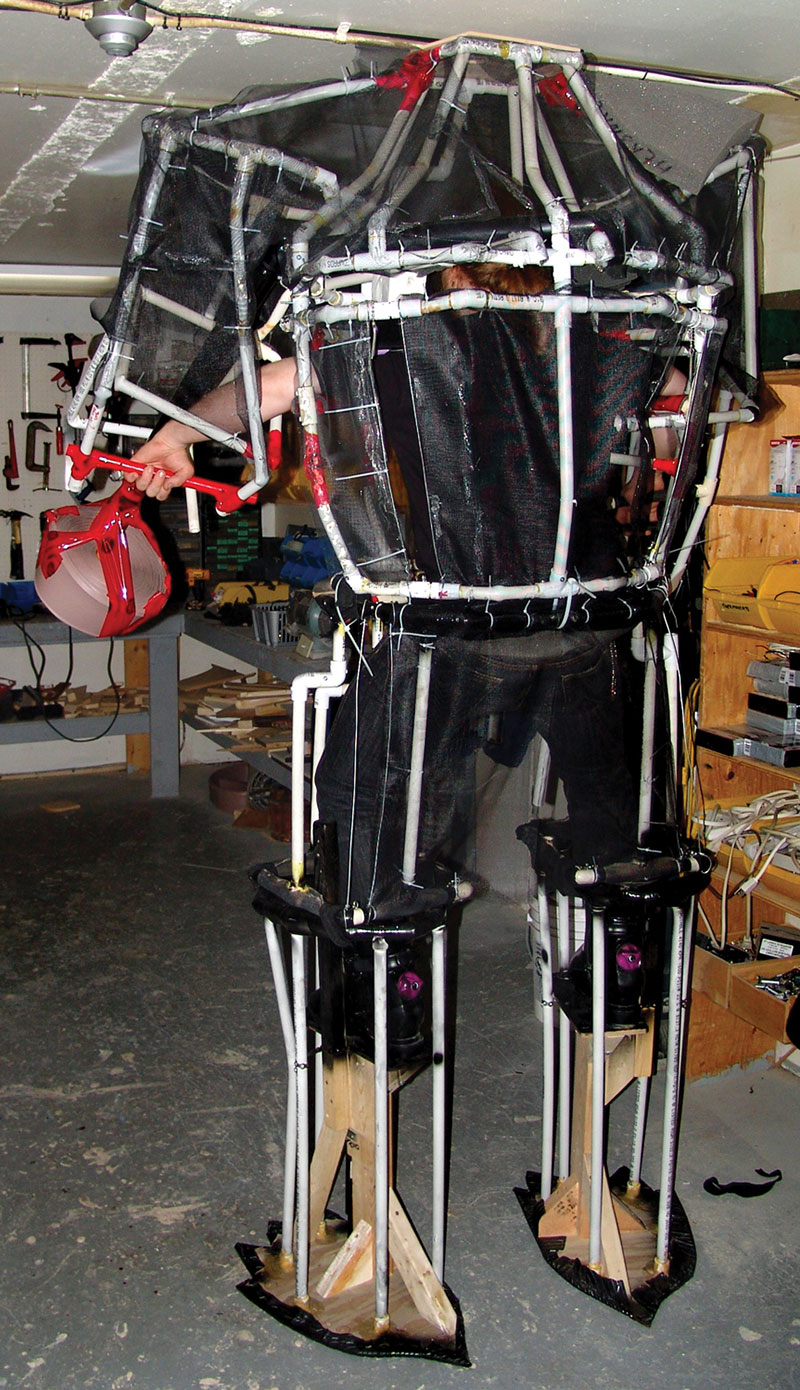
FIGURE 6. The Golem skeleton from behind.
The full extent of work that went into the engineering of the skeleton was quite long, but what I did was to study how the human skeleton works and transfer the concepts to the Golem (Figure 7). This was actually harder than I thought it would be due to the size and the fact that someone less than half its height had to walk Rock Golem around.
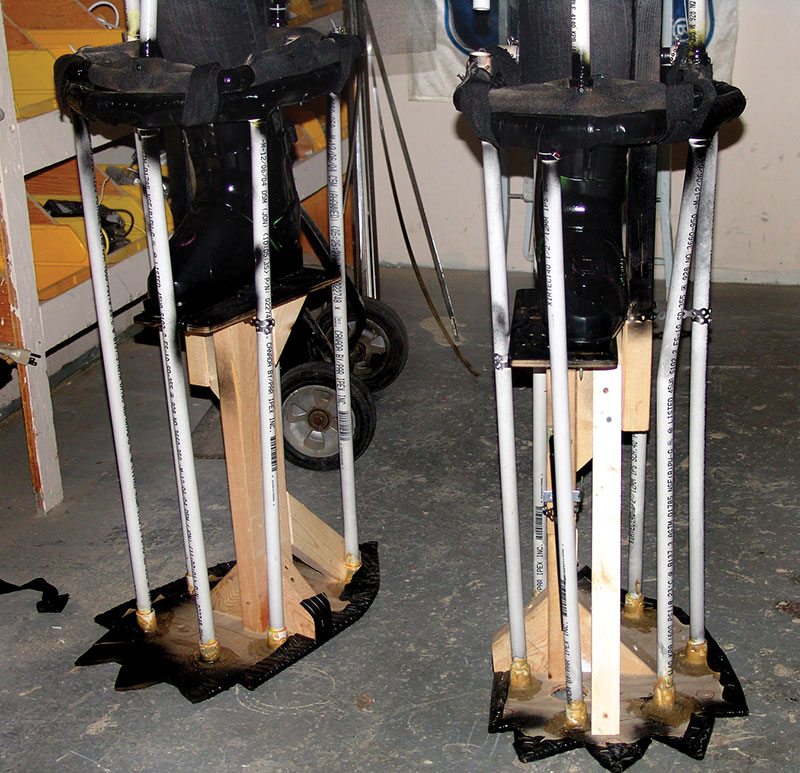
FIGURE 7. The operator in the foot stilts, taking baby Golem steps at first.
After trying to use assisted walking devices such as hydraulics on the legs (which only made him lose balance), we came up with a technique where the operator was able to successfully walk the Golem around while turning his head and moving his arm and hand.
The biggest obstacle in the build process of the skeleton was attaching the energy crystal weapon which was much heavier than the rest of the costume. For this, I created strengthened joints all up the arm and upper chest to distribute the weight evenly over the upper body. This left him very front heavy though, so I designed a ratchet system spinal cord that connected his upper shoulders to one of his feet creating a core of balance, then used the Golem’s own weight to balance him.
LEDs — It’s an Abusive Relationship
I learned my first hard lesson on the use of current-limiting resistors. Initially, I ran two wires to every LED and many more back to a single resistor. This created a rat’s nest of wiring and LED grids that were power hogs that created substantial heat in the few current-limiting resistors.
Torso LEDs
There is well over 50 linear feet of red LED strips mounted among the Golem’s internals. Each strip is cut into four-LED sections, then re-wired back together to create a single glowing effect in the cracks between the rocks. It was a very long process, but well worth the effort (Figure 8). The LED strips originally ran back to a standard 44-option controller (the white ones that come with most LED strips) which allowed me to create a very nice pulsing lava effect. This same method controlled the tubes on the chest, but at a slightly different frequency. All the protruding crystals have an amber LED under them.
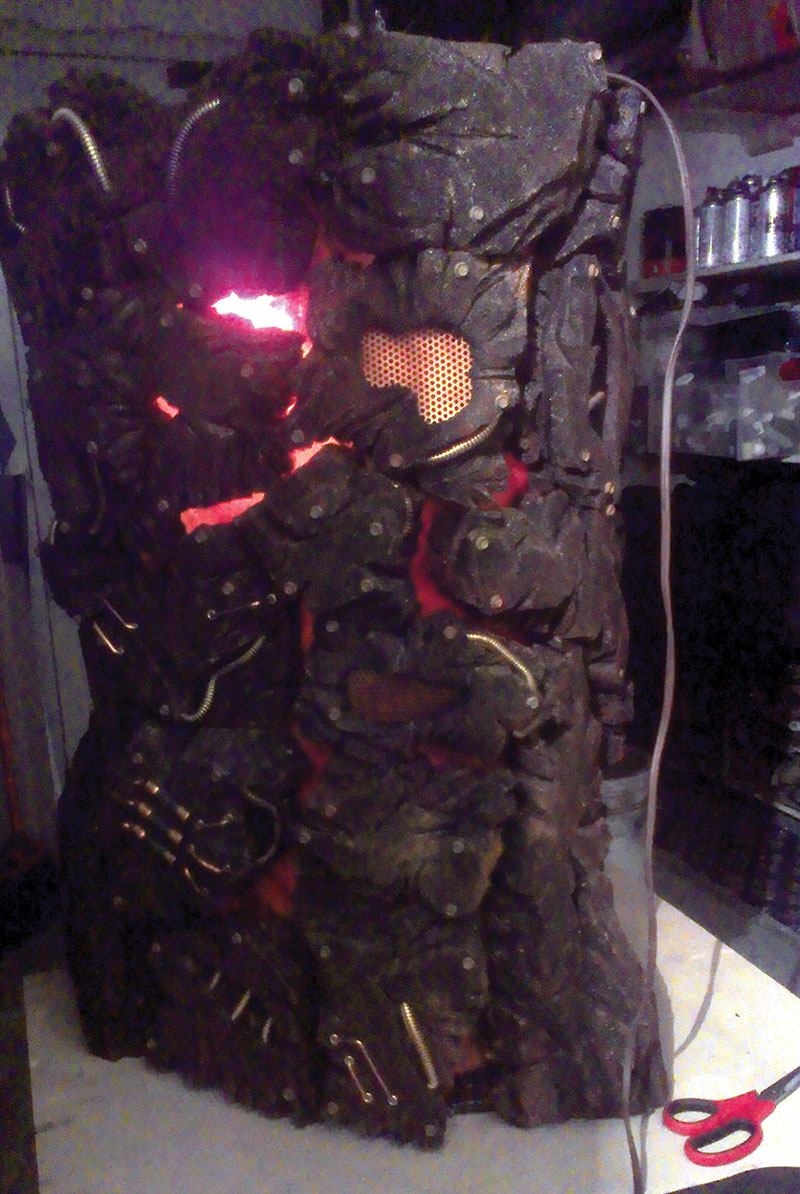
FIGURE 8. Lighting tests on the leg to see what the best way to utilize the LED strips was.
Rock Golem’s upper back housed a small tube-shaped power cell hacked from a dollar store toy (dollar stores are where I get most of my hackable electronics). I also added wire mesh grids to give more depth and mechanical integration to the rocks. Under each grid were plastic red emergency exit signs, backlighted with flickering LEDs from electronic tea candles.
The glowing letters on the collar were created by carving them in the foam, filling them with hot glue, then embedding approximately 50 LEDs. This was the first place that I appreciated the benefit of series-wired LEDs rather than parallel ones.
The Crystal Energy Weapon
This is the centerpiece of the Golem (see Figures 9 and 10). It is designed to spin the outer three blades around a central “power core.” The weapon’s power core light show consists of a column of 14 rings of eight LEDs each, surrounded by an array of individual LEDs illuminating the edge crystals. We split the 14 rings into two sets of seven pairs, with output 1 driving rings one and eight; output 2 driving rings two and nine, etc. Each ring was powered by its own N0106 FET, so each output drove two FET gates.
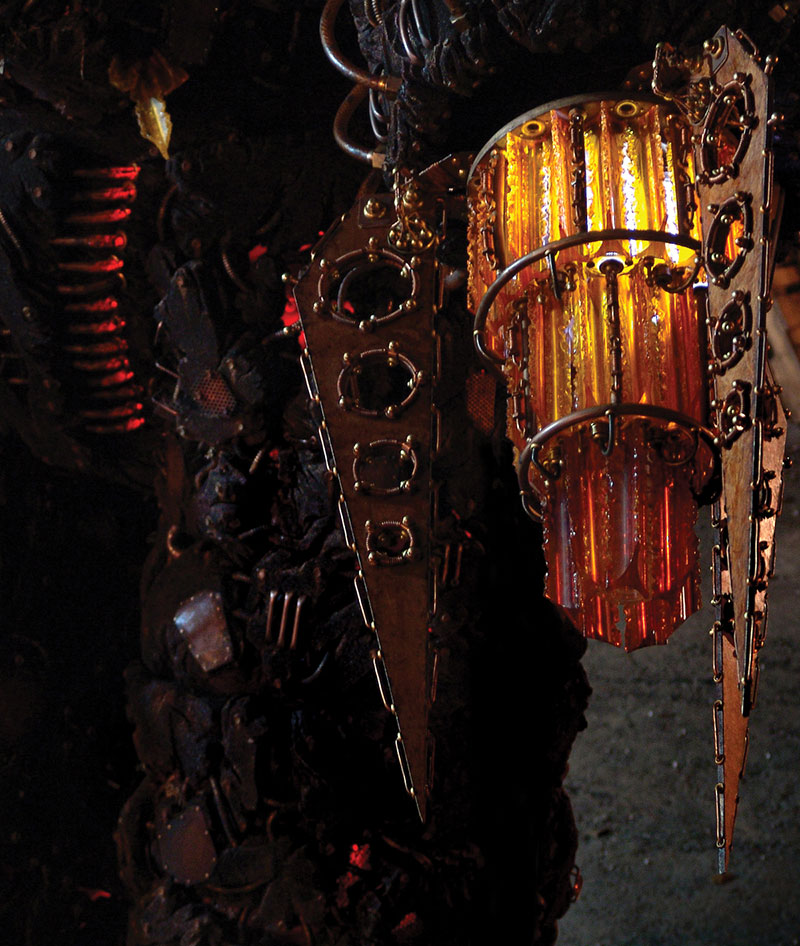
FIGURE 9. The Golem's energy crystal weapon. The three outside blades rotate faster and faster, creating a pulsing charge in the center crystals getting it ready to fire.
The original plan was to show the weapon “charging” via the rings pulsing sequentially in increasing frequency, but until that animation was ready, I set it for a steady “on” which was a bad idea — 112 low-efficiency orange LEDs draw substantial power. An input was connected to an RC1 output to receive an “Animation Start” command, causing the ring sequencing to increase from a slow single-ring climbing pulse, to a more rapid one involving increasingly more simultaneously-on rings.
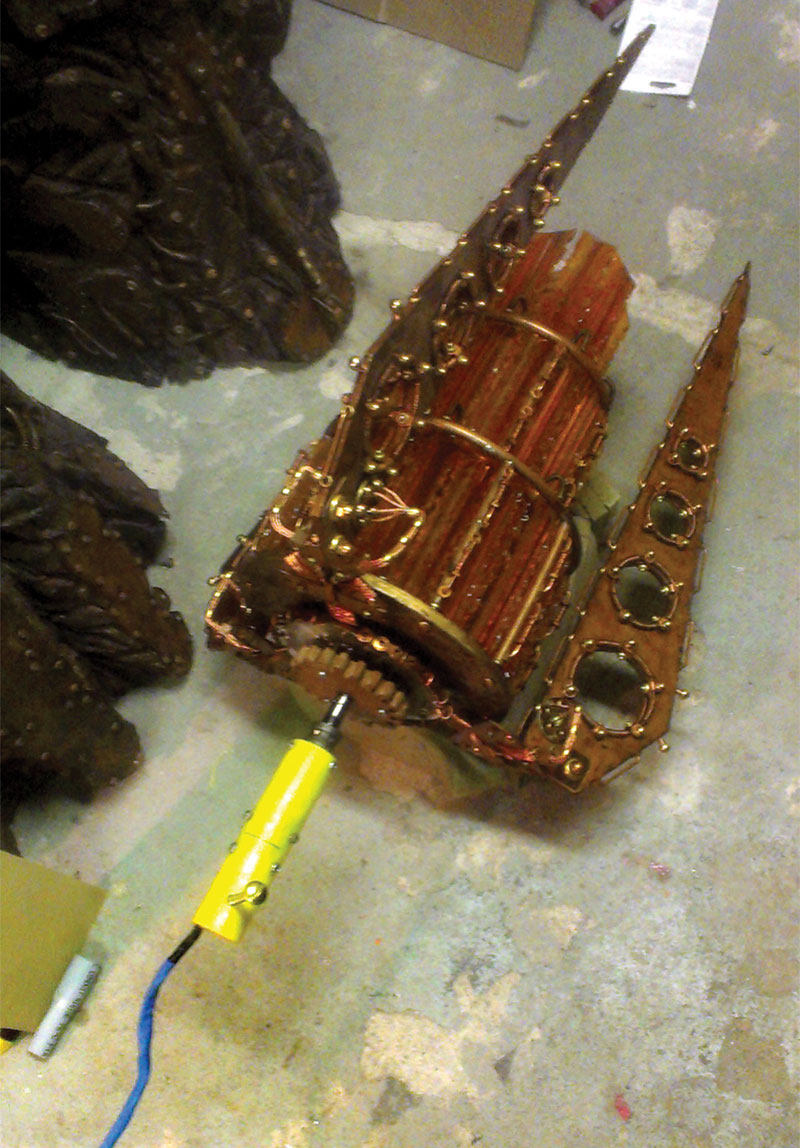
FIGURE 10. Power lines that feed the crystals and the gear system which spins the outer blades.
Don’t try to run four amps through a single strand of telephone wire! It glows and melts every wire in the bundle next to it! For that matter, avoid using telephone wire in any circuit where there is a chance it will flex — this stuff is brittle.
The mechanics behind the spinning outer blades were based on the bearing system from a ceiling fan. The effect I hoped to achieve was that as they spun faster, they would create an electrical charge that would seem to power the crystals. I used a 12 VDC drill mounted to a hand-cut wooden 3:1 gear reduction system that was attached to the ceiling fan assembly. The drill’s gearmotor assembly was cut from the handle/trigger portion, and motor wires were extended.
With the trigger easily hand-reachable, the pilot could slowly pull the trigger and have the blades ramp up to full speed (see Figure 11). This was effective and worked quite well, but the drill gearmotor was overloaded and pulled lots of power, rapidly killing the batteries. This was corrected later with the help of Solarbotics when we replaced the drill with a much higher geared unit.
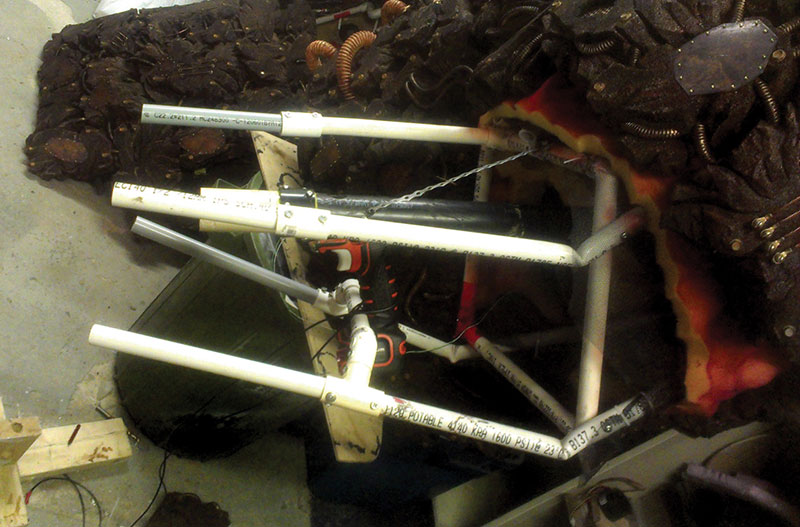
FIGURE 11. The interior of the weapon arm, with the drill mounted and made accessible to the operator.
Behind All Great Men
Rock Golem comes with its very own Sorceress (Figure A). One of the myths of the Golem is that it is brought to life by a magical person. In this instance, the Sorceress molded the Golem from the Earth and detritus around her, including rocks, machine parts, glass, and wood. This Sorceress also directly controls parts of the Golem via gesture command, activating Golem’s chest gears by pressing her own chest piece. She’s also in charge of his armament, controlling the spinning crystal energy weapon by raising her own arm and making a spinning motion with her fingers.
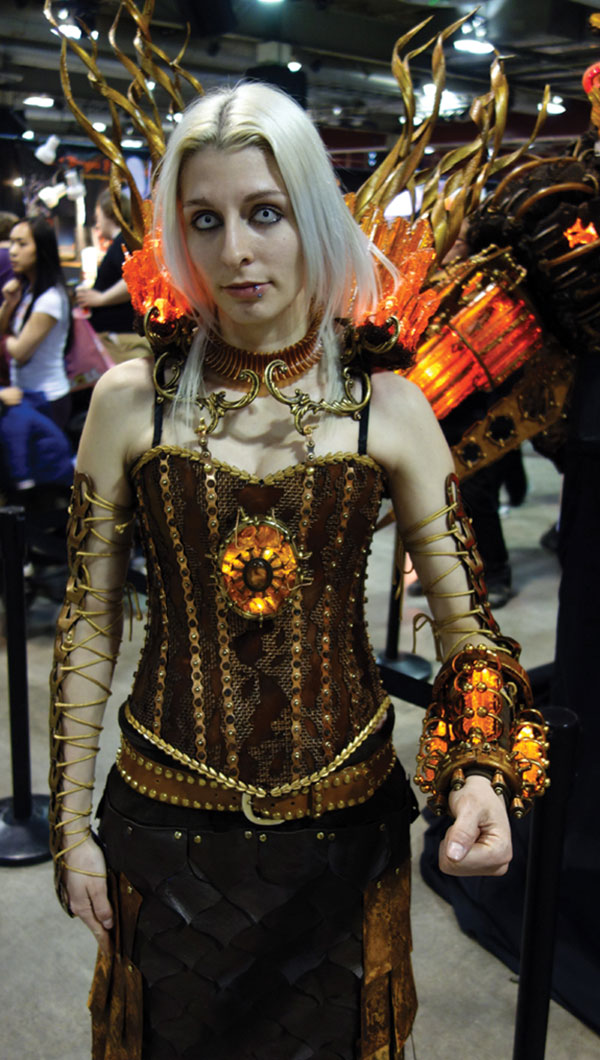
FIGURE A. The Sorceress (Kayna Hardman) with her crystal chest and arm bracelet, wirelessly controlling the Golem.
The Sorceress
The Sorceress’ initial role was to hand-guide the Golem since pilot visibility was very low. As I explored the idea of the Sorceress, we wanted her to be in more control of the Golem. So, I built her a whole new costume featuring remote control functions. The original design used a highly decorated LED closet light dome connected to an IR transmitter circuit hidden in the back of the dress. The IR LED was tucked in among the crystals of her center chestpiece, with the wire woven back to the rear electronics (see Figure 12). The dome chestpiece was retrofitted with harvested limit switches from a VCR, so a push to the chestpiece would signal the Golem pilot it was time to move.
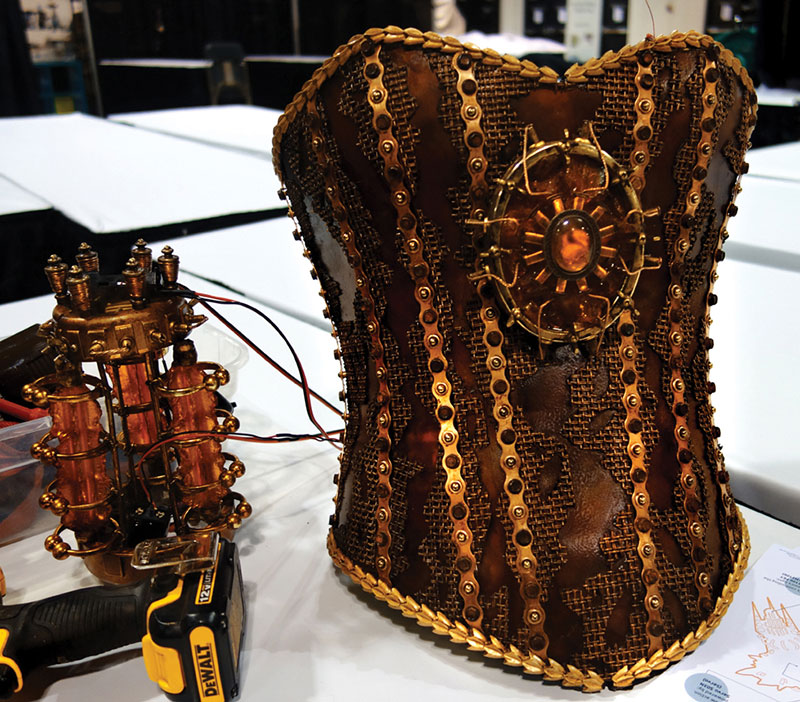
Figure12. the Sorceress’ costume pressing the center button of the chest crystals activates the golem's chest gears; lifting the crystal bracelet activates the spinning weapon blade
IR communication seemed like a good idea, but the receiver circuit in the Golem had a hard time actually getting the signal in a dense electrically-noisy environment. It worked sporadically at best — often self-activating — so it was back to the drawing board.
Communication ended up being a straightforward 433 kHz four-channel key fob setup. We were always in close range (less than 3M/10’) for strong signal communication, and it left two spare channels for other potential “enchantments.” We wanted to use a Synapse wireless RF100 2.4 GHz radio for a “bulletproof” signal, but time constraints led to this solution which seems adequate for now. Lesson learned with radios: Always check your transmitter batteries first before doing any other debugging!
The Sorceress’ collar is an important accent to her costume, featuring an ATtiny45-based “FireFly” LED board powered by a small 7.4V Lipoly cell (regulated down to 5V), running the fabulous “flickering candle” code by Park Hays. It drives 34 LEDs through a single FET to create a very convincing flame flicker.
The Head of the Golem
I wasn’t sure on how to approach the head. I had built one out of rock, but found it was not suited to the rest of the Golem, so I decided to go the route of a machine-like face merged into the rock (Figures 13 and 14).
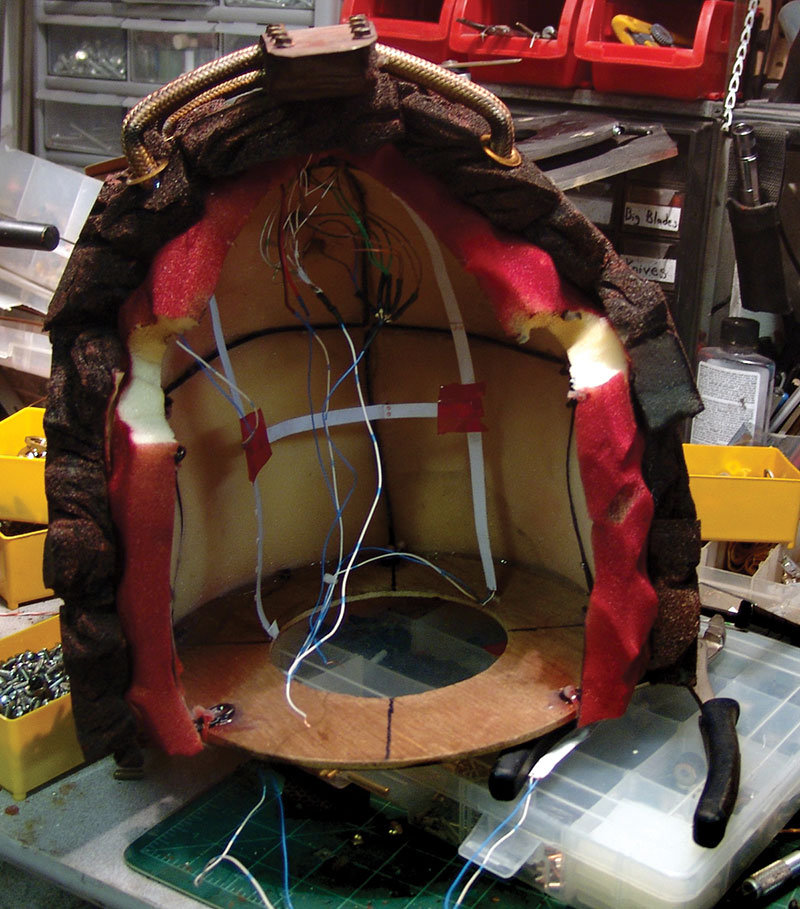
Figure 13. Interior of the head, getting the lighting all in place
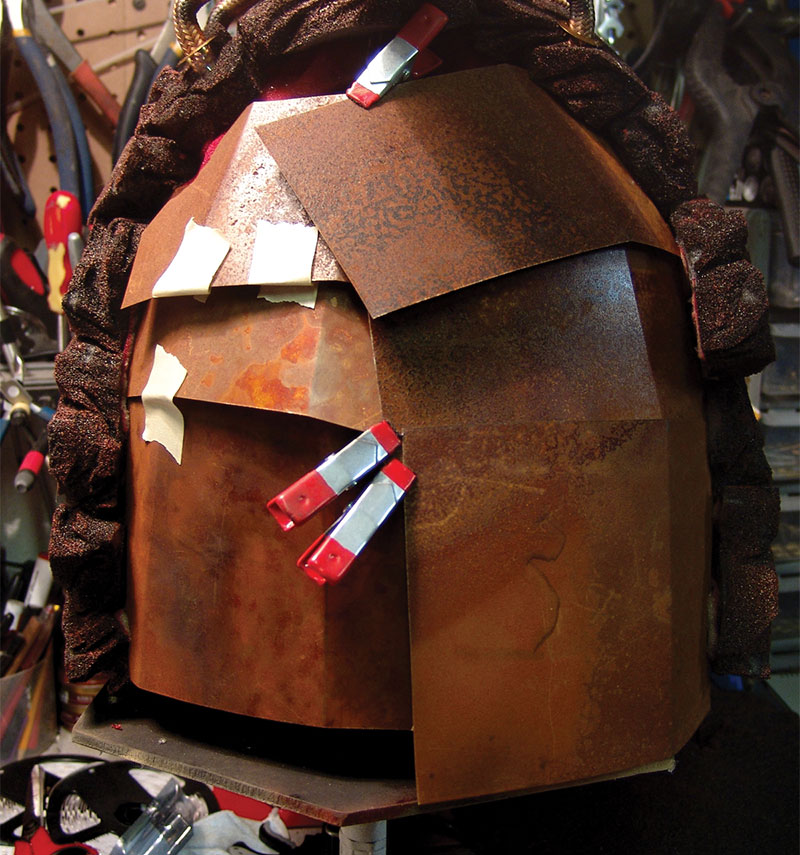
Figure 14. Shaping the face out of some scraps of sheet metal i had laying around.
For lighting, the head had some pulsating cracks which were tied into the body circuits. Some LED circuits made the mouth glow orange and the cylon-style eye glow yellow, but I wanted more life in the face, so I added a Larsen scanner. I had a chaser beacon that came out of the lights that are stuck on the roofs of utility vehicles. I hacked this by tracing the circuits and adding on longer wires so I could put all the LEDs in a row. I also had to change out the resistors on the board to suit the LEDs I was using (Figures 15 and 16).
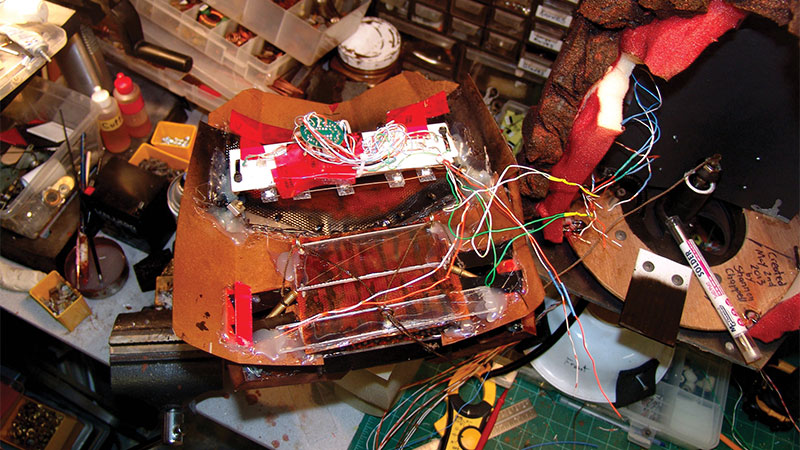
Figure 15. The electronics of the face, and the pulley system that activates the jaw.
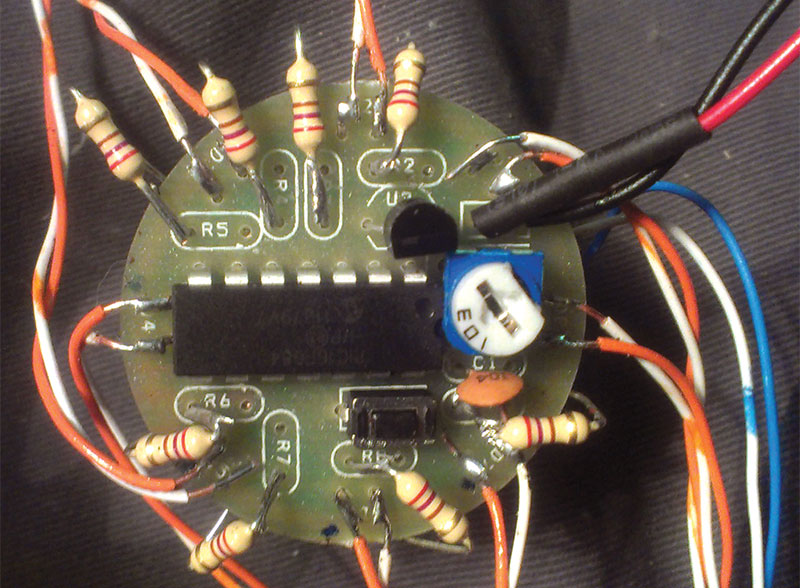
Figure 16. The hacked chaser beacon.
Now all that was left to do was to figure out how to get the LEDs to create a line of light across the middle of the eye instead of the round bursts of light. For this, I took an acrylic rod and placed all the LEDs behind it. The result was the LED light was refracted out the other side as a flat beam of light. When they went off in sequence, I had a scanner. I wasn’t quite done because I also wanted to have the jaw open and close. Try as we might to run a servo off the Double-Rainbow 2 controller, all the PWM channels were busy, and we couldn’t trick it into easily bit-banging a servo drive signal without causing issues elsewhere. So, we grabbed another Pro Mini just to run the jaw animations.
At the time, I was not really familiar on how servos worked, so I came up with a very rudimentary system of pulleys, lamp parts, string, and eye loops with which I was able to control the jaw via the operator’s head. This was done by creating a spring-activated rod with a salad bowl that came down from the head of the Golem. When the operator pus his head in the bowl and pushes up and down, the jaw would open and close (this was later changed to a servo; refer to Figure 17).
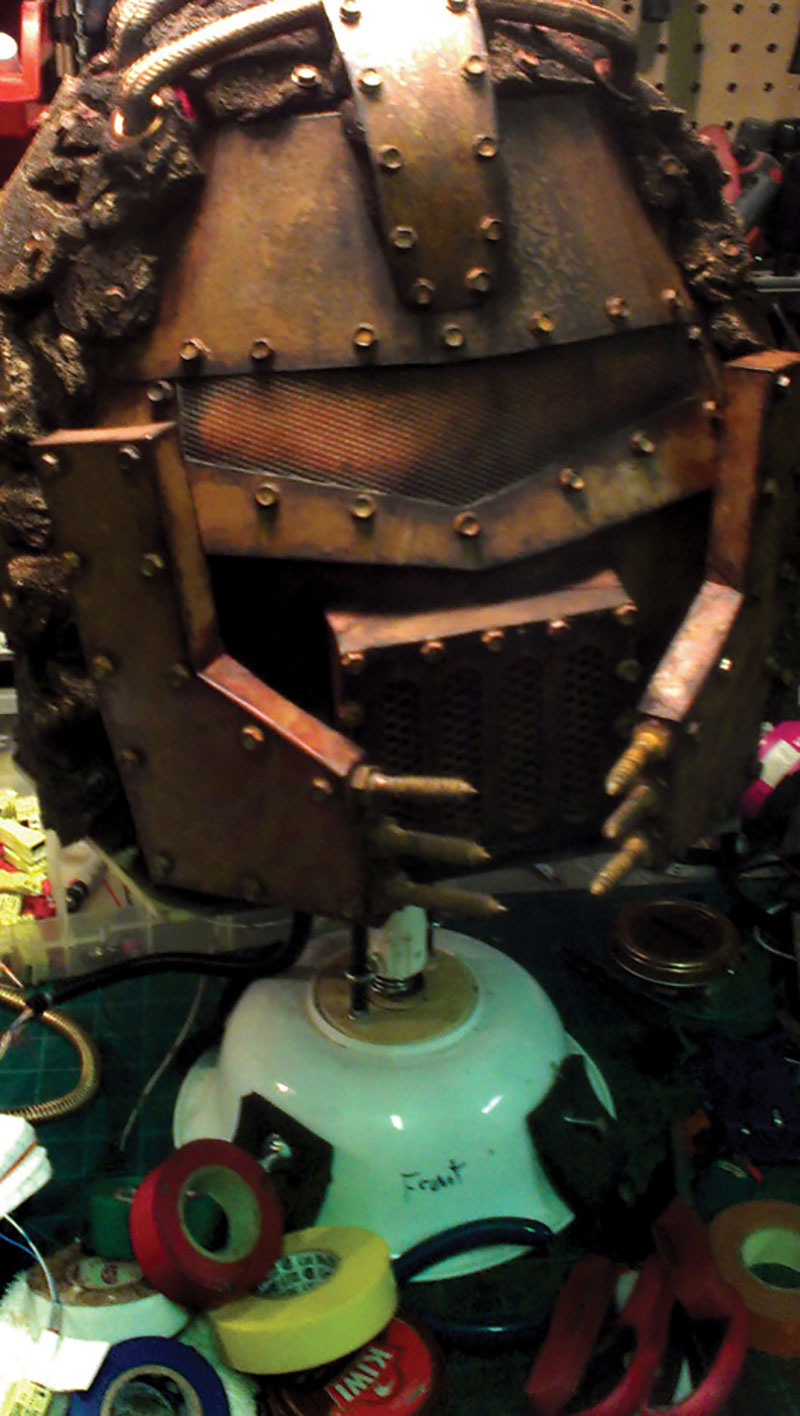
Figure 17. Finished head with bowl attachment.
The head was mounted on a lazy Susan, so when the operator put his head in the bowl he could also turn the Golem’s head side to side. I decided to put in some smoke effects as well, and by luck I came across a device called the Dragon Puffer which was used to detect drafts in houses by releasing smoke. I drilled a hole in the bottom of the lazy Susan, mounted a hose, and attached the Dragon Puffer at the other end so the Golem “breathed” smoke. The only problem with this was that the smoke could not make it up the tube. So, I took apart a video card heatsink, removed the fan, and tied it into the tube, then connected a 9V battery with a temporary switch.
The Hand
There were not a lot of electronics here, but I created a large articulating hand using aircraft cable, PVC tubing, a cut-up tape measure, and latex tubing to create the movement of the fingers (see Figures 18 and 19). Since they were too large to be controlled individually, I had one lever that the operator would grasp and squeeze to open and close them all at once. This way, he could come up behind people, put his hand over their head and pretend to crush them.
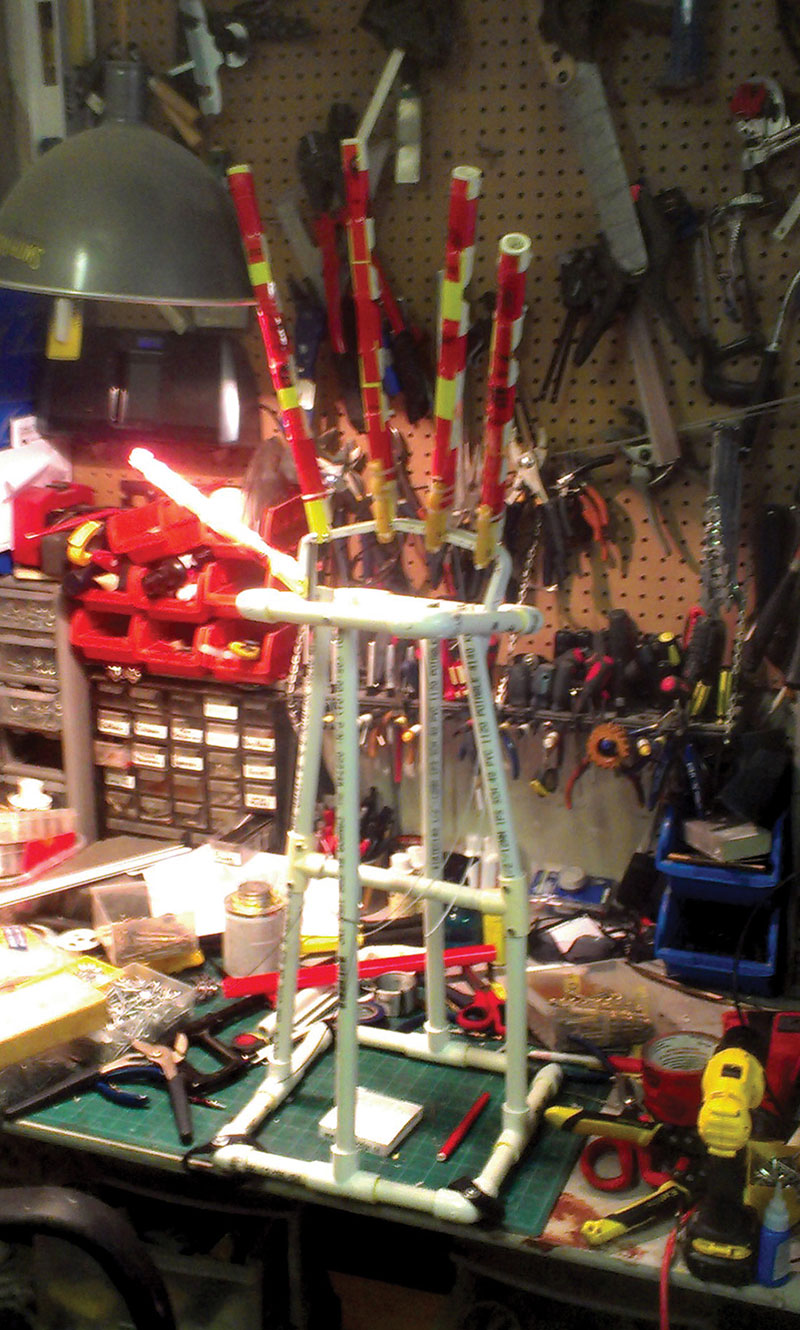
Figure 18. The workings of the Golem's hand.
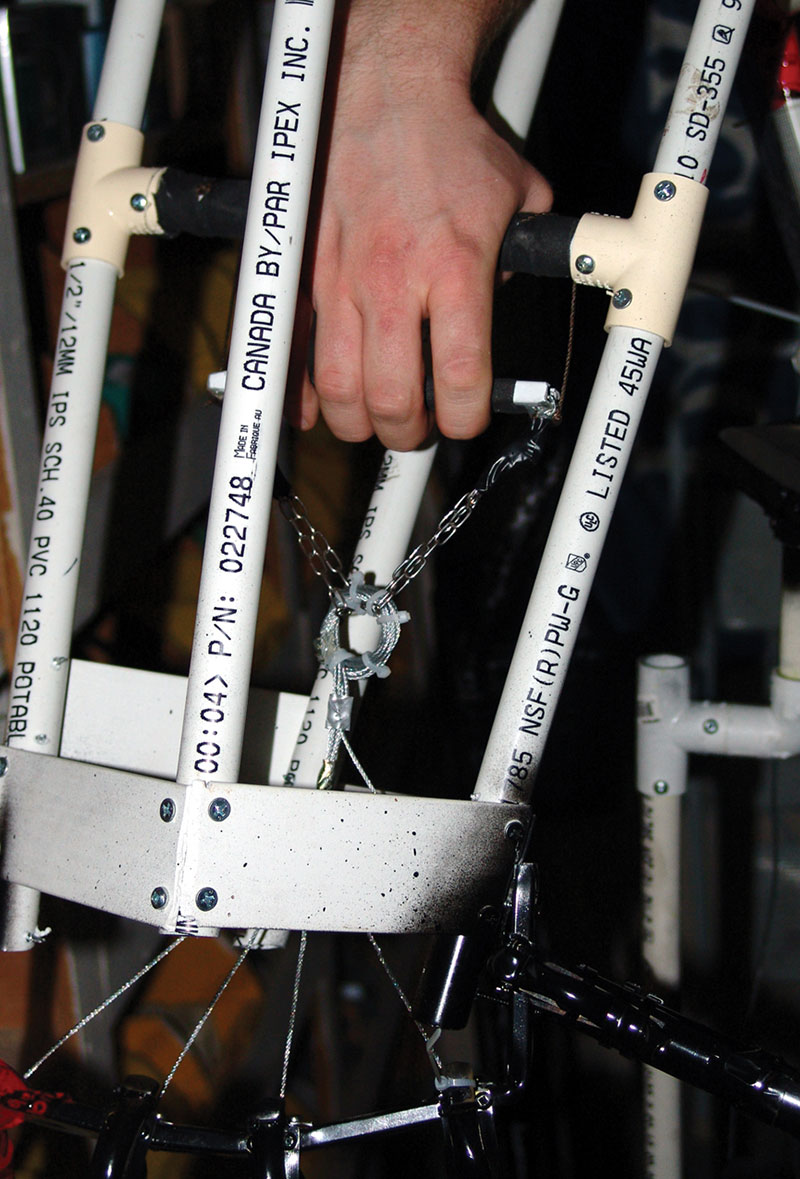
Figure 19. Pulling the bar would make the hand open and close.
The Center Gear Chest Piece
Through the years, I have been taking apart hundreds of printers and saving all the gears. So, I painted a bunch of them in a brass color, aged them up, and mounted them on a piece of plexi (see Figure 20). To drive all the gears, I used a 12V motor I got from a local electronics surplus store and a vacuum cleaner belt. To light it up, I wanted hot spots of light behind the gears. I used chicken wire mesh as a grid and attached 50+ LEDs behind the plexi to give a warm uneven light.
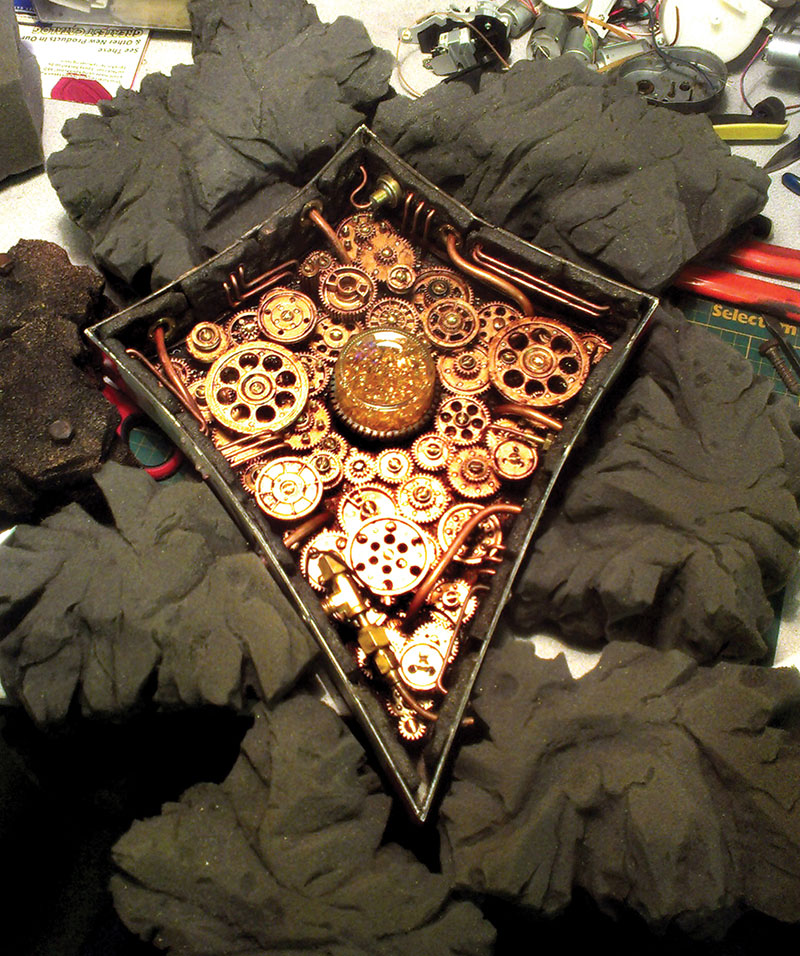
Figure 20. The chest gears.
In the center of the gears is a central core power cell which also lights up and pulses. To achieve this pulse, I hacked another chaser beacon and placed it behind a glass jar filled with orange scented oil beads. As each LED goes through its programmed rotation, it reflects off all the beads making very interesting patterns (Figure 21).
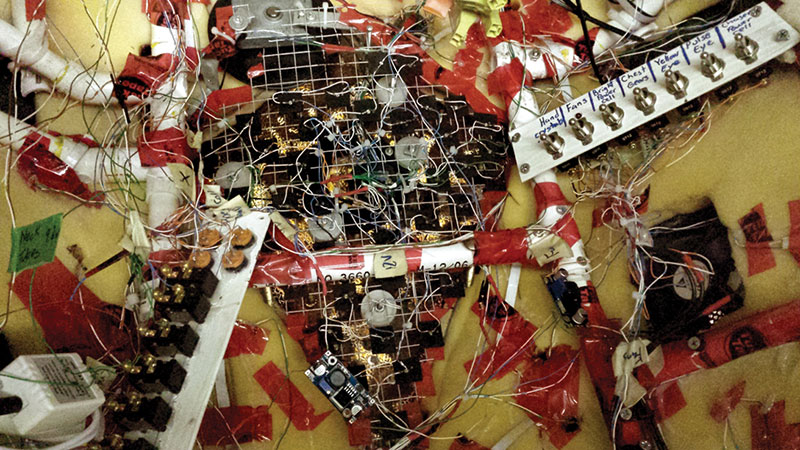
Figure 21. The back of the chest gears, and all the system emergency shutdown switches (before the Solarbotics upgrade).
The Cockpit
Everything converges in the “cockpit” of the body. Having very little exposure to the “maker” world, I thought it was best to hide the electronics and the workings of the Golem. I couldn’t have been more wrong (Figure 22). It turned out everyone — no matter what their interests in electronics were — wanted to see how it worked. The insanity of the inside with flashing lights, hundreds of feet of wire, and the fact that someone got in there was very fascinating.
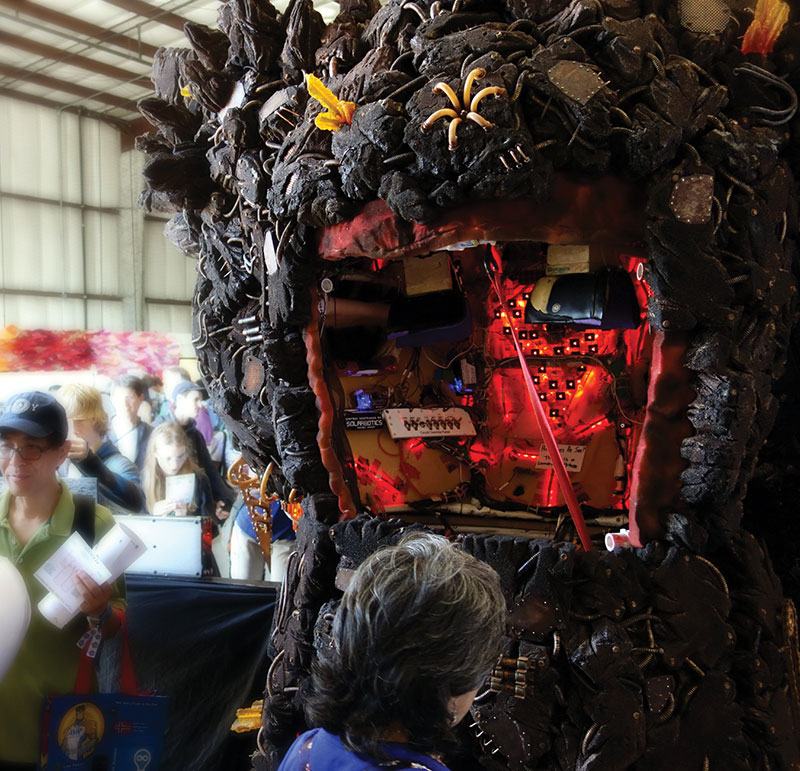
Figure 22. Everyone was just as amazed with the inside as with the outside!
During the wiring process, I learned to mount things so they were accessible, label things properly (which Solarbotics greatly appreciated), put proper connectors on, have a proper soldering technique, and so on. I also put in around 25 pole and temporary switches to be able to shut down different systems in case of shorts or to conserve power. There was also a system of fans to help with the heat of the costume. Amazingly, the Golem never had a problem because everything worked as it should.
FIGURE 23. The back hatch where the operator gets inside.
Golem 2.0
Solarbotics “sponsored” the upgrade for all of the electronics and continues to work with me as I improve my Golem. As mentioned, I come from an industrial background where black is the live wire and white is neutral. Solarbotics comes from a low voltage background where red is live and black is ground. Let’s just say that we discovered how robust Atmel makes their microcontrollers against reverse voltage damage that melts wires together.
The Double Rainbow controllers were originally designed as Arduino-compatible/six-channel high current drivers for powering two independent RGB LED strips (R/G/B * 2), plus offered a bunch of Ground/Voltage/Signal (GVS) pins for wiring up controls. They proved to be almost perfect for the job, with handy three-wire I/O connections and screw-down terminals. Most features were wired through the cockpit control panel with beefy toggle switches, so the pilot could toggle effects for best battery life or debugging purposes.
“Why did you make this?”
It's the most common question I get. I had seen big costumes at events before, but I thought I could go bigger. I built it particularly for the 2013 Calgary Entertainment Exposition, but due to its size, I was denied permission to have it walk through the event. It sat in a storage room growing spider webs until I was approached by Shannon Hoover from the Calgary Mini Maker Faire, who brought us out to the light of day. Ever since, we’ve been delighting large costume fans.
To sum this all up, at the end of the day what it takes to build one of these guys is a good inventory of discarded treasures, an understanding partner, and sheer stubborn determination to finish no matter what. Or, more simply stated as Thomas Edison once said, “To invent, you need a good imagination and a pile of junk.” NV