Are you looking for a way to contribute to the next generation of scientists and engineers, perhaps in your own family? What if you could build your own technology mentoring platform in a single afternoon, then spend hours of fun with your child or grandchild making simple computer games or exploring computer-controlled hardware circuits together?
This article will explain my efforts to do just that, and then suggest how you can too (Figure 1).
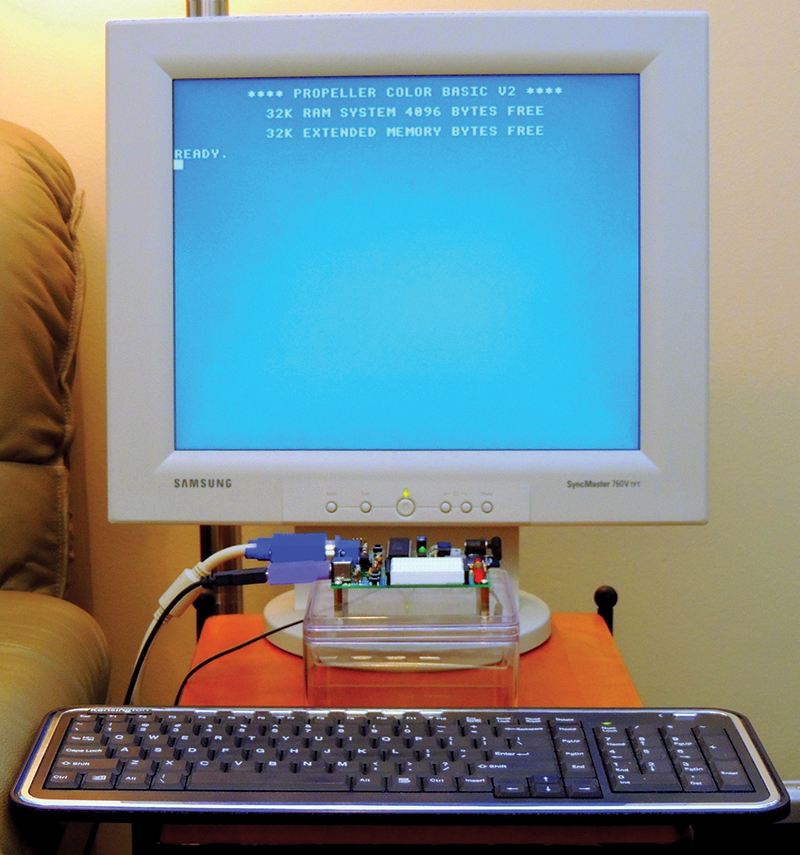
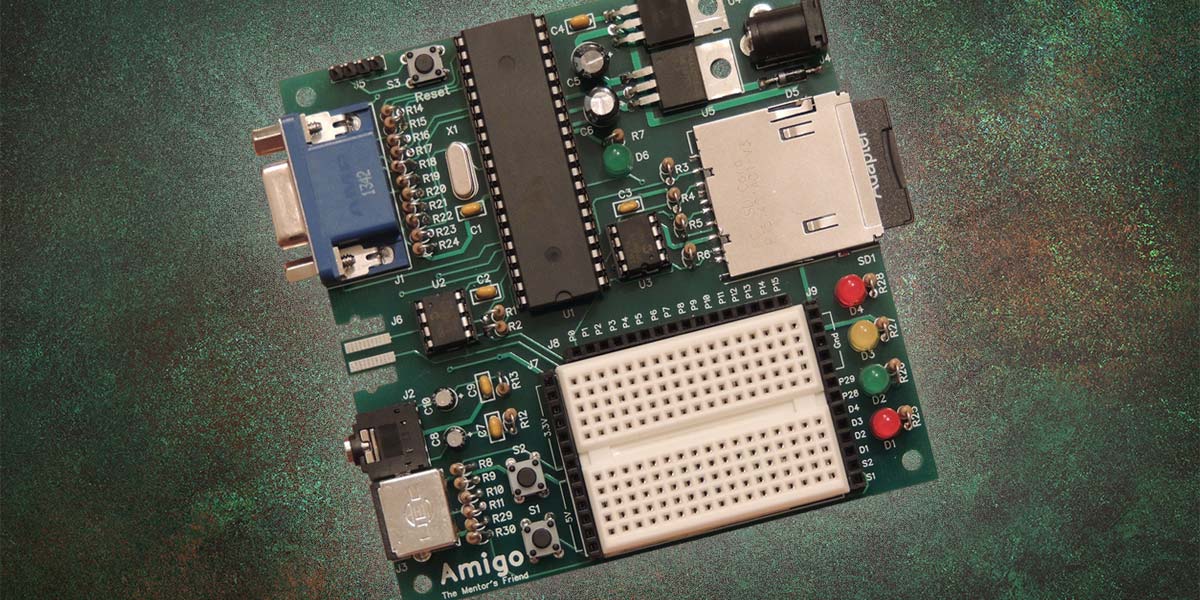
FIGURE 1. The Amigo — a Propeller-based technology mentoring platform you can build.
Over the past few years, I’ve built several little “retro computers” to help young family members and friends learn introductory programming, and it’s been fun and rewarding. I also wrote a book for parents and/or grandparents to guide the learning experience, mentoring their youngsters on the fundamentals (emphasis on “fun”) of programming and computer-controlled hardware. Most of these “mentoring platforms” were built from kits based on the Parallax Propeller, and they used that amazing chip to host a tinyBASIC interpreter and drive all the I/O for a self-contained “old style” computer: keyboard, monitor, file storage, audio, and joystick.
My favorite of these kits was the Propeller Experimenter’s Board (PEB 2014) which is a version of the “Pocket Mini Computer” from Jeff Ledger at propellerpowered.com — easy to build, full of features, and loads of fun. For me, the PEB 2014 and its Color BASIC “operating system” bring to mind the Commodore, Atari, and Tandy computers of the early 1980s, which were easy to understand and program, and were ready to go as soon as you hit the “on” button. (The PEB 2014 has just 4K of program memory, and to me is eerily reminiscent of my first TRS-80 — a 4K Color Computer.)
Those early machines were so much fun precisely because they were easy to understand and program, with no hidden layers of complexity or steep learning curves. They were directly responsible for the career choices of thousands of today’s sweetly successful hardware and software engineers.
Hola Amigo!
I believe that this “simple and fun” formula still works. So, when the PEB 2014 was no longer available from Propellerpowered earlier this year, I was disappointed enough to design and build a simplified replacement that preserved the features most important to me: easy to build (perhaps with a youngster helping); easy to program (using Jeff Ledger’s generously licensed Color BASIC); containing a breadboard with access to some Propeller I/O pins; and sporting an “old computer” monitor and keyboard.
I call the result the “Mentor’s Friend,” and nicknamed it “Amigo.” In this article, I’ll attempt to explain what the Amigo does, how it works, and how you can build one (Figure 2).
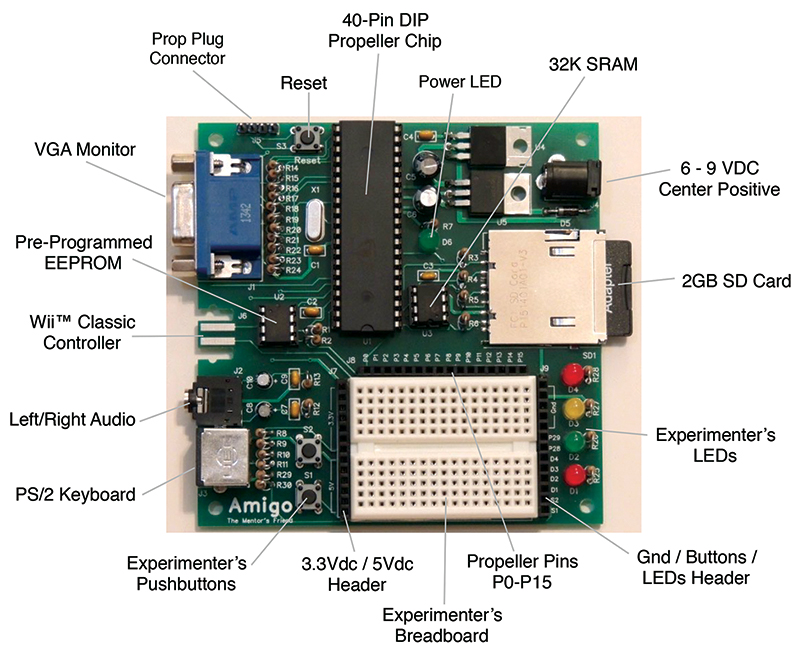
FIGURE 2. The Amigo, showing key interfaces and the Experimenter’s Section.
Figure 2 shows the features and interfaces of the Amigo. It uses an old PS/2 keyboard and VGA monitor as primary user interfaces, and comes with onboard connectors for a Wii classic controller (not the nunchuck) and earbuds or a powered speaker. The Propeller itself is a 40-pin DIP package (to allow easy DIY construction), with the standard 5 MHz crystal, reset switch, and Prop Plug connection. The EEPROM holds Color BASIC — the Propeller Spin binary that boots up a tinyBASIC interpreter and drives the various input/output channels via Prop I/O pins. The 2 GB SD card supports non-volatile storage of BASIC programs and data files, and the SRAM chip provides 32K of volatile data storage.
The Experimenter’s Section contains a small breadboard (the same one used on several Parallax boards), two tact switches and four LEDs, and headers for access to Prop pins P0-P15, the switches and LEDs, and power and ground. The power supply provides 5 VDC and 3.3 VDC to all of the above as needed.
(Way) Back to BASICs
The “secret sauce” of the Amigo is (as mentioned) Color BASIC: a Propeller Spin program with roots back to 2006 and a history of contributions by a plethora of Propeller gurus. Color BASIC was begun in 2007 by Jeff Ledger as a software “fork” of FemtoBASIC — a version of tinyBASIC developed for the Propeller in 2006 by Mike Green and Tomas Rokicki.
Over the next few years, Jeff added and improved Color BASIC, with contributions from Green, Rokicki, and other Propeller notables like Marko Lukat, Jon Williams, Johannes Ahlebrand, Michael Park, and Andre’ LaMothe. By 2012, Color BASIC was in use as the “operating system” of the Pocket Mini Computer — a self-contained “retro computer” that was a blast from the past for oldsters and an interesting technology throwback to youngsters who got their hands on it.
One thing that’s different about the Amigo is that you can control Propeller I/O pins from Color BASIC instead of Spin — so you can write simple programs to control your homebrew circuits with a keyboard and a monitor without any other computer, application, or programming environment.
It’s not sophisticated, and it certainly won’t replace C, Spin, or Propeller Assembly Language, or those really cool boards from Parallax, but it is simple, understandable, and fun — perfect for a mentoring platform intended to introduce programming and computer-controlled hardware (Figure 3)!
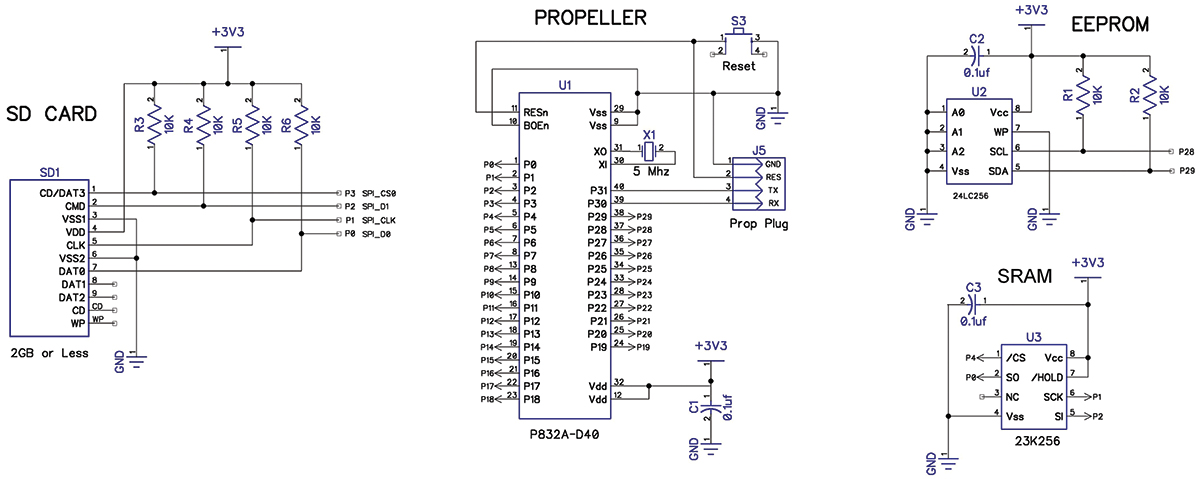
FIGURE 3. Amigo schematic, showing Propeller pin assignments and support devices. Circuit designs are “standard” for these subsystems.
Shown in Figures 3-5, all hardware subsystems in the Amigo are open source circuit designs from various Parallax boards or the PEB 2014 and its progenitors. So, after picking the subsystems I wanted and assigning Propeller I/O pins to each of them, the design challenge for this project became developing a circuit board layout that tied everything together, and was easy to build and easy to use. I enlisted DipTrace for board design and PCBWay for board fabrication, and can offer both my highest recommendation.
It was my first experience with DipTrace, so I had to climb the learning curve, but the tool suite is full-featured and provided everything I needed. PCBWay was a pleasure to deal with — excellent product quality, fast, and very reasonably priced. For the Amigo, I ended up with a 4” x 4” two-sided board with through-hole components for everything except the SD card socket, which was only available as surface-mount (Figure 4 and Figure 5).
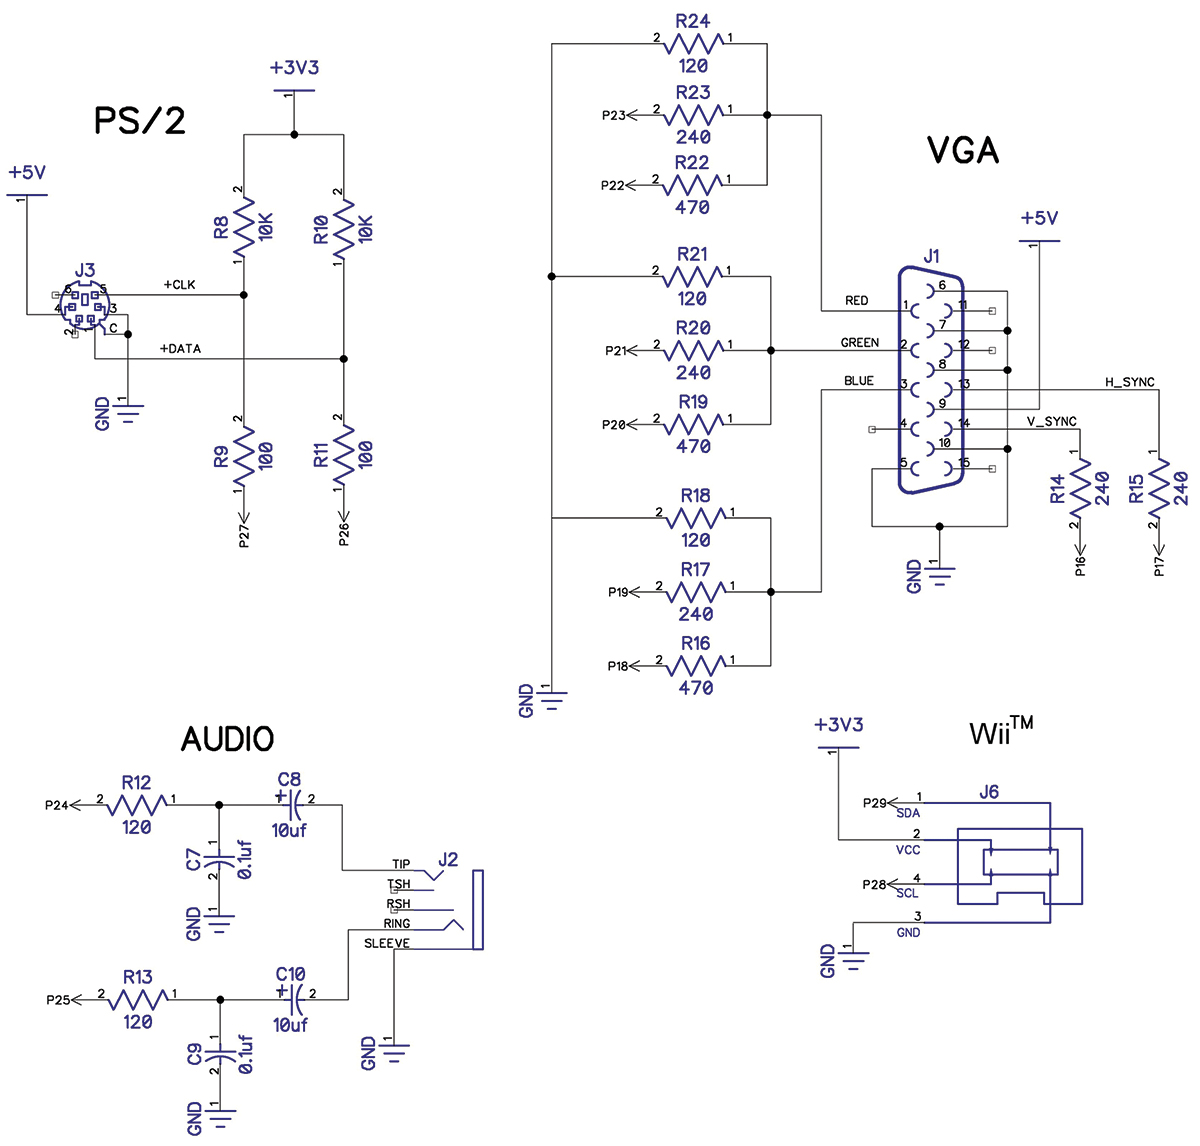
FIGURE 4. Schematic of Amigo peripheral interfaces. Again, circuit designs are standard.
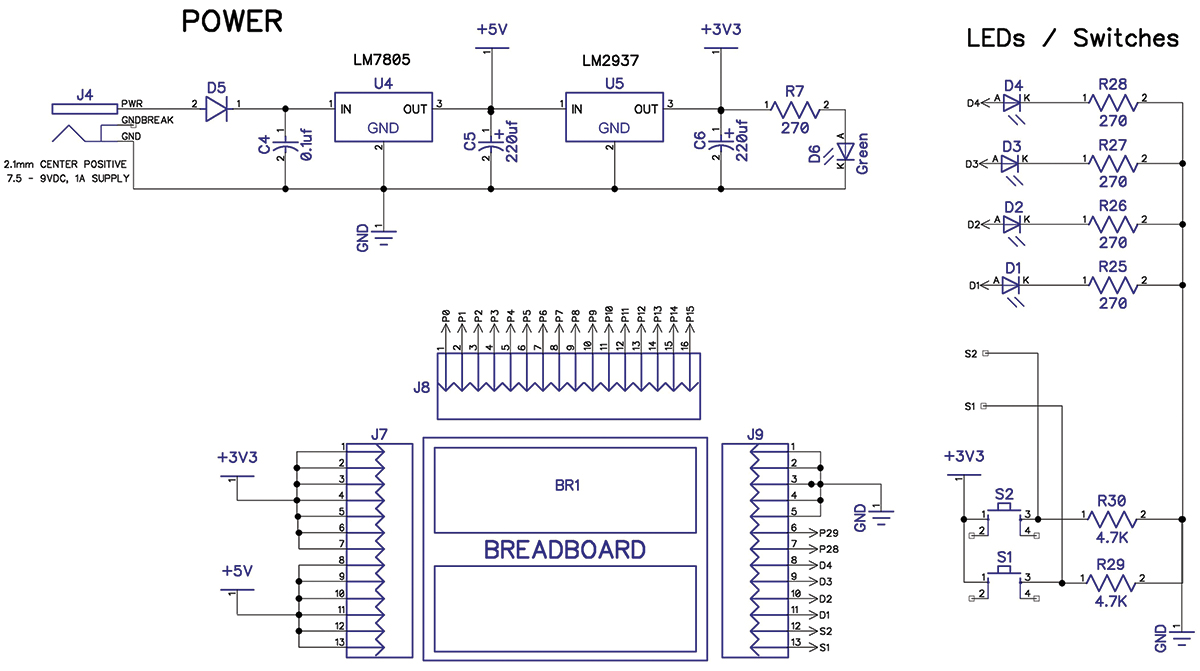
FIGURE 5. Schematic of Amigo power supply and Experimenter’s Section.
Build it Yourself or Build the Kit
There are several ways that you can create your own Mentor’s Friend. The key is a Propeller platform with PS/2, VGA, and SD card capability that can run Color BASIC. If you already have a Propeller board with the needed peripherals or some version of the Propellerpowered Pocket Mini Computer, you should be able to download the Color BASIC Spin source from the downloads at the end of this article, adjust the pin assignments to your specific board, then use your Propeller tool to compile the program and load the binary to your EEPROM. However, it may be more fun to use the Amigo kit available from the Nuts & Volts webstore — especially if you want to “build a computer from scratch” with a young friend!
The Nuts & Volts kit provides everything you need to build your own Mentor’s Friend — just add a monitor, keyboard, and power supply, and you’re in business. Kit contents include a 4” x 4” through-hole circuit board; a 40-pin DIP Propeller chip with associated crystal, EEPROM, and sockets; a 32K SRAM chip and socket; 3.3 VDC and 5 VDC power supplies; a 2 GB SD card and socket; a reset button; and the connectors and components for a VGA monitor, PS/2 keyboard, left/right audio channel, and Wii Classic Controller. The EEPROM comes pre-loaded with Color BASIC, so there’s no need to worry about programming the Propeller.
In addition, the kit provides an onboard Experimenter’s Section which consists of a small solderless breadboard, four LEDs, and two tact switches, and headers for access to 18 Propeller I/O pins, the LEDs and switches, and power and ground connections. The breadboard is small, but it’s all you need for many computer-controlled hardware experiments. (In fact, it’s the same one that’s on several Parallax hobbyist boards.) Figure 6 shows the Amigo kit and what comes in the box.
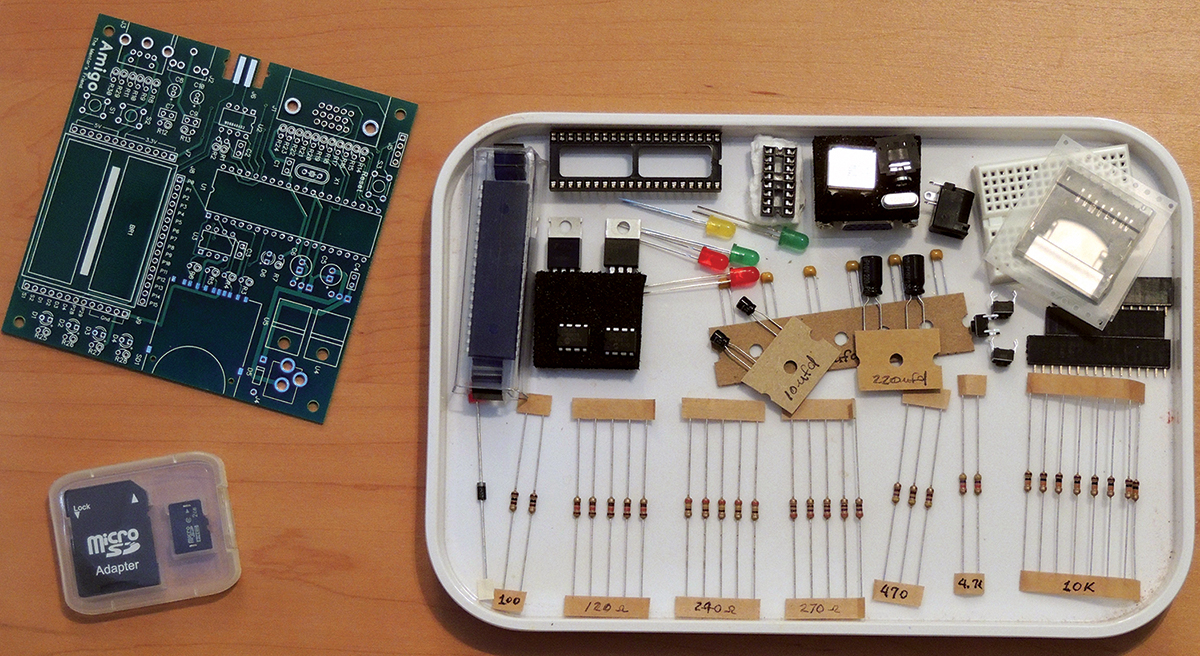
FIGURE 6. The Nuts & Volts kit includes everything needed to build your own Amigo, including a pre-programmed EEPROM and a 2 GB SD card with starter files.
Since you are reading this magazine, the chances are excellent that you already possess the background and skills to easily build your own Amigo. The assembly instructions are meant to be complete and easy to follow, and they include lessons learned from builders before you. With the exception of the SD card socket, all parts are through-hole — not surface-mount — and the 4” x 4” board size allows plenty of room to work comfortably. I am a slow and methodical builder, but my 15 watt iron, magnifier, and I can easily finish an Amigo kit in a single afternoon, with plenty of time left over for some refreshments after the tools are put away.
Time for a Test Drive
So, once you’ve built your Amigo, what can you do with it? The first thing you’ll notice is that Color BASIC is definitely tiny — only 26 variables, just 4K of program memory, no support for strings, 32-bit integer arithmetic only, no arrays, no explicit DATA statement. However, for an initial mentoring platform, those are all good things, not bad ones. Excluding the various operators, Color BASIC has about 50 commands. (Please see online resources for an overview of most Color BASIC commands. You’ll be glad you did!)
It’s fun and compact, and easy to learn and enjoy. It also includes everything you need to really understand the fundamentals of computer programming and hardware control, without the continuing disappointment of yet another layer of complexity to learn. With a little guidance, young students can truly “master” the Amigo, and with that mastery comes a self-confidence and “big picture” understanding that will serve them well going forward.
Here is an actual Amigo starter program to give you an idea of how simple Color BASIC is to understand and use. Once you get your kit built and see the READY prompt on your VGA monitor, press <F1> on your keyboard to start the editor, then enter this Color BASIC version of the classic first program:
10 REM *** HELLO WORLD! ***
20 COLOR 63,0 REM <~~~ WHITE TEXT, BLACK
BACKGROUND
30 CLS REM <~~~ CLEAR THE SCREEN
40 FOR N=1 TO 100
50 A=RND(34) REM <~~~ RANDOM COLUMN
60 B=RND(37) REM <~~~ RANDOM ROW
70 C=RND(63)+1 REM <~~~ RANDOM TEXT COLOR
(NOT 0)
80 LOCATE A,B
90 COLOR C,0
100 PRINT “HELLO WORLD!”;
110 NEXT N
120 PAUSE 3000 REM <~~~ WAIT 3 SECONDS
130 GOTO 20 REM <~~~ DO IT AGAIN
When you’ve entered the code, press <F1> again to return to Color BASIC and run your program. If all goes well, you should see lots of instances of “HELLO WORLD!” in different colors at random screen locations, followed by a short pause, then repeating. Now, press <Esc> to interrupt Color BASIC, and type in SAVE “HELLO.BAS” to save your first program to the SD card. Next, type DIR to view a directory of the files on the SD card. You should see an entry for HELLO.BAS. You can now LOAD “HELLO.BAS” from the SD card, then RUN it to see it work, or LIST it to see the program code (Figure 7).
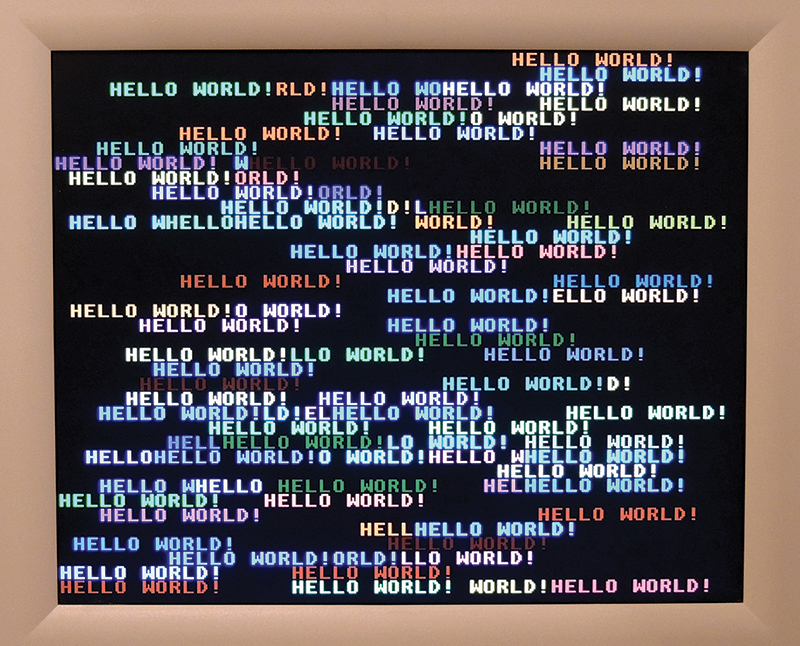
FIGURE 7. Greetings from the Mentor’s Friend!
It really is that simple! If you have a youngster watching over your shoulder, press <F1> again to go into the editor and have him or her change WORLD in Line 100 to their name, then press <F1> again. Now, watch those young eyes light up as the Amigo screen fills up with personalized multicolor greetings!
Here’s one more example of Amigo simplicity and fun to help get you started. Type NEW at the READY prompt to clear program memory and variables, then press <F1> for the editor and enter this code:
10 CLS
20 PRINT “AMIGO SIMPLE I/O”: PRINT “ “
30 PRINT “CONNECT S1 TO P8”
40 PRINT “CONNECT D1 TO P9”
50 PRINT “PRESS S1, AND D1 SHOULD BLINK”
60 REM ~~~ LOOP TO CHECK FOR BUTTON PUSH ~~~
70 IF INA[8]=1 THEN GOSUB 100 REM -
‘1’=PUSHED
80 GOTO 70
90 REM ~~~ SUBROUTINE TO BLINK LED ONCE ~~~
100 OUTA[9]=1 REM - ‘1’= LED ON
110 PAUSE 250 REM - WAIT 250MS
130 OUTA[9]=0 REM - ‘0’= LED OFF
140 PAUSE 250 REM - WAIT 250MS
150 RETURN
Press <F1> again to run the code, install two wire jumpers as instructed, then press switch S1. If all goes well, LED D1 should blink while you hold down the button, and stop when you release it. If not, check your jumpers. I know it’s easy for me to misalign jumpers on the headers without a magnifier or my readers.
When you’re ready to try something different, press <Esc> to return to the READY prompt, and don’t forget to save your work with SAVE “BLINK.BAS.” Figure 8 shows my Amigo sending you greetings via a red LED.
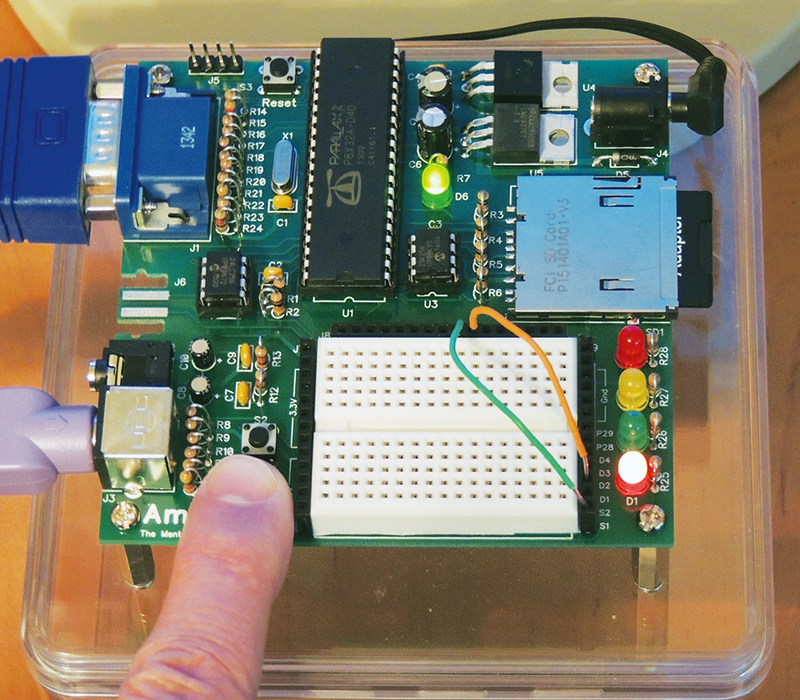
FIGURE 8. More greetings from the Mentor’s Friend!
This little program uses two jumper wires to demonstrate the Amigo version of the HELLO WORLD program of microcontrollers: the blinking LED. Setup is simple — just two wires — and I hope you think the program code is simple and intuitive.
No separate computer and integrated development environment (IDE), no compiling code and programming chips, and no dedicated microcontroller programming language to learn.
It’s absolutely true that the Amigo lacks the richness of a full microcontroller lab (Color BASIC has no native commands for ADC or PWM, for instance), but it also lacks the accompanying complexity and learning curve. It is intended only to introduce youngsters to a few programming and hardware interface fundamentals in a one-on-one setting.
Comparisons to “more robust” learning platforms or languages sort of miss that point. In my opinion, the Amigo gives you plenty to work with to introduce technology in an easy and fun way. Who knows where that might lead?
Next Steps
What else can you do with the Mentor’s Friend? In addition to being an excellent mentoring platform, the Amigo is a good choice if you don’t need a full-featured programming language and just want to knock around on a simple and fun retro computer. This can include some enjoyable retro programming challenges. Try writing the classic player-versus-computer Battleship game in 4K with no arrays. You can do it, but it will make you work!
The Amigo is also handy to have around if you are a Spin programmer or want to be. (Spin is the purpose-built language from Parallax for programming the Propeller chip.) Editing the Spin source code for Color BASIC (to add your own custom BASIC commands, for instance) is a great way to explore the Propeller and Spin, and the Amigo is a good target platform for custom binaries that you might write.
If you choose to explore this, you will need a Parallax Prop Plug to interface the Amigo to your Spin development environment via USB.
So, that gives you some background on the Mentor’s Friend, and some idea of what you can do with it. I think the Amigo is an excellent technology mentoring platform, easy to build, a good value for your dollar, and loads of fun to play with. Stay tuned for more articles on different Amigo projects, from beginner to advanced. Perhaps you and a young friend will join us for the adventure! NV

History of the Pocket Mini Computer
The Amigo is a direct descendant of the Pocket Mini Computer (PMC): a project by Jeff Ledger that combined the work of several Propeller gurus to offer a series of retro computers running a version of BASIC. A bit of history may be helpful to understand the technical elegance behind this seemingly simple little device.
In 2012, Gadget Gangster offered the first official Pocket Mini Computer created by Ledger, who himself was a longtime Propeller project designer and more recently, the proprietor of propellerpowered.com. (You may have come across Ledger on various computer Internet forums under the nickname of Oldbitcollector. He has been a prolific designer, author, and contributor.)
The initial PMC combined a Parallax QuickStart board with an expansion board that interfaced a PS/2 keyboard, VGA monitor, Wii controller, audio jack, and SD card. In addition to the open source software objects that supported all those interfaces, the PMC software contained a tinyBASIC interpreter that Ledger and others extended from the original 2006 work of Tomas Rokicki and Mike Green.
The design challenge for Color BASIC was figuring out how to shoehorn all that capability into the eight cogs and 32K memory of the Propeller chip. Several “big brains” in the Propeller user community volunteered their expertise where needed to help make Color BASIC a reality, and in mid-201,2 the first PMC was on the market.
In 2013, Ledger and Propellerpowered released an updated PMC which paired the Parallax QuickStart board with an improved expansion board, adding 32K of SRAM and upgrading the VGA from 48 to 64 colors, with an option for 256. This update also added bus headers to allow direct access to available Propeller I/O pins. In 2014, the PMC was updated again to move to an easier-to-build single board configuration (no longer using the QuickStart board) and to add several features users were asking for. These included more access to I/O pins; onboard breadboard, LEDs, and switches; an interface option to the Raspberry Pi (or other computers); and sockets for port expansion and Flash memory ICs.
The resulting Propeller Experimenter Board (PEB 2014) from propellerpowered.com was a superb technology mentoring platform, but was no longer available in late 2014. The Amigo is a simplified version of that PEB 2014 developed by Dane Weston in mid-2015 to provide a BASIC-driven mentoring platform for Nuts & Volts readers.
A Complete Kit is available in the Nuts & Volts Webstore.
A Partial Kit is available in the Nuts & Volts Webstore.
Dane Weston’s book on Color BASIC for the Pocket Mini Computer is available at
www.lulu.com/shop/display-product.ep?pID=4536358.
Downloads
What’s in the zip?
Source Code
Assembly Instructions
User Guide
Schematic