In our last installment, we finally finished our Fritzing workshops with a brief introduction to the new parts editor. We then learned how to move our proto shield alarm clock from the breadboard to the PCB (printed circuit board; Figure 1). We were also introduced to the Arduino alarm clock software (Figure 2).
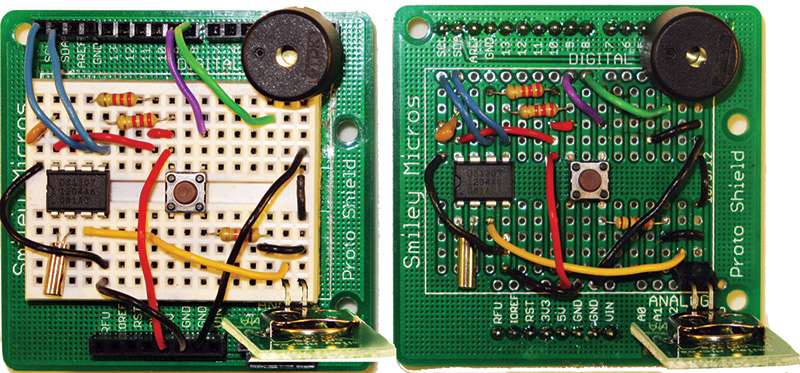
FIGURE 1. Proto shield alarm clock on breadboard and PCB.
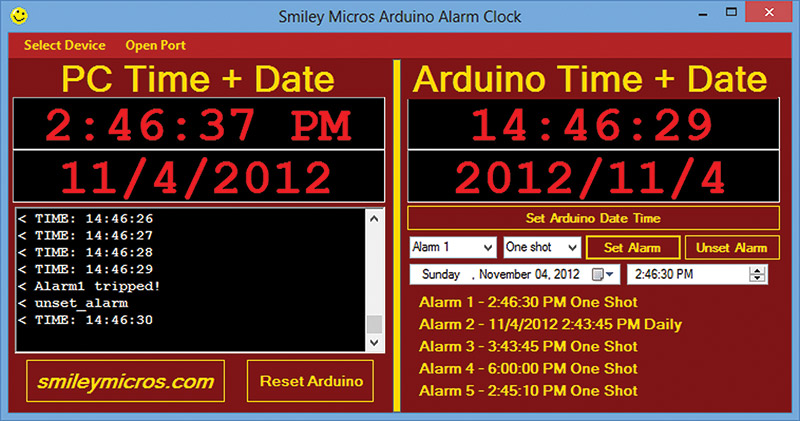
FIGURE 2. Arduino alarm clock application.
The associated parts kit (Figure 3; available from the Nuts & Volts Webstore) allows you to follow the materials presented in Workshops 52 through 55. With this kit, you can create both the breadboard and the PCB versions of the Arduino proto shield based alarm clock. This month, we are going to dig into the software for both the Arduino and PC, and we'll take a general look at how dates and times are handled on microcontrollers.

FIGURE 3. Arduino proto shield alarm clock kit.
| Item |
Description |
| 1a, 1b |
Two proto shield PCBs |
| 2 |
One mini breadboard |
| 3 |
Four-pin female header |
| 4 |
10-pin shield header |
| 5 |
Eight-pin shield header |
| 6a, 6b |
Six-pin shield header |
| 7 |
10-pin male header |
| 8 |
Eight-pin male header |
| 9a, 9b |
Six-pin male header |
| 10 |
One DS1307 RTC IC |
| 11 |
One 32.768 kHz watch crystal |
| 12 |
One breadboard battery PCB |
| 13 |
One battery holder 12 mm coin |
| 14 |
One battery CR1220 |
| 15 |
One two-pin 90 degree male header |
| 16 |
One capacitor 0.1 µF |
| 17 |
Two resistors 2.2K ohm |
| 18 |
One 10K ohm pull-up resistor |
| 19 |
One pushbutton |
| 20 |
One piezo buzzer |
| 21 |
Two feet of uncut jumper wire |
TABLE 1. Bill of Materials.
Introducing Date and Time on a PC
First, let's take a look at how dates and times are handled on a PC. We will discuss the way Unix and C handle them by using some examples written in C, and then we'll run them on the PC using the free Pelles C compiler (discussed back in Smiley's Workshop 23). You can get Pelles C for free at www.smorgasbordet.com/pellesc, but please donate a few dollars to help support this excellent learning tool.
How Time Data is Stored
Back in Workshop 48 when we studied data structures and enums, we chose to use time data for our examples. While helping us to understand how to use data structures, the examples weren't how the data is actually structured in the C standard library, so let's look at how the big boys do it.
First, we will look at the central timekeeping data structure tm which is located in time.h:
struct tm {<br />
  int  tm_sec;   /* seconds after the minute [0-61]<br />
  int  tm_min;   /* minutes after the hour [0-59]<br />
  int  tm_hour;  /* hours since midnight [0-23] */<br />
  int  tm_mday;  /* day of the month [1-31] */<br />
  int  tm_mon;   /* months since January [0-11] */<br />
  int  tm_year;  /* years since 1900 */<br />
  int  tm_wday;  /* days since Sunday [0-6] */<br />
  int  tm_yday;  /* days since January 1 [0-365] */<br />
  int  tm_isdst; /* Daylight Savings Time flag */<br />
};
That just about covers everything we'll need to express a date or time.
Now that we have a structure to hang things on, we need a compact way to store a date and time. Our structure has nine ints — most of which are far larger than necessary for storing a particular value. For instance, month only has values of 0 to 11 which could easily be stored in four bits. Since an int is usually 16 bits on a microcontroller, that's a lot of wasted space.
We use ints because they are the unit of data exchange in most microcontrollers, so it is easier for the device to deal with ints rather than other data types that aren't physically present on the machine.
Of course, early microcontrollers were four-bit machines so an int was perfect. Devices in use today are usually 16 bits, but can easily be 32 or even 64 bits.
To keep C simpler, we just use the int data type and let the compiler deal with the actual size. This still doesn't deal with all the wasted space for storing the data, so we'll define a new data type — datetime — that on Unix type systems is 32 bits. We use this to store the number of seconds since January 1, 1970 Greenwich Mean Time. Say what?
Well, that particular time was chosen as the beginning of the epoch for time keeping in Unix systems, so it is now available in most PC type systems. We declare this as:
typedef long time_t;   <br />
/* time in sec since 1 Jan 1970 0000 GMT */
Just FYI, this will store the number of seconds to get us to Jan 19, 2038 where it will roll back to 1901 and likely cause headaches much like the Y2K bug was supposed to (but didn't). So, since the Mayan datetime data type was wrong and the world didn't end December 21, 2012, keep an eye out for 2038.
We also have a variable for storing the time since a software process started as a function of processor ticks, clock_t:
typedef long clock_t;<br />
/* time in ticks since process started */
This variable depends entirely on the processor and how it counts ticks. Since AVRs tick at millions of times per second, this is more useful for determining how long a particular section of code takes to complete than it is for keeping track of time on a human scale.
Finally, for more human friendly units, we define CLOCKS_PER_SEC which is a device dependent number that tells how many ticks in clock_t are equal to one second.
Time Manipulation Functions
time() — Returns the time since the beginning of a system epoch. In the case of Unix, that is the number of seconds since Jan. 1, 1970.
clock() — Returns a processor tick count.
difftime() — Calculates the difference between times.
Format Conversion Functions
Uses the tm calendar type.
asctime() — Converts a given calendar time to a textual representation.
ctime() — Converts a given time since the epoch start to a local calendar time and then to a textual representation.
strftime() — Converts date and time data from a given calendar time to a formatted null terminated string.
Uses the time_t — time since epoch type.
gmtime() — Converts a given time since the epoch start to a calendar time expressed as Coordinated Universal Time (UTC).
localtime() — Converts a given time since the epoch start to a local calendar time.
mktime() — Converts calendar time to a time since the epoch start.
Using time.c on a PC
Let's see how this all plays out on a PC by getting some time. First, let's see how many system ticks there are in a second on my PC. We run the following DateTimeTest1.c in Pelles C:
#include <stdio.h><br />
#include <time.h>
int main(int argc, char *argv[])<br />
{<br />
  // define two variables of type clock_t<br />
  clock_t ticks1, ticks2;
  ticks1=clock(); // get the number of ticks<br />
                // since the process started<br />
  ticks2=ticks1; // make a copy of it
  // wait for 1 second to pass while getting<br />
  // the ticks<br />
  while((ticks2/CLOCKS_PER_SEC-<br />
  ticks1/CLOCKS_PER_SEC)<1)<br />
    ticks2=clock();
  printf("Took %ld ticks to wait one<br />
  second.\n",ticks2-ticks1);<br />
  printf("CLOCKS_PER_SEC is<br />
  %ld.\n",CLOCKS_PER_SEC);<br />
  printf("They should be the same.\n");<br />
  return 0;<br />
}
Turns out that there are 1,000 system ticks per second on my PC. This should allow us to time intervals down to a single millisecond.
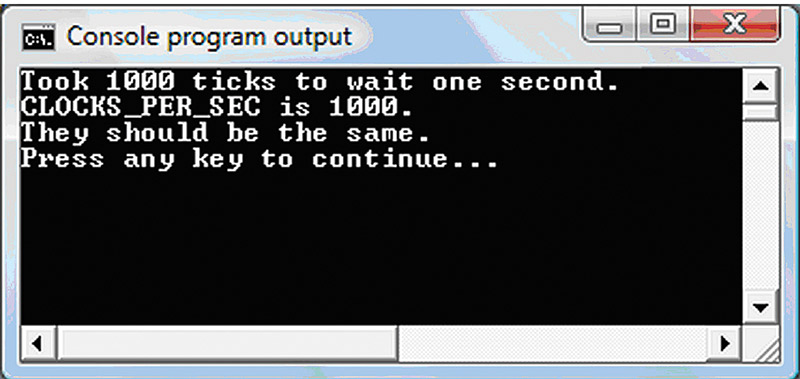
FIGURE 4. Clocks per second.
Next, let's write DateTimeTest2 and see how many seconds it has been since January 1, 1970:
int main()<br />
{<br />
  time_t myTime; // define a time_t variable
  time(&myTime); // use as a pointer to get the<br />
               // time in seconds
  printf("It has been %ld seconds since Jan. 1<br />
  1970\n",myTime);
  return 0;<br />
}
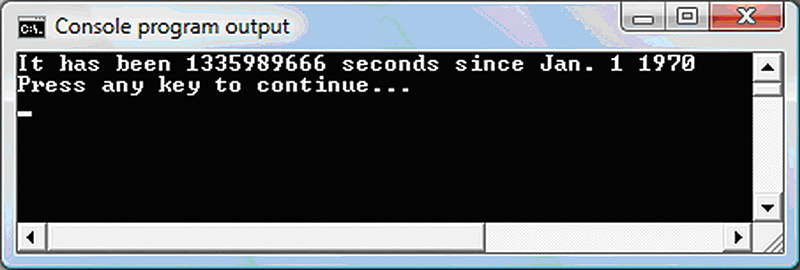
FIGURE 5. Seconds since epoch began.
Good grief, has it really been that long? It's 1,335,989,666 seconds already and it seems like only yesterday (which is me being sarcastic about how useful that number is to tell when now is). So, what is the date and time that this number represents? Well, let's use the asctime() function in DateTime3 to get the date and time in a format that makes sense:
int main()<br />
{<br />
  time_t myTime; // define a time_t variable
  time(&myTime);    // use as a pointer to get<br />
            // the time in seconds
  printf("The current time is<br />
  %s.\n",asctime(localtime(&myTime)));
  return 0;<br />
}
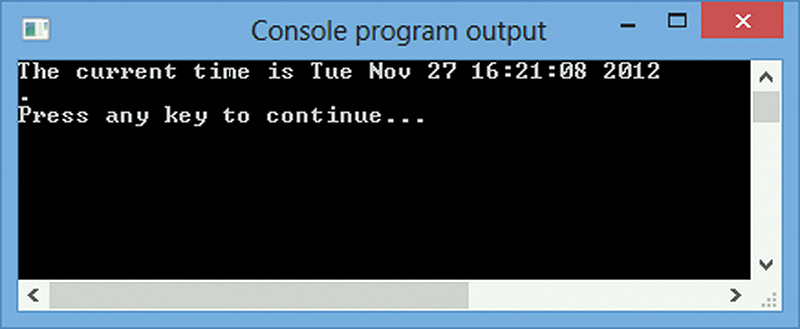
FIGURE 6. DateTimeTest3.
We used the localtime function to convert the time since the beginning of the previously mentioned epoch into a calendar time, and then used the asctime() function to convert that into a string that we can then show on our console window using the printf function.
Next, let's write DateTimeTest4 to get the epoch time, and then convert that into the tm data structure so that we can manipulate each aspect of the date and time as separate variables:
int main()<br />
{<br />
  time_t myTime; // define a time_t variable
  time(&myTime);    // use as a pointer to get<br />
            // the time in seconds
  // load a pointer to a tm struct with the<br />
  // local time<br />
  struct tm* time_parts = localtime(&myTime);
  printf("Let's look at the data:\n");<br />
  printf("tm_sec = %d\n",time_parts->tm_sec);<br />
  printf("tm_min = %d\n",time_parts->tm_min);<br />
  printf("tm_hour = %d\n",time_parts->tm_hour);<br />
  printf("tm_mday = %d\n",time_parts->tm_mday);<br />
  printf("tm_mon = %d\n",time_parts->tm_mon);<br />
  printf("tm_year = %d\n",time_parts->tm_year);<br />
  printf("tm_wday = %d\n",time_parts->tm_wday);<br />
  printf("tm_yday = %d\n",time_parts->tm_yday);<br />
  printf("tm_isdst = %d\n",time_parts->tm_isdst);
  return(0);<br />
}
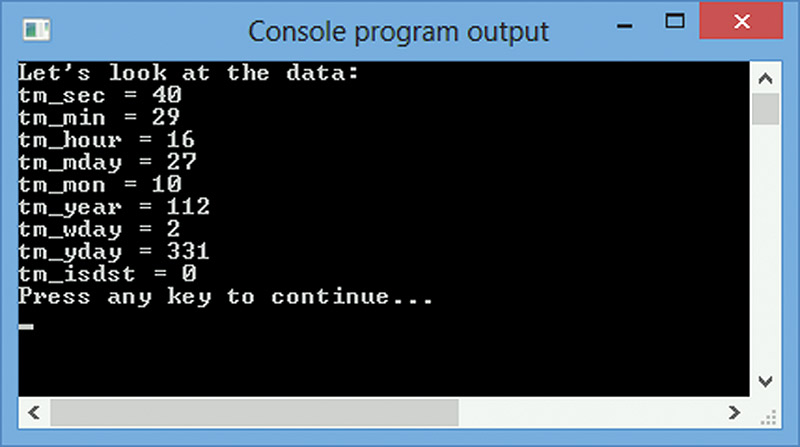
FIGURE 7. Show the tm structure.
Wait a second. The year is 112? Well, I neglected to mention that the year is calculated by adding the value in tm_year to the constant TM_YEAR_BASE that just happens to be 1900. So, 1900 + 112 = 2012 and we are right on time. You might notice that the month is 10, but in DateTime3 we saw that it is November. What gives?
Well, months are 0 based, so January is 0 and December is 11. We could take care of this in the software, but it is good to reinforce what we are doing by seeing the raw output.
You now have a good introduction to how C handles dates and times on a PC, so let's see how we do this on the Arduino.
Introducing Date and Time on a Microcontroller
As you may remember, the Arduino uses some standard C and C++ stuff based on the resources in WinAVR. Unfortunately, one of those resources (avrlibc) does not implement the standard C library time.c and time.h files. This is because the functions in those files require some sort of built-in timekeeping facility that usually comes with an operating system, but are not available in a raw AVR that is small and has no OS.
In order to use these functions, we have to build our own custom timekeeping system. Since there are so many ways to do this, the folks who did avrlibc thought it best to leave it to the programmer of a particular system.
We've seen how this is done with regular C and an operating system by using Pelles C. Now, we will look at a way of using some similar concepts on the Arduino using an external IC — the DS1307 real time clock — as our arbiter of dates and times.
Our Windows Alarm Clock Software
We probably could have written something to communicate with our Arduino on the PC using Pelles C, but I find Visual C# much quicker and with more attractive results. So, I wrote the PC side application for the Arduino alarm clock in Visual Studio C# Express 2012 for Windows Desktop.
I also wrote several articles about using a virtual serial port with C# that were published in the January, February, and March 2010 issues. These might provide a good introduction if you aren't already familiar with creating PC applications with C#.
Showing the Date and Time on a PC
Microsoft uses a DateTime value type that can represent Gregorian calendar dates and times from 00:00:00 (midnight) January 1, 0001 to 11:59:59 P.M., December 31, 9999. This is divided into 100 ns ticks, allowing us to represent any 100 ns interval in the above range as a single number — a very big number — but that's what PCs are good at. So, let it worry about storing and converting the number of ticks from the beginning of the Common Era to this very moment.
It is very easy to use DateTime in C# once you know how, but it can be very hard to figure out how to use it at first. That may sounds like some nonsense, but look at the following example. We create the date and time displayed on the left of Figure 8
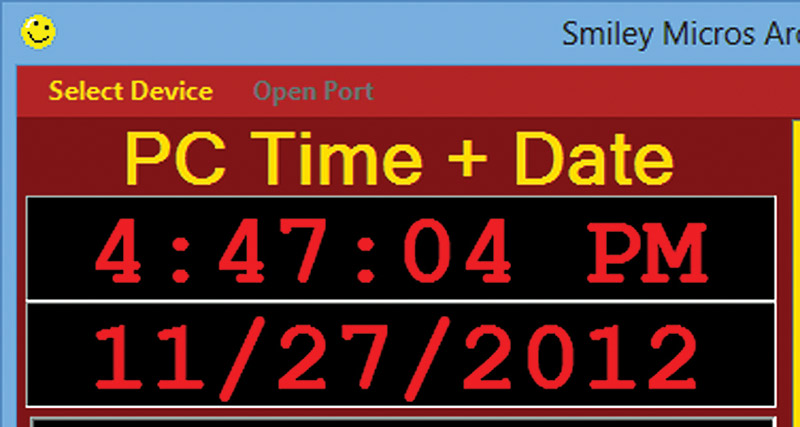
FIGURE 8. PC date and time.
using the following two lines of code:
labelTime.Text = DateTime.Now.ToLongTimeString();<br />
labelDate.Text = DateTime.Now.ToShortDateString();
Two lines of code. How simple is that? Darn simple, actually, but it is a real bear to figure out what you really need to use from the many DateTime functions available. For all I know, it may not be the best way. However, it does work, so I'll live with it.
You have a choice of becoming an expert in C# or relying on your Google-Fu and finding working examples. I prefer the latter technique.
Sending the Date and Time to the Arduino
So, how easy is it to send the date and time from the PC to the Arduino? Just look at the following code:
    TimeSpan _UnixTimeSpan = (DateTime.Now - new<br />
    DateTime(1970, 1, 1, 0, 0, 0));<br />
    richTextBoxReceive.Text += "unixtime = " +<br />
         _UnixTimeSpan.TotalSeconds.ToString()<br />
          + "\n";<br />
    serialPort1.WriteLine("P" + _UnixTimeSpan<br />
       .TotalSeconds.ToString() + '!');
You just instantiate a TimeSpan object to this particular 100 ns interval, then subtract the number of 100 ns ticks since the beginning of Unix time, and send that number to the Arduino. Yup, it's another totally easy thing to do. (We won't mention the hours of Google-Fuing around the Internet it took to find those three lines of code, however.) Luckily, you can get the C# code for the PC side of the Arduino alarm clock at the link for this article, so you can reuse these concepts for your own PC side application. Just be aware that the code I'm providing (while working just fine) looks a bit like road-kill under a magnifying glass, so I recommend squinting when you use it.
ALARM TYPES
While we can have up to 65,535 different alarm types, in our example we only have two: 'One shot' and 'Daily.' You might want others such as 'Weekly' that would activate once per week, or perhaps 'On event' that creates an alarm to activate at a specific duration after an input (maybe you have a rain detector and you set an alarm to go off in two hours to check a rain gauge, then you get a tweet with the value).There are endless possibilities, and as I've said before, you have the source code to add whatever you like.
How to Set an Alarm
In order to set an alarm, first open the dropdown box and click on the desired alarm as shown in Figure 9.
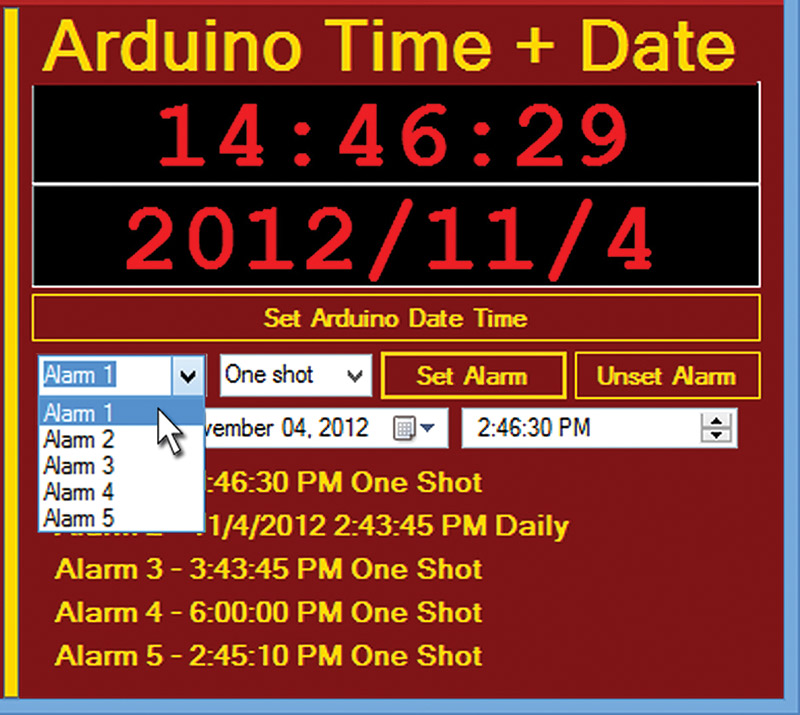
FIGURE 9. Select the alarm.
Next, we open the alarm type dropdown box and select either One shot or Daily as shown in Figure 10.
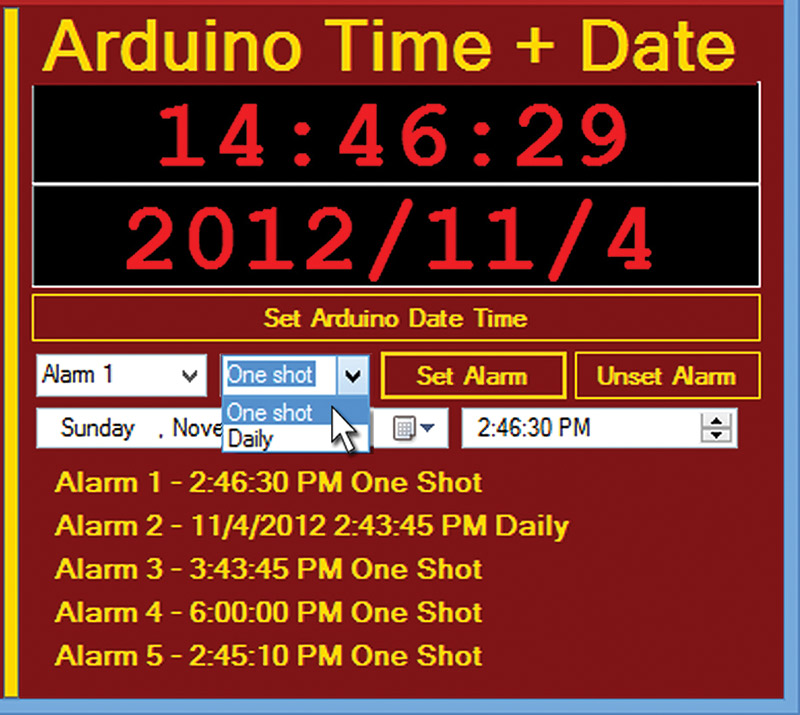
FIGURE 10. Select the alarm type.
Now, we click on the calendar selector as shown in Figure 11. By the way, this really shows the power of using something like C# since all one has to do is drag and drop this component, click, click, and you've go a powerful graphical element at your disposal.
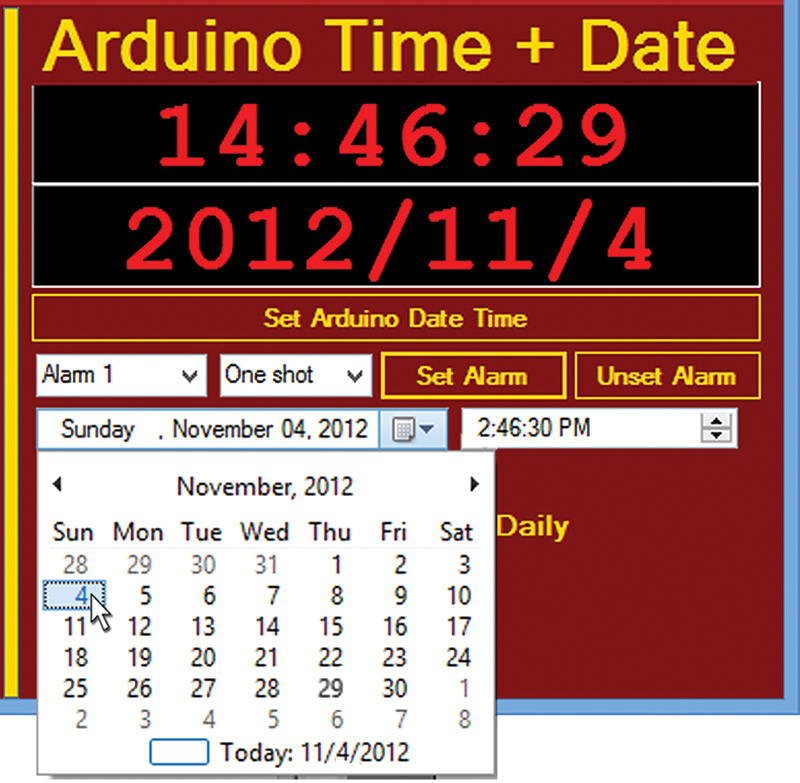
FIGURE 11. Select the date.
Finally, we select the time as shown in Figure 12 and then click the 'Set Alarm' button. The alarm is now set.
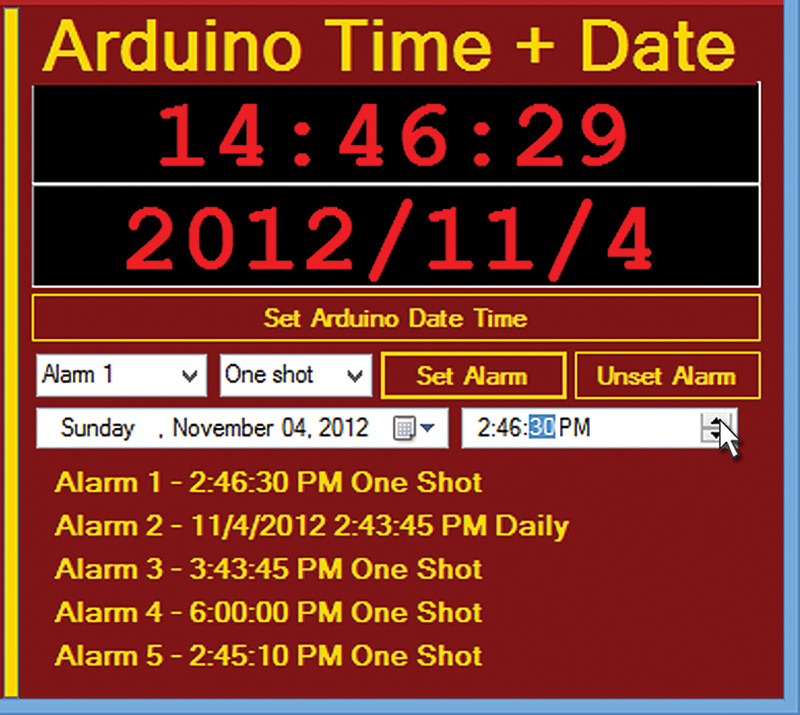
FIGURE 12. Select the time.
Well, that was certainly easy, and, of course, you've got all the source code at your disposal.
How RTClib Tells Time
RTClib was written for the Arduino in C++ by Jean-Claude Wippler of jeelabs.org — be sure to check out his website. He chose to create his own version of some of the data structures used in the C standard library time.c, and since we are using his library we'll discuss his version of the DateTime object.
His original code was oriented to getting the DateTime values. I modified it to allow setting them, and I changed the name to AlarmClockRTCLib to hopefully prevent confusion. My modifications are included in the software download package at the article link.
The purpose of this library is to allow us to store a Unix date and time as a 32-bit unsigned integer, and then set or get the year, month, day, hour, minute, and second from that value.
Using RTClib with the Arduino
First, we must include the header:
#include "Wire.h"    <br />
#include "AlarmClockRTClibSW.h"
We include Wire.h because the RTClib uses the I2C bus that has functions defined in Wire.h. We then use the functions from the RTClib library in our initializeDS1307RTC() function from the Arduino project Alarm_Clock\Alarm_Clock_Time module. In this function, we run:
RTC.begin();<br />
// initialize the DS1307
This function uses the I2C bus to set up the DS1307 for our use. You can look at the code in the RTClib.cpp to see how this is done. This also gives a good introduction to using the I2C bus with the Arduino.
Now, how do we monitor the time and check it against the alarm settings? This was a bit more complex than I initially expected.
I finally ended up running Timer1 at one second ticks to set a flag (check_alarm to 1) and in the loop() function, I check to see if this flag is set. If so, I call a function to handle the situation. Running this only once per second allows the Arduino to do other tasks in the background, such as communicating with the PC and running the piezo alarm.
Each time the Arduino loop() function sees that flag set, it checks the time against the alarms and sets them accordingly:
  // timer sets check_alarm<br />
  // once per second<br />
  if(check_alarm){  <br />
    if(alarm1_set){<br />
     go_alarm1();<br />
    }<br />
    else if(alarm2_set){<br />
      go_alarm2();<br />
    }<br />
    else if(alarm3_set){<br />
      go_alarm3();<br />
    }  <br />
    else if(alarm4_set){<br />
      go_alarm4();<br />
    }<br />
    else if(alarm5_set){<br />
      go_alarm5();<br />
    }<br />
    check_alarm = 0;<br />
  }
Each go_alarm#() function may be written however you wish, depending on what you want to do with a particular alarm.
To keep track of alarms, we use integer variables for each alarm: alarm#_set, alarm#_tripped, and alarm_type. While the first two are used as Boolean values with only 0 and 1, the third would allow us to define 65,535 possible types of alarms — far more than we'll need. We set all these variables to 0 when we run initializeDS1307RTC().
Well, look at the time! I guess we will have to continue this next time. Since this is a work in progress, the actual code [that you can get from the article link] may have a few things different than what we've discussed here, but nothing major. Besides, all differences will be documented in the code. NV
Downloads
Source code files for workshops 54 & 55.