Recap
Last month, we continued our AVR Memory series and discussed the EEPROM. This month, we will look at a special type of EEPROM named Flash that is used by the AVR for storing program memory. We will learn how to store constant data (like sentences) in Flash and how to write code that will read from Flash. We will write pgmtest.c to demonstrate these principles. This program is written in a single file that can be compiled for either the AVR Butterfly (ATmega169), the Arduino hardware (ATmega328), or the BeAVR40 (ATmega644). [The BeAVR40 was shown in Workshop 22: Busy as a BeAVR in the May ‘10 Nuts & Volts.]
Why Flash?
We looked at this some in earlier articles but let’s revisit the concepts. A computer requires some sort of persistent binary memory for a program. It needs to be persistent so that when the power is turned off, the computer won’t forget what it is supposed to do. This persistent memory can be anything that can store binary data, from ordinary switches to rolls of paper tape. To get things moving fast, we need to use electrons. While these computer memories tend to evolve at computer speed, the sweet spot for persistent memory in microcontrollers is now occupied by Flash — a form of EEPROM (Electrically Erasable Programmable Read Only Memory).
The big difference between regular EEPROM and Flash is that the regular kind can have individual bytes written or erased, while the Flash is written or erased in larger groups of bytes called pages. Since the erase/write circuitry is expensive (compared to the memory itself), using pages is considerably cheaper than bytes. The trick is to copy the page about to be written from the Flash to a section of RAM the same size as the page, change it in RAM, erase the Flash page, and then copy the data from the RAM back to the Flash page. We don’t need to understand much beyond that this process makes Flash a lot cheaper than other forms of reprogrammable persistent memory.
C Doesn’t Know About Flash
The C programming language was designed for Von Neumann memory architecture — a single memory external to the CPU where both the program and data are stored. However, most microcontrollers are designed to use a modified Harvard memory architecture where the program is stored in one type of memory and the data is stored in another. [For AVRs, it is even a bit more complex since many AVRs have the program stored in non-volatile Flash, but the data is mapped to registers and SRAM. So, typical AVRs have four types of memory: EEPROM, registers, SRAM, and Flash.]
The C programming language has often been referred to as a device-independent assembly language. This means that C models a general-purpose computer, but not any specific computer. C doesn’t know a lot about how real computer memory is implemented; this is a good thing since virtually every microcontroller family has different ways of handling memory. This separation from the underlying hardware makes C portable in the sense that it leaves figuring out the machine-dependent specifics to the folks who write compilers that translate C into a device specific assembly language
The WinAVR toolset uses the venerable GCC compiler (that is arguably the most important piece of free software ever written). GCC is an acronym for GNU Compiler Collection and GNU is an acronym for ‘GNU Not Unix.’ If you like the idea that the text the acronym is based on contains the acronym — a concept known as recursion — you may well be a natural-born programmer. The WinAVR that we use with AVRStudio contains a version of GCC with specific tweeks to make it compile C to AVR assembly language. This is important because our compiler has to provide some not-so-portable methods so that we can use C most efficiently with the AVR memory architecture.
Since regular C isn’t aware of our particular memory architecture, we have to use special, non-C concepts for the most efficient use of our memory resources. For instance, we might have a design that uses a serial port and outputs strings to a PC terminal to tell the user what is going on. We might have a switch statement that when it detects someone pressing the big red button, it will call printf() to output the string: “Did you really mean to press the self-destruct button?” [String is used in C to describe a sequence of characters that is ended by the null character 0x00.]
Some of us find it very annoying when we give a computer a command and it second-guesses us. If you were a Vista user and you hate the Nanny messages, you might have gotten used to yelling at the terminal something like: ‘Of course I meant to press the @%$#*!* button. I pressed it, didn’t I?’ [Followed by a last thought: “Wait a second, did that say ‘self-destruct?’”] We aren’t concerned here with destroying ourselves. Instead, we want to know where the AVR is storing the strings it calls in response to button presses. The GCC compiler writes the assembly code to set up memory (including string storage) before the main() function runs, and it copies all variables to SRAM — even constant variables like our string. But wait — isn’t a constant variable some sort of oxymoron?
Well, you’d think so but it is really a variable that just happens to not change in this particular program. In another program, the string could be printf (“Did you really mean to press the self-destruct button because you know that it means blowing us both up?”). Either string gets moved from cheap Flash to expensive SRAM and wastes resources — something we don’t want to do — so we have to learn special methods to get the compiler to leave the strings in Flash and let us read it from Flash.
Of course, theoretically a compiler could figure out that the string isn’t changed in the program and could automatically set things up to read it out of Flash without transferring it to SRAM, however, our free GCC compiler doesn’t. (Before we complain, let’s remember the price.) We do however, have some methods that will let us keep the strings in Flash, and the avrlibc gives us some special functions that let us handle these strings almost like regular old C does.
Using AVR Flash To Store And Read Constant Data
In addition to the GCC compiler, our WinAVR toolset provides avrlibc — a library that helps us make better use of C with the AVR. For using Flash, we find a number of useful macros and functions in pgmspace.h.
PROGMEM attribute
I like to have demonstration programs that start off by introducing themselves. For instance, if I’m using the AVR Butterfly with the pgmtest.c source code and this is the sixth version, I might begin the program by sending the string: “pgmtest - Butterfly 1.06\r” to the PC terminal. I could create this string in a HELLO[] array as follows:
const char HELLO[] = “pgmtest - Butterfly 1.06\r”;
If we do this, the GCC compiler will store the string in Flash, but will also cause it to be copied to SRAM when the program starts up. [Aside: C terminates a string with the ‘\0’ character which is also known as null and has an ASCII value of 0x00 — so that character is the last one in the array.] With the string in SRAM, the ordinary C string functions such as strcmp() [string compare] from the string.h library can be used with it. Like I mentioned before, though, SRAM is precious so we would like to leave the string in Flash and read it from there. We do this by adding the PROGMEM attribute as follows:
const char HELLO[] PROGMEM = “pgmtest - Butterfly 1.06\r”;
The compiler will now leave the HELLO[] array in Flash and let us use it from there. The avrlibc provides a special set of string manipulation functions for use with Flash that are similar to those in string.h, but are in pgmspace.h and have a ‘_P’ appended to them. (For example, if we use strcmp_P().) This, of course, means that we aren’t using the standard C string library and our code is less portable. It’s a tradeoff well worth the sacrifice, though, if we are using the AVR with the free WinAVR toolset.
PSTR attribute for in line strings
We use PROGMEM to store constant strings and arrays in Flash. We can also use the PSTR attribute to create strings in the parameter list of a function in a line of code. For instance:
sendStringP(PSTR(“This is a test for sending a string.\r”));
We’ll see how this works in our pgmtest.c demonstration program [available in Workshop25.zip at www.nutsvolts.com].
Reading sections of Flash program memory
The final demonstration is for reading sections of program memory. Avrlibc has a bunch of functions for accessing program memory, depending on the data type to be accessed, and whether the data is in the lower 64K or in higher memory. We will only look at the function for reading bytes from the lower memory: pgm_read_byte(). We use this function in another function that sends Flash strings out the serial port:
void sendStringP(const char *FlashString)<br />
{<br />
    int i = 0;
    // The ‘for’ logic terminates if the byte<br />
    // is ‘\0’ or if i = 80.<br />
    // ‘\0’ is ‘null’ and terminates<br />
    // C strings<br />
    // The 80 prevents too much overrun if we<br />
    // get a bad pointer<br />
    // and it limits the string size    <br />
    for( i = 0 ; pgm_read_byte(&Flash<br />
    String[i]) && i < 80; i++)<br />
    {<br />
        sendByte(pgm_read_byte<br />
        (&FlashString[i]));<br />
    }<br />
}
Now, please relax when reading this ... yes, there will be pointers. The first is the pointer FlashString which is set to point to a constant character; in our case, the first element of a string array. We then use it as an array with the subscript ‘i’ being incremented to indicate the specific character in the FlashString array; we add the ‘&’ ‘address of’ operator to get the specific address of the specific character at that position in the array. See ... that wasn’t so hard, was it?
But then we do something a bit doofy in the ‘for’ loop that runs the loop until one of two things happen as shown below:
pgm_read_byte(&FlashString[i]) && i < 80;
We want the loop to exit if one of two conditions occur. The loop will run as long as &FlashString[i] is true — meaning it is not equal to 0 and ‘i’ is less than 80. We do this because we terminate a string with 0x00 (the null character), so we want to end our loop if we see that character. We will also end the loop if ‘i’ gets up to 80, thus limiting our string size to 80 characters. This assures that the for loop will exit if we accidentally send it a pointer to an array that isn’t terminated by 0x00.
Let’s Look At The Flash Memory
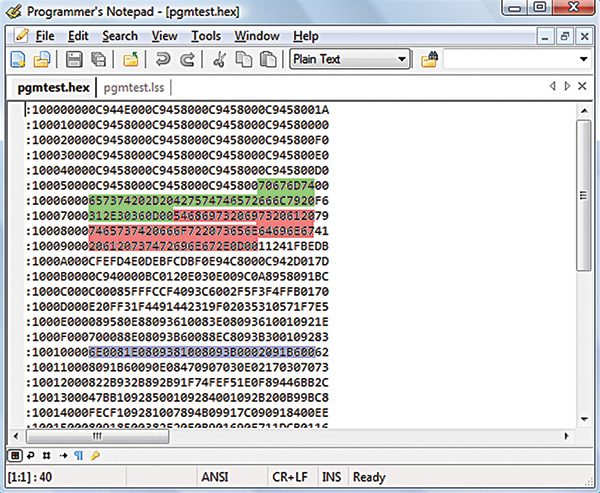
FIGURE 1. pgmtest.hex with sections marked.
When we compile our pgmtest.c program (we’ll do that later), the compiler generates several files. The pgmtest.hex file is the file we upload to our development board using the bootloader resident on the AVR. The pgmtest.hex file (in the source code default directory) contains the binary code for program in the form of an Intel hex file (shown in Figure 1). [Note that I’ve marked several lines in color because we will look at these later]. You can use Programmer’s Notepad [a great tool you can find in your WinAVR directory] to open the hex file.
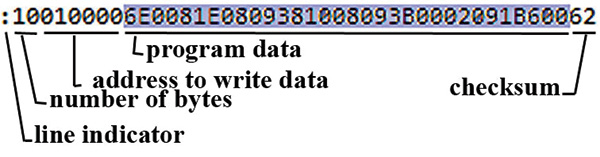
FIGURE 2. Intel hex format for pgmtest.hex data.
Figure 2 shows how our data is formatted. Each line in the file begins with ‘:’ then ‘10’ to indicate that 0x10 (16 decimal) bytes of code are in the line. This is followed by two hex bytes that give the address that the code should be written to, followed by the 16 bytes to be written. The last byte in the line is a checksum. As you can see from Figure 1, I’ve marked three sections of the hex file. The green is for the data for the string: “pgmtest - Butterfly 1.06\r”. The pink is for “This is a test for sending a string.\r”.And the blue is 16 bytes beginning at memory location 0x0100 that we will read in the demonstration program.
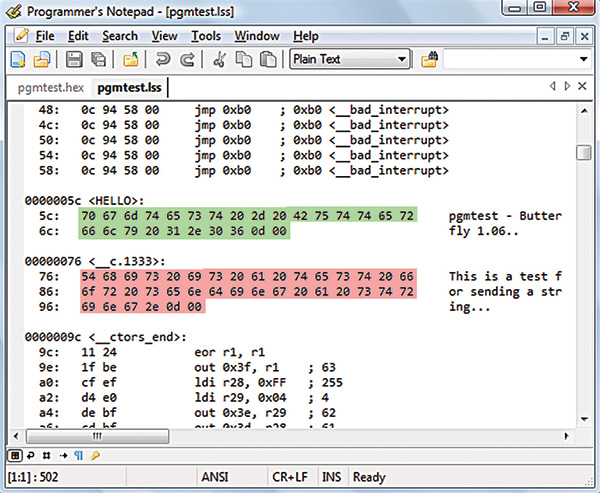
FIGURE 3. pgmtest.lss showing stored strings.
In Figures 3 and 4 we look at the pgmtest.lss file that is also in the default directory along with pgmtest.hex. Figure 3 shows the green data that is stored beginning at address 0x005C, and the red data stored beginning at address 0x0076. You can see that the .lss file also shows the characters for the data to the right. In Figure 4 we see the 16 bytes of code that are stored beginning at address 0x0100 and to the right we see the assembly instructions that this code represents. Above the code we see the C instructions. The .lss can be very useful for debugging and for learning how the compiler translates our C code into the AVR assembly language.
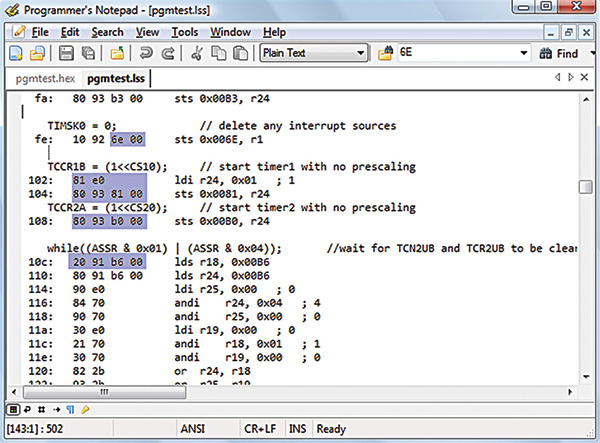
FIGURE 4. pgmtest.lss showing 16 bytes stored at address 0x0100.
The pgmtest.c demonstration program will print the two strings stored in Flash and when you send it ‘R’ it will read out the 16 bytes of Flash beginning at address 0x0100.
Program Memory Demonstration — pgmtest.c
The full source code for this demonstration is included in Workshop25.zip on the NV site www.nutsvolts.com in the downloads. In this section, we will look at a few of the more relevant items.
One source file for multiple devices
The following discussion isn’t related to memory, but to creating the demonstration program pgmtest.c. At one time, I found that lots of #define and #ifdef in source code seemed to make things more confusing. It does, but it also makes it possible to write one source code file that can be compiled for multiple devices. This comes in handy when you have situations like the one that requires different register names for the USART in different AVRs (as is the case of the Butterfly’s ATmega169 versus the BeAVR40’s ATmega644). The compiler preprocessor looks for #if defined structures and, based on what was previously defined, it selects the correct code section. For instance, in pgmtest.c you see:
#define Butterfly // ATmega169<br />
//#define Arduino // ATmega328<br />
//#define BeAVR40 // ATmega644
// SmileyUSART.h uses the above defines<br />
// Note that Butterfly USART runs at 19200 Baud<br />
// while the Arduino and BeAVR40 run at<br />
// 57600 Baud<br />
#include “SmileyUSART.h”
#if defined(Arduino)<br />
const char HELLO[] PROGMEM = “pgmtest -<br />
Arduino 1.01\r “;<br />
#elif defined (Butterfly)<br />
const char HELLO[] PROGMEM = “pgmtest -<br />
Butterfly 1.04\r “;<br />
#elif defined (BeAVR40)<br />
const char HELLO[] PROGMEM = “pgmtest -<br />
BeAVR40 1.00\r”;<br />
#else<br />
const char HELLO[] PROGMEM = “pgmtest -<br />
UNDEFINED\r”;<br />
#endif
There are three main things going on here. First, we select the platform we want to compile our code for: either the Butterfly, the Arduino, or the BeAVR40. We remove the preprocessor comment delimiter \\ in front of the one we want to compile the code for. Note that we must also leave the \\ in front of the other two or we’ll get some strange errors. The second thing to note is that the include file SmileyUSART.h follows this define list. That is because the SmileyUSART header file needs to know which device is selected; the preprocessor writes the whole header file at this point in the code before it compiles it. [Aside: Note that the Butterfly baud is 19200 while the Arduino and BeAVR40 baud is 57600]. The third thing to note is that there are four HELLO[] character arrays, but only the one with the device defined for it is used by the preprocessor. The fourth is included in case none of the legitimate possibilities are defined.
Using The pgmtest.c Demonstration Program
Download the pgmtest.hex to your device using the methods learned in the earlier Smiley’s Workshop(s) for that device. Notice that in Figure 5 the first two lines in the Receive window are in plain text, while the third line is a list of hexadecimal characters. To get Bray’s to show the data this way, you have to set the Receive window checkbox to ASCII when the pgmtest first opens; then you set it to HEX before you send the ‘R’ from the send window. This will show you the two strings and the line of hex code discussed above.

FIGURE 5. pgmtest using Bray’s Terminal.
In this episode, we looked at AVR memory principles and applied those principles to software that can run on one of three development platforms: the AVR Butterfly, the Arduino, and the BeAVR40. If you want to learn more using the Butterfly or the Arduino, you can get a book and projects kit from the Nuts & Volts shop. Next time, we will apply what we’ve learned about AVR memory to begin learning how to write our own bootloader. NV
Downloads
Smiley’s Workshop 25 source code.zip