Long-time readers of Nuts & Volts may recall that I have covered Internet radio topics a couple of times in the past. My first build was based on a repurposed Wi-Fi router and was described in the article, "Build Your Own Wi-Fi Internet Radio" in the March 2012 issue. With the arrival of the Raspberry Pi (RPi), I updated (and simplified) my approach and documented that in the article, "More Raspberry Pi Anyone?" in the August 2013 issue. These systems have served me well over the past few years, but when I stumbled across the Pi MusicBox software for the Raspberry Pi, I knew I had to revisit this again. The Pi MusicBox software combined with a RPi (B+ or Pi 2 B) makes for an incredibly flexible music system. I truly cannot envision a system much more flexible than this.
The Pi MusicBox software running on the RPi provides the following features:
- Remote control using a web interface from any browser on any device or by using an MPD client app like MPDroid for Android.
- A headless audio player for streaming music from Spotify, SoundCloud, Google Music, and Podcasts (with iTunes, gPodder directories), local and networked music files (MP3/OGG/FLAC/AAC), and Web/Internet radio (with TuneIn, Dirble, AudioAddict, Soma FM, and Subsonic).
- Includes AirTunes/AirPlay and DLNA/OpenHome for streaming from a phone, tablet (iOS and Android), or PC using software like BubbleUPnP.
- Flexible USB audio support for all kinds of USB sound modules including generic (like I used here), HifiBerry (DAC/Digi/AMP/+), IQ Audio, etc., for higher end audiophile applications.
- Can play music files from the RPi's SD card, from an attached USB Flash or USB hard drive, and over a local area network (LAN).
- Wi-Fi support for Raspbian (the officially recommended RPi operating system software) supported Wi-Fi adapters.
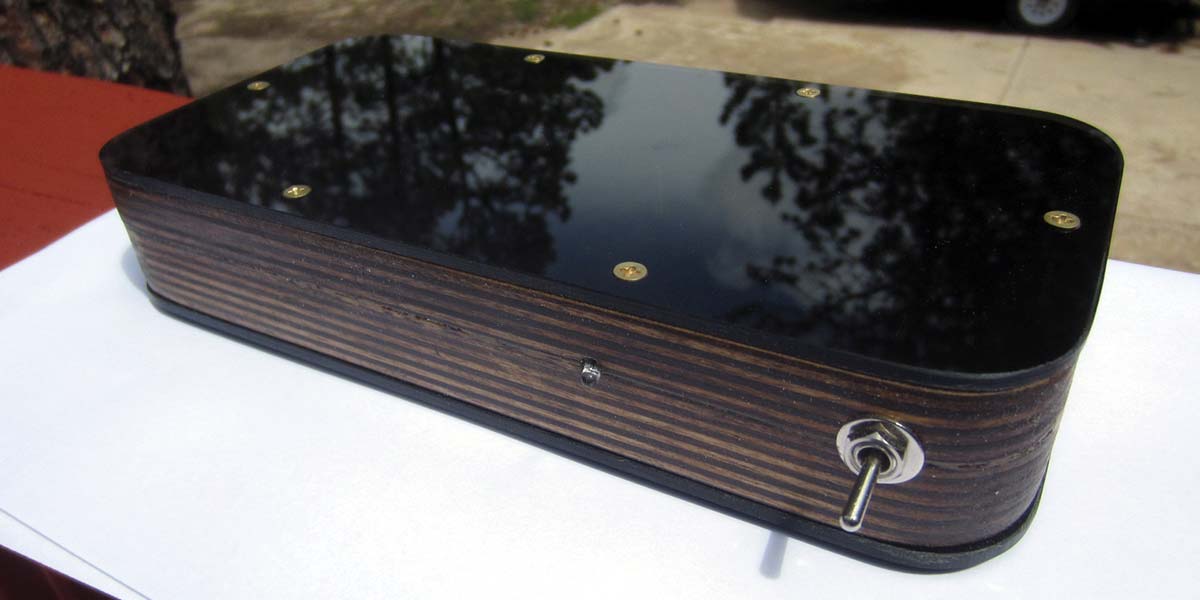
The music player system I’ll describe in this article (refer to lead photo) is like having a Wi-Fi remote-controllable iPod that also plays 100s of Internet radio stations, and can play music from many streaming services. I have over 500 digitized CDs online, and this system plays them flawlessly. In fact, I copied my entire iTunes music library onto a 64 GB USB Flash drive that I included in my new MusicBox player system and away I went.
The project itself is relatively simple to build with the packaging being the hardest part. If you look around for deals, you can build this music player system for around $80. You will need a stereo system to plug into, however, as the build I describe here does not include amplifiers or speakers.
Finally, even though Pi MusicBox software is hosted on the Raspbian version of Linux used on the RPi, there is no requirement for using the Linux command line during installation or normal operation. A Parts List for the music player for the configuration I built is shown in Figure 1. The schematic is shown in Figure 2.
| PART DESCRIPTION |
PART NUMBER |
SOURCE |
| Raspberry Pi Model B+ or Raspberry Pi 2 Model B |
83-16317 or 83-16530 |
mcmelectronics.com |
| MicroSD Card 2 GB or larger |
83-11235 |
mcmelectronics.com |
| USB Audio Adapter |
Syba SD-CM-UAUD USB
Stereo Audio Adapter |
amazon.com |
| USB Wi-Fi Adapter |
Miniature Wi-Fi (802.11b/g/n)
Module ID: 814 |
adafruit.com |
| USB 64 GB Flash Drive |
PNY Attaché 64 GB USB 2.0
Flash Drive — P-FD64GATT03-GE |
amazon.com |
| Male Micro USB Connector |
Micro USB Type A
Male five-pin Connector |
amazon.com |
| Power Switch |
Any switch you would like to use |
|
| Power Indicator LED |
Any color and/or size
(I used a color changing RGB LED.) |
|
| 1K ohm 1/4 watt Resistor |
|
|
| USB Cable (minimum three foot length) |
83-14274 |
mcmelectronics.com |
| USB Power Adapter 2 amps @ 5 volts |
28-19300 |
mcmelectronics.com |
| Audio Cable |
Stereo cable for connecting USB audio module to your stereo system |
|
| 250 µF @ 25 volts or greater Filter Capacitor |
|
|
| .1 µF Capacitor |
|
|
| Wire, solder, baltic birch plywood, smoked plastic sheeting, wood screws, and other misc. hardware |
FIGURE 1. Parts List.
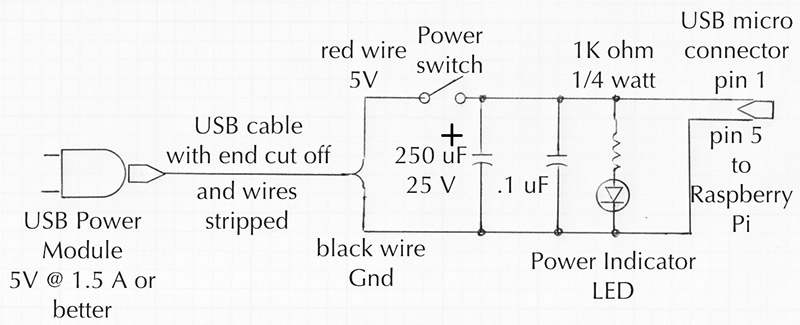
FIGURE 2. Music player schematic.
Software Preparation and Configuration
For this part of the process, you will need a computer system that is capable of writing to a microSD card (2 GB minimum size), and that is connected to the Internet and able to download files.
The first item of business is to download the Pi MusicBox software from www.pimusicbox.com. This is a rather large file, so it will take some time to download. Once downloaded, unzip the file to get the file “musicbox0.6.img” contained within. This is the operating system's image file that must be transferred to the microSD card. How this is done depends on the computer system you are using. For instructions on how to do this on your computer, go to http://elinux.org/RPi_Easy_SD_Card_Setup.
The Pi MusicBox software uses a file named settings.ini for all of its configuration settings. The file is structured as a Windows ini file where all lines starting with a # are comments. Comments within the configuration file describe each configurable item, so read the comments carefully. Some configuration lines are commented out by default, so if you want to use them, remove the # at the beginning of the line.
Once the Pi MusicBox software is operational, you can manipulate the configuration settings online through the web interface. It is also possible to enable SSH in the Pi MusicBox software so the configuration file can be accessed and manipulated remotely by logging into the RPi (default username: root; password: musicbox) and using an editor like Nano or Vi to edit the configuration file. At runtime, the configuration file can be found at /boot/config/settings.ini.
You can also edit the Pi MusicBox settings file directly on the SD memory card before the card is inserted into the RPi. To do this, put the SD card into your computer and open the contents of the file /config/settings.ini with your favorite text editor.
Most of the configuration items are set to reasonable initial values, but some must be tailored to your specific environment. At a minimum, the following two items must be set:
wifi_network = your_wifi_<br />
  networks_SSID<br />
wifi_password = your_wifi_<br />
  networks_password
Set the wifi_network value to the SSID of your Wi-Fi network and set the wifi_password entry to the password of your Wi-Fi network.
Since I like to be able to remotely log in to the RPi in the music player, I always enable SSH (Secure Shell) as follows:
enable_ssh = true
Pi MusicBox must scan local and networked music files before they will be selectable in the web user interface. Scanning can take a long time if there are a lot of music files to process. If your music library is very dynamic, uncomment the scan_always entry which will cause a rescan every time your music device is powered up. If your music library is relatively static, set scan_once to true:
scan_once = false<br />
#scan_always = true
Then, when the Pi MusicBox software runs, it will scan your music library once and then reset scan_once to false automatically. If you add new music to your library, set scan_once to true again and reboot.
Hardware Configuration
In my music player, I used a 64 GB USB Flash drive for holding my complete music library. As mentioned, I copied my entire iTunes music directory to this device so I would have local access to all of my digitized music. Before doing this, however, I had to reformat the Flash drive into plain FAT32 format. This was necessary because the Flash drive I used came formatted as exFAT which the Pi MusicBox software does not support natively.
Once I had formatted the Flash drive, it was an easy — but long — process to copy the music files (33 GB total). Once you are finished with copying, make sure to properly eject the USB Flash drive so as not to corrupt it accidentally when you unplug it from your computer.
Music Player Packaging
How one packages a device such as this music player is a matter of personal choice, taste, and budget. When I started thinking about how I would do it, I looked around my shop and found some leftover baltic birch (BB) plywood and some 1/8” black translucent sheet plastic/acrylic that I had from past projects.
So, that is what I decided to use. I will describe what I did in the hope it will be helpful at least for a starting point in whatever you do if you decide to build a music player for yourself. Note if you use a different USB sound module than I did you may have to alter the dimensions given in the discussion that follows.
First thing I did was to figure out the size of the enclosure I needed to build to house all of the components: RPi, Flash drive, USB sound module, etc. So, I plugged all of the components together and with a ruler determined the minimum volume necessary.
I decided the internal dimensions had to be at least 2-1/2” deep by 6” wide and 1-1/8” tall. Past experience told me it was not a good idea to try and minimize the enclosure size, so I decided on slightly larger internal dimensions of 3” deep by 7” wide and 1-1/4” tall. This size would allow me to easily fit all of the required components.
Next, I decided that the enclosure I was to make from BB would need to have at least a 1/2” thick border to make it structurally rigid. So, the outside dimension of the enclosure would be 8” by 4”. To achieve the desired height, I would need to glue 3/4” and 1/2” pieces of the BB plywood together. With that decided, I made a template out of 1/4” MDF that was 8” by 4”. I rounded the corners of the template for a more sleek look (IMHO). I marked the template with an arrow to indicate the top front side.
On my router table, I set up a flush cutting bit with a bearing on the bottom that would ride on the template and allow me to cut the BB and the plastic sheeting to the exact dimensions I needed. Using the template guaranteed each piece would be exactly the same.
I rough-cut the two BB pieces and the two black plastic sheets into rectangles that were 1/8” larger in each dimension than the template. I marked each piece with an arrow which would indicate the front of the piece, and I made sure the arrows on the template and the arrows on each piece were aligned before machining.
I used double-sided template tape to secure each piece to be routed to the template. With this done, routing each piece took only a couple of minutes.
I set aside the plastic pieces and glued the two BB pieces together, making sure the arrows were pointing in the same direction. After gluing, I measured in 1/2” from each side of the piece to delineate where the internal cavity would be. I then used a 3/4” spade drill bit to drill out each corner. Finally, I used a jig saw to cut along the lines to hollow out the internal cavity.
Next, I drilled holes for the power switch and the LED power indicator, and milled slots in the back for the audio cable and the USB power cable. Additional milling was also required for mounting the power switch (as can be seen in the photos). After a bunch of sanding, the result is shown in Photo 1. I finished up by staining the BB with a dark walnut stain.
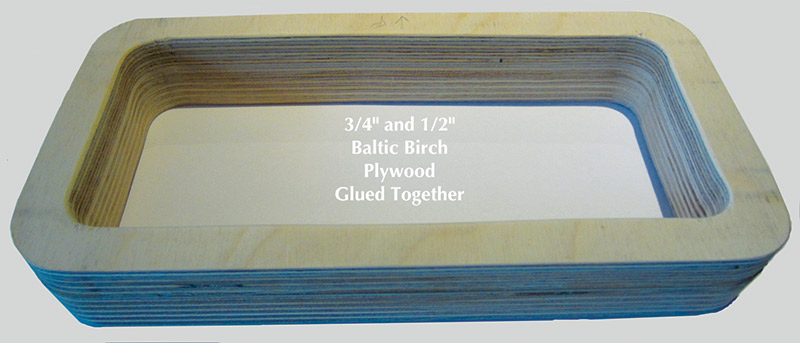
PHOTO 1. Case/enclosure during construction.
I then turned my attention to the top and bottom smoked plastic pieces. First, I used some 120 grit sandpaper to soften the edges of the plastic because they were very sharp as a result of the milling.
Machining the top was easy as I only needed to locate holes for the six flat head brass wood screws which would hold it on. I countersunk the screws so the heads would be flush with the surface of the plastic.
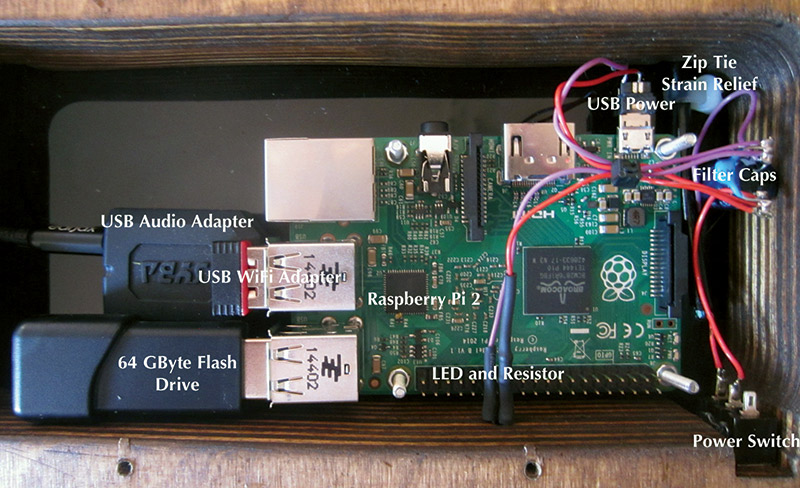
PHOTO 2. Internal view of the music player.
The bottom is just a little more complex because in addition to the mounting screws (which were done identically to the top), I had to drill holes to mount the RPi. Four 4-40 by 1” machine screws, 1/8” spacers, and nuts were used to mount the RPi.
With all of the machining and staining completed, I mounted the RPi onto the bottom plastic piece, glued a color changing RGB LED power indicator into place, mounted the power switch, inserted the 2 GB microSD card I had prepared previously, and then screwed the bottom assembly onto the enclosure. I attached four cork adhesive pads to the bottom as feet to protect whatever surface the music player was set upon.
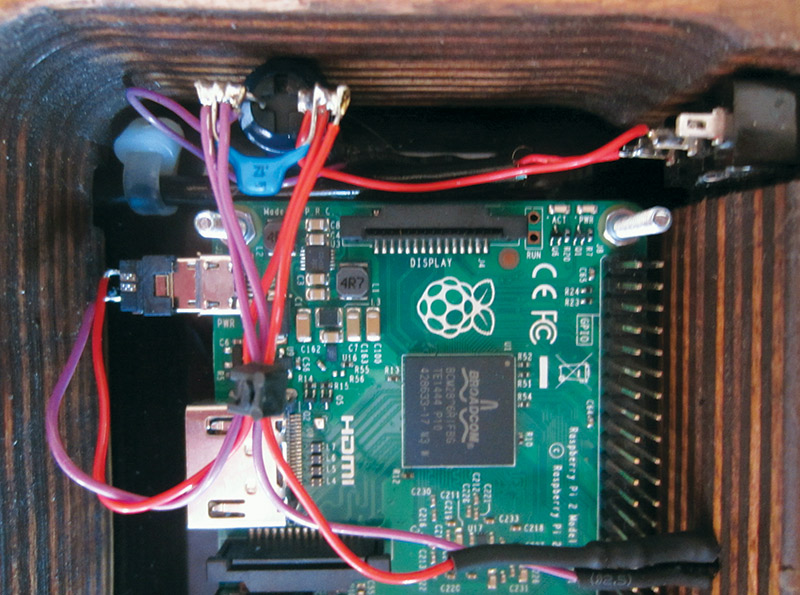
PHOTO 3. Music player wiring closeup; 250 µF capacitor is glued to the plastic bottom and supports all of the wiring.
Wiring was performed according to the simple schematic shown in Figure 2. I super-glued the electrolytic capacitor to the bottom plastic (noting polarity) and wired up the power connections, including the modified USB cable used for power.
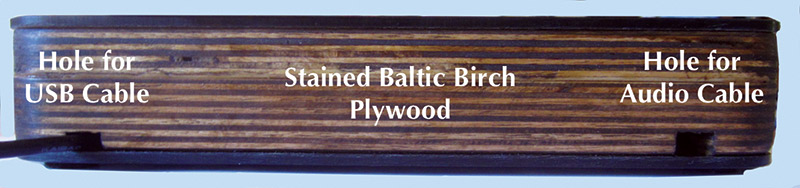
PHOTO 4. Rear view.
With the wiring completed, I plugged an audio cable into the USB sound module, connected up my USB power module, and then put the top into place and screwed it down. Assembly was now complete and the player was looking good.
Flipping on the power switch caused the rainbow power indicator to light, and I could see the RPi's power and activity indicators flashing through the translucent plastic, indicating the RPi was booting.
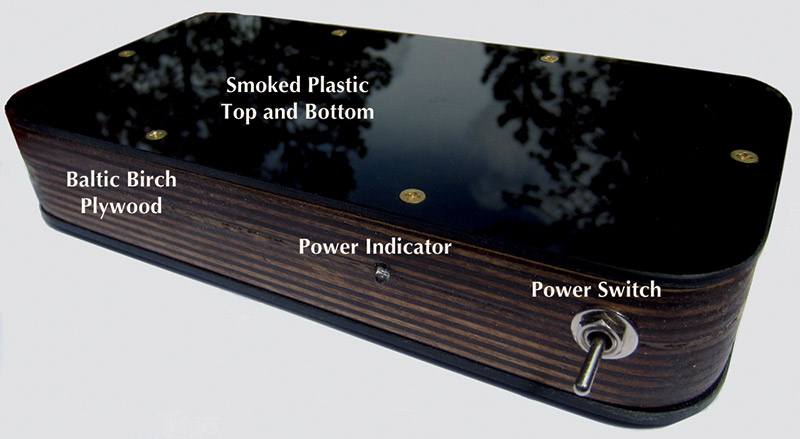
PHOTO 5. Components labeled.
Using the Music Player
Booting the music player takes a couple of minutes. During that time, there will be numerous clicks and pops sent out the audio connection, so it is best to allow the player to boot completely before turning on or turning up your connected stereo system. I always wait until I can access the player with a web browser before turning on my stereo.
Once the player is up, you can access it by typing “musicbox.local” or by typing the IP address your home router assigned into your browser’s address bar. Once connected, you should see a screen like Figure 3.

FIGURE 3. Pi MusicBox Main Screen.
By clicking the Browse tab (Figure 4), you can navigate to either your local music collection, your networked music collection, select one of the many streaming sources, or select from a vast array of Internet radio stations via TuneIn, for example.
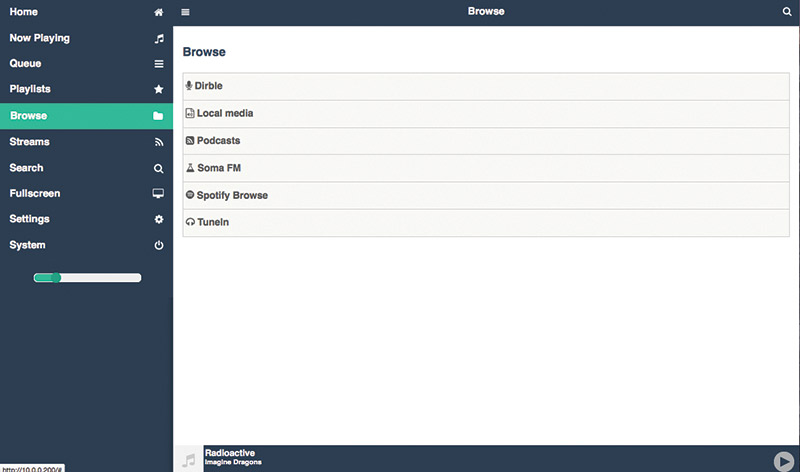
FIGURE 4. Pi MusicBox Browse Screen.
From the web user interface, you can control volume and selection of what music you want to hear. You can also control if the music should be played in a loop, and whether songs should be played sequentially or in random order.
Music in the Back Country
My wife and I have a little retreat we often visit that has no cell phone service or Internet. It does, however, have electricity. We have a small stereo system that we hook an iPod to that provides music for us while we are visiting.
This has worked fine, but it is somewhat inconvenient in that we cannot control the music selection or volume from a different room. We have since replaced the iPod with this music player and it works great.
To do this, however, I had to modify the software running on the RPi to support an Ad-Hoc network. What this means is the Music Player creates its own Wi-Fi network, allowing another Wi-Fi enabled device to connect to it wirelessly. Configuring an Ad-Hoc network is beyond the scope of this discussion, but for those interested, the information I used is available at http://lcdev.dk/2012/11/18/raspberry-pi-tutorial-connect-to-wifi-or-create-an-encrypted-dhcp-enabled-ad-hoc-network-as-fallback.
With an Ad-Hoc network set up, I can use my iPod Touch's browser to control the music player. Note: Since there is no Internet available, I cannot listen to Internet radio stations. However, with over 500 CDs available on the 64 GB Flash drive built into the device, I never lack for music. Why not build one of these music players for yourself? NV
Resources
The following websites have information pertinent to this discussion:
Developer of the Pi MusicBox software
www.woutervanwijk.nl
Forum for users of the Pi MusicBox software
https://discuss.mopidy.com/c/pi-musicbox.
List of FAQs about the Pi MusicBox
https://github.com/pimusicbox/pimusicbox/blob/master/docs/faq.rst.
Pi MusicBox manual
https://github.com/pimusicbox/pimusicbox/releases/download/v0.7.0RC5/PiMusicBox.pdf