Previous issues of Nuts & Volts introduced the Mentor’s Friend: a retro computer that you can build yourself and program in BASIC. The “Amigo” was designed as a home-built mentoring platform you and your child or grandchild can use together to explore computers and programming. Here are five more easy Amigo projects for you and a young protégé. These have been selected to continue a hands-on introduction to Color BASIC, while preserving the necessary ingredient of “fun.” Enjoy!
1. TYPE-IT.BAS.
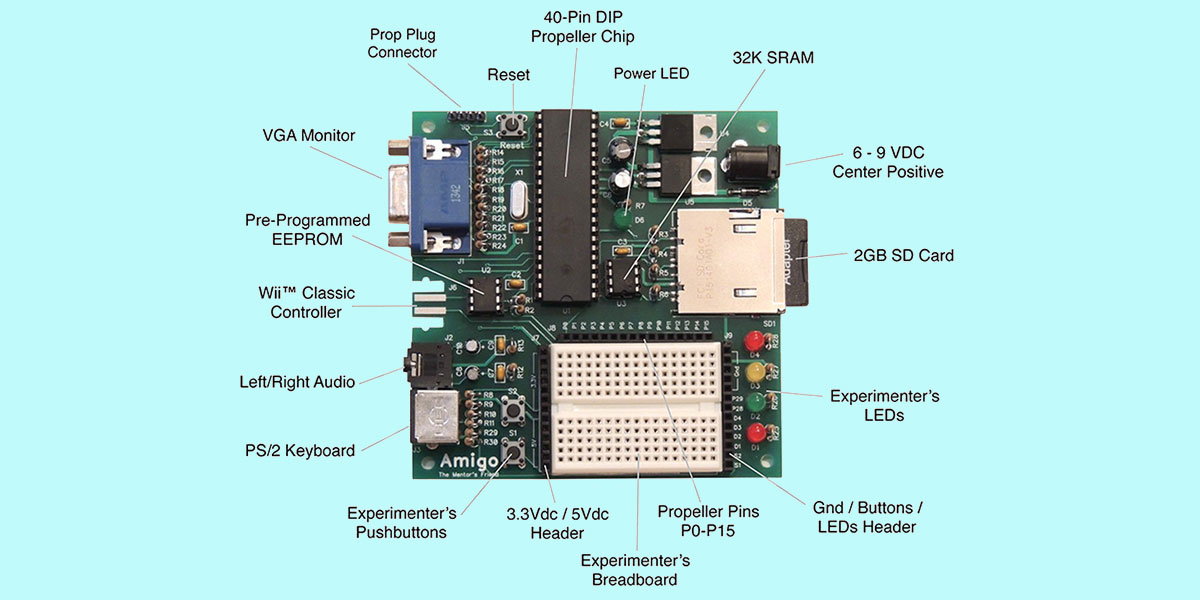
One of the first things my grandkids wanted to do with their retro computers was just type text on the screen. This helped their keyboarding skills, and more importantly it got them spending a little “alone time” with their new computer friend. Here’s a program that displays keystrokes on the monitor, with the bonus of changing the text colors as needed (Figure 1).
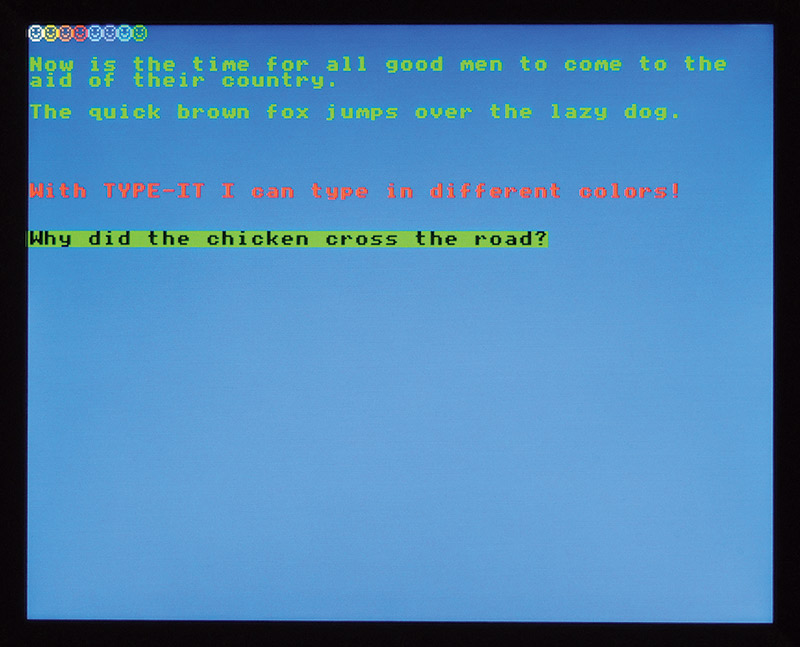
FIGURE 1. It’s surprising how engaging a simple keyboard and monitor can be.
Use the Editor (press <F1> at the flashing cursor) to enter the code below. Take your time! This is a “real” program, and there’s a bit to it. If you’re working with a young one, you may ask him or her to help by entering all the lines with a COLOR command, or some similar division of labor to keep them engaged. Take a couple of breaks if needed — don’t let the tedium of code entry destroy the fun of the adventure!
Once you’re done, press <F1> again to return to Color BASIC, then <Esc> to interrupt program flow. SAVE the code as “TYPE-IT.BAS,” then RUN the program through its various features and functions to find and correct any typos. (You’re very special — or very lucky — if you have none!) Don’t forget to SAVE again after your corrections. This is a lot of keyboard work, and you want to protect your investment.
Here’s the code to enter:
10 REM *** TYPE-IT.BAS ***<br />
20 REM —- Initialize Things —-<br />
30 f=63: b=22: c=22   REM <- White on Blue Text<br />
40 REDEFINE 123,255,129,129,153,153,129,129,255<br />
42 REDEFINE 125,60,66,165,129,165,153,66,60<br />
50 REM —- Print Initial Screen —-<br />
60 COLOR f,b<br />
70 GOSUB 1000<br />
80 REM —- Start Main Loop —-<br />
90 k=INKEY<br />
100 IF k=0 THEN GOTO 90<br />
105 COLOR f,b<br />
110 REM —- Check for Function Key —-<br />
120 IF k<208 OR k>213 THEN GOTO 150<br />
130 GOSUB (k-207)*1000   REM <- Execute Command<br />
140 GOTO 90<br />
150 REM —- Check For Backspace First —-<br />
160 IF k=200 THEN DISPLAY 8,32,8: GOTO 90<br />
170 REM —- Print Character —-<br />
180 DISPLAY k<br />
190 GOTO 90<br />
200 REM —- End of Main Loop —-<br />
999 END<br />
1000 REM —- Print Commands Screen —-<br />
1005 GOSUB 2000<br />
1010 LOCATE 5,1: PRINT “>>> TYPE-IT Commands<br />
     <<<”<br />
1015 LOCATE 3,3: PRINT “F1 - Show This Screen”<br />
1020 LOCATE 3,5: PRINT “F2 - Clear The Screen”<br />
1025 LOCATE 3,7: PRINT “F3 - Change Text Color<br />
     (Arrow Keys, Then Enter)”<br />
1030 LOCATE 3,9: PRINT “F4 - Change Screen<br />
     Color”<br />
1035 LOCATE 3,11: PRINT “F5 - Print Smiley”<br />
1040 LOCATE 3,13: PRINT “F6 - Quit Program”<br />
1045 LOCATE 3,17: PRINT “>>> Press Any Key To<br />
     Continue...”<br />
1050 IF INKEY =0 THEN GOTO 1050<br />
1055 GOSUB 2000<br />
1095 RETURN<br />
2000 REM —- Clear The Screen —-<br />
2005 COLOR c,c<br />
2010 CLS<br />
2015 COLOR f,b<br />
2095 RETURN<br />
3000 REM —- Change Text Color —-<br />
3005 DISPLAY 123<br />
3010 u=INKEY : IF u=0 THEN GOTO 3010<br />
3015 IF u=192 AND f>0 THEN f=f-1<br />
3020 IF u=193 AND f<63 THEN f=f+1<br />
3025 IF u=194 AND b<63 THEN b=b+1
3030 IF u=195 AND b>0 THEN b=b-1<br />
3035 COLOR f,b<br />
3040 DISPLAY 8,32,8<br />
3045 IF u<>13 THEN GOTO 3005<br />
3095 RETURN<br />
4000 REM —- Change Screen Color —-<br />
4005 COLOR 63,0<br />
4010 CLS<br />
4015 FOR n=0 TO 63<br />
4020 COLOR n,0<br />
4025 PRINT n,<br />
4030 NEXT n<br />
4035 LOCATE 3,15: INPUT “New Screen Color? “;c<br />
4040 GOSUB 2000<br />
4095 RETURN<br />
5000 REM —- Print Smiley —-<br />
5005 DISPLAY 125<br />
5095 RETURN<br />
6000 REM —- Quit Program —-<br />
6005 CLS<br />
6010 LOCATE 16,16: PRINT “Quit Program (Y/N)?”<br />
6015 u=INKEY : IF u=0 THEN GOTO 6015<br />
6020 IF u<>”y” AND u<>”Y” THEN GOTO 60<br />
6025 REM <- Reset Redefined Characters -<br />
6030 REDEFINE 123,7,12,12,120,12,12,7,0<br />
6032 REDEFINE 125,112,24,24,15,24,24,112,0<br />
6040 REM <- Reset Screen, Print Prompt, and<br />
     End -<br />
6045 COLOR 63,22<br />
6050 CLS<br />
6055 PRINT “READY”<br />
6060 END<br />
6095 RETURN
Once everything is working, you should have a little program that presents an instruction menu for function keys F1 through F6. It then allows your “student” to type text in various colors on a screen color of their choice, clearing the screen, changing colors, or printing a smiley as needed. It may seem unexciting at first (no animation, no multi-gesture swiping, etc.), but my grandkids seemed to truly enjoy typing their own little jokes and short stories with a real keyboard and screen.
If you’ve worked through the Color BASIC projects in previous issues of this magazine, most of the code in this program should make sense on your first read-through. However, this project is probably close to some that you will build later on, so a general walk-through of the code may be in order.
The program is divided into modules, delineated with REM statements. It consists of a main loop to capture and process keyboard inputs, preceded by some necessary initialization, and followed by a series of subroutines that perform desired program features. Here’s what’s going on in each module:
- Lines 10 - 42 initialize the text foreground (f), text background (b), and screen (c) color variables to white on blue, then REDEFINE the right and left brace keys (ASCII 125 and 123) to a smiley and a purpose-built character for changing f and b.
- Lines 50 - 70 set the text colors and call the Print Commands Screen subroutine at Lines 1000 - 1095. Like any subroutine in Color BASIC, program flow jumps from the calling GOSUB (in this case, Line 70) to the specified line number (Line 1000), then from the RETURN (Line 1095) back to the line following the GOSUB (Line 80).
- Lines 80 - 200 comprise the main loop of the program, which converts keystrokes into program commands or characters on the screen. Lines 110 - 140 check for Function Keys 1 (ASCII 208) through 6 (ASCII 213). If these are not found, program execution continues at Line 150. If F1 through F6 is presented, Line 130 sends program flow to the appropriate subroutine. Then, Line 140 jumps to the top of the loop for another keystroke. Note the use of the expression (k-207)*1000 in Line 130 to select the proper subroutine. In Color BASIC, both GOTO and GOSUB can use expressions like this, as well as explicit line numbers.
- Lines 150 - 160 provide the program with an important capability: the ability to backspace to correct errors. If the keystroke is a <Backspace> (ASCII 200), Line 160 displays an ASCII 8 (move the cursor back one space), an ASCII 32 (print a space over the current character), and an ASCII 8 (move the cursor back one space again). This is a bit confusing at first, but it makes sense after you think about it. After eliminating the offending character, program flow jumps back to get another keystroke.
- Lines 170 - 190 print the character glyph of any remaining keystroke value, then goes back for another keystroke. This process continues until the program is ended by the F6 command.
- Now, let’s take a look at the subroutines. Lines 1000 - 1095 print the commands screen, which lists the active function keys and the function each performs. Note the use of GOSUBs in Lines 1005 and 1055 to avoid duplicating code. (Subroutines can “nest” one inside another five deep in Color BASIC.) The strange numbering on Line 1095 and the other RETURN statements are there because I first put a program “stub” in for each subroutine when developing my code — just the REM statement label and the ending RETURN statement. This lets me set up and check my program framework first, and then build (and improve) the functional modules after program flow has been validated.
- Lines 2000 - 2095 clear the screen in the screen color c, then set the text colors back to f and b.
- Lines 3000 - 3095 display a change-text-colors indicator (a rectangle containing a dot) in the current colors, then allow the user to change colors with the arrow keys, pressing <Enter> to return to typing mode. The left and right arrows (ASCII 192 and193) decrement or increment f; up and down (ASCII 194 and 195) increment or decrement b. After setting the text colors to the new value and backspacing over the change-color indicator, program flow loops to the top of the routine unless the <Enter> key (ASCII 13) has been pressed. This design has less user prompting than I like, but doesn’t require us to separately track the cursor in our code.
- Lines 4000 - 4095 erase the current screen, present the color value set in the assigned colors, and prompt the user to select a new color. Note that in the call to the clear-the-screen subroutine in Line 4040, all variables are shared among subroutines in Color BASIC. So, the value of c set in Line 4035 is available to Line 2005 without any explicit passing of variables.
- Lines 5000 - 5095 simply print a smiley at the current cursor location, in the current foreground and background text colors.
- Lines 6000 - 6095 end the program, first getting user confirmation, then resetting the redefined characters and screen color, then clearing the screen and printing a READY prompt. The RETURN in Line 6095 is never executed, but left in there for consistency.
You should find it fairly straightforward to add features to this code that you and your protégé come up with — more emoticon function keys is a good place to start. If you haven’t done so yet, check out the REDEFINE.BAS program that ships with the Amigo kit (available through the Nuts & Volts webstore). It should help with developing REDEFINE statements for any new glyphs you implement. Also, please consider using TYPE-IT.BAS as a starting point for similar programs you build, perhaps with a completely different topic.
Just LOAD “TYPE-IT.BAS,” SAVE it with the name of your new program, then open the Editor and start hacking the code. Have fun, and don’t forget to save your work!
2. JOY.BAS.
If you have a Wii™ Classic Controller (not the nunchuck), you can use it with your Amigo to increase the number of fun things your programs can do. The secret is the Color BASIC JOY command, which works like INKEY, but for the controller buttons instead of keyboard keys.
Enter the code below, then SAVE it as “JOY.BAS” to explore this neat command:
10 REM *** JOY.BAS ***<br />
20 COLOR 63,22<br />
30 CLS<br />
40 LOCATE 10,0: PRINT “>>>  Wii Controller<br />
     Values <<<”<br />
50 LOCATE 1,2: PRINT “Press Any Button, or<br />
     SELECT+HOME to Return…”<br />
60 REM —- Get Button Push —-<br />
70 A=JOY<br />
80 IF A=0 THEN GOTO 70  REM <- No Button Pressed<br />
90 REM —- Show Value —-<br />
100 LOCATE 18,18: PRINT “JOY = “;<br />
110 PRINT A,<br />
140 REM —- Again? —-<br />
150 IF A<>12 THEN GOTO 70  REM <- SELECT+HOME?<br />
160 CLS: END
Now, connect your controller to the Amigo (the indented side of the connector should face up) and RUN the program. In addition to the title and simple instructions, you should see the non-zero value returned by the JOY command when you press any button.
If the program doesn’t seem to work when you first run it, check your cable connector (indented side up!), then reboot your system (press the reset button, or type REBOOT at the flashing cursor prompt). That should get you in business (Figure 2).
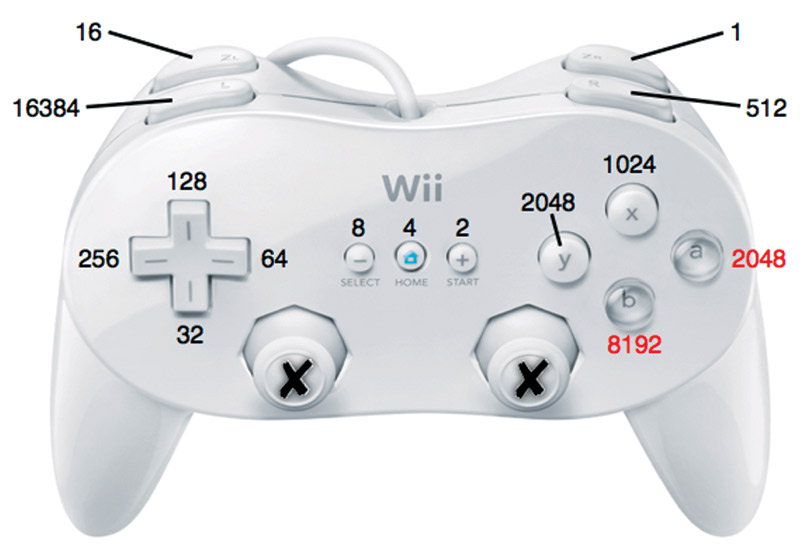
FIGURE 2. The Wii™ classic controller, showing values for each button. Note that Color BASIC does not recognize the joysticks, just buttons.
You should notice that the JOY command returns the value of any button pressed, or zero if no button is pressed. (See Figure 2 for the numbers Color BASIC assigns to each button.) Also note that when two or more buttons are pressed at the same time, JOY returns the sum of their assigned values. The a and b buttons always override any other buttons, with a always taking priority over b. Also note that Color BASIC does not recognize the joysticks on the Wii controller — just the buttons — and the controller must be connected to the Amigo before the system is started.
3. DRAW.BAS.
If you do have a Wii controller, here’s a simple program snippet to make use of the JOY command. Enter this code, save it as “DRAW.BAS,” then use the controller buttons to drive a little square around on the screen:
10 REM *** DRAW.BAS ***<br />
20 COLOR 63,0<br />
30 CLS<br />
40 c=22 REM <- Color (0 to 63)<br />
50 x=49 REM <- Graphics Column (0 to 99)<br />
60 y=37 REM <- Graphics Row (0 to 74)<br />
70 REM —- Get Button Push, Update Parameters —-<br />
80 IF JOY=64 AND x<99 THEN x=x+1<br />
90 IF JOY=256 AND x>0 THEN x=x-1<br />
100 IF JOY=128 AND y<74 THEN y=y+1<br />
110 IF JOY=32 AND y>0 THEN y=y-1<br />
120 IF JOY=2048 THEN C=C+1<br />
130 REM —- Plot Point —-<br />
140 PLOT x,y,c<br />
150 GOTO 80
The Color BASIC screen has 100 graphics columns, numbered 0 to 99, and 75 graphics rows, numbered 0 to 74. The PLOT command has the syntax PLOT <column>, <row>, <color>; this code simply uses button values from the controller to update where a graphics point is plotted and in what color. The result is a maze of brightly colored lines on a black screen. Like our previous typing program, at first glance this does not seem very exciting, but it’s surprisingly engaging to young ones — at least until the new wears off (Figure 3).
FIGURE 3. Using the Wii™ classic controller with DRAW.BAS. The colors are much more vivid than those in this photo.
If your youngster is intrigued by this little bit of code, here’s a challenge from me to you; Use the main loop in this code snippet to rewrite TYPE-IT.BAS into DRAW-IT.BAS. Include controller buttons for a commands screen, changing cursor and screen colors, clearing the screen, printing a smiley, typing a text snippet, and any other features your helper might want. I bet you’ll find this easier than you think, and it should be a great joint project!
4. TIMES.BAS
Here’s another “real” program to help with multiplication practice (if your student is still at that stage of his/her schooling). It’s old school — not common core — but perhaps it will be helpful, and it may be something your helper can customize for a younger brother or sister. Enter this code, and save it as “TIMES.BAS:”
10 REM *** TIMES.BAS ***<br />
20 COLOR 63,22<br />
30 CLS<br />
40 LOCATE 14,1: PRINT “~~~ Math Practice ~~~ “<br />
50 REM —- Get Practice Range —-<br />
60 LOCATE 3,3: INPUT “First Number Low, High?<br />
     “;c,d<br />
70 LOCATE 3,5: INPUT “Second Number Low, High?<br />
     “;e,f<br />
80 LOCATE 3,8: PRINT “Press Any Key to Begin...”<br />
85 REM —- Randomize RNG —-<br />
90 u=INKEY<br />
100 v=RND (10)<br />
110 IF u=0 THEN GOTO 90<br />
115 REM —- Main Loop —-<br />
120 r=0    REM <- Correct Answers Counter<br />
130 FOR n=1 TO 10<br />
140 COLOR 63,22<br />
150 CLS<br />
160 LOCATE 14,1: PRINT “~~~ Math Practice ~~~”<br />
170 a=RND (d-c+1)+c<br />
180 b=RND (f-e+1)+e<br />
190 LOCATE 20,16: PRINT a;” X “;b;” = “;<br />
200 INPUT k<br />
210 LOCATE 20,18<br />
220 IF k=a*b THEN GOTO 270<br />
225 REM —- Incorrect Response —-<br />
230 PRINT a;” X “;b;” = “;a*b<br />
240 COLOR 20,22<br />
250 LOCATE 20,16: PRINT a;” X “;b;” = “;k<br />
260 GOTO 280<br />
265 REM —- Correct Response —-<br />
270 PRINT “Correct!”: r=r+1<br />
280 PAUSE 2000<br />
290 NEXT n<br />
295 REM —- Again? —-<br />
300 COLOR 63,22<br />
310 LOCATE 13,16: PRINT “You got “;r;” of 10<br />
     correct.”<br />
320 LOCATE 20,18: PRINT “Again? (Y/N)”<br />
330 u=INKEY<br />
340 IF u=”Y” OR u=”y” THEN GOTO 120<br />
350 IF u<>”N” AND u<>”n” THEN GOTO 330<br />
355 REM —- New Ranges? —-<br />
360 LOCATE 18,18: PRINT “New Ranges? (Y/N)”<br />
370 u=INKEY<br />
380 IF u=”Y” OR u=”y” THEN GOTO 10<br />
390 IF u<>”N” AND u<>”n” THEN GOTO 370<br />
400 CLS : PRINT “Bye! Hope you had fun!”<br />
410 END
When you run the code, you’ll be prompted to enter the low/high ranges for the multiplier and multiplicand, and then press a key to start the drill. You’ll then be presented with 10 random problems, one after another, with immediate correct/incorrect feedback after each one. You are then given the option to practice again or change the ranges.
By now in your Color BASIC journey, most of this code should be intuitive to you, but a couple of things deserve mention. Lines 85 - 110 serve to randomize the Color BASIC random number generator, which (like most software RNGs) isn’t truly “random.” Without this code, the random number stream after each program start-up will be the same, and problems presented for like ranges will appear in the same order each time. By using the “random” time it takes for the user to press a key, the RNG is set differently each time the program starts, with different problems for the same practice ranges.
Lines 170 and 180 pick the random multiplier and multiplicand for each problem, based on the ranges previously set. Note that the ranges can include zero on the lower end, and you can enter the same number for low and high if you want to practice a specific problem set, like “times sixes.”
It will be fairly simple to modify this program for addition instead of multiplication, and subtraction and division are possible with a little thought. If you get really ambitious, you could modify the framework of TYPE-IT.BAS to include all four arithmetic operations. At any rate, I hope your student enjoys this program!
5. OPERATOR.BAS.
One of the things that can be a bit confusing when learning Color BASIC is how the various arithmetic, comparison, and logical operators work. Sooner or later, you’ll bump into the limits of 32-bit integer arithmetic, or need a specific conditional test for a critical IF statement in your project. Here’s an instructive little program that lets you input two integers, and then shows you the result of each Color BASIC operation on them. Enter this code, and save it as “OPERATOR.BAS:”
10 REM ***** OPERATOR.BAS *****<br />
20 COLOR 63,22<br />
30 CLS<br />
40 LOCATE 10,1: PRINT “>>> Color BASIC Operators<br />
   <<< “<br />
50 PRINT “ “: INPUT “ > Enter Integers A,B:<br />
   “;A,B
60 PRINT “ “<br />
70 PRINT “ A = “;A;”   B = “;B<br />
80 PRINT “ “: PRINT “ —- Arithmetic Operators<br />
     —- “<br />
90 PRINT “ A+B = “;A+B<br />
100 PRINT “ A-B = “;A-B<br />
110 PRINT “ A*B = “;A*B<br />
120 PRINT “ A/B = “;A/B<br />
130 PRINT “ A//B = “;A//B<br />
140 PRINT “ “: PRINT “ —- Comparison Operators<br />
     —- “<br />
150 PRINT “ A=B = “;A=B<br />
160 PRINT “ A<B = “;A<B<br />
170 PRINT “ A>B = “;A>B<br />
180 PRINT “ A<=B = “;A<=B<br />
190 PRINT “ A>=B = “;A>=B<br />
200 PRINT “ A<>B = “;A<>B<br />
210 PRINT “ “: PRINT “ —-<br />
    Logical Operators<br />
     —- “<br />
220 PRINT “ A AND B = “;A AND<br />
    B<br />
230 PRINT “ A OR B = “;A OR B<br />
240 PRINT “ NOT A = “;NOT A<br />
250 PRINT “ NOT B = “;NOT B<br />
260 PRINT “ “: PRINT “ >>><br />
    Again (Y/N)?”<br />
270 I=INKEY<br />
280 IF I=”Y” OR I=”y” THEN<br />
    GOTO 30<br />
290 IF I=”N” OR I=”n” THEN END<br />
300 GOTO 270
When you run this program, you should see a prompt to enter two integers. When you do, the program lists the results of each Color BASIC arithmetic, comparison, and logical operation on those integers. The five arithmetic operations always return a 32-bit integer value.
The six comparison operations always return either a -1 (the comparison is TRUE) or 0 (the comparison is FALSE). The three logical operators of NOT, AND, and OR also return either a -1 or a 0 value.
Note that Color BASIC supports bitwise operators, but they will be discussed in a future article and are not covered here.
So, that completes five more easy projects for the Mentor’s Friend! I hope your Amigo and Color BASIC are bringing big smiles to you and any young helpers, and that you are starting a list of projects to tackle with this cool little platform.
Future Mentor’s Friend articles will discuss some simple (and fun!) hardware interface projects for your Amigo.
Until then, enjoy! NV
Downloads
What’s in the zip?
1 - Color Basic Source Code
What’s in the zip?
2 - Amigo Schematic, Assembly Instructions, Photo, Intro to Color Basic