Recap
You may have noticed that recently these workshops have had a split personality with a theory part on some difficult topic in C, and then a lab part with some sort of related hardware project with shiny lights (ohhh ... s-h-i-n-e-y!). We will continue this for a while until we complete these difficult (but important) C topics. In our last episode, we had some fun with the simple chaser lights board and we had less fun (maybe even some pain) with an introduction to C pointers. So, this time, we're going to have some fun by expanding our chaser lights into a movie theater style marquee frame (Figure 1), and we are going a little deeper with C pointers.
FIGURE 1. DIY marquee frame mockup.
Introducing Some Hard Stuff
We are getting into some C programming concepts that novices find most difficult to get their heads around. These include pointers, arrays, enums, unions, and structures. While these can be difficult at first, they are so important to using C to its fullest power that I encourage you to stick with it for the next several episodes while I do my best to make these concepts comprehensible. I am going to use a lot of repetition in these discussions — going at things from different angles and over-explaining things to such a degree that some readers may lament my overkill approach, while others may find that they really needed to see the same thing from different angles in order to finally get it.
I will also be adding another duplication. I am going to use both the standard Atmel AVR programming tools — AVRStudio, avrlibc, and avrdude — and I’m going to show the same concepts with a free PC based C tool: Pelles C. By seeing these concepts on two different systems, I’m hoping that this will further reinforce your learning. If you have been following my discussions of C so far (and continue to follow them for the next several episodes), you may then consider that you have had a good solid introduction to the C programming language.
‘Best’ Way to Learn About C Pointers, Arrays, Structures, Etc. ...
I once got into an argument with a bunch of folks on AVRFreaks about the best way to start learning C. There were about 10 folks involved with at least 20 different opinions. I asserted that since the novice was going to be using C in the AVR on some sort of embedded system, then that embedded system would be the best platform to start with. Several other folks argued that starting on a PC with the easier user interface was a better idea since it gave immediate feedback. I poo-pooed that stating that using C on a PC in the 21st century was stupid since almost nothing on a Windows PC is written in C anymore. And bla bla bark bark ... the argument finally petered out with no consensus.
Well, I’ve changed my mind. Some C techniques are pretty hard to learn, and having the extra hassle of an AVR development system to deal with can distract people from learning the C syntax. For instance, I was trying to refresh my recollections on how to pass a two-dimensional array to a function in C and after a couple of passes at it using my BreadboArduino, I got frustrated not knowing if there was a hardware problem on the breadboard, a software problem with AVRStudio, or a wetware problem with my brain. So, I got out Pelles C and ran a few quick tests and figured out the correct way to do things in C before applying that correctness to the rats nest of my breadboard. (Yes, it was a wetware problem.) I figured if I am going to use it to make my life easier, then it is only fair to suggest you do likewise.
You can get Pelles C at www.smorgasbordet.com/pellesc. It is free, and once you figure out how to enlarge the print to a readable size, it is very easy to use [Tools\Options\Source\Fonts\Size]. So, for the discussion on further introducing pointers, let’s start with Pelles C. [BTW, we were first introduced to Pelles C in Smiley’s Workshop 23: AVR Memory Part 1, Introduction in the June ‘10 issue — some of which is repeated here so you don’t have to dig it out.]
Using Pelles C
The book C Programming Language by Brian W. Kernighan and Dennis M. Ritchie starts with the classic ‘hello, world’ program:
#include <stdio.h>
main()<br />
{<br />
    printf(“hello, world\n”);<br />
}
Interestingly, Pelles C has a wizard application that creates a version of this program as a template for writing other programs.
Open Pelles C (Figure 2), click on the File menu, and select New\Project.
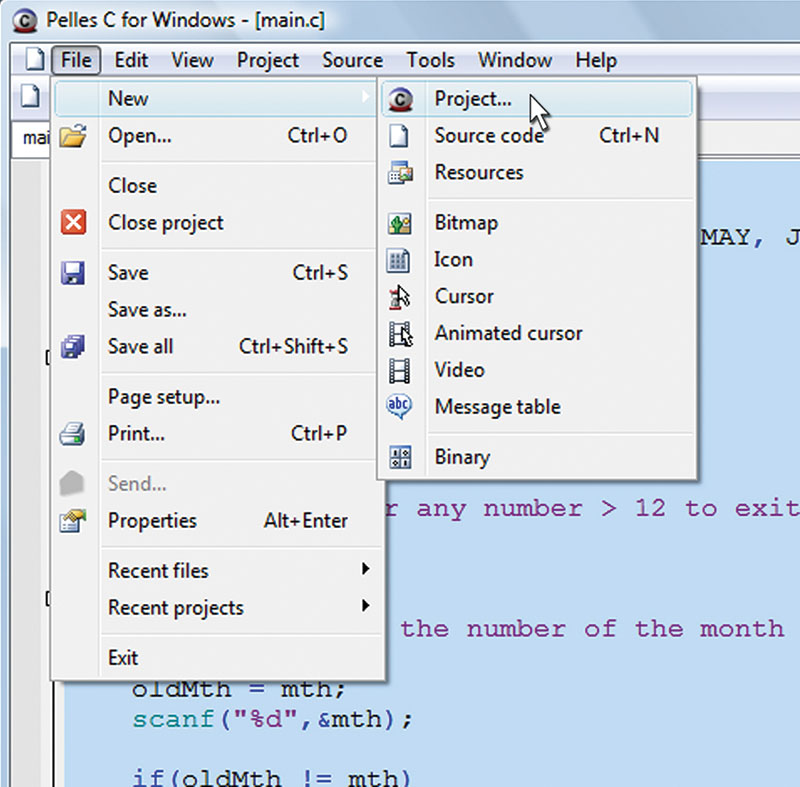
FIGURE 2. Open project in Pelles C.
Figure 3 shows the resulting window with ‘Console Application Wizard’ highlighted and Hello_World typed into the ‘Name:’ field.

FIGURE 3. Pelles C new project.
Click OK and you’ll see the window shown in Figure 4.
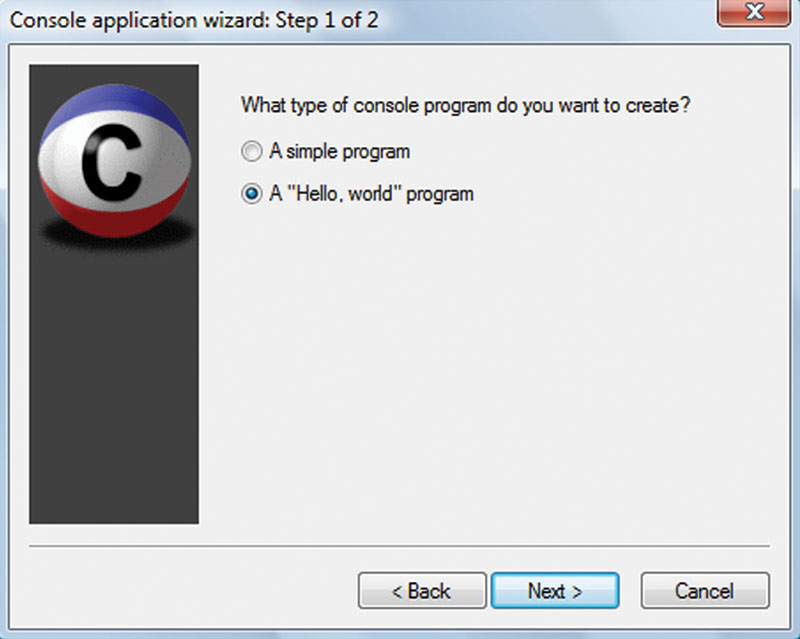
FIGURE 4. Pelles C console wizard step 1.
Check the ‘A “Hello, world” program. Yes, the Hello World program is so basic that it is included for you! Click Next, and you’ll see the window in Figure 5.
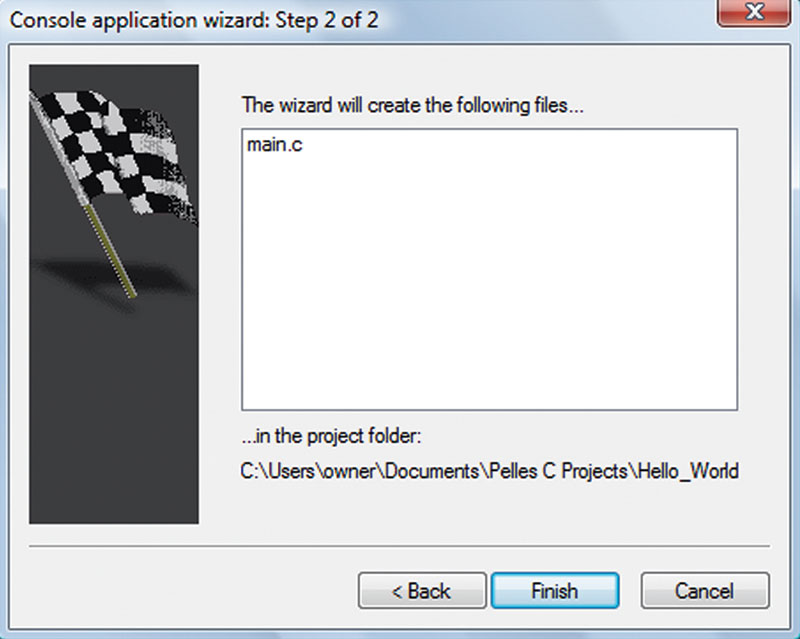
FIGURE 5. Pelles C console wizard step 2.
Now click the ‘Finish’ button. As if by magic, Pelles will write your first Hello World program for you as shown in Figure 6.
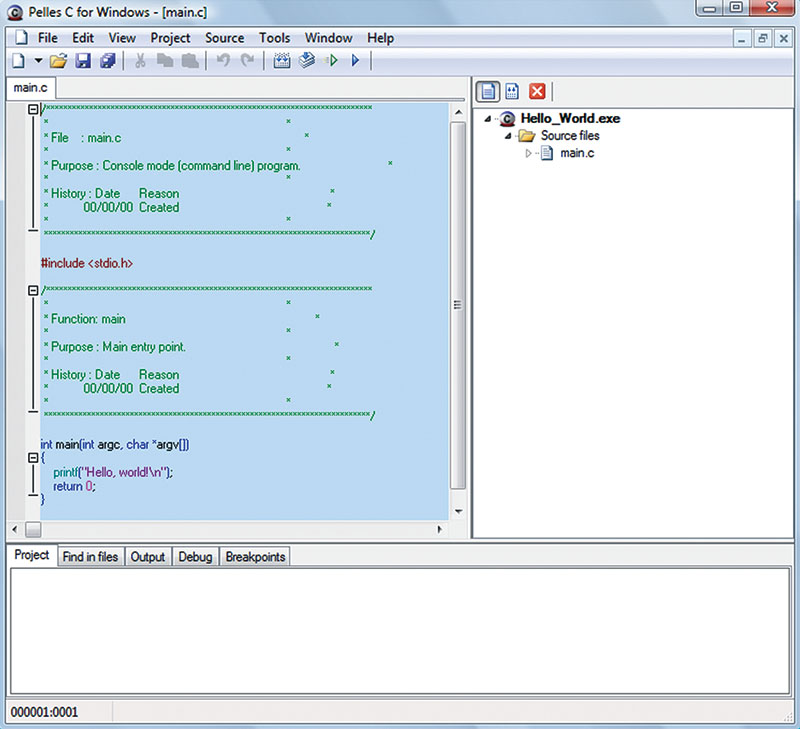
FIGURE 6. Pelles C Hello World.
Next, click the ‘Compile’ button and the ‘Execute’ button; you’ll see the console output shown in Figure 7.
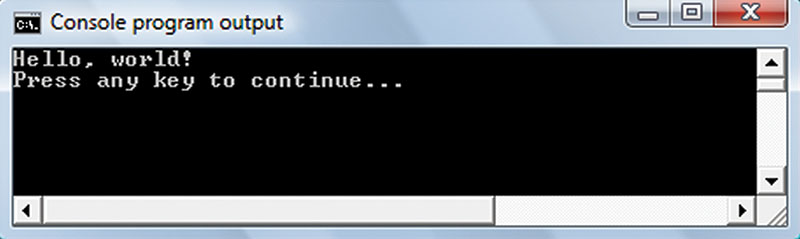
FIGURE 7. Pelles C console Hello World.
Whoa! That’s so easy that it almost makes us forget that there are some not so easy things going on under the hood. Our job is to learn about those not so easy things.
Note on Porting Pelles C Code to AVRStudio
You may have noticed that the program generated by Pelles C looks a bit different from the version in K&R (C programming language; Brian Kernighan and Dennis Ritchie) and from what you would use with AVRStudio. First, there are the parameters for the main function. Also, the main function returns 0 as shown below:
// Using main with an Operating System<br />
int main(int argc, char *argv[])<br />
{<br />
    printf(“Hello, world!\n”);<br />
    return 0;<br />
}
We typically don’t use either of these in embedded systems because they imply an operating system that we don’t have for the small embedded systems we are using. The ‘argc’ and ‘argv’ parameters in main() are input that the OS sends to the main() function when invoking the C program; the ‘return’ is what is returned when the program exits. A system with an OS can run a variety of C programs, but an embedded system without an OS just starts up and runs a single program until power down. So, sending it parameters and then waiting for a return value from it makes no sense. For embedded systems, we usually run the code in some sort of infinite loop in the main() function. If we write the code for an AVR using AVRStudio, we’d drop the argc, argv, and return:
// Using main with out an Operating System<br />
void main(void)<br />
{<br />
    printf(“Hello, world!\n”);<br />
}
Keep this in mind; we should be able to port code directly from Pelles C to AVRStudio.
Getting Started With Pointers
Last time, we were given a brief introduction to pointers and learned the following:
- In C, a pointer is a data type with a value of an address that refers directly to (points to) another value stored elsewhere in memory.
- A pointer is said to reference that value, and using a pointer to get the value is called dereferencing.
- A pointer is like any other variable in that it has an address, and that there is data stored at that address. [That data is an address.]
- It is different from other variables in that C knows that a pointer is to be used to store the address of another variable.
- At the memory address of a pointer, the memory address of another variable is stored.
- By dereferencing a pointer, C gets the address stored at the pointer’s address and uses that stored address to access the data stored at the address indicated.
- A variable has an address and data is stored at that address. A pointer has an address and the address of another variable is stored at that address.
That list had some redundant concepts in it, but these concepts are so important that repetition may help some folks get them. So, let’s be even more repetitive because I’ve never felt comfortable explaining pointers since I still tend to mess them up. I remember how many false starts I had trying to learn them. On the surface, they are simple: A pointer is a memory location containing the address of another memory location.
In C, a pointer is a data type for a variable intended to hold the address of another variable. You tell C that a data type is a pointer by marking it with an asterisk ‘*.’ So, when you define char *myCharPointer, you are telling the C compiler that myCharPointer is the address of a character. When you define it, it does not contain an address of a character, but must have that address given to it by an assignment operation. You extract the address of a character from a char variable by using the ‘&’ address-of operator. So, to set the pointer to contain the address of a character you would first define a pointer to a character, then put the address of a character as follows:
// pointer declared, but not set to anything<br />
char *myCharPointer;
// char variable myChar declared and set to<br />
// the char ‘Sa’<br />
char myChar = ‘S’;
// myCharPointer is set to contain the address<br />
// of myChar<br />
myCharPointer = &myChar;
This may look simple but implementation can be the killer. Cliff Lawson — the number one poster on AVRFreaks — manages large software projects with 50+ programmers and he says that 50% of the bugs come from pointers. And these guys know what they are doing. So, expect to have to approach learning about pointers many times and from many directions. The best thing I can suggest to help you learn to safely use pointers is to write small pieces of code and thoroughly test them before including them in larger pieces of code.
When you get experienced enough that pointers seem second nature, that’s when you will start to get into real trouble. You’ll get bugs that drive you, well ... buggy, but that is part of the price of admission to C programming of microcontrollers. (Hey! What a nice title for a book — and coincidentally, a book that you can get along with an excellent hardware projects kit to give yourself a leg up on this C stuff.)
We need to leave room in this article so we can get started on the chaser light marquee project, so let’s finish the theory with a Pelles C program to show a simple use of pointers. Next time, we’ll look more deeply at this example and expand on it some:
#include <stdio.h>
int main()<br />
{<br />
  // declare a char variable and set it to ‘S’<br />
  char myVariable = ‘S’;<br />
  // define anotherChar to hold the data ‘A’<br />
  char anotherVariable = ‘A’;
  // declare a variable that will contain the<br />
  // address of a char<br />
  char *myPointer;
  printf(“Begin with myVariable = %c\n”,<br />
  myVariable);<br />
  printf(“and anotherVariable = %c\n\n”,<br />
  anotherVariable);
  // set myPointer to the address of myVariable<br />
  myPointer = &myVariable;
  // load anotherChar with the char pointed to<br />
  // by myPointer<br />
  anotherVariable = *myPointer;
printf(“End with myVariable = %c\n”,
  myVariable);<br />
  printf(“and anotherVariable = %c\n\n”,<br />
  anotherVariable);<br />
}
Run this program and then get out the pencil and paper computer to make sure you really understand what is going on.
Lab: Marquee Chaser Lights
Time for an antidote to C pointers. Have you ever wanted one of those chaser light movie poster frames for your very own home theater? Well, I have and they cost hundreds (even thousands) of dollars each. So being DIYers, why not build one? Figure 1 shows a mockup of a chaser lights marquee frame for an old-style movie lobby-card. So now, we'll get started on this project and finish it off in our next installment. Our goal here is not just to have something to hang on our wall, but to learn how to use a few control points for a whole string of LEDs arrayed like the chaser lights on a theater marquee.
When you look at a chaser light marquee, you might wonder how on earth do they get enough I/O lines to run all those lights. Well, there is a trick. They only use a few control lines and they gang a bunch of lights onto each control point as shown in Figure 8. While this illustration shows only three LEDs being controlled from a single control point, the only practical limit to how many of these eight light groups you control is how much current you’ve got and what kind of devices you use to control that current.
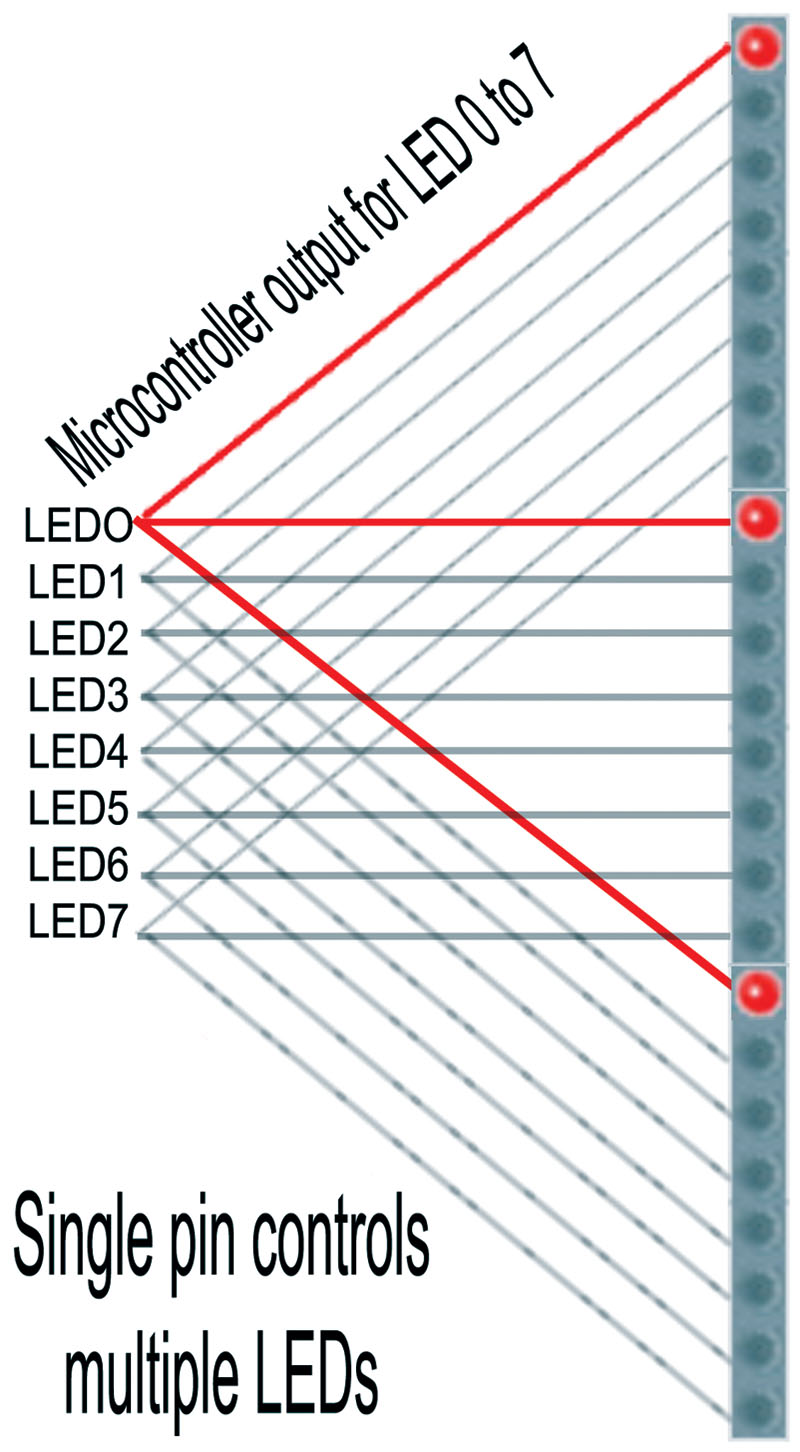
FIGURE 8. Multiple LED output.
If we wanted to, we could put a few million searchlights around the US border and provide quite a show for visiting aliens — and it could be controlled by a single AVR! The control itself only needs to drive a switch (usually some sort of transistor or relay) and that switch then powers all the lights. So, we can have eight control lines and then if we choose to have 56 lights, we can link them as seven blocks of eight LEDs each, arranged end to end. This is what we do with the marquee frame project. However, instead of driving them in parallel as shown in Figure 8, I’ve chosen to stack them such that each LED is driven in series rather than parallel. [See Figure 9 for the schematic.]
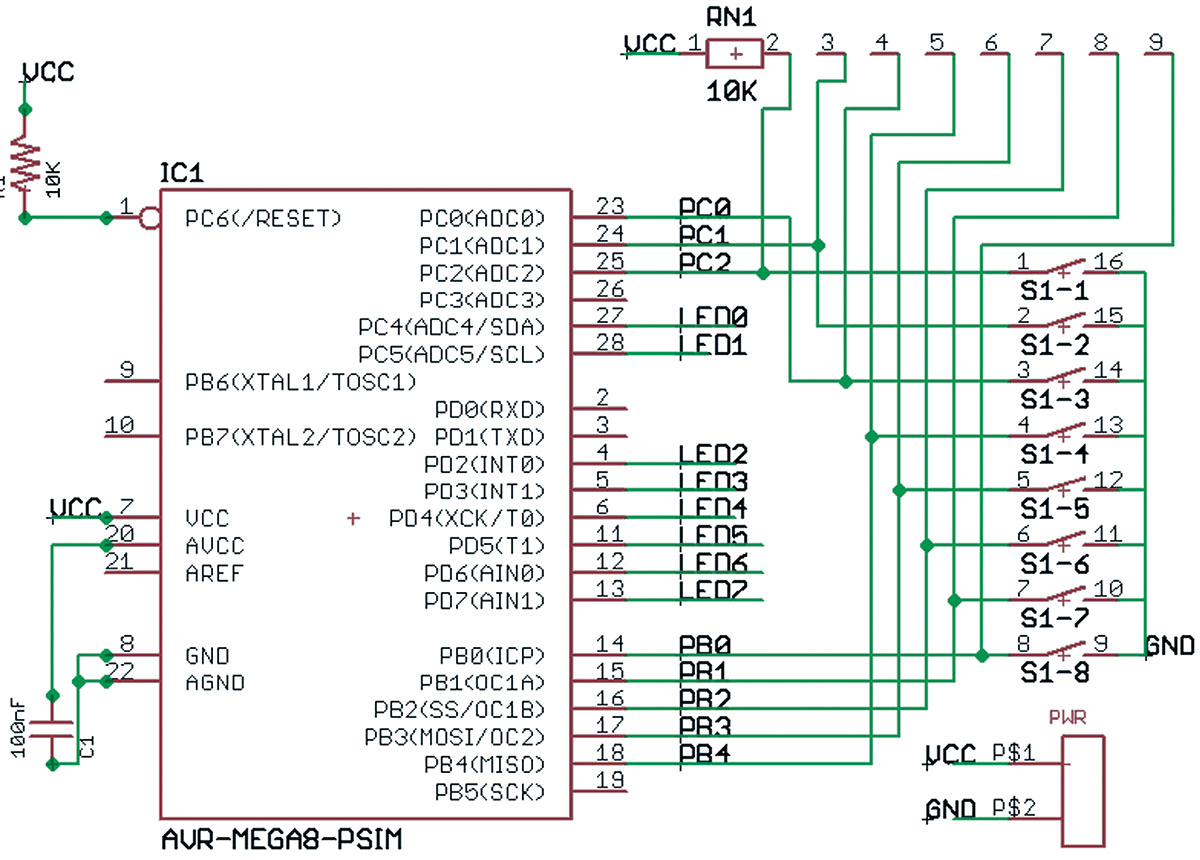
FIGURE 9. Schematic for the LED controller.
The parallel arrangement makes a better explanatory illustration, but stacking them in series as shown in Figure 10 makes better electrical sense, as you’ll see in a minute.
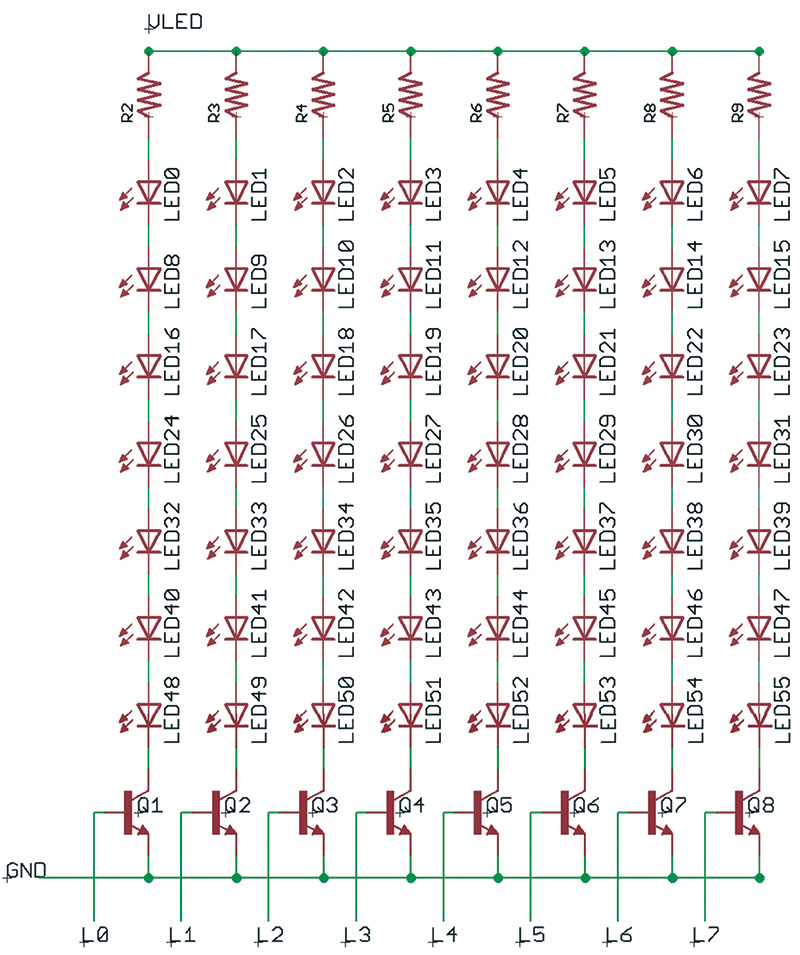
FIGURE 10. Schematic LED array.
How to Use It
Driving Seven LEDs in Series
The LEDs I use in this project drop 3.4 volts and are plenty bright at 20 milliamps. If we stack them as shown in Figure 10 and we use 30 volts, then we can drop 7 x 3.4 = 23.8 volts. The transistors will drop another .7 volts, so our total drop is 24.5 volts, leaving us with 5.5 volts to control the current. This requires about a 275 ohm resistor. DON’T follow what I just said until you measure the voltage drop on your LEDs since it may well be different. [I used white, but colored LEDs tend to drop much less voltage.] Our tradeoff here is that we need a higher voltage, but we only have to use a single resistor for each of the LED channels. Having eight resistors instead of 56 (as we’d need if we did the LEDs in parallel) saves us a bunch of work. [NOTE: I may refine these values next time, so don’t rely on them too much.]
You might question if the transistors are really necessary since the control line is pulling the 20 mA current to ground; what difference does it make that it starts off as 30 volts? Well, probably not one little bit. However, rather than risk some sort of screw-up during construction exposing the AVR control pins to that high a voltage, I decided not to take the risk since switching transistors are a few pennies each.
I found chrome plated plastic 10 mm LED bezels (Figure 11) on eBay for $20 per hundred. They aren’t exactly high quality, but for twenty cents each I can’t really complain. I found 100 10 mm white LEDs (Figure 12), also on eBay for $14. Both of these orders included free shipping from Hong Kong and took about three weeks to get here.

FIGURE 11. The 10 mm LED bezel.
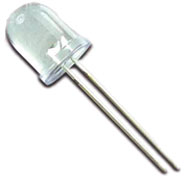
FIGURE 12. The 10 mm white LED.
| Table 1. Bill of Materials. |
| Item |
Description |
| Simple chaser lights kit |
Nuts & Volts |
| 56 10 mm white LEDs |
eBay |
| 56 10 mm LED bezels |
eBay |
| Lots of 24 AWG stranded wire |
(> 50') |
| Frame stock |
Your choice |
| 30 volt power supply |
Your junk box |
In our next installment, we will grimace and dig ourselves in deeper with C pointers and we will grin and finish the chaser lights frame. NV
Theory is all well and good, but to really learn this stuff you have to get your hands on some tangible items that blink, whirr, and sometimes detonate. As a service for the readers of the Smiley’s Workshop articles, we have simple and inexpensive projects kits available that can help you make it real. You can find these kits (and some darn good books) at the Nuts & Volts Webstore.