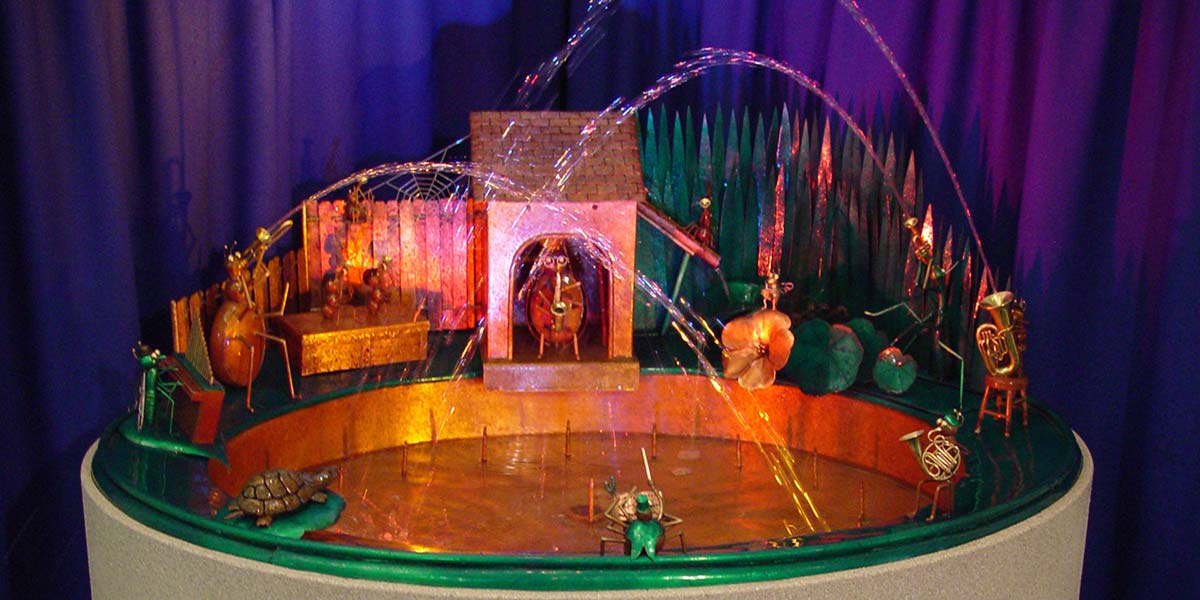
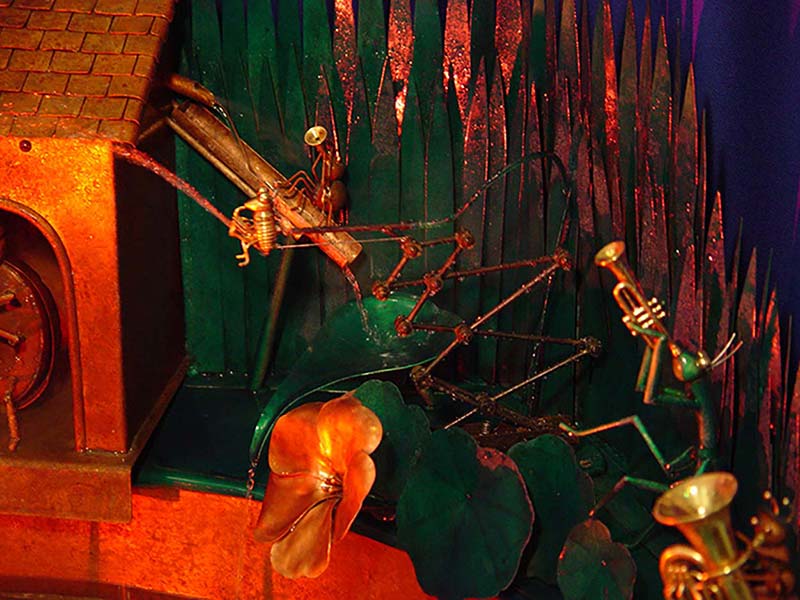
What kind of home project has 82 legs, horns, and will never have all of the "bugs" worked out of it? The answer is "H-2-Opus," a musical water fountain. It features a scene of insects surrounding a pond of water, each with a musical instrument that squirts water.
Water fountains are all nice, but I find that ones with computer-controlled leaping streams of water are especially interesting. A local amusement park has one with arches of water jumping between ponds, which started my fascination. Disneyland and Universal Studios go a few steps farther. What finally convinced me to try one of my own was seeing the magnificent musical fountain at the Bellagio Hotel in Las Vegas. My fountain takes quite a different approach than this, but all of us who have an interest in computer-controlled motion should be mesmerized by the Bellagio's ultimate display.
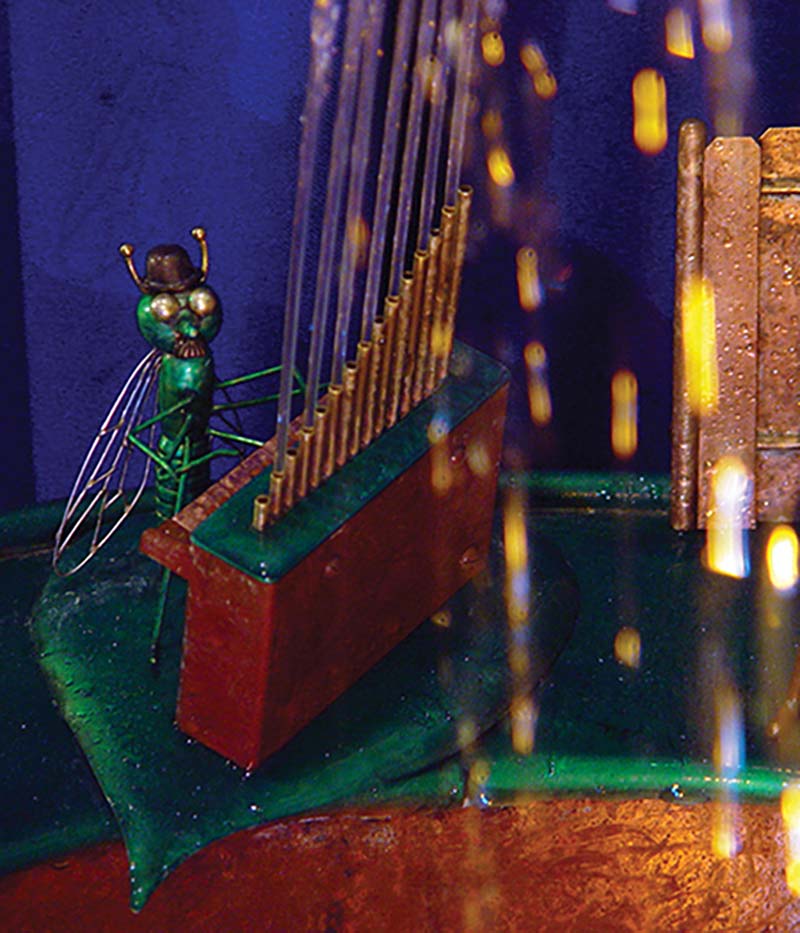
The pond.
What Can I Do?
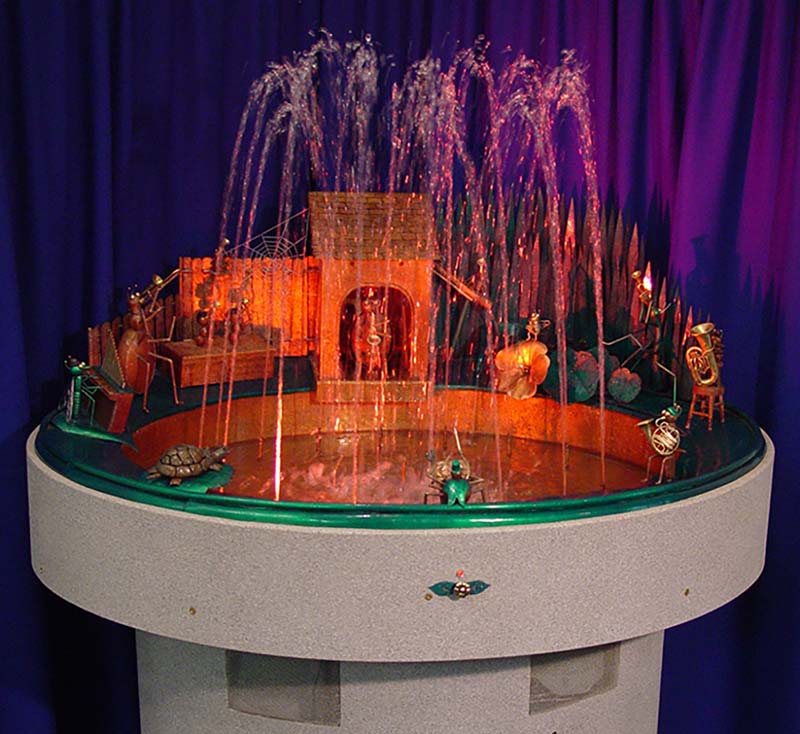
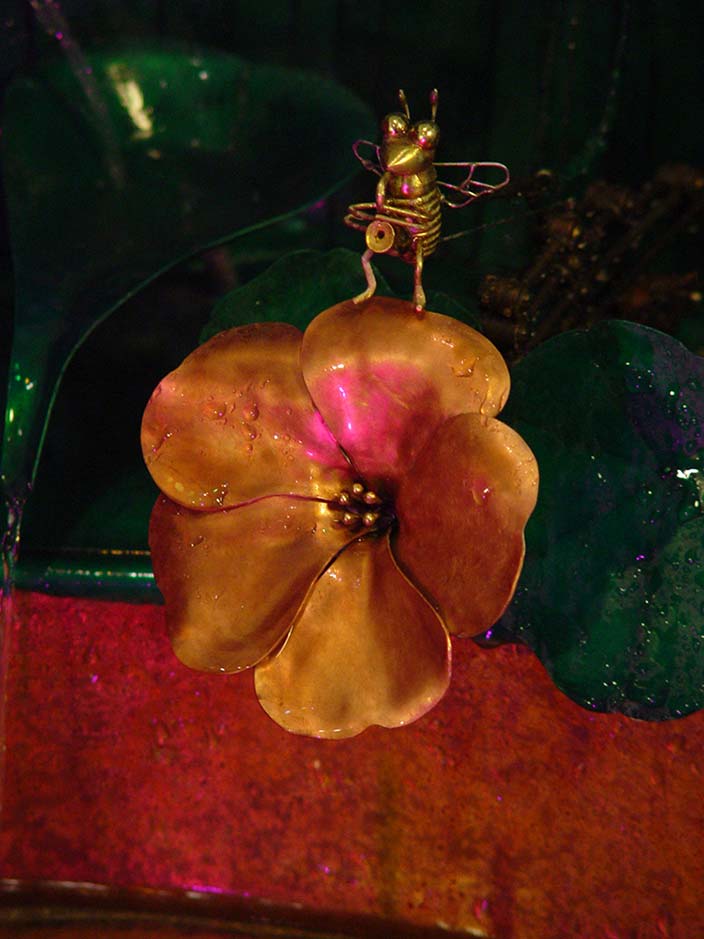
Since Bellagio's lake-sized fountain won't fit in my garage (or budget), I made "H-2-Opus" to a scale that I could handle. It is controlled by MIDI and has 36 valves, five servos, seven lights, three lasers, and a fog machine. The scene and the creatures are made from copper and brass, and the metals are polished with patina, or enameled. From the floor of the pond arise 16 spouts in a big ellipse, and another spout comes from the very center. Where many of the insects just squirt the water to music, there are several special features, as well. A tiny bee sits on a flower, and when it becomes his turn to solo, he flies from his flower while playing his saxophone (squirting water) and maneuvering above the pond. Then a turtle on the other side squirts water at him before he lands back on the flower.
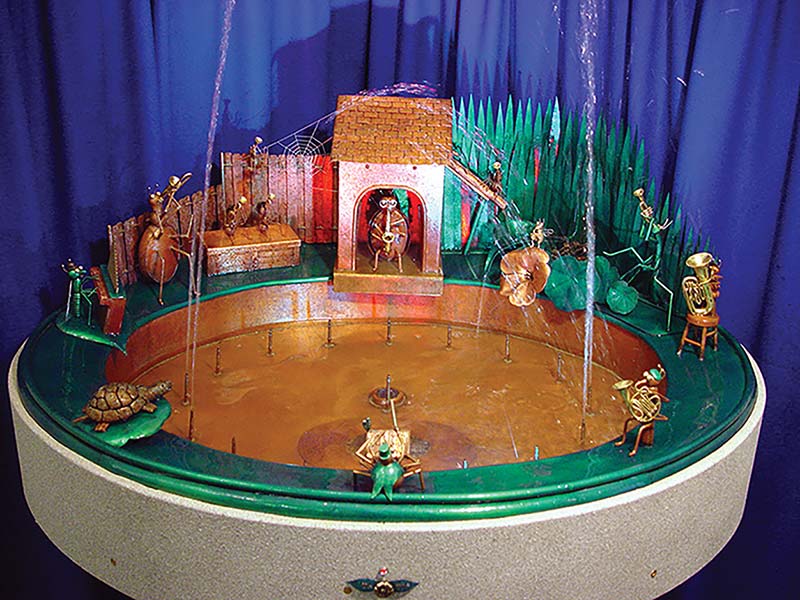
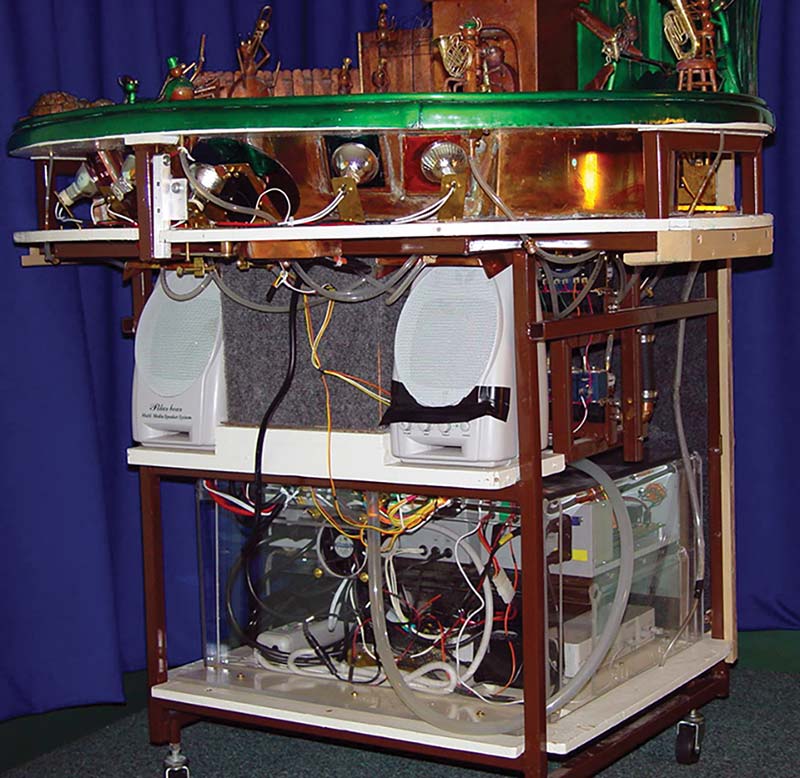
Front view. All the actors.
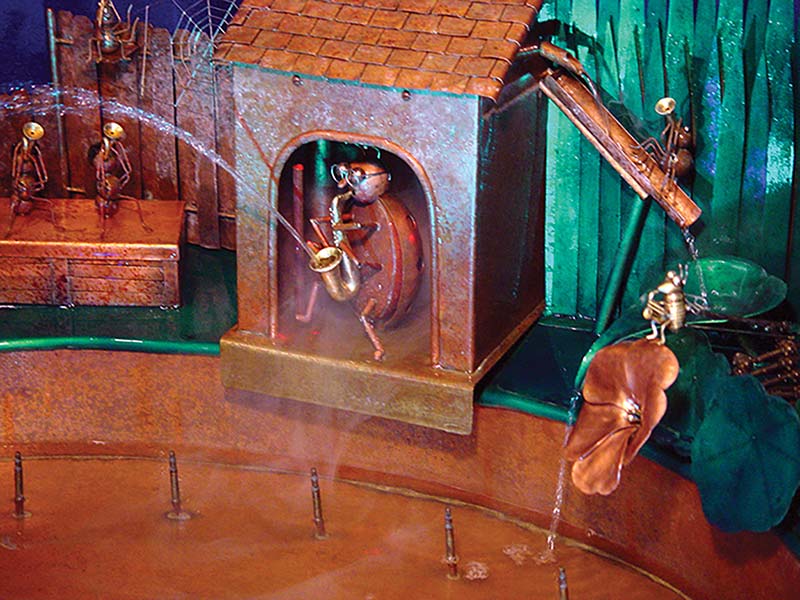
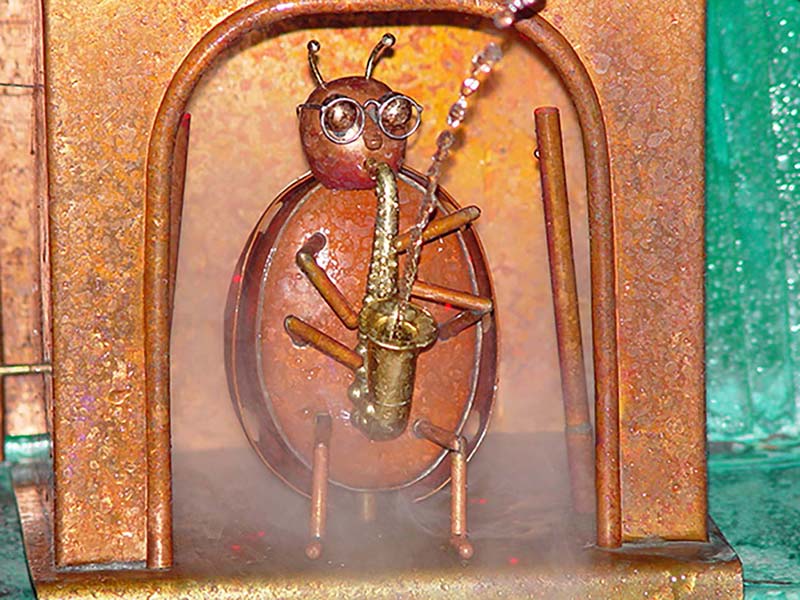
In the center is a hut with a saxophone-playing ladybug in it. The ladybug pivots back and forth as he plays. He "rocks out" as he blows his sax and kicks his leg to the music. Hidden inside the hut are two 10mm cubic-zirconia (CZ) which rotate, while two lasers hit the CZs from below. The laser beams are split into many beams. The lasers are taken out of laser pointers. A tiny fog machine fills the hut with fog, which makes the rotating beams of the lasers visible, and can also fill the pond with fog when desired. My whole desire for the fog machine was inspired by wanting to see the laser beams, but having a bunch of fog on the pond with the lights on it turned out to be a cool effect, and it seems that people really like it.
The ring of spouts in the pond also makes patterns of water with the music. The center spout has a servo-controlled pinch valve that can change the volume of water from this spout, and make it grow from low to high. There is a laser coming up through the stream of water in the center, which illuminates the water from inside the spout. There is also a spotlight at the base of the center spout that can illuminate the spout on the outside.
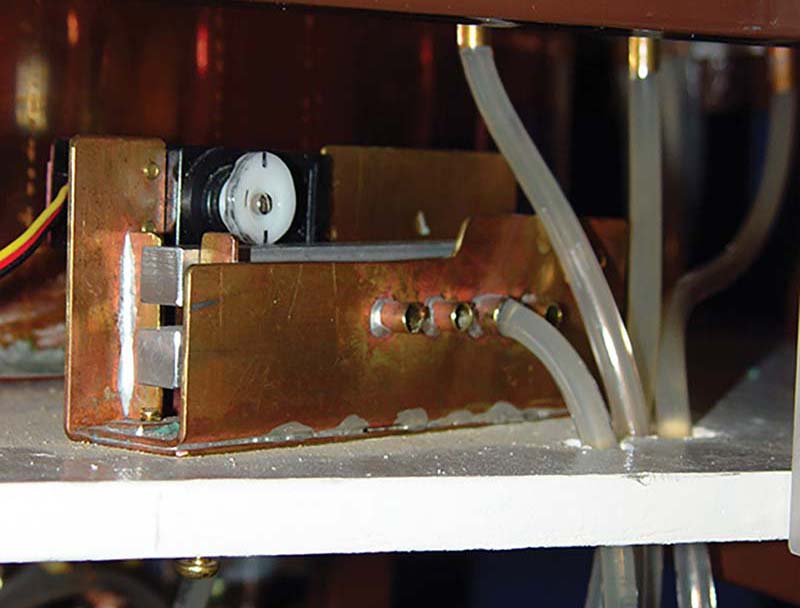
Pinch valve. A cam on a servo moves a lever that pinches the tubing and controls the flow.
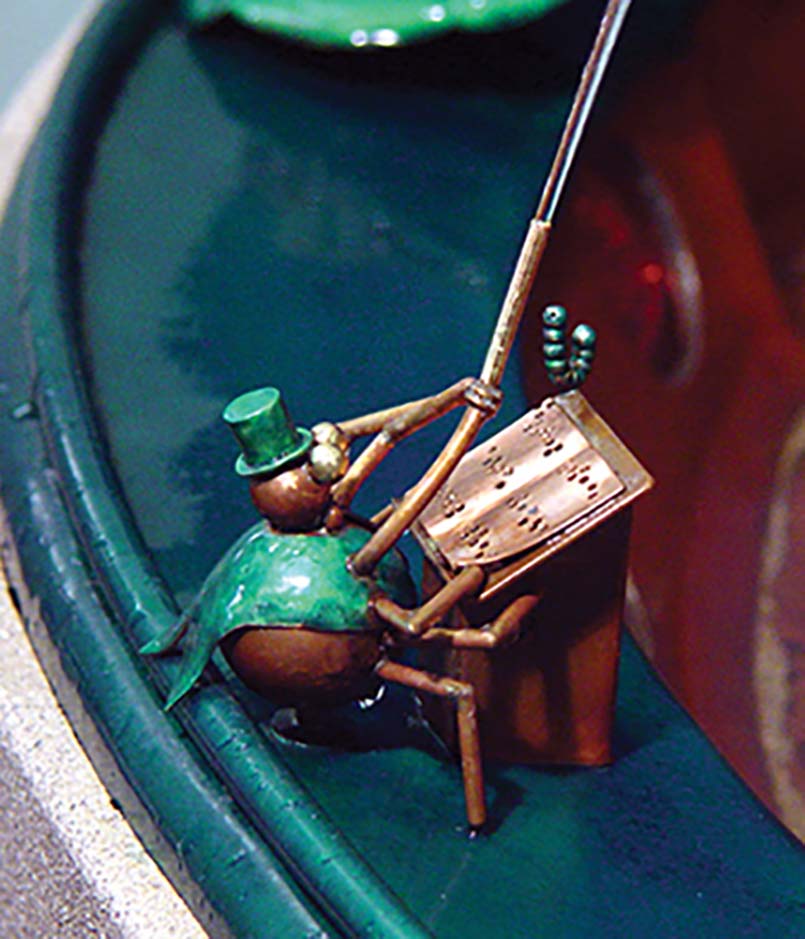
Set inside the front rim of the pond are five colored halogen spotlights. The center light has a servo-controlled color wheel, enabling this light to have four colors. The band conductor at the front also has a light inside his podium.
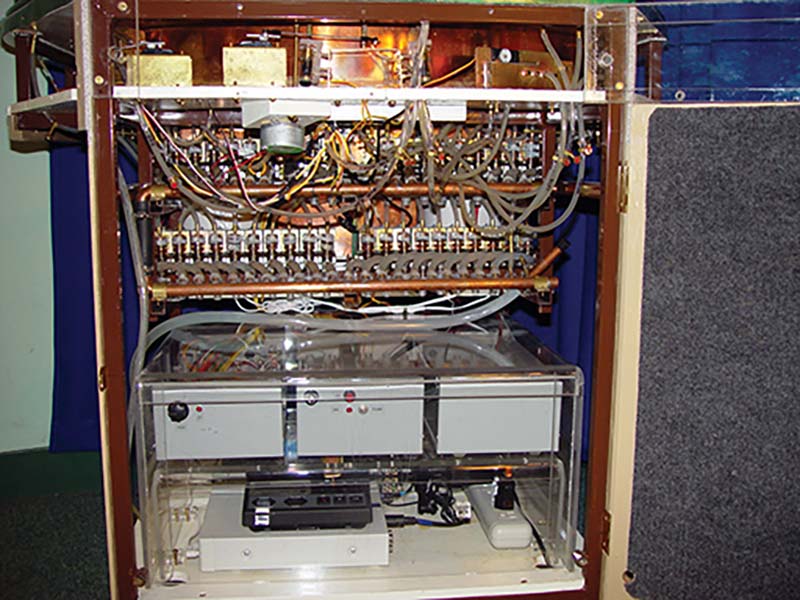
Front view. Lights and color wheel above, speakers and water pump reservoir in the middle, electronics below.
How it Works
The music is played on a floppy disk MIDI player (Yamaha MIDI Data Filer MDF-4), although for programming the display, I used the MIDI output of a computer. By using a music sequencing program, the events can be clicked in with a mouse. A solenoid-valve's activation can be dragged to an earlier or later time, or turned on for a different duration of time. Then I can watch it perform to a section of the music, and change the performance to suit the mood of each portion of the musical piece.
When a piece of music is choreographed with everything performing to the music, then the MIDI file is saved and added to a floppy. When the fountain performs, the MIDI player plays one tune after another from the floppy.
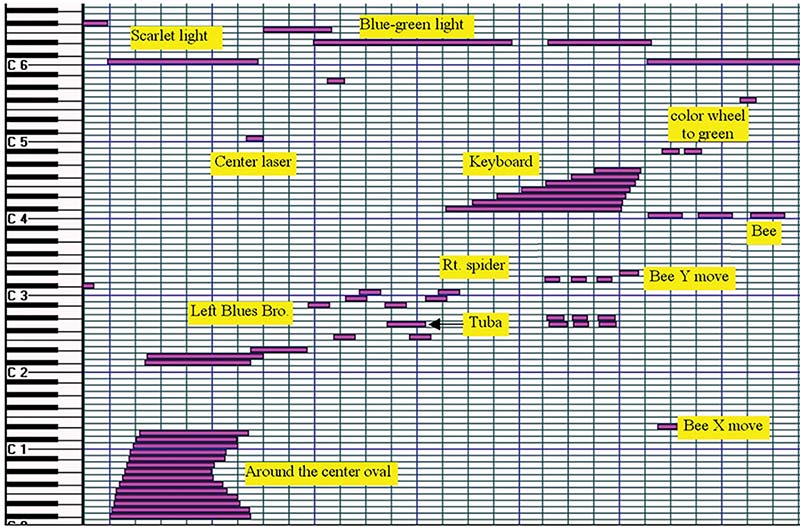
Fifteen channels of the MIDI are actually music, but the 16th channel is what controls the fountain. Each "note" turns something on, or starts a servomotor routine. There are 84 notes’ worth of events in controlling everything. Some of the notes perform multiple functions together.
MIDI and Electronics
The MIDI music goes through to a sound module and computer speakers for the sound, with channel-16 notes set at volume and velocity of "1" so that they are not heard.
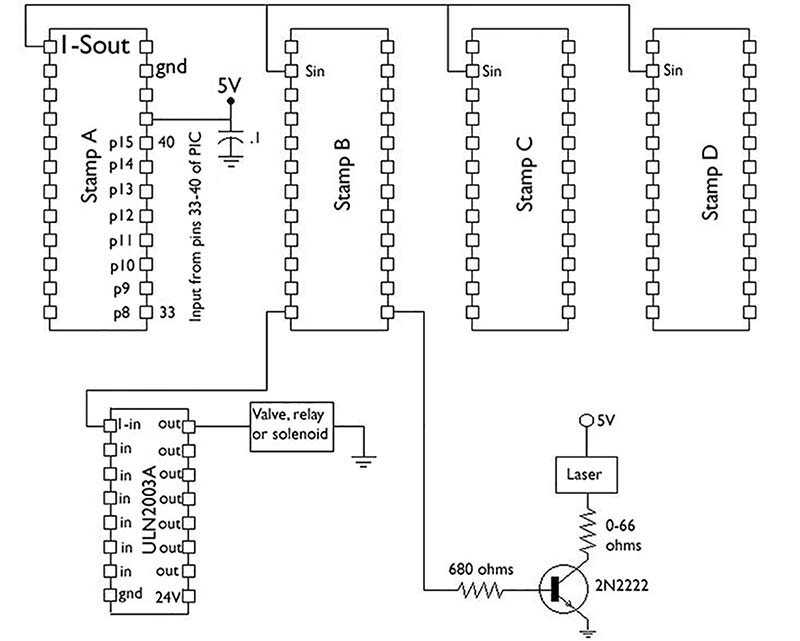
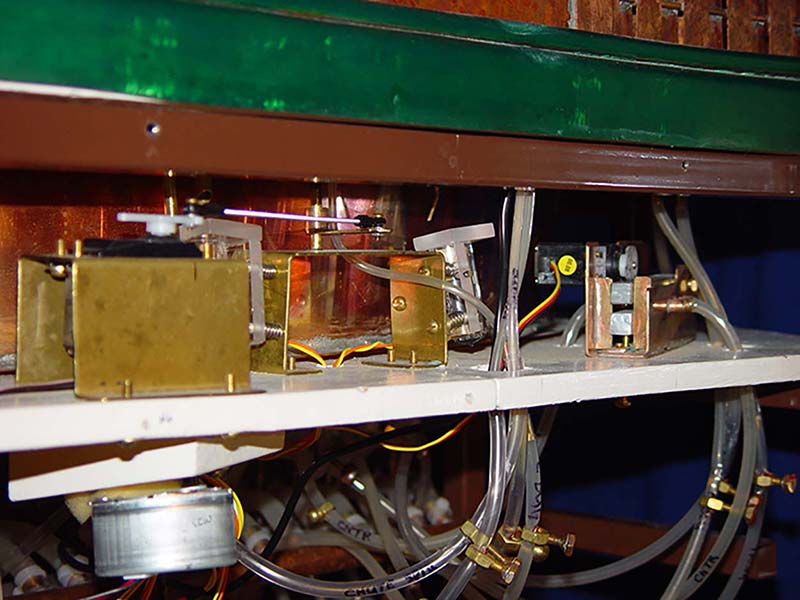
The 16th channel is filtered with a PIC 16F877 microcontroller. Channel 16 goes from the PIC to four BASIC Stamps (BS2SX) that actually control the fountain's parts.
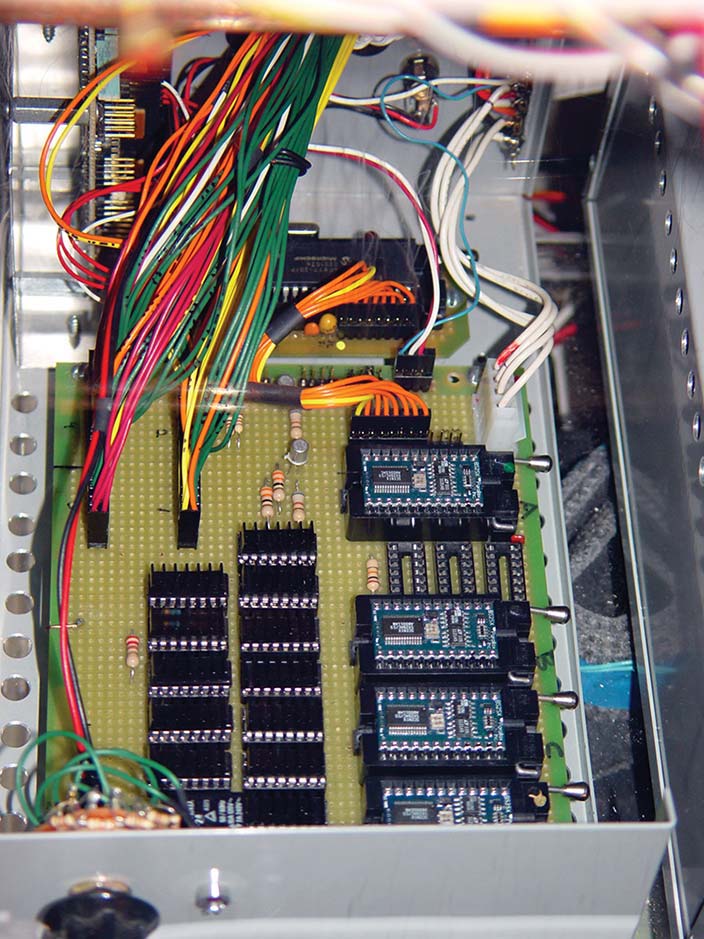
The brains. Other boxes are mostly power supplies.
I am an amateur in electronics and programming (a dentist by profession), and constructed Thorsten Klose's MIDI filter as a starting point. A few modifications to his code were all I needed. A MIDI note for channel 16 is made into a byte that holds the function number and on/off status, and is sent on eight parallel lines to Stamp A.
BASIC Stamp circuit.
The Stamp A reads the byte from eight pins of the PIC. It then either turns on a light, or sends data serially to the other three Stamps to turn something else on. By splitting the duties between the Stamps, one Stamp can fly the bee in the x-axis, another Stamp fly it in the y-axis, and the last Stamp squirts the bee's saxophone while the bee flies. The BASIC Stamps work very well for an amateur like me, as they are so easy to program. Making everything perform artistically with the music took a lot of programming and re-programming to get everything just right.
The notes of Channel 16 are triggering events over time. The vertical lines are the beats of the music.
The outputs of the Stamps control servos, solenoid valves, and relays. The solenoids and relays run at 24 VDC, driven by ULN2003A Darlington transistor arrays. The relays turn on the 12VAC halogen spotlights, the motor that rotates the CZs, and operate the footswitch plug on the MDF. A solenoid also pushes a button on the front of the MDF. Transistors (2N2222) help the Stamps turn on the lasers. There are a lot of different power requirements, and what a pile of power supplies is needed! It is important to have a separate 5V supply for the microcontrollers and the servos. The servos will cause the BASIC Stamps to sometimes reset if they are on the same supply. This is most likely to happen if a big crowd or somebody important is watching.
Flying and Dancing
The bee "flies" by means of a scissors jack.
Bee in action.
One servo controls the y-axis direction that actually makes the bee fly in an arc — up and out from the flower. Another servo controls the x-axis direction, making the bee fly back and forth. Between the arc of the y-axis direction and the back and forth of the x-axis, the bee seems to fly in three dimensions. There are four different routines for the bee to fly, with different motions and lengths of program to go with different pieces of music.
Bee servos.
Bee Resting.
The ladybug has a servo that pivots him back and forth. A cam arrangement inside of him pulls a Kevlar thread, which lifts one leg as he goes to each side. The movement of the ladybug while shooting water from his saxophone makes for a nice effect. He has six routines from a single kick to longer programs for his "solos."
Top view of ladybug.
The fog is made by a small, ultrasonic fog maker that makes the water into a very fine mist, which flows down from the inside top of the shack, and then across the pond of water.
Ladybug lifts one leg to dance as he goes side to side.
Construction
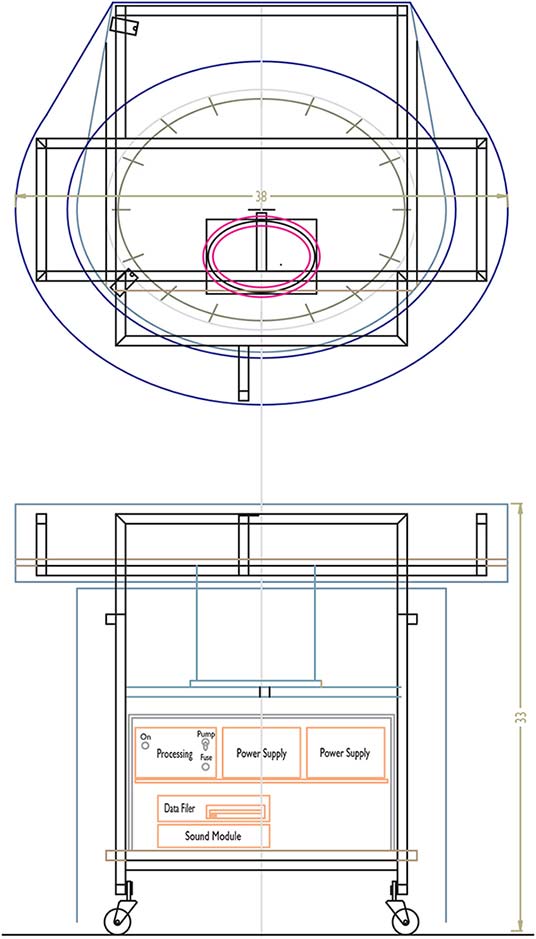
A welded steel frame, using 3/4-inch steel tube, supports the entire fountain inside. Plywood forms the floor of the inside, and on top of this are the electronics. The electronics have an acrylic enclosure over all, and a fan keeps it all cool inside. In this enclosure is the MIDI player, sound module, microcontrollers, relays, and power supplies. Everything electrical in the fountain is protected from the water by enclosures or shields, so that if something goes wrong, all will not get destroyed by four gallons of water getting sprayed all over the inside. (This has happened a few times — Murphy's Law at work!).
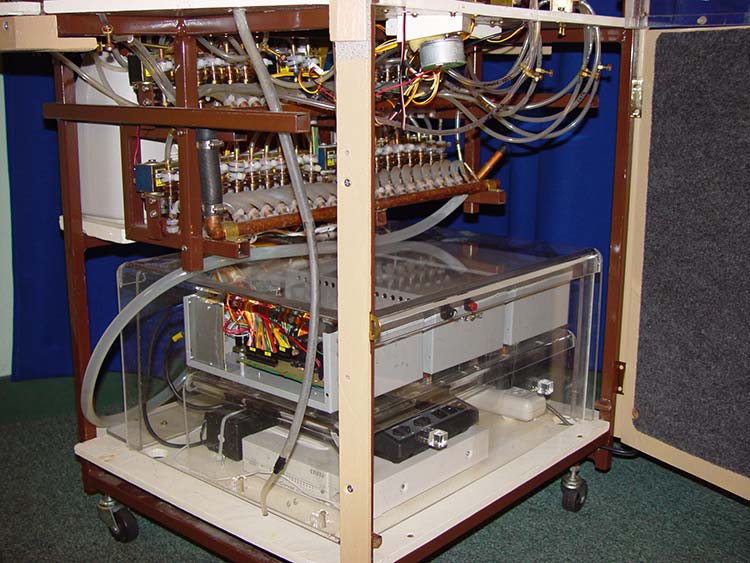
Back view. Sound module and MIDI player on the bottom, electronics above them. Rows of valves in the middle. At the top are servos for bee x-axis and ladybug, lasers for the shack, and servo for the center valve.
In the middle are rows of solenoid valves. I used surplus 24-volt DC valves. It is helpful if these do not use too much current, so that the driver chips can handle the load. Nearby is the lower reservoir, which contains the 500GPH submersible pump. Each supply tube has a flow-adjusting valve made from a big nut with a #8 screw tapped through the side. The screw presses a copper pad that pinches the tubing. Using distilled water keeps everything running smoothly, and is kind to the finish on the metals.
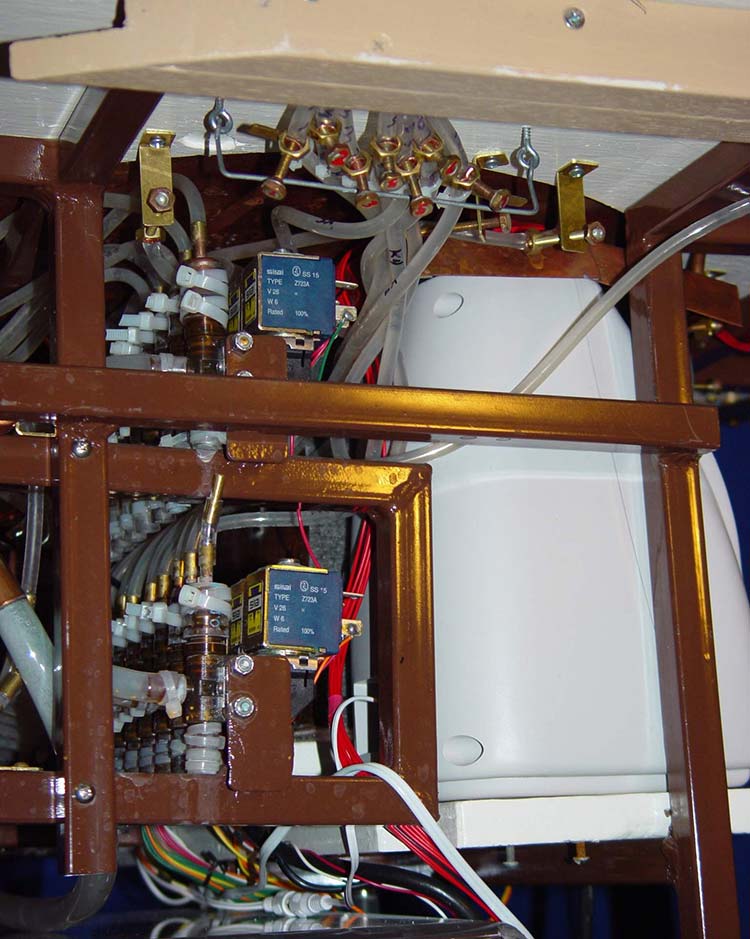
More inside views.
Above the valves is the pond. A ring of plywood supports the base of the pond, and another ring supports the rim. Between these two rings is room for servos, lights, and mechanical drives. The white lights are colored with pieces of colored gel, like DJs use.
More inside views.
The outer part of the base is made of 1/16-inch polycarbonate sheets laminated with five layers. They are glued with solvent made for solvent-welding plastics. The skirt on the top was formed on the fountain. The base was formed on a plywood jig, using two cutouts separated by some 2x4 lumber pieces. The layers are put on one at a time, squirting solvent onto it a foot or so at a time, clamping it in place for about 10 minutes, then doing another section. When it is done, it holds its shape, and can be cut, filed, and sanded to final trim. Blocks of acrylic plastic glued inside allow the base to rest on the plywood at the edges, so then only a few screws are needed to anchor it in place. I love working with plastics — the glue joints are very strong, the material is strong, and it handles water well with no surface treatment.
Drawing.
The base was first painted to block the light, and make it less transparent, and then painted with a simulated rock coating. The inside is lined with carpeting to help dampen the sound of the solenoid valves. Wheels on the bottom help to manage the 250-pound weight.
Copper, Brass, and Bugs
My orchestra is made of mostly copper and brass. I made insects because they are whimsical, easy to make, and it does not look strange to have them in many different sizes. I used different sizes of brass tubing, brass rod, and brass balls for many parts of the insects, and sheet copper (.025") and brass (.050") for the bigger pieces. It is all soldered with a propane torch, Tin/Silver (96/4) alloy solder, and paste flux. Heat shielding compound is a wonderful clay that allows you to anchor one piece that you just soldered, and solder something else next to it without melting and destroying the joint you just made. Most everything that squirts has a 3/32-inch inside diameter.
Keys Player.
French horn.
Conductor.
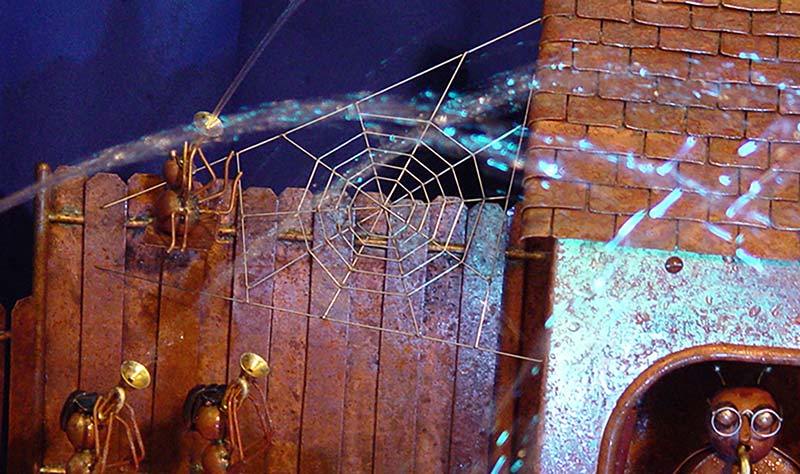
The spiderweb and some insect wings were made of .025" stainless steel wire, soldered with hard silver solder.
Spider web.
I made all of the parts, including the instruments. Some pieces were soldered together from existing shapes (tubes, balls, etc.). A small lathe helped turn most of the horns. A few parts were cast from brass, using the lost-wax process.
Tuba.
The ladybug's saxophone was cast in four pieces and then soldered together. The copper is worked by heating it red hot, then quenching it in water. It becomes softer, and can be pounded into compound shapes. As it gets shaped, it also gets harder, so sometimes repeated heating and quenching is needed to keep it workable. Pickling it in 10 percent sulfuric acid removes all of the black discoloration.
Ladybug's Saxophone
Some of the metal was colored by patina, and then coated with clear finish, that is originally made for cars. The green areas use the clear finish, with blue and green pigments from an auto body shop mixed in. The color makes a nice effect over the clean copper showing through. Some of the parts were left polished — little parts like eyes, and bigger parts especially like the instruments. The finish keeps it from tarnishing.
The top rim was first made of several layers of plywood, which was shaped to slope down to the pond. Then copper was formed around it in four pieces, and soldered together. A rim of 3/8-inch copper tubing makes a border on the outer edge.
The fountain now resides in my office waiting room, and is a big hit. People come to my office just to visit my creation. I hope to have it in the California State Fair this summer. The music is mostly big band music, with up-tempo beats, horn fills, and multiple parts. This makes for a lot of action with the water. There are six tunes in it now, including "In the Mood," "Peter Gunn," and "Don't Get Around Much Anymore." This kind of project is very fun to work on, and it is amusing to scheme up the different performing events.
This is my second fountain, the first is smaller and without music or lights. It has two BASIC Stamps controlling 27 valves and three servos, in a three-minute program of dancing water. It was a simpler project, and also very fun to make. A lot of action can be packed into two BASIC Stamps.
More information, including circuit diagrams, code, drawings, patina recipes, and other information can be found in the downloads below. NV
A note from Vic Chaney
My article in Nuts and Volts is not intended to be step-by-step instructions on how to make this fountain, as this would take a whole book. I do believe that I have provided enough information for someone with some electronics experience, some imagination, and some mechanical know-how to make one. After all, I am a dentist, and not an electronics engineer. My hope is that if you make a similar fountain, that you will find this information a guideline to change into something in your own style.
There are additional notes and information in the downloads file below that give some additional insight into what it took to build this project.
Thorsten Klose's extensive work with MIDI is at www.ucapps.de/index.html, and my modified version of his MIDI filter is in the downloads section below, used with permission.
Solenoid valves and pumps can be found at Mendelson Electronics (www.meci.com).
Micro-Mark, at www.micromark.com, has telescoping sizes of brass tubing.
Brass balls and gears are great at McMaster-Carr Supply (www.mcmaster.com).
A good reference for working and soldering metals is The Complete Metalsmith by Tim McCreight, available from Micro-Mark.
Patina chemicals and sulfuric acid are available from Bryant Laboratory (now Art Chemicals) (www.artchemicals.com).
Urulac #9778 is a "catalyzed clear exterior coating" by G. J. Nikolas & Co., Inc. (708-544-0320) sprayed on with a little aerosol spray kit from the hardware store.
About The Author
Victor Chaney is a dentist in private practice in Vallejo, CA, where he keeps the fountain on display. Before dentistry, he received his bachelor's degree in Physics. His electronics education comes from books, magazines, and the Internet. He also plays pedal steel guitar in a Rock-and-Roll/Country band, "Coyote." His last fountain, "Insectopia," won top prize — Creativity Trophy in Best-of-Show Competition at the California State Fair.