Recap
In our last episode, we learned some theory about C arrays and then did a lab project that used the Simple Chaser Lights kit to build a POV (Persistence Of Vision) wand. This time, we are going to look at some C theory for structuring data and then do some hands-on lab work using a DS1307 real time clock IC on a breadboard.
“Does anybody really know what time it is? Does anybody really care?”
The Chicago Transit Authority, 1969.
Well, I for one care, and I have read enough of the physics and philosophy of time that I can safely say I don’t have a clue what time it is. Before I did all that reading, I thought I knew what time is. Now, I’m befuddled. I’m pretty sure time has to do with things falling apart (which is verified by my mirror), but beyond that ...
For this article, let’s settle on the Wikipedia definition that time is what clocks measure. Since computers have clocks, let’s start to learn about those clocks and how to use C to keep track of time.
C Theory
C provides some features that help us organize and manipulate data. We’ve already looked at how arrays help us work with large blocks of data of a single type. We use some concepts that duplicate what we could do with pointers, but make the work somewhat more intuitive than pointers and therefore easier. Remember that in C, the name of an array is equivalent to the address of the first element of that array. This is the same as a pointer is to the first element of a section of memory. We can use arrays which we may already be familiar with from our math studies (for many folks, arrays seem like obvious ways to group data) or we can use pointers to do the same thing in a much less intuitively friendly fashion.
Let’s look at a couple of other C features that will help us deal with data: enums and data structures. Enums are simple and only occasionally needed; data structures can be quite complex and are used everywhere in C to handle all but the simplest work with data. We will learn about these using examples that we will run under Pelles C to help us master the concepts. [Pelles C was introduced in Workshop 23. You can get a copy from www.smorgasbordet.com/pellesc.] Then, we will see how these concepts can be used in actual examples of computer time keeping. These high level software data handling concepts for manipulating data — when applied to time as that data — will soon lead us to some very low level hardware concepts involving the AVR timer/counter peripherals. This is another case where it is difficult to know the order to present the information, so bear with me. Hopefully, things that seem to be presented out of sequence will eventually start to line up and make sense.
Enums
The C keyword enum (from enumeration) conveniently provides a way to give names for constant sequential numbers. Enums let you think of the data as a name, not a number, and lets the computer worry about the number for you. For instance, you might say:
enum boolean { NO, YES }; // NO is 0, YES is 1
The computer will automatically assign the number 0 to NO and the number 1 to YES. You can then use these names in the code. For instance, you might query a user with a yes or no question and call one of three functions depending on the answer:
if (answer == YES) sheSaidYes();<br />
else if (answer == NO) sheSaidNo();<br />
else sheIgnoredYou();
You could just as easily use:
#define NO 0<br />
#define YES 1
Enums come in really handy when you want to assign a longer sequence of words that naturally associate with sequential numbers, such as many words that are used in time keeping. For instance, the month of the year. We might write a date as 5/6/12 or we might write it as May 6, 2012. The 5 and May are equivalent. (This is true in America, but other countries list numerical dates differently so they may think 5/6/12 is actually 5 June 2012.)
When you define a sequence of names in an enum, the default behavior is for the first name to be defined as 0. If you specify a number for the first, the enum will assign the numerical sequence that follows for the rest of the numbers. For example:
enum months { JAN = 1, FEB, MAR, APR, MAY, JUN, JUL, AUG, SEP, OCT, NOV, DEC };
If you are dealing with a calendar, you don’t care what the number of the month September is, you just want to deal with September. A simple example for using this follows:
#include <stdio.h>
enum months { JAN = 1, FEB, MAR, APR, MAY, JUN, JUL, AUG, SEP, OCT, NOV, DEC };
int main(int argc, char *argv[])<br />
{<br />
  enum months myMonth;<br />
  int mth,oldMth;<br />
  int go = 1;
  printf(“Enter 0 or any number > 12 to<br />
  exit\n”);
  while(go)<br />
  {<br />
    printf(“What is the number of the month you<br />
    were born?\n”);
    oldMth = mth;<br />
    scanf(“%d”,&mth);<br />
    <br />
    if(oldMth != mth)<br />
    {<br />
      myMonth = mth;
      switch(myMonth)<br />
      {<br />
        case JAN:<br />
          printf(“You were born in January\n”);<br />
          break;<br />
        case FEB:<br />
          printf(“You were born in<br />
          February\n”);<br />
          break;<br />
        case MAR:<br />
          printf(“You were born in March\n”);<br />
          break;<br />
        case APR:<br />
          printf(“You were born in April\n”);<br />
          break;<br />
        case MAY:<br />
          printf(“You were born in May\n”);<br />
          break;<br />
        case JUN:<br />
          printf(“You were born in June\n”);<br />
          break;<br />
        case JUL:<br />
          printf(“You were born in July\n”);<br />
          break;<br />
        case AUG:<br />
          printf(“You were born in August\n”);<br />
          break;<br />
        case SEP:<br />
          printf(“You were born in<br />
          September\n”);<br />
          break;<br />
        case OCT:<br />
          printf(“You were born in October\n”);<br />
          break;<br />
        case NOV:<br />
          printf(“You were born in<br />
          November\n”);<br />
          break;<br />
        case DEC:<br />
          printf(“You were born in<br />
          December\n”);<br />
          break;
        default:<br />
          printf(“What, were you hatched?\n”);<br />
          go = 0;//<br />
          break;<br />
      }<br />
    }<br />
 }<br />
}
You can find this example in the source code file at the article link.
Structures
A structure is a collection of variables that may be of different data types, all grouped together under a single name. This is similar to an array that groups data under a similar name and locates it in contiguous memory. Unlike an array in which all the data must be of the same type, a structure can have data of different types. They are like records in other programming languages and form a data unit that is convenient to handle. This convenience is very useful in large programs because it allows us to group related variables of different types and handle them as a unit rather than as individuals. It also allows us to pass the entire structure to a function by only passing the name of the structure which (like for arrays) is the address of (a pointer to) the first element of the data.
We usually declare structures near the start of a file or in a header. For example, we can declare structures for the date as follows:
struct date_t<br />
{<br />
  int year ;<br />
  int month;<br />
  const char *month_text;<br />
  int day;<br />
  const char *day_text;<br />
};
This declaration tells the compiler that you want to store two ints, a constant character pointer (a pointer to a string), another int, and another pointer to a string all together in a package that you can handle as a unit. The compiler will determine how much memory space is actually needed to store this data. If our system defines an int as two bytes and the address of a string as four bytes, then this structure will occupy 14 contiguous bytes of memory. We don’t need to know how the compiler defines these data types nor do we need to know how it allocates memory for it. Since we are curious folks, however, let’s look to see how Windows stores this data. In Pelles C, write and run the following:
#include <stdio.h>
// Declare date_t<br />
struct date_t<br />
{<br />
  int year ;<br />
  int month;<br />
  const char *month_text;<br />
  int day;<br />
  const char *day_text;<br />
};
int main()<br />
{<br />
  struct date_t myDate;<br />
// define an instance of date_t
  printf(“date_t takes %d bytes.\n”,sizeof(myDate));<br />
  printf(“An int takes %d bytes.\n”,sizeof(myDate.year));<br />
  printf(“A const char * takes %d bytes.\n”,sizeof(myDate.month_text));<br />
}
This results in the output shown in Figure 1. So, I guessed wrong about the data sizes since an int is four bytes in Windows.
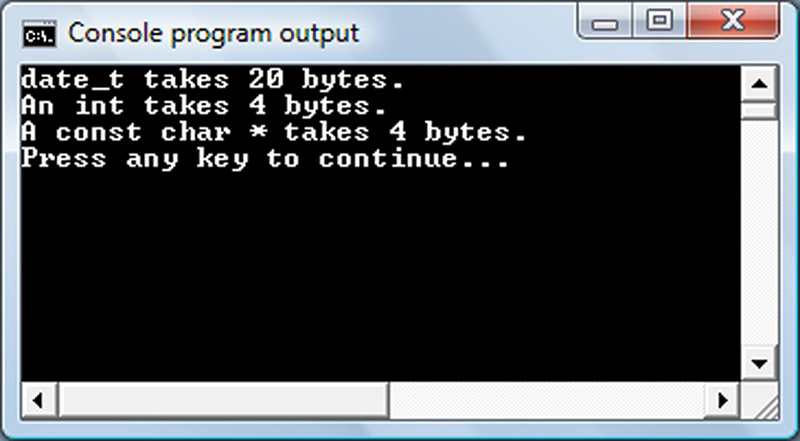
FIGURE 1. Size of date_t.
Notice in the above source code that the date_t structure is declared outside a function and defined within the function. The declaration tells the compiler what a date_t structure looks like; the definition creates a specific instance of that structure. You may also note that when we want to access a specific element of the structure, we use the dot operator, so we see myDate.year for the year element of the myDate structure. We’ll see another way to access these elements later.
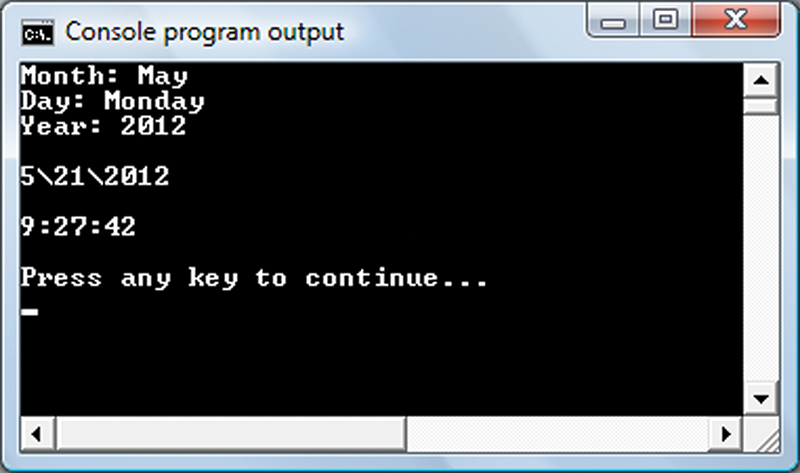
FIGURE 2. Date and time output.
Now, we have the date aspect of date-time defined; let’s look at the time aspect:
struct time_t<br />
{<br />
  unsigned int hour;<br />
  unsigned int minute;<br />
  unsigned int second;<br />
};
We might have an application like a real time clock that needs to use the date and time as a unit, so we can declare a structure that contains both the data and time structures — a nested structure — as follows:
struct rtc_t<br />
{<br />
    struct date_t myDate;<br />
    struct time_t myTime;<br />
};
At this point, we have declared three structures but we haven’t created an instance of any of them. We have seen how to create an instance of a structure by defining it within a function. However, we could instead add a name following the final bracket to create the instance:
struct rtc_t<br />
{<br />
    struct date_t myDate;<br />
    struct time_t myTime;<br />
}myRTC;
This use does the same thing as writing the following in a function:
struct rtc_t myRtc;
The difference is that the former creates an instance that is available to all functions in the module (the .c text file), while the latter creates an instance that is only available to the function in which it is declared. Either way, by declaring myRtc we are also declaring instances of the date_t and time_t structures.
As with arrays, we pass structures to functions using pointers. This requires that we use two sorts of operators to access the data in a structure. In the function where the structure was declared, we use the ‘.’ operator. If we pass the structure to another function, we access the elements of the structure with the ‘->’ operator. The following example creates an instance of rtc_t in main, then uses the ‘.’ to load it with data. Next, it sends it to the function showDateTime, passing it as a pointer. In the function showDateTime, the data is accessed using the ‘->’ operator.
#include <stdio.h>
struct date_t<br />
{<br />
  int year ;<br />
  int month;<br />
  const char *month_text;<br />
  int day;<br />
  const char *day_text;<br />
};
struct time_t<br />
{<br />
  unsigned int hour;<br />
  unsigned int minute;<br />
  unsigned int second;<br />
};
struct rtc_t<br />
{<br />
  struct date_t myDate;<br />
  struct time_t myTime;<br />
};
void showDateTime(struct<br />
rtc_t *myRtc);
int main()<br />
{<br />
  // Declare an instance of<br />
  // rtc_t<br />
  struct rtc_t myRtc;
  // Load it with data<br />
  myRtc.myDate.year = 2012;<br />
  myRtc.myDate.month = 5;<br />
  myRtc.myDate.month_text =<br />
  “May”;   <br />
  myRtc.myDate.day = 21;<br />
  myRtc.myDate.day_text =<br />
  “Monday”;<br />
  myRtc.myTime.hour = 9;<br />
  myRtc.myTime.minute = 27;<br />
  myRtc.myTime.second = 42;
// Send the address-of to<br />
// show the date and time<br />
  showDateTime(&myRtc);<br />
}
// Take a pointer to an rtc_t structure and show the data<br />
void showDateTime(struct rtc_t *myRtc)<br />
{<br />
  printf(“Month: %s\nDay: %s\nYear: %d\n\n”,<br />
    myRtc->myDate.month_text,<br />
    myRtc->myDate.day_text,<br />
    myRtc->myDate.year);
  printf(“%d\\%d\\%d\n\n”,<br />
    myRtc->myDate.month,<br />
    myRtc->myDate.day,<br />
    myRtc->myDate.year);
  printf(“%d:%d:%d\n\n”,<br />
    myRtc->myTime.hour,<br />
    myRtc->myTime.minute,<br />
    myRtc->myTime.second);<br />
}
Take a moment to review that code and think about the two methods for accessing the data in a structure. When you are dealing directly with the structure, you use the dot ‘.’ operator. When you are dealing with a pointer to the structure, you use the arrow ‘->’ operator. When you are dealing with structures within structures as shown in our example, you use the ‘->’ for the outer structure which was passed as a pointer and the ‘.’ for the inner structures that got passed along with it. You have to use this a bit to get comfortable with it.
Lab
The PC has a real time clock (RTC) that has its own battery so that it can keep running — even when the PC is unplugged. With microcontrollers, we have to add hardware to make an RTC. In the AVR Butterfly, a 32.768 kHz watch crystal is attached to an internal AVR timer/counter peripheral so that an interrupt can be generated every second to keep count of seconds. Another way to do this is to have an external IC to keep time for us; we can then ask that device for the time. One common device used for this is the DS1307 that requires one of those 32.768 kHz crystals. It can communicate with a microcontroller via an I2C bus. In this episode, we will build an RTC on a breadboard for use with an Arduino that conveniently has an RTC library already written for us. We will then add a PCB to this kit (DS1307RTC kit) that you can purchase from the Nuts & Volts Webstore. In a later Workshop, we will take a deeper look at computer time-keeping that will lead us to writing a C based time-keeping library and to learning about the AVR timer/counter peripherals.
How the DS1307 Stores Date and Time Data
The DS1307 has 64 registers in SRAM — the first eight bytes are used to store the time data; the next 56 are available for your use (more on that later).
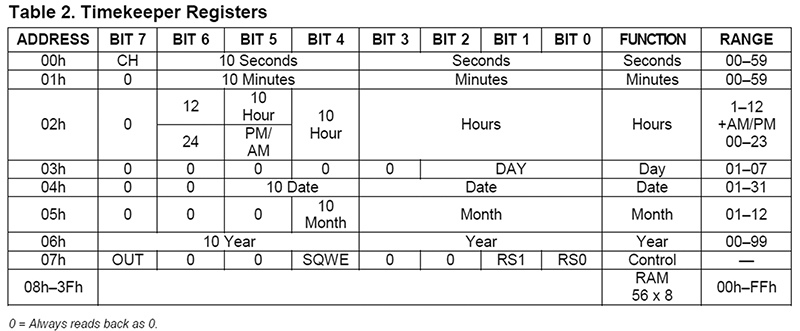
FIGURE 3. DS1307 timekeeper registers.
Take a look at the first byte 00h that is used to store seconds. You see that the four lower bits store seconds, while the next higher three bits store ‘10 seconds.’ You might wonder what that is all about since you can, in fact, store all the seconds in a minute — all 60 of them in five bits (stores up to 64 unique values). What you are seeing is BCD (Binary Coded Decimal) storage. This allows the binary numbers to be directly used to express human readable numbers without translating them. In a later Workshop, we will see how to use what we have learned about data structures to manipulate the DS1307 data in software. Since we are limited in space, let’s build our real time clock now and learn about the code later.
Build a DS1307 Circuit on a Breadboard
We see an illustration for a DS1307 circuit on a breadboard in Figure 4.
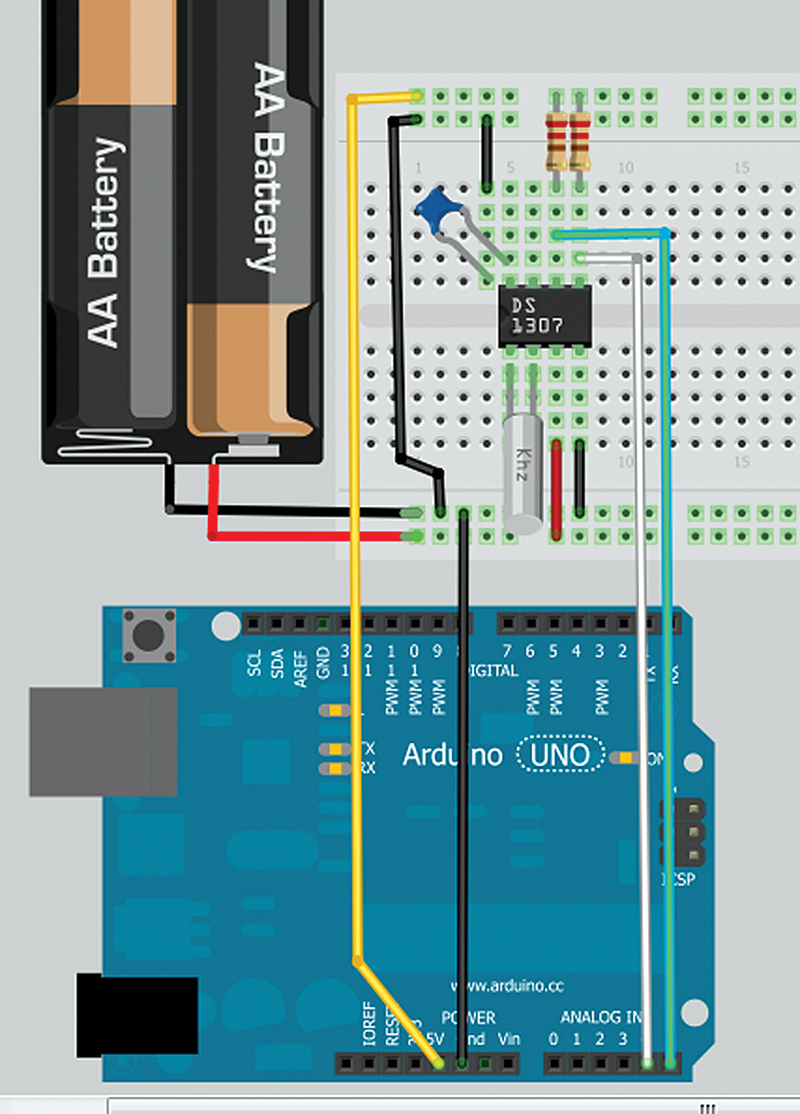
FIGURE 4. Arduino/DS1307 RTC on a breadboard.
This illustration was generated in Fritzing — a very interesting open source application that hopes to be for Electronic Computer Aide Design (ECAD) what the Arduino is for microcontrollers. We will get into the details of Fritzing next time, but for now let’s build our real time clock and test it with an Arduino.
We see a close-up of the breadboard in Figure 5 that has labels added to help us with our wiring. Figure 6 shows how this looks on a real breadboard.
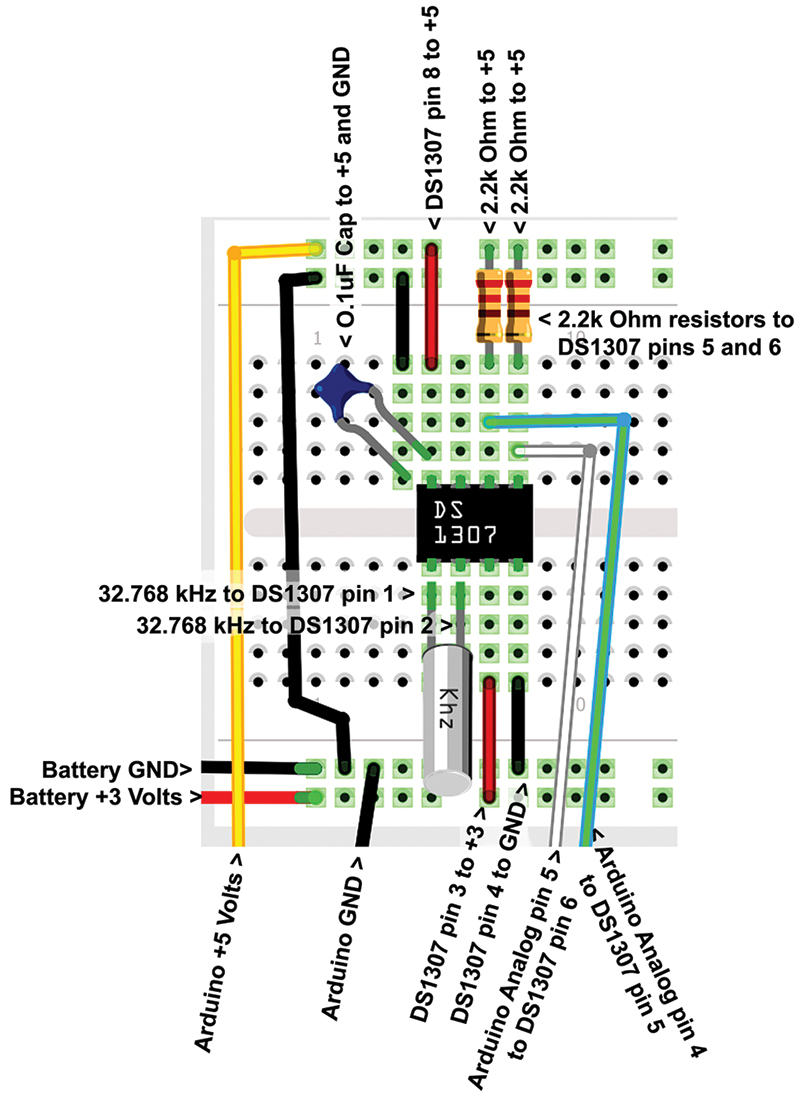
FIGURE 5. Breadboard wiring guide.
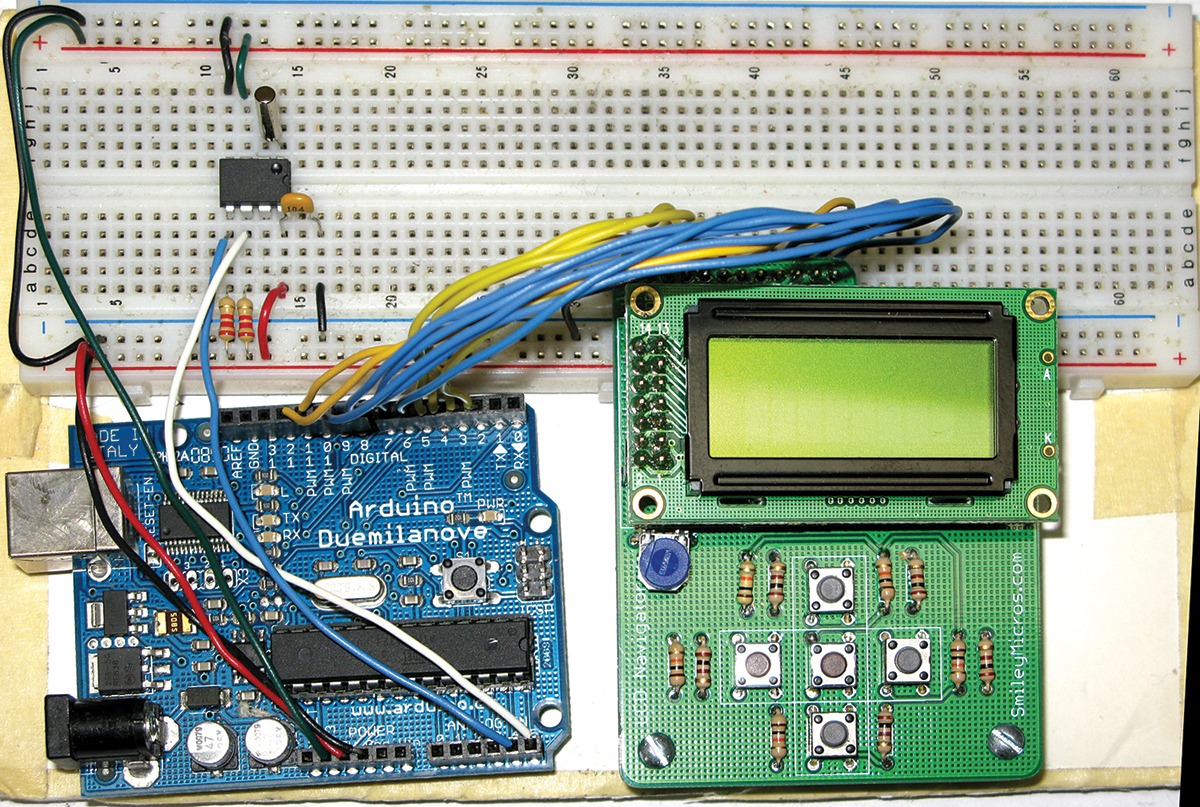
FIGURE 6. DS1307 RTC on a breadboard using Fritzing.
With those great images in Figures 4 and 5, you’d think I’d wire it up like that, but I didn’t. I had wired it up and tested it before I came across Fritzing which I used to make Figures 4 and 5. Showing the alternate wiring doesn’t cause any real problems. You can wire it up either way, as long as you make sure you get the power and ground correct. Figures 6 and 7 show the DS1307 wired up on a breadboard for use with the Arduino. It also has the LCDNAV wired up (perhaps for a breadboard alarm clock that we might see in a later Workshop).
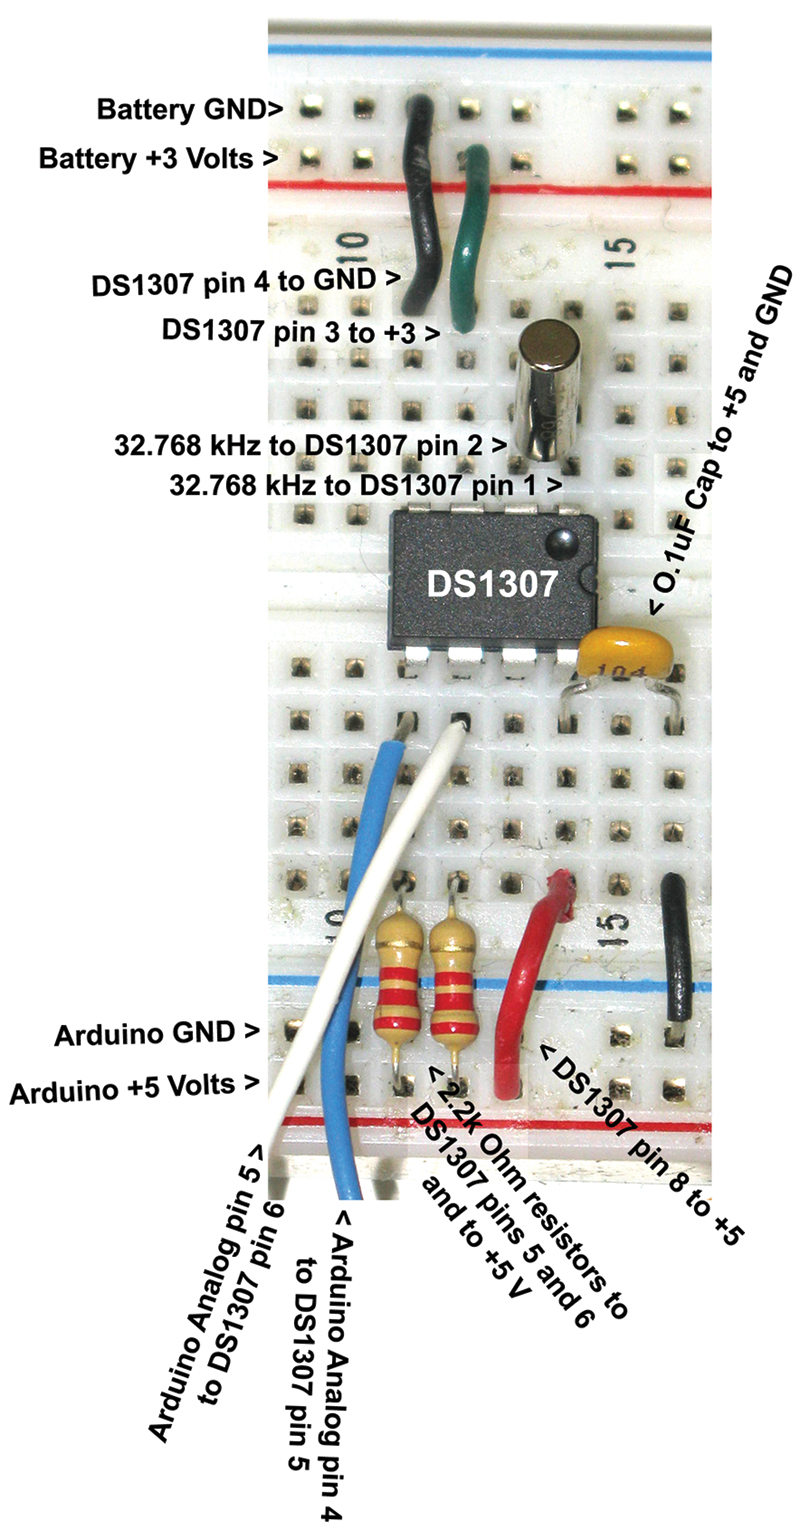
FIGURE 7. Close-up of the DS1307 RTC on a breadboard.
Bill of Materials
Table 1 lists the parts you can get from www.mouser.com. (Or, as mentioned before, you can check the Nuts & Volts Webstore where you can get these parts and a PCB to mount them on.)
| Qty |
Name |
Mouser Part Number |
| 1 |
DS1307 |
700-DS1307 |
| 1 |
32.768 watch crystal |
815-AB38T-32.768KHZ |
| 1 |
Battery holder 12 mm coin |
534-3001 |
| 1 |
Battery CR1220 |
614-CR1220 |
| 1 |
Capacitor 0.1 µF |
21RZ310-RC |
| 2 |
Resistor 2.2K ohm |
660-MF1/4DCT52R2201F |
TABLE 1. Bill of Materials.
Using the DS1307 With the Arduino
There is an excellent library for the Arduino at www.arduino.cc/playground/Code/Time that lets you use a DS1307. Follow the Arduino directions for including a library. Then, click on the library and the DS1307 examples as shown in Figure 8.
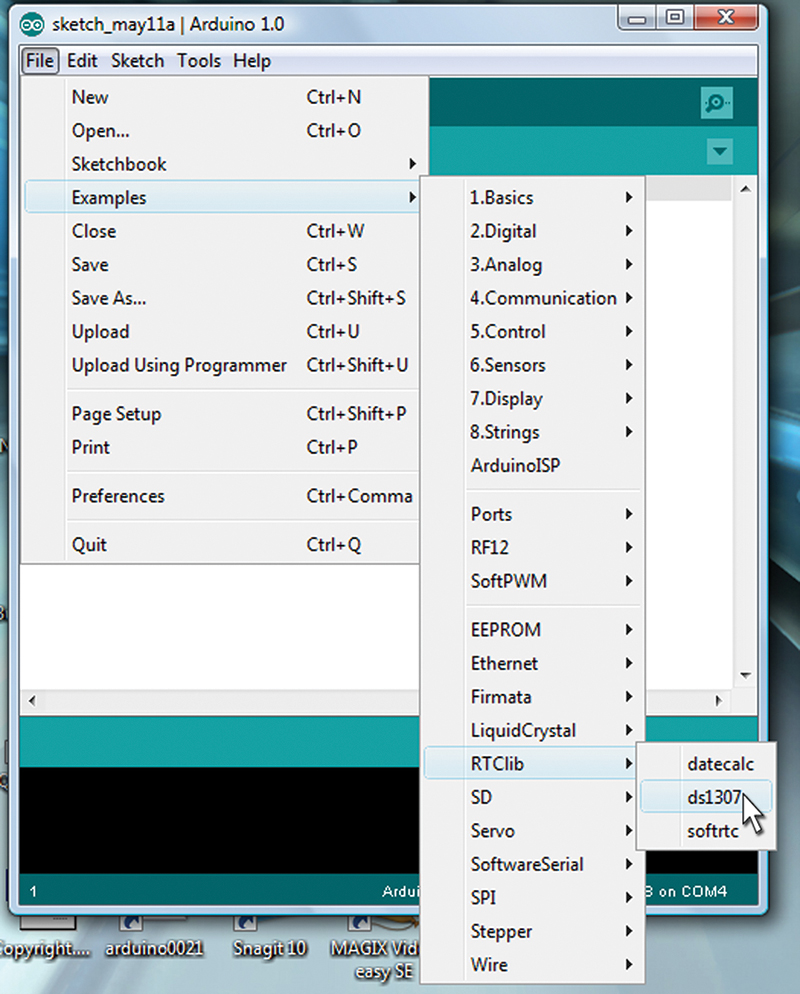
FIGURE 8. Arduino select RTCLib DS1307 sketch.
The files shown in Figure 9 calculate the seconds from the Unix Epoch which began 1/1/1970, convert that to days and then to now (today’s date/time) plus seven days and 30 seconds as shown in Figure 10.
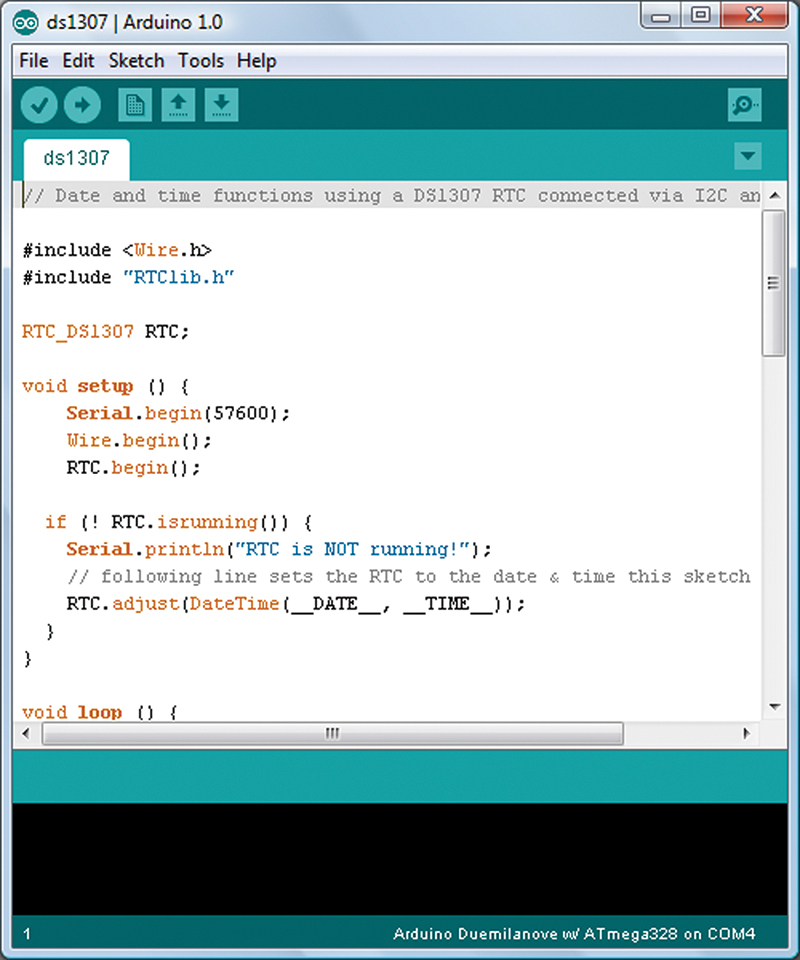
FIGURE 9. Arduino DS1307 sketch.

FIGURE 10. Arduino DS1307 sketch output in a serial monitor.
DS1307-RTC Kit
There is certainly nothing wrong with purchasing all the parts and then building this circuit on a breadboard as discussed above. It is easier and more reliable, however, to build it on a printed circuit board. Figure 11 shows the schematic; Figure 12 shows the components. Figure 13 shows the PCB; Figure 14 shows the PCB with the parts mounted; and Figure 15 shows it on a breadboard hooked up to an Arduino.
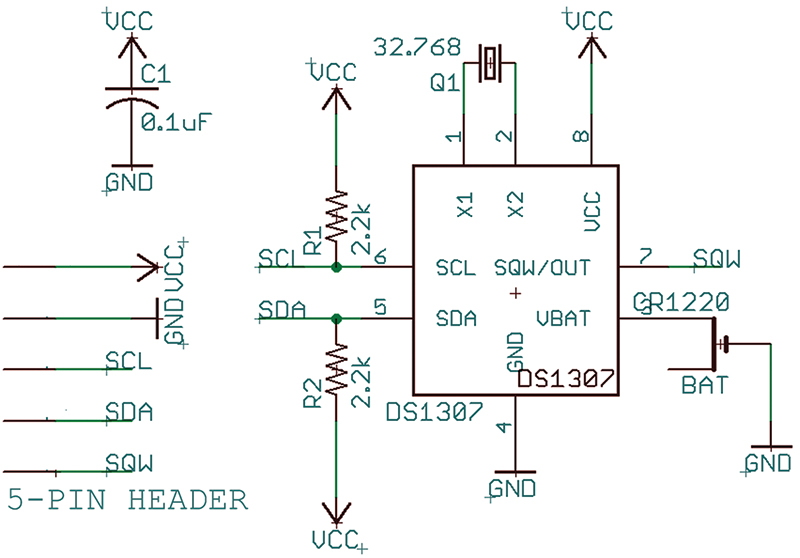
FIGURE 11. DS1307 RTC schematic.
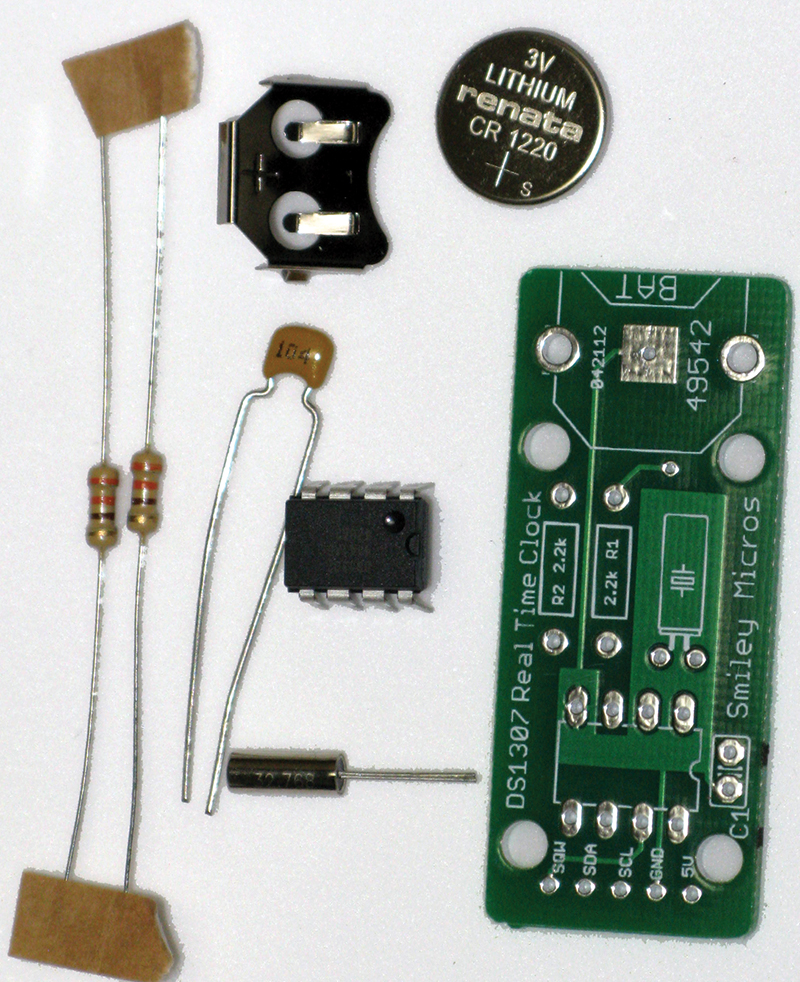
FIGURE 12. DS1307-RTC parts kit.
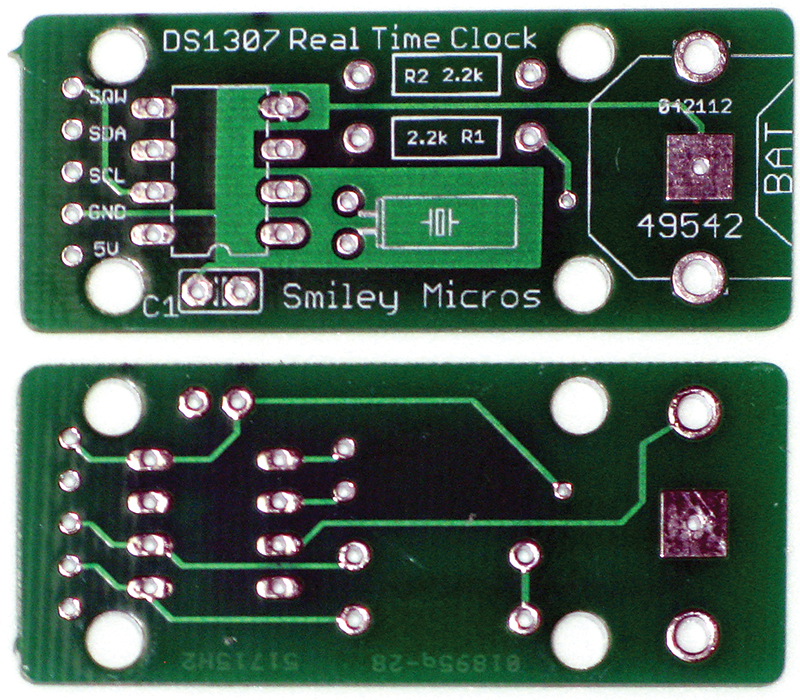
FIGURE 13. Arduino DS1307 printed circuit board.
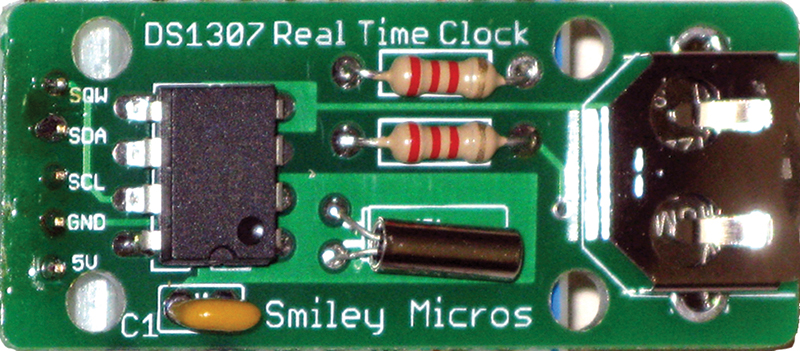
FIGURE 14. DS1307 RTC PCB with components.
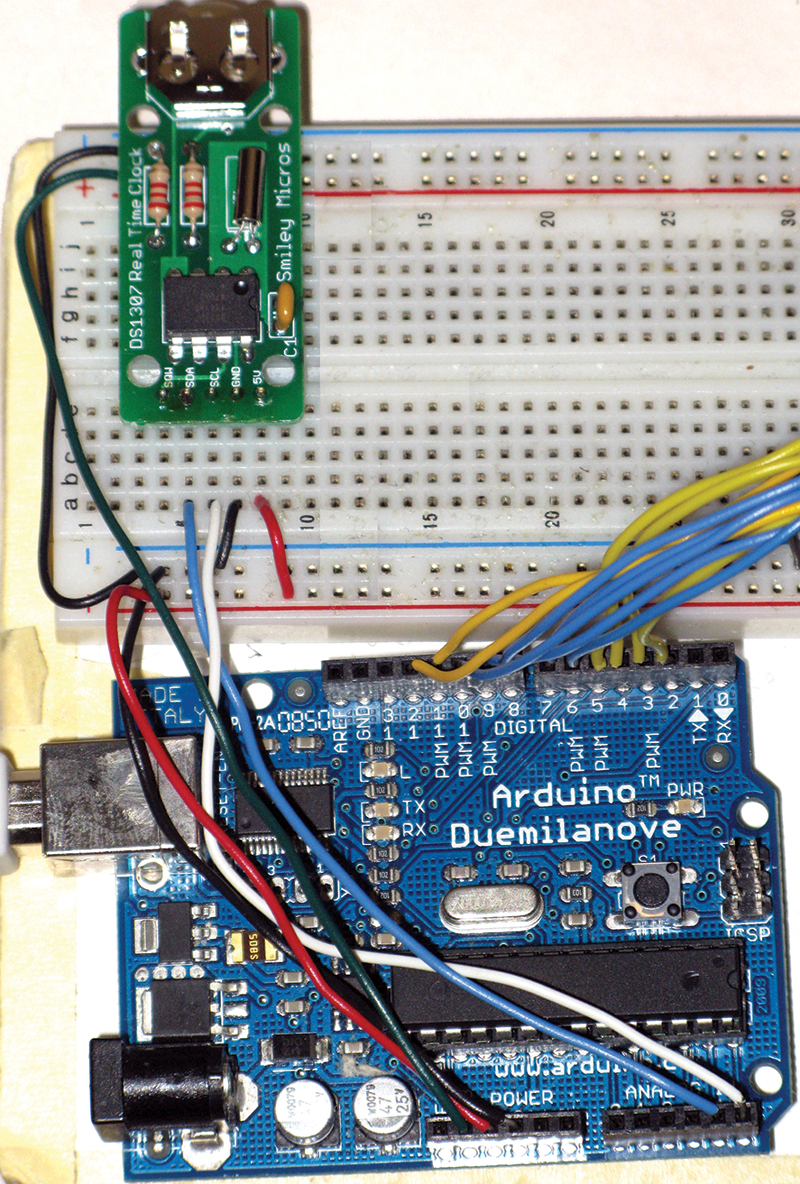
FIGURE 15. DS1307-RTC on breadboard with Arduino.
The DS1307 uses the I2C bus where pin 6 goes to SDA and pin 7 goes to SCL. On the Arduino, we connect the SDA to the analog pin 4 and SCL to analog pin 5. These Arduino pins are, of course, not used in the analog mode, but are set up in software for the I2C bus. You can use the same software as discussed above for the breadboard version of the design.
So, now we have a tool to provide a real time clock on a breadboard. We see that we can use this tool with an open source Arduino library. My goal in building the breadboard RTC was to provide a design that can be ported to a PCB break-out board for ease of use, and then use the data from this board to look in more detail at how C handles dates and times.
Along the way, I ran into Fritzing which gives us Figures 4 and 5. Fritzing is a free open source program that hopes to do for hardware design what the Arduino has done for software. Amazingly, they have somewhat succeeded.
Anyway, Fritzing is so compelling that I’ve decided to delay the C time discussion. So next time, we will begin a two-part series on Fritzing and then resume our C time discussion after that. NV
Theory is all well and good, but to really learn this stuff you have to get your hands on some tangible items that blink, whirr, and sometimes detonate. As a service for the readers of the Smiley’s Workshop articles, we have simple and inexpensive projects kits available that can help you make it real. You can find these kits (and some darn good books) at the Nuts & Volts Webstore.