I built an acoustic guitar a few years back, which turned out to be a lot of work (see craigandheather.net/cgitpage.html if you are interested in seeing that process). I wasn't aware I wanted to build an electric guitar until I got an email from the Stewart-MacDonald company describing what is probably the easiest electric guitar one can construct. This guitar was simpler than most electric guitars for two main reasons:
- It utilized a pre-built electric guitar neck with frets already installed and already finished. Using a pre-built neck cuts days — or weeks — out of the guitar making process.
- The body was a simple rectangle instead of the more complex shaped bodies found on many electric guitars.
As soon as I saw this, I knew I had to build one. I remembered that Bo Diddley played a rectangular guitar, so I knew I would be in good company. The Gretsch music company even made rectangular guitars for a while. The instrument I had in mind would have the neck and the playability of a Fender Telecaster/Stratocaster electric guitar, with the pickups and hardware of a Gibson Les Paul. A crossover guitar, so to speak.
If you are not familiar with Telecaster (Tele), Stratocaster (Strat), or Les Paul guitars, look them up at wikipedia.org. Wikipedia is also a great resource for checking out any guitar terms used in this article that you may be unfamiliar with.
Sustain —- Length of time a string vibrates.
Nut — The bit that is between the fingerboard and the headstock that the strings pass over and touch.
Intonation — Refers to the instrument being in tune along the fretboard.
Bridge Pickup — In electric guitars, this is the pickup that is placed closest to the bridge
Neck Pickup — Refers to the pickup closest to the neck.
Humbucker — A noise canceling twin coil pickup normally associated with Fender.
Convinced I should build one, I immediately started thinking about all of the individual pieces/parts that make up an electric guitar: the neck, tuning heads, neck screws, neck plate, pickups, switches, controls, etc. As you can imagine, the list gets long very quickly. I toyed with the idea of buying a used electric guitar and scavenging the parts from that, but I couldn’t bring myself to dismantle a perfectly good instrument.
In the end, I decided to buy all of the parts individually even though that would cost a little more. I stumbled upon a site called GuitarFetish.com which offered most of the parts I would need at reasonable prices. I made up a rather long list of components (see Table 1) and placed the order (total of $280 in December 2012). With that done, I started to think about how to build the body of the guitar.
| QTY |
ITEM |
PART # |
DESCRIPTION |
| 1 |
Pre-made neck |
TLCGMP |
Clear gloss finished Telecaster neck with maple fingerboard |
| 1 |
Gold neck plate |
K02 |
Gold neck plate with screws |
| 1 |
Tuneomatic bridge |
B06 |
Large bushing Tuneomatic style gold bridge |
| 1 set |
Tuners |
E17 |
Gold Gotoh style 14:1 tuners |
| 1 |
Control plate |
K05 |
Telecaster gold vintage style control plate |
| 1 pair |
Strap buttons |
K32 |
Gold strap buttons with screws |
| 1 pair |
String trees |
K35 |
Gold string trees. (Only used one of the two.) |
| 1 |
Tailpiece |
GTS09GD |
Gold tailpiece with mounting studs |
| 1 |
Neck pickup |
H182 |
Gold neck mini humbucker pickup |
| 1 |
Bridge pickup |
H183 |
Gold bridge mini humbucker pickup |
| 1 |
Pickup selector switch |
F24F167 |
Three-way Telecaster style pickup selector switch with screws and black top hat tip; switch is 2P3T. |
| 1 pair |
Knobs |
A03 |
Gold knurled brass Telecaster knobs for split shaft pots |
| 2 |
Potentiometers |
F22 |
Full size 250K audio taper potentiometers (pots) |
| 1 |
Capacitor |
F36 |
.047 µf Sprague orange drop capacitor |
| 1 |
1/4" output jack |
F17 |
1/4" mono output jack |
| 1 |
Output jack mount |
4283-G |
Gold Electrosocket jack mount purchased from stewmac.com. |
| NOTE: |
All components were purchased from guitarfetish.com except as noted. |
TABLE 1. Guitar Hardware Parts List
Electric guitar bodies are usually made with some kind of hardwood. Guitar building forums have endless debates about which woods are best. Many insist the more dense the wood is, the better sustain the guitar will have. Originally, I wanted to make the guitar body out of black walnut but I couldn’t find a board locally that was thick enough and not seriously warped.
Instead, I purchased a beautiful, perfectly straight two inch thick piece of Sapele (Entandrophragma cylindricum) wood from Woodcraft. Sapele is a tropical African hardwood (also known as sapelli or aboudikro) used by many guitar manufacturers because of its tonal properties. The Sapele board I bought was not wide enough for my guitar body, so I had to glue 1-1/2” pieces to each side of it since the finished size of the guitar blank (body) needed to be 9 1/2” x 17”. Photo 1 shows the clamps holding the glued pieces together.
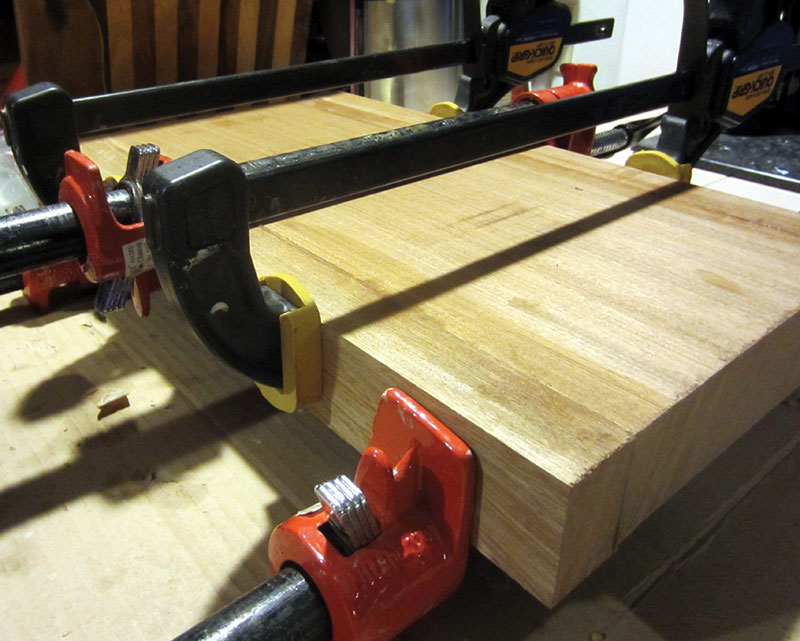
PHOTO 1. Gluing up the Sapele guitar body.
After the glue dried, I ran the blank through my planer to remove the glue residue and to flatten the top and bottom (see Photo 2).
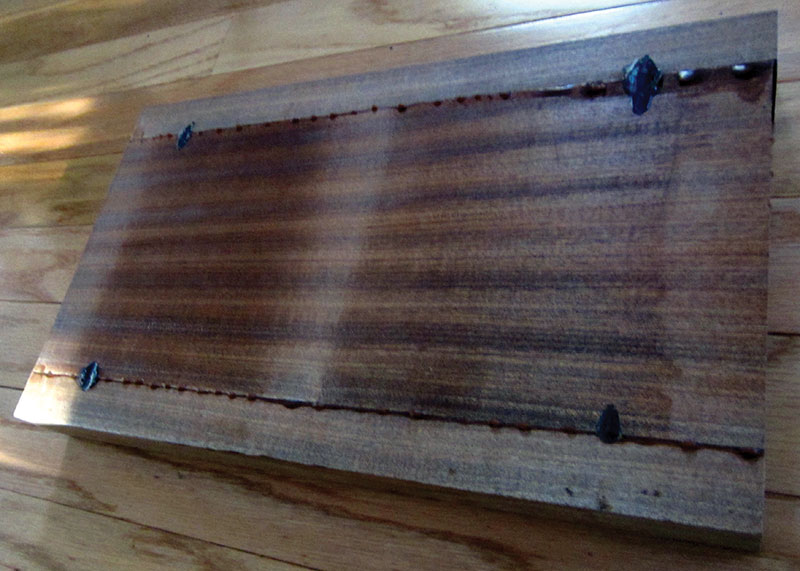
PHOTO 2. After the glue dried, but before planing.
Next step was to machine a dado (slot) around the blank’s perimeter using dado blades on my table saw. This was necessary because I wanted to inlay white ash around the body for an artistic touch. The light colored ash contrasts nicely with the dark Sapele. I did the same thing with the ash trim for a coffee table I built. (It always gets comments from the people who see it.) Of course, this is an optional step you don’t have to do if you build a guitar like this.
I mitered the ash corners to 45 degrees and fit the ash into the dado. In Photo 3, I’m gluing the ash onto the Sapele body. After the glue dried, I trimmed up the body edges on the table saw so the ash was flush with the Sapele.
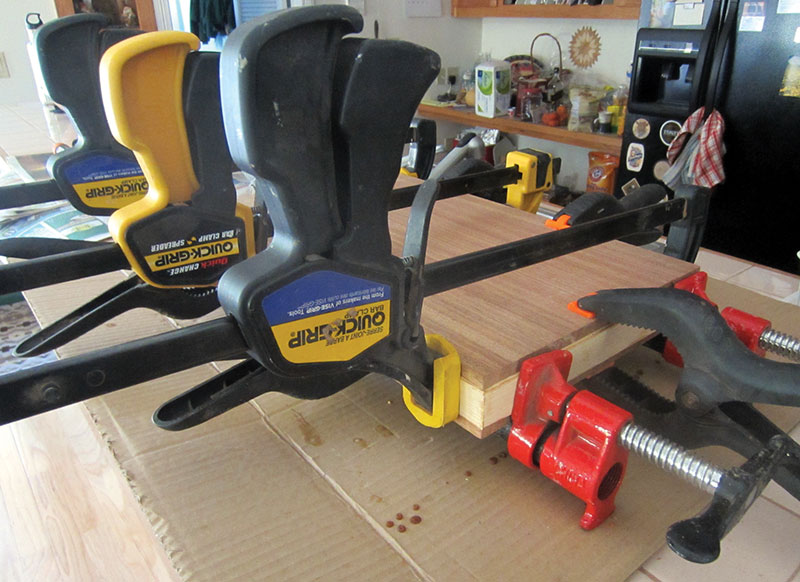
PHOTO 3. Gluing the ash inlaid strip around the body.
You might be asking yourself at this point if I had plans I was working from to build this guitar. The answer would be no. I did, however, know the most important piece of information about the guitar I was building and that was its scale length (which is a function of the Fender style neck I chose to use).
Scale length is the distance from the nut of the guitar (above the first fret) to its bridge. In my case, that was 25.5”.
It is absolutely critical that the distance from the nut to the 12th fret be exactly equal to the distance from the 12th fret to the bridge of the guitar. If not, the guitar will have bad intonation which — in severe cases — can make the guitar unplayable.
Luckily, the bridge I selected was adjustable which made getting the scale length correct much easier.
The guitar dimensions evolved as follows. First, I laid out and machined the neck cavity so I could insert the neck into the body. Next, I measured 12.75” from the 12th fret and drew a line for where the bridge would be located. I placed the tailpiece 1.5” behind the bridge line and the bridge pickup position 1.5” in front of the bridge. Finally, the neck pickup was positioned as close as possible to the end of the neck.
Placement of the control cavity, strap buttons, and output jack are not critical, so I placed them where I thought they looked and would work best.
I built custom templates for my router for the neck cavity and for the pickup cavities (pre-made templates can be purchased from stewmac.com). I used a flush cutting router bit with the bearing on the shaft towards the router.
The bearing rides on the template to make correctly shaped cavities. This was kind of a pain because you cannot cut the full depth of the cavities in a single pass. So, I had to elevate the template on spacers, make a cutting pass, lower the template a little, make another pass, then remove the spacers under the template and make a final pass.
I machined cavities for the neck, both pickups, and for the guitar’s control panel. My guitar will have simple controls like a Fender Telecaster guitar: a three-position pickup selector switch, and a volume and tone control.
If you look closely at Photo 4, you can see pencil lines on the tape.
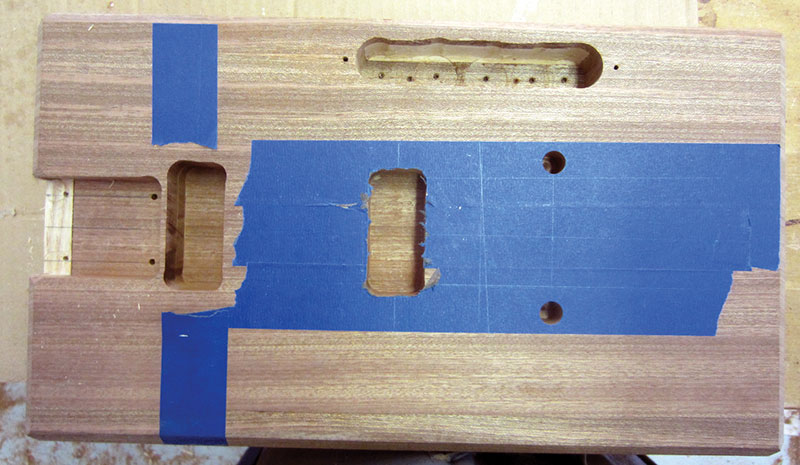
PHOTO 4. Machining of the body almost complete.
The vertical line at a small angle from vertical is for placement of the bridge. The bass side of the bridge must be offset an additional 1/8” for proper intonation. Photo 5 shows how the neck fits tightly into the body.
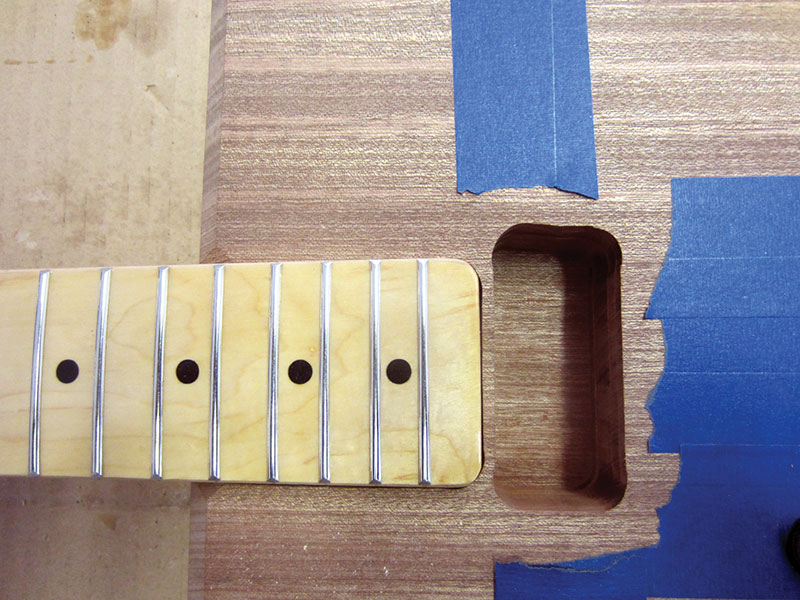
PHOTO 5. Closeup of the neck in the neck cavity and adjacent neck pickup cavity.
In Photo 6, you can see I drilled out the holes for the tuning keys and mounted them. I also drilled the four holes in the body for the neck plate. This type of guitar is referred to as a “bolt on neck” guitar as opposed to a guitar where the neck is glued permanently to the body.
PHOTO 6. Fitting the neck to the body, and the drilled and mounted tuning keys.
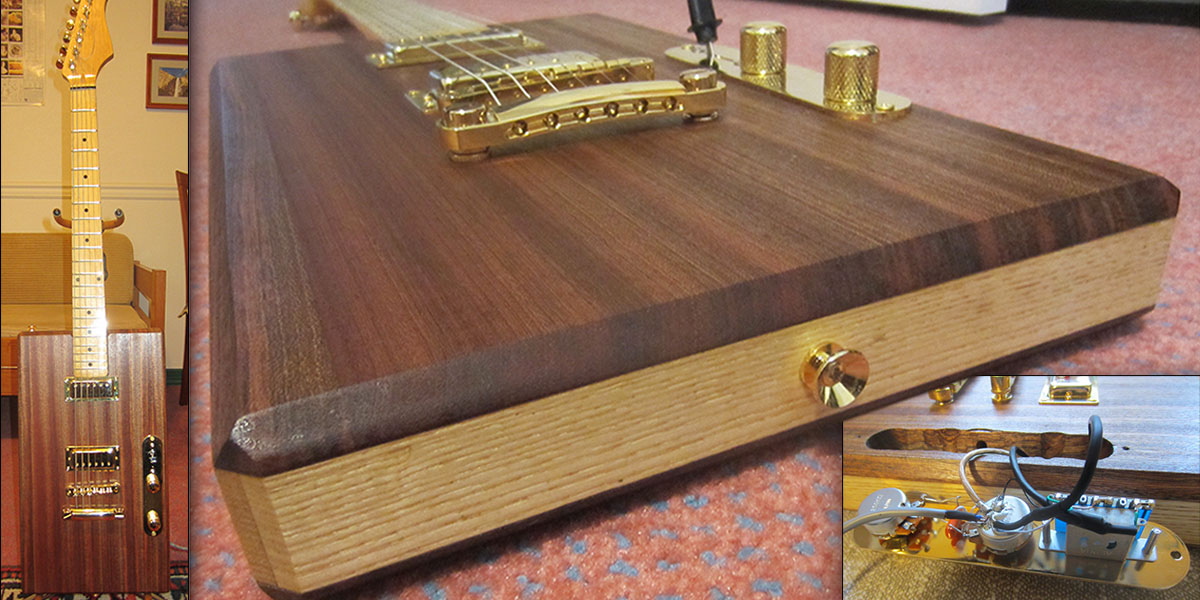
The four gold neck screws will pass through a gold metal neck plate, then through the body of the guitar and into the wood of the neck. You can also see in the photo that I beveled all of the hard edges on the body at a 45 degree angle. This makes the guitar more comfortable to play.
The final machining steps shown in Photo 7 were to drill holes for the bridge supports, the mounting holes for the pickups, and for the control panel. What you cannot see in this photo is that I had to drill holes/tunnels between the pickups and the control cavity, and between the bridge support hole and the control cavity, so I could run the electrical wires that I will eventually hook up to make the guitar function.
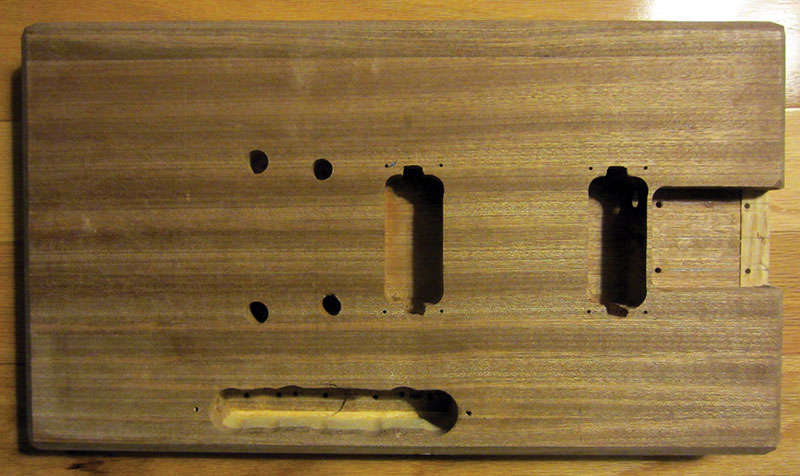
PHOTO 7. Body after the application of Tung Oil finish.
I also drilled a 7/8” hole in the bottom of the guitar for the output jack. I had to drill a tunnel for this connection, as well. Finally, I applied five coats of Tung Oil finish to bring out the nice Sapele wood grain. The neck (as mentioned) was already finished.
Photo 8 shows the back of the body after finishing.

PHOTO 8. Rear of body after finishing. Note neck screw holes.
With machining and finishing completed, I mounted the major components into the body and pulled the wires into the control cavity making sure I placed the neck pickup next to the neck and the bridge pickup next to the bridge because they are different. Refer to Photo 9.
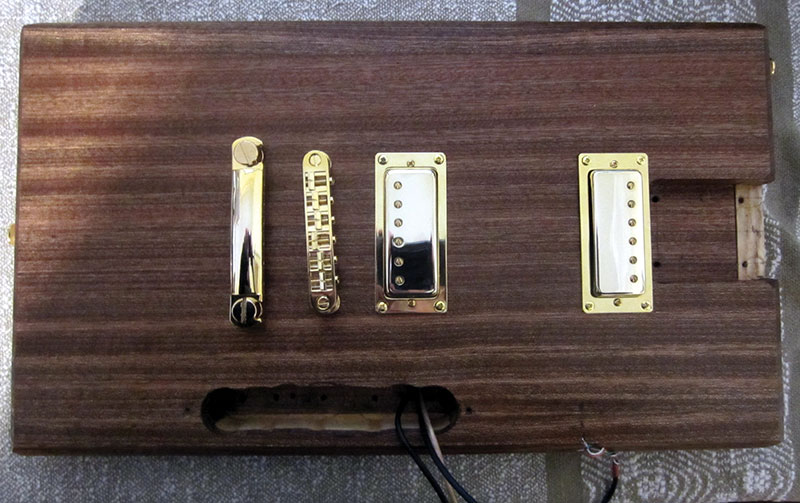
PHOTO 9. Installation of the tailpiece, bridge, and pickups.
The electronic portion of the guitar is really very simple (see the schematic in Figure 1). It consists of a three-position selector 2P3T switch which selects the neck pickup (for a more bassy sound) in the forward position, the bridge pickup (for more treble) in the rear position, and both pickups together in the middle position.
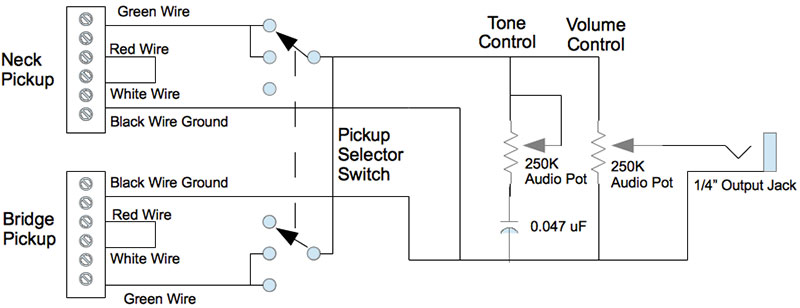
FIGURE 1. Guitar schematic.
The middle volume control governs the overall volume of the guitar, and the tone control rolls off the highs (via a first order R-C low pass filter) as it is rotated counter-clockwise.
You can see the finished wiring of the controls in Photo 10. The two black wires are connections to the pickups. The middle heavy wire is the ground for the bridge which is necessary or the guitar will hum when you touch the strings. The wire on the left is the shielded wire going to the output jack.
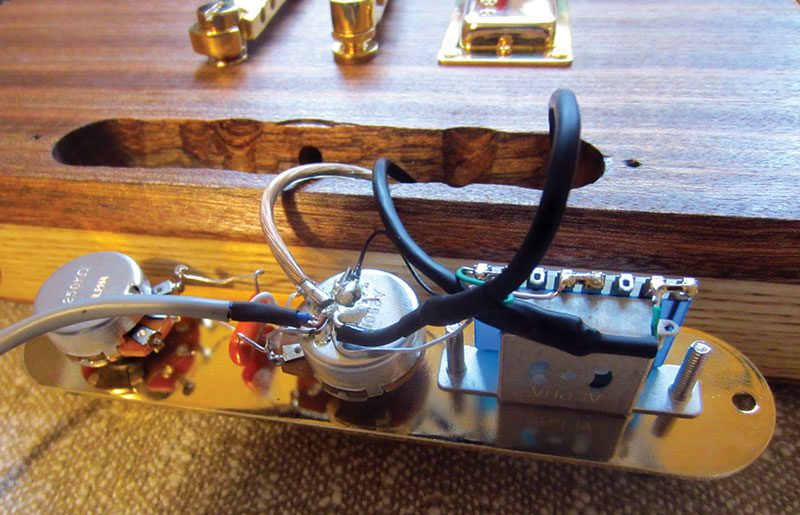
PHOTO 10. Control cavity wiring completed. Note all ground connections to the back of the volume pot.
The orange item between the pots is a 0.047 µF capacitor for the tone control. NOTE: It is very important to have a single ground point for all of the wiring. This helps to eliminate ground loops and hum. Here, all ground connections are soldered to the back of the volume pot.
Photo 11 shows the output jack wired up and Photo 12 shows it mounted into place.
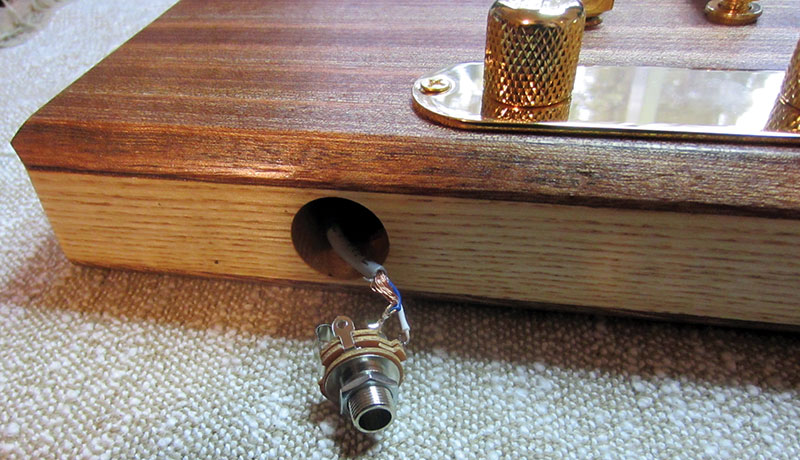
PHOTO 11. Output jack wired up.
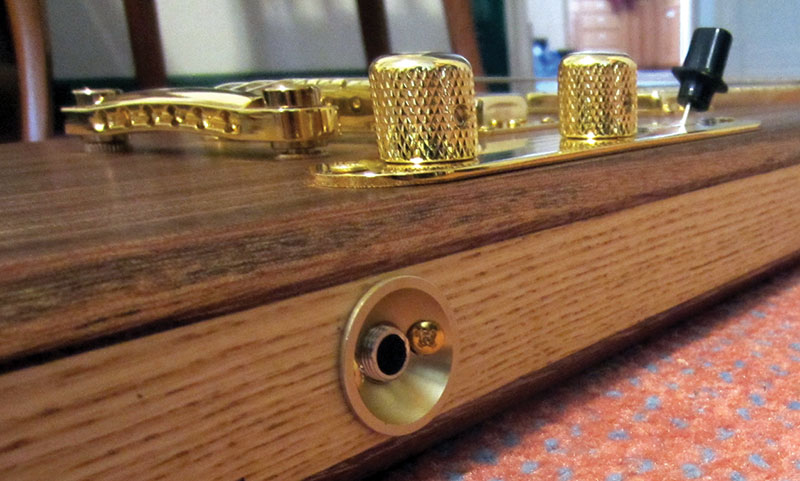
PHOTO 12. Output jack mounted in place.
Photo 13 shows the string tree I used for the E and B strings. Its function is to pull these strings downward off of the nut so the strings don’t come out of the nut grooves when the guitar is being played hard.
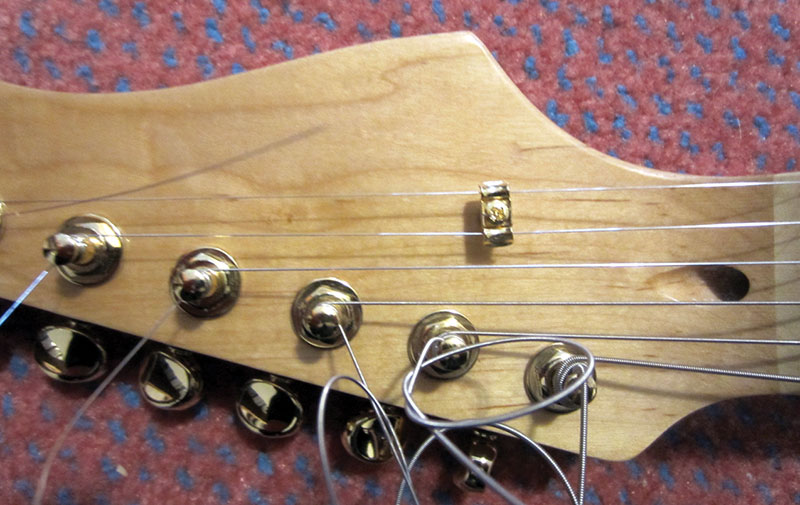
PHOTO 13. String tree mounted for the E and B strings.
Photos 14, 15, and 16 provide various views of the completed guitar. (Isn’t it pretty!?!?) In my opinion, it turned out very well.
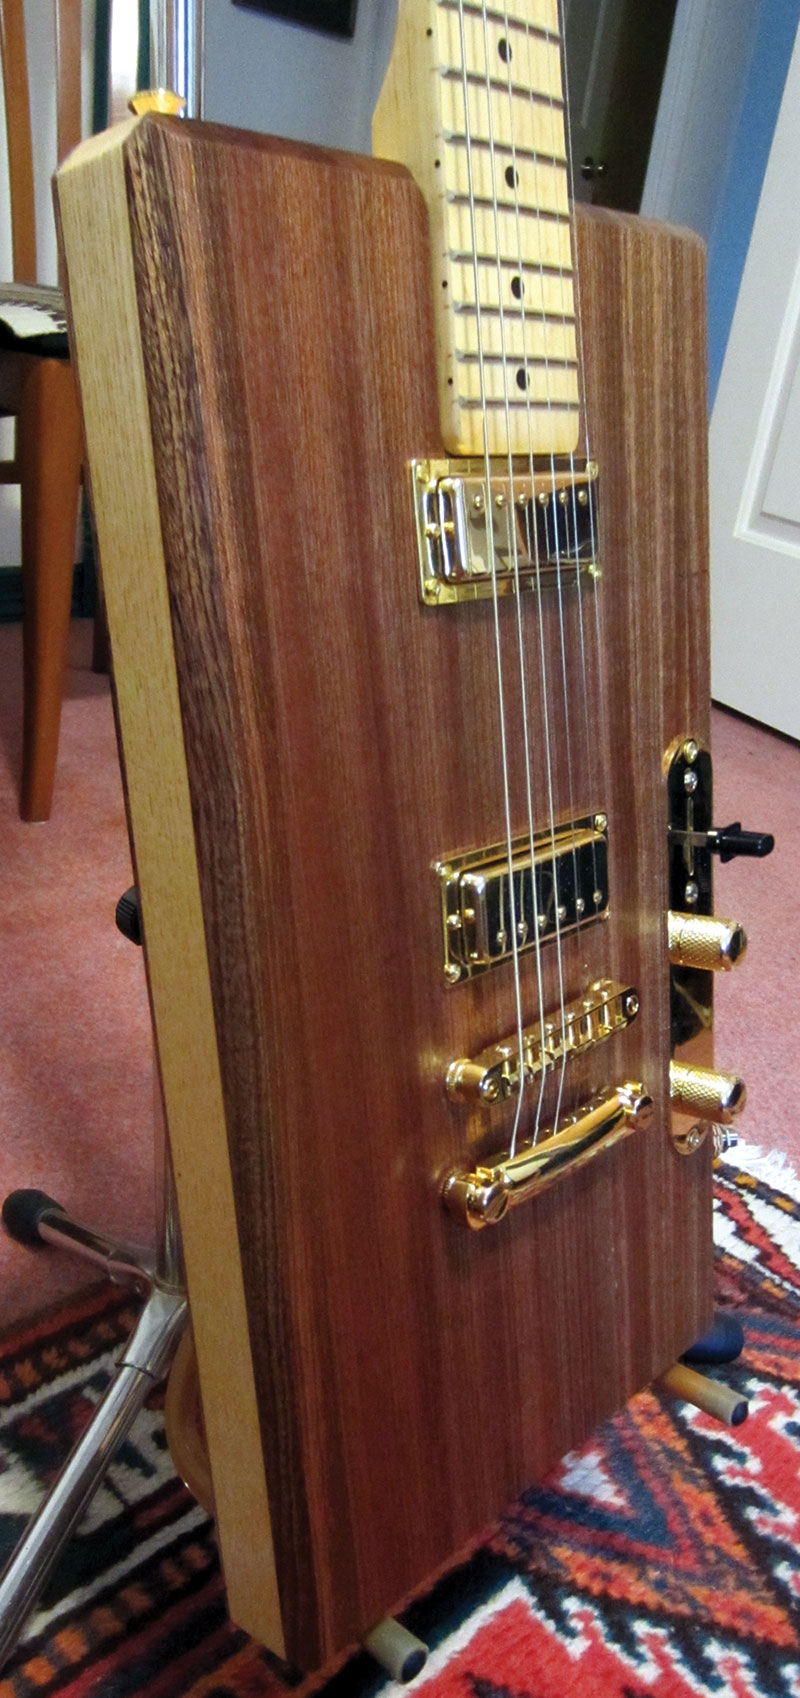
PHOTO 14. Closeup view of the guitar body.
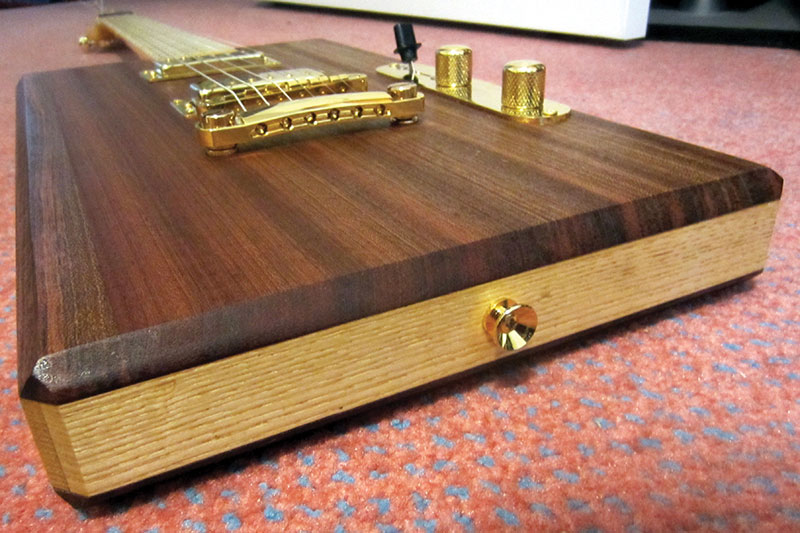
PHOTO 15. View from the rear of the guitar. Rear strap button is visible.
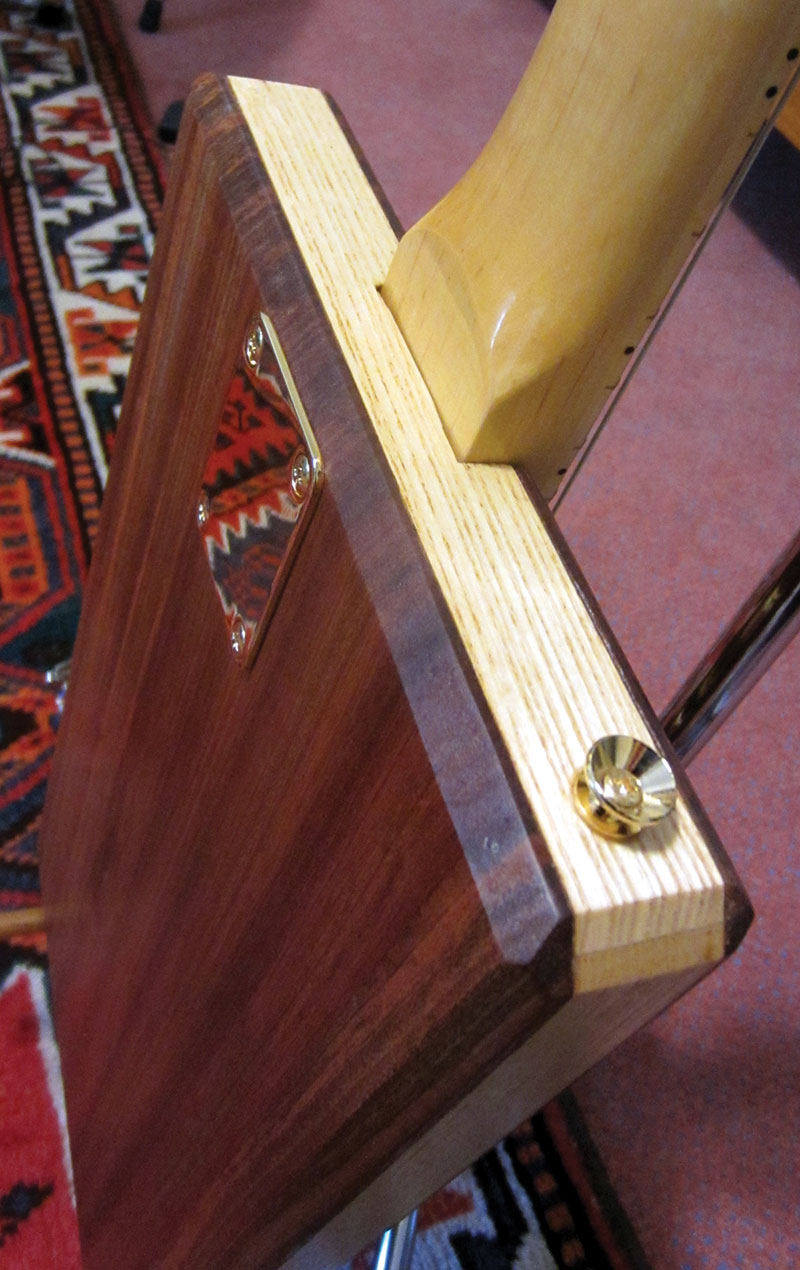
PHOTO 16. Top view of the guitar. The neck plate and front strap button are visible.
Additional photos and build information for this guitar are available on my website at www.craigandheather.net/electricguitarpage.html.
Conclusion
Building this guitar — while not your typical Nuts & Volts project — was a lot of fun. Due to the simplicity of design, a guitar like this can be built by most people with sufficient motivation. If you don’t possess the necessary tools or the woodworking skills required, maybe a friend or family member does and they can help you build one.
This guitar was not inexpensive to make, however. Much of my expense was a result of my particular choices of guitar components; two top of the line humbucker pickups instead of one, and the use of gold colored hardware drove my price up considerably.
I decided I was only going to do this once, so I might as well use high quality components.
Was it worth it? Definitely yes! Not only do I have a one-of-a-kind guitar that I can say I built myself, but I also have a wonderful sounding instrument that I will get years of use out of.
If you are interested in hearing how this guitar sounds go to craigandheather.net/songsilike2013cd.html. You’ll find songs off of a CD I did. Every electric guitar part on every song was played on the guitar you see here.
So, that’s proof enough that you too can build an electric guitar that sounds every bit as good as one you would buy, but for probably about one tenth the cost.
Plus, there’s also the pride that comes from building it yourself. That, my friends, is priceless. NV
Resources
| COMPANY |
WEBSITE |
DESCRIPTION |
| Warmoth |
www.warmoth.com |
Electric guitar and electric bass bodies, necks, and assorted hardware made in the USA. |
| Guitar Fetish |
www.guitarfetish.com |
Suppliers of all things guitar from parts to complete guitars. |
| Stewart-MacDonald |
www.stewmac.com |
Supplier of guitar parts, luthier tools to make guitars, and acoustic and electric guitar kits, plus much more. |
| Allparts Music Corporation |
www.allparts.com |
Supplier of electric guitar parts and accessories. |
| Greasy Groove, Inc. |
www.greasygroove.com |
Supplier of electric guitar parts and stylish accessories. |
Craig lives in the mountains of Colorado and can be contacted at [email protected]. When not messing around with music, electronics, computer projects, wood working or beer brewing, he plays in a rock and roll band and does a solo musical act around Colorado Springs.