Keeping tabs on relative humidity and temperature is important in a variety of situations. Museums often need to monitor these conditions in order to preserve rare artifacts. Musicians are concerned about the effects on their stringed instruments. Cigars and other natural products are often stored in climate controlled boxes. Not to mention, of course, homeowners who are concerned about the comfort level within their own homes.
The DHT22 is a recent contribution to the lineup of joint humidity/temperature sensors. It is particularly attractive to DIYers thanks to its low cost, which is around $10. It spans an impressive range of 0% to100% relative humidity, and -40° C to 125° C (that’s -40° F to 257° F). Of course, it’s doubtful any homebrew circuits could operate at these two extremes of temperature, but it’s nice to know the sensor won’t be the limiting factor. The claimed accuracy is ±5% worst case for humidity and ±0.2° C for temperature. A rather neat feature is that both values are measured to the nearest tenth; that is, to one decimal place.
Unfortunately, if you poke around the Web, you’ll quickly discover that there are more questions than answers concerning this device. Part of the reason for this confusion is that it spits out the readings digitally using a non-standard protocol. Another major problem for English speaking experimenters is that the datasheet (originally in Chinese) has been poorly translated and more often than not leaves you scratching your head.
Then, there’s the problem of the numerical format of the readings. This is not addressed in the datasheet and demands a bit of detective work at the bench. A few people have managed to put all the pieces together and get it percolating in the Arduino or C languages, often employing built-in timers or more exotic aspects of microcontrollers.
Can the DHT22 sensor be made to work in the more beginner-friendly Basic language, say on a commonplace PIC, and without reference to complex hardware features? Yes, indeed!
This article lays bare these secrets and demystifies the application of the DHT22. In particular, we’ll:
- Use the common and inexpensive PIC16F88 microcontroller to drive it.
- Program it in the free and easy-to-use Great Cow Basic language. (Refer to my article in the November 2012 issue which explains this awesome software.)
- Avoid timers, capture/compare modules, interrupts, and other complicated notions.
- Make it work with ordinary fixed point arithmetic (no floating point routines needed).
- Test it all with a remarkably simple LCD breadboard rig.
How to Take a Reading
Let’s see if we can first make sense of the communication protocol. Begin by looking at the schematic in Figure 1. As indicated there, the DHT22 is a four-pin device; +5V is applied to pin 1, while ground is pin 4. Pin 3 is a “no-connection” and simply ignored. Pin 2 is where the magic occurs.
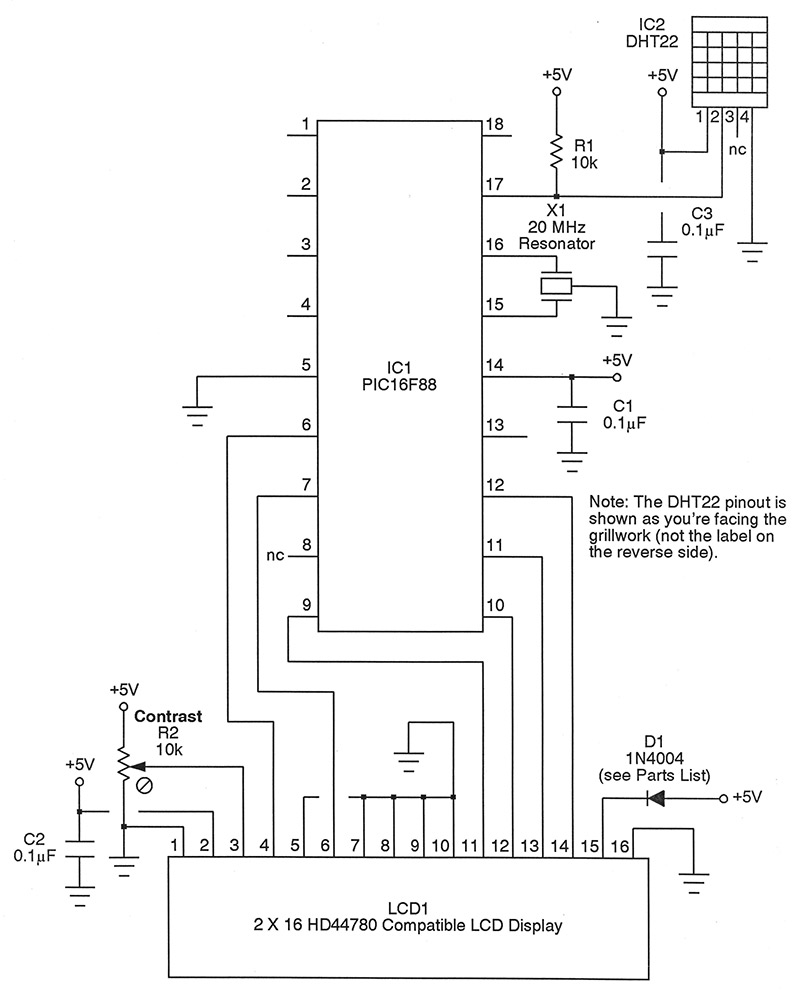
FIGURE 1.
This single pin establishes a two-way conversation with the PIC16F88. Obviously, this is going to be serial communication, but it follows a proprietary protocol — one you’ve likely never seen before.
There will be five bytes transmitted to the PIC. The first two give the relative humidity, and the next two give the temperature. The last byte is a checksum used to confirm everything went okay. We’ll look more closely at how to interpret these five bytes in just a moment, but for now let’s presume that a string of 40 bits (five eight-bit bytes) is going to shoot along pin 2 to port line A.0 of the PIC16F88. Referring again to the schematic, A.0 appears at pin 17 of IC1 and can be configured either as an input or output. We’ll assume it’s an input when first powered on, with resistor R1 acting as a pull-up.
To request a reading, port line A.0 is made an output and then pulled low for 18 milliseconds. After this fairly lengthy time, the line is pulled high again but for a much shorter 40 microseconds. This sequence then awakens the DHT22 sensor from its idling, low current state. The PIC gets ready to listen to it by making port line A.0 an input again.
The DHT22 responds with an acknowledgement, indicated by the following signals. The sensor now has control of A.0 and pulls it low for 80 microseconds. The firmware in the PIC can easily monitor this period and if things run long, a timeout is declared and some error-handling can be invoked.
Okay, let’s assume everything has gone according to Hoyle so far. The DHT22 next brings port line A.0 high, again for 80 microseconds. Once more, a timeout can be checked on if desired.
Thus far, the PIC16F88 has sent a request and the DHT22 has responded with an acknowledgment. The port line is still an input at this point, and the microcontroller is ready to start receiving those 40 bits that make up the five bytes. Here’s how it goes:
The DHT22 drops A.0 low for 50 microseconds. You can think of this as a start signal. Now, the sensor pulls the line high again. The length of this pulse conveys the information we want. If A.0 is high for 26 to 28 microseconds, a “zero” is indicated. If it’s high for 70 microseconds, then a “one” is implied. Hence, the pulse width expresses the bit status.
In everyday language: After the start signal, a short pulse represents a zero, while a long pulse signals a one. That takes care of the first bit. Now, just go back to the start of this paragraph and repeat the sequence 39 more times to get the remaining bits. Notice that port line A.0 is still an input. By the way, the bits always come in from high order to low order. It is convenient to store the bits in an array of bytes. Let’s call it VALUES. In the syntax of Great Cow Basic, VALUES(1) and VALUES(2) hold the relative humidity, while VALUES(3) and VALUES(4) contain the temperature in Celsius. The checksum is in VALUES(5).
One other thing; the DHT22 moves along at a fairly peppy clip, so the PIC needs to keep pace. Run the microcontroller on a 20 MHz resonator so it doesn’t fall behind. On the other hand, the sensor can only update itself every two seconds, so don’t query it more often than that.
How to Interpret the Numbers
Now, comes one of the more mysterious aspects of the DHT22: figuring out what the numbers mean. While the relative humidity is always a non-negative number, the temperature might be negative. And don’t forget about the decimal fraction portion of the number. Let’s see if we can untangle this mess.
Relative humidity is easy. The two bytes simply give a 16-bit representation of 10 times the relative humidity in ordinary binary notation. (The scaling factor of 10 will make more sense in a moment). In particular, if we declare an integer variable RH, then making the assignment:
RH = 256 * VALUES(1) + VALUES(2)
will give a result 10 times greater than the actual relative humidity. If it isn’t clear, in Great Cow Basic integers are signed 16-bit numbers.
As mentioned, the temperature may be negative. If so, the high bit of VALUES(3) will be set; otherwise, it’s clear. Please note the following important point! The representation is not the usual two’s complement business you might expect, but we can make it so in the following manner.
First, save that sign bit for later. Next, strip it off of VALUES(3); in other words, make it a zero. That’s easy to do via masking with the conjunction operator AND:
VALUES(3) = VALUES(3) AND 0b01111111
Then, declare an integer variable CELSIUS and carry out the assignment:
CELSIUS = 256 * VALUES(3) + VALUES(4)
This variable presently holds the absolute value of 10 times the Celsius temperature. We can now factor in the plus or minus business properly. If the sign bit saved earlier was a zero, then there’s nothing to do; CELSIUS holds the correct result. If the sign bit was a one, then let:
CELSIUS = -CELSIUS
and we’re good to go. At this point, RH and CELSIUS both hold legitimate two’s complement integers that are 10 times the detected values.
Time to Print the Results
Before proceeding, we need to see how a checksum can help pinpoint erroneous results before they ever get to the LCD. Suppose we were to add up the first four bytes just received with:
TOTAL = VALUES(1)+VALUES(2)+VALUES(3)+VALUES(4)
TOTAL can be a byte variable, since all that’s needed is the least significant byte of the sum. If this doesn’t match VALUES(5), then you’ll know there was discombobulation somewhere and the scrambled pattern should be discarded.
Assuming everything is hunky-dory, we’re ready to print the results. We don’t have the luxury of floating point routines in Great Cow Basic (or in unadulterated Assembler for that matter). That’s okay; we can easily deal with the decimal fraction in the following way. Remember, RH and CELSIUS contain properly signed integers, but 10 times too large. That’s good, because if you simply divide RH by 10 (saving the remainder for a moment) and print the result, you’ll see the whole number part.
Now, print a decimal point and follow this with the remainder just saved. Voila! There’s the relative humidity and temperature — accurate to one decimal place — shining away at you.
A Couple of Niceties
It’s easy enough to convert to Fahrenheit if desired, using the well-known formula:
FAHRENHEIT = CELSIUS * 9 / 5 + 32
but you’ll need a more obscure trick to get an accurate conversion out of it with integer arithmetic. The trouble lies in the division. Any remainder is unceremoniously jettisoned — this is truncation, not rounding.
For example, imagine the computation ended up as 56.78; you’d like this to be rounded to 56.8, but will instead wind up with 56.7 in simple integer arithmetic. Here’s how to deal with the problem. Remember that CELSIUS contains 10 times the true Celsius reading. Before invoking the conversion to Fahrenheit, multiply by 10 so the value is now 100 times too big, yielding the modified conversion:
FAHRENHEIT = 10 * CELSIUS * 9 / 5 + 3205
I bet you were expecting to see a 3200 there (32 times 100), but by making it five units larger, we are — in effect — adding the digit 5 in the hundredths place. This will cause an overflow to the tenths place if the hundredths digit is a 5 or larger. Then, if we divide the entire thing by 10, that will dump the hundredths digit which has already served it purpose. FAHRENHEIT will now contain a value 10 times too big (just like CELSIUS) and properly rounded. If you don’t believe me, try a few samples with pencil and paper. In a nutshell, we don’t need no stinking floating point arithmetic!
You can grab the complete source code (written in Great Cow Basic) from the download link for this article. The code has been heavily commented, so you’ll be able to see exactly how all of this has been implemented in an imminently practical and straightforward fashion.
Very likely, you’ll want to test the relative humidity portion for accuracy. You can employ what’s known as a salt box for this, or more properly here, a salt bag. Figure 2 gives the idea.
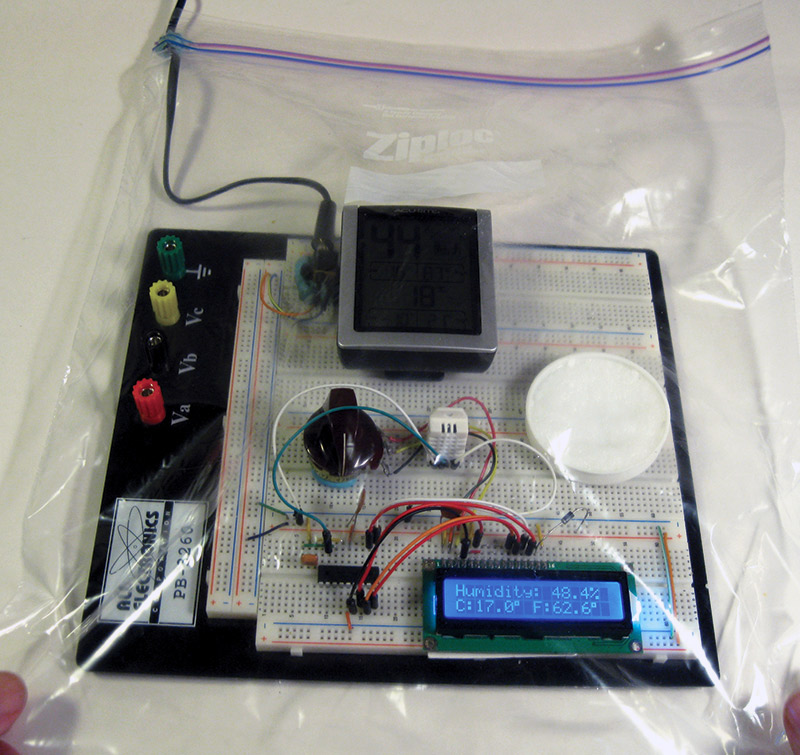
FIGURE 2.
You enclose the entire circuit and sensor within a two gallon Zip-Loc bag, sealing the power supply cable entrance with a wad of Blu Tack or chewing gum. (Blu Tack is a neat general-purpose sticky putty). Before you close up the bag, however, also include a small plastic cap filled with ordinary salt. Put a few drops of water on the salt; you want just enough so the crystals are clumpy — not soggy or runny.
Amazingly, when sealed from the outside air, the physical chemistry of such a rig will create a 75% relative humidity climate. Keep the bag poofy so there is lots of air sealed inside, and let it sit for at least 12 hours. When properly executed — and assuming your sensor is accurate — you should see the readings rise to 75%. You’ll note in Figure 2 that I also enclosed a commercial humidity gauge for comparison. I found that both ran a trifle on the low side.
That’s it! I don’t know why the manufacturer couldn’t have made this a little easier to unravel. With a more complete and comprehensive datasheet, I bet they’d sell a lot more.
At least now, you have everything necessary to get the DHT22 up and running. Try this simple test rig and see for yourself! NV