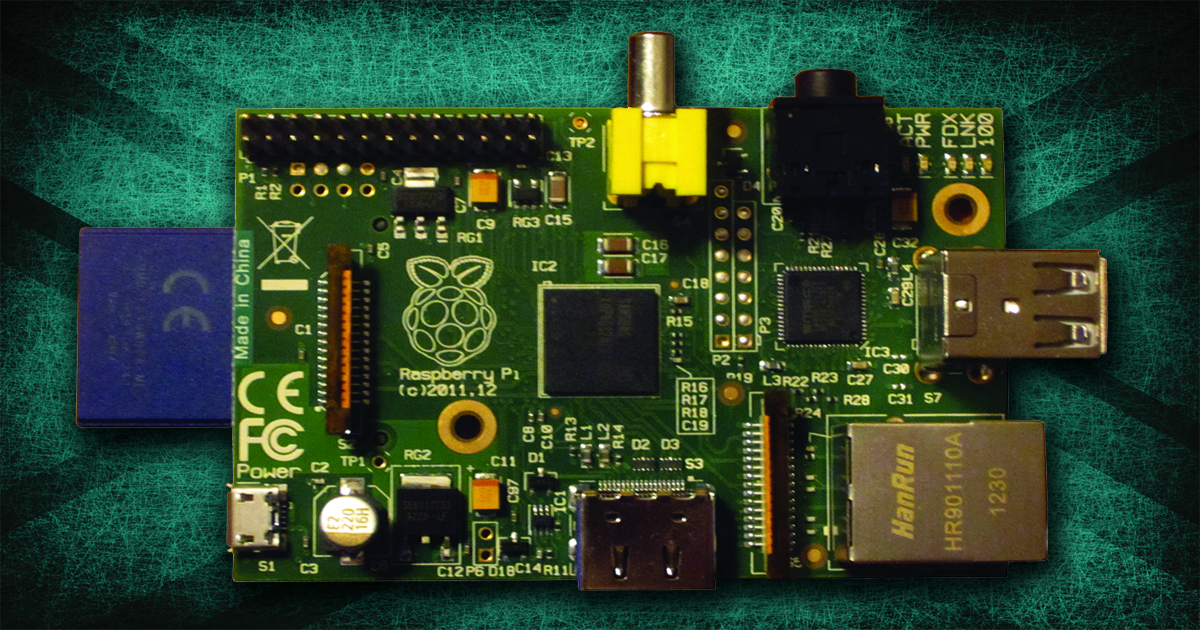
With the cost of most things continually on the rise, it is pleasing to note the price of our intelligent gadgets and that of compute power continues to fall. The cost of computing power dropped again with the introduction of the Raspberry Pi (RPi) — an ARM processor based Linux workstation the size of a credit card (see Figure 1 at top).
FIGURE 1. (above) The Model B Raspberry Pi. On the left is the SD memory card; top center shows the RCA composite video output; top right is where the 3.5 mm stereo audio output is located. On the right is the dual USB connector; in the lower right is the RJ45 Ethernet connector; bottom center shows the HDMI connector.
This computing marvel was developed in the UK by the Raspberry Pi Foundation (a UK registered charity) with the idea of getting students interested in computer science by making it cheap enough for anyone to afford, and fun enough to capture their interest. The Raspberry Pi Foundation understands computers and programming are integral to the future, but noticed fewer students getting into computer science. With the RPi, they hope to rekindle the excitement over microprocessors that many of us felt in the 1970s and 1980s. I, for one, caught the computer bug at that time and haven't ever gotten over it.
While the Raspberry Pi Foundation’s focus is on the educational market, there has been major demand for RPis in the DIYer/hacker community. A Google search for Raspberry Pi on the Internet will net you seemingly endless projects people are powering with RPis.
It is important to note an RPi is a bare bones single board computer built as inexpensively as possible. When you buy an RPi, you don’t get a case, power supply, display, keyboard, mouse, cables, or storage device. All peripherals must be purchased separately. The idea is to connect your RPi to a USB power source, a TV set with HDMI input, a USB keyboard, and mouse. Even with the additional cost of the required peripherals, a computer system based on an RPi is still a bargain.
| Feature |
Model A |
Model B |
| Suggested Retail Price |
$25.00 |
$35.00 |
| CPU |
700 MHz ARM11 with hardware floating point |
| GPU |
Capable of 1080p video |
| Memory |
256 MB shared with GPU |
512 MB shared with GPU |
| USB Ports |
1 |
2 |
| Video Outputs |
HDMI and composite video |
| Audio Outputs |
Stereo 3.5 mm jack + HDMI |
| Onboard Storage |
SD memory card up to 128 GB |
| Networking |
None |
10/100 Ethernet |
| Connectivity |
8 x GPIO, UART, I²C, SPI |
| Size |
3.3” x 2.1” |
| Power Requirement |
300 mA – 1.5W |
700 mA – 3.5W |
| Official Operating System |
Raspbian version of Linux |
TABLE 1. Raspberry Pi Specs.
The Raspberry Pi Foundation has standardized on two models of the RPi hardware (Table 1) and have also standardized on Python as the programming language. If you don’t program in Python, don’t worry. Many programming languages are available for use with your RPi, including Assembler, C, C++, Java, Basic, plus various shell languages. As an added bonus, most of the software development tools for your RPi are free and open source which lowers the barrier to entry even further.
Raspberry Pi versus Arduino
Many people — myself included — are currently using Arduino controllers in many of their embedded projects. While RPis and Arduinos have a lot in common, they address two different application areas. The RPi has much more computing horsepower (and hardware floating point) than any of the Arduino family, but much less directly useable I/O built onto the board. So, the RPi is a better fit for video applications, robotics, graphical applications, or anywhere there are a lot of computations needing to be done.
Arduinos, on the other hand, have lots of I/O pins which can source and sink lots of current, which makes them perfect for making things move, taking sensor measurements, data collection, driving arrays of LEDs, etc. Arduinos can perform many of the same computational tasks as RPis, but they will take a lot longer to do so.
Another big difference between an RPi and an Arduino is the idea of an operating system. When you program an Arduino, you write code and use libraries that are placed directly on top of the hardware. If you need some new functionality, you either code it yourself or find a library that provides it for you. Also, most code written for an Arduino is single threaded; your application is the only thread of execution running. You have to go to great lengths to run multiple threads on an Arduino.
The RPi, on the other hand, has a full blown, mature, multitasking, multiuser version of the Linux operating system running on it. When you write programs for an RPi, your code runs on top of the operating system and for the most part, is intentionally prevented from directly accessing the hardware. This makes for a more robust and reliable computing environment as any violation of the rules established by the operating system will cause your application/program to be terminated, but will not take the whole computer system down.
A down side of the operating system approach is the learning curve. It can take years to fully understand Linux and what it is capable of. Luckily, you don’t need to understand all of Linux to put it to work. Finally, Linux is a multiuser operating system meaning that multiple people can be logged in at the same time, and each can be doing unrelated, meaningful work without knowledge of each other. By extension, this means your RPi can support many simultaneous users if your application(s) require it.
Arduinos and RPis both use the concept of shields to provide additional hardware features not found on the basic devices themselves. While Arduino shields plug directly onto the Arduino printed circuit board (PCB), the RPi equivalent is attached with a ribbon cable. Since Arduinos have been around longer, there are more shields available for it than for RPis but this situation is quickly changing. Soon there will be shields available for both platforms that perform just about any function you can dream up.
Table 2 provides a basic comparison between the Raspberry Pi and the Arduino families of computing devices.
| Feature |
Raspberry Pi |
Arduino |
| Suggested Retail Price |
~$25 to $35 |
~$22 to $65 |
| CPU |
700 MHz ARM with hardware floating point. Overclocking can increase performance. |
ATMega Family with clock speeds of 8 MHz or 16 MHz. Software floating point only. |
| GPU |
Built in |
None |
| Memory (RAM) |
256 MB or 512 MB |
2K to 8K |
| USB Ports |
1 or 2 |
1 |
| Video Outputs |
HDMI and composite video |
None |
| Audio Outputs |
Stereo 3.5 mm jack + HDMI |
None |
| Onboard Storage |
SD card up to 128 GB |
32K to 256K Flash |
| Networking |
None/10/100 Ethernet |
None |
| Connectivity |
8 × GPIO, UART, I²C, SPI |
Up to 54 GPIO, 10-bit ADC, USART, TWI, SPI |
| Size |
3.3” x 2.1” |
Various sizes from postage stamp size to 2.1” x 4.0” |
| Power Requirement |
1.5W to 3.5W |
>=0.5W depending upon loads driven |
| Official Operating System |
Raspbian Linux |
No operating system |
| NOTE: The Arduino Due has been left out of this comparison because it is ARM instead of ATMega based. |
TABLE 2. Raspberry Pi vs. Arduino.
Configuring Your RPi
What I hope to do in this article is to show you how to bring up a brand new RPi so you can start experimenting with it. You will need the following:
- A Raspberry Pi Model A or B.
- A USB power supply/charger capable of 500 mA or more with USB cable.
- An SD memory card (and card reader/writer) that is at least 2 GB in size.
- A monitor or TV with an HDMI input.
- A USB keyboard and mouse. It is best if both of these devices work through a single USB connection.
- A network your RPi can connect to.
The first step in the process is to download the latest Raspbian Wheezy version of Linux from www.raspberrypi.org/downloads and transfer it to your SD memory card. How this is done depends on the type of computer you are using. Detailed instructions for Windows, Mac OSX, and Linux are available at www.elinux.org/RPi_Easy_SD_Card_Setup. With the operating system on the SD card, insert the SD card into your RPi, connect the monitor, keyboard, mouse, Ethernet cable, and power supply. Your RPi should boot up when power is applied, and in the process you should see the boot messages racing past on your monitor.
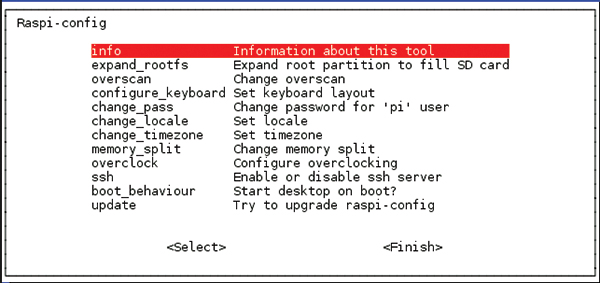
FIGURE 2. The raspi-config screen.
Once the initial boot completes, the RPi configuration program raspi-config automatically runs; refer to Figure 2. From here, you set your initial configuration and (in a sense) Americanize your RPi. Remember the RPi is a product from the UK, so initially was configured for UK users. Each of the provided menu items are described in Table 3 and suggest how you might want to set each one. If you don’t understand what these configuration items do, don’t worry. Just follow my lead. Use the keyboard arrow keys to move through the menu items and the return/enter key to select the highlighted one.
| Menu Item |
Short Description |
Long Description |
| Info |
Information about this tool |
You can skip this as it just provides information about raspi-config. |
| expand_rootfs |
Expand root partition to fill SD card. |
The Raspbian software requires about 2 GB of space on the SD memory card. Running this menu item allows your RPi to use all available space on the SD card if you use a larger SD card. Do this if you are using an SD card larger than 2 GB. |
| overscan |
Change overscan |
If you see black borders around the sides of the display when running the graphical desktop, you can disable overscan with this menu item. In most cases, this will clear things up. |
| configure_keyboard |
Set keyboard layout |
By default, a Generic 105-key (Intl) PC keyboard is selected. If you cannot find your specific keyboard on the long list, choose Generic 101-key PC. You’ll be asked two more questions and you should probably answer, “The default for the keyboard layout” and “No compose key.” |
| change_pass |
Change password for ‘pi’ user |
All RPis start out with the same user/password. If security is important for your application, you should change the password for the pi user. |
| change_locale |
Set locale |
A locale is a set of parameters that defines a user’s language, country, and special preferences a user wants to see in their user interface. The default is en_GB.UTF-8 UTF-8. Find this on the list and deselect it by hitting the space bar. Next, find the US locale en_US.UTF-8 UTF-8 and select it. |
| change_timezone |
Set timezone |
Find your timezone and select it. |
| memory_split |
Change memory split |
Leave this alone unless you know exactly what you are doing. |
| overclock |
Configure overclocking |
RPis were designed to run at a 700 MHz clock rate. It has been found that overclocking can be used to provide higher performance but with some risk of doing damage. I always choose Modest overclocking which increases the clock rate to 800 MHz but doesn’t increase the voltage to the processor. Use at your own risk. |
| ssh |
Enable or disable ssh server |
Enable ssh if you plan on logging into you RPi remotely. |
| boot_behaviour |
Start desktop on boot? |
Select this menu item and then select Yes if you would like your RPi to boot directly into the graphical desktop. Otherwise, you will interact using a shell/command line interface. |
| update |
Try to upgrade raspi-config |
I suggest you don’t do this yet as we will be updating all the Raspbian software shortly. |
TABLE 3.
If you made changes to the defaults, you will be asked to reboot in order for them to take effect. Do so now, if necessary. When your RPi comes back up, it will be running with the configuration changes you just made. If you ever want to change the configuration again, run sudo raspi-config from a shell.
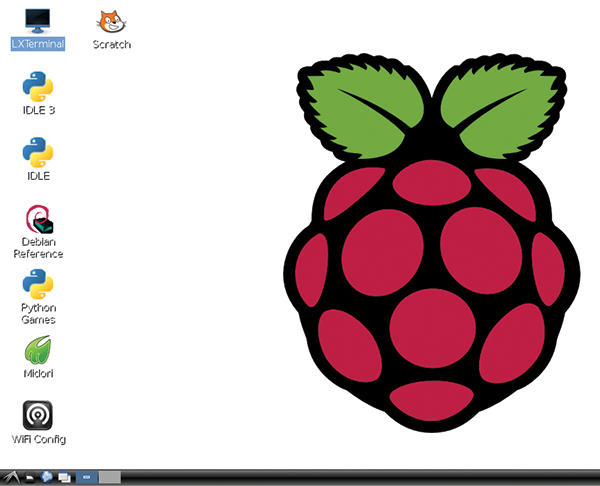
FIGURE 3. RPi's graphical desktop.
Interacting With Your Raspberry Pi
Once configuration of your RPi is complete, you have numerous ways of interacting with it. You can:
- Log in (user “pi” — password “raspberry”) directly using an attached USB keyboard and monitor, and interact via the bash shell’s command line.
- Log in directly using an attached USB keyboard, mouse, and monitor, and start the graphical desktop by typing startx. The RPi’s graphical user interface is similar to Windows. Take a look at Figure 3.
- You can log in to your RPi remotely using ssh from a remote computer. Say, for example, the IP address of your RPi is 192.168.0.13 (the IP address can be seen in the boot messages). From a shell/command line on your remote computer, you would log in with ssh [email protected], and you would then be asked for your password (“raspberry”).
- Lastly, you can use the power of XWindows and redirect your RPi’s desktop to your remote computer. How this is done depends on what type of computer you are using (there isn’t space here to adequately describe all the possibilities). Google Raspberry Pi remote access XWindows and you will find the information you need.
To shut down your RPi system, you can type sudo shutdown -h now. Note, it is important to shut down your RPi before you remove power so that all data will be correctly written to storage.
Software Update
To complete the installation/configuration process for your RPi, you should update the installed software to the latest version possible. Even though you started with the newest Raspbian release, many changes have been made to components of this version since it was made available to the public.
Directly from a shell or using the LXTerminal window on the desktop, execute the following series of commands:
sudo apt-get -y update
sudo apt-get -y dist-upgrade
This will cause your RPi to find, download, and install the latest versions of all of the component parts of the Raspbian software. With this, your RPi is up to date.
A Family Friendly Development Platform
It turns out the only HDMI display I had in my home was the family’s only TV set. While using the TV as a monitor was fine for a while, I needed a longer term solution. That is when I discovered the AT&T laptop dock (lapdock) for the Motorola ATRIX 4G smartphone. While this discontinued product was built to provide a laptop computer interface to a smartphone, it turns out to work great with a Raspberry Pi. Consider the lapdock’s features:
- A high resolution 11.6” HDMI monitor.
- A full keyboard.
- A large touchpad.
- A built-in USB hub with two external USB 2.0 ports.
- Stereo speakers.
- Internal rechargeable battery that provides up to eight hours of power.
- An external power supply.
- A super thin, sleek design that weighs just 2.4 pounds.
The best thing about the lapdock was I was able to buy it for $50 online which is a lot of functionality for my money. Of course, since the lapdock was not designed for the RPi, it requires a bit of effort to use. Specifically, the lapdock has two connections we have to deal with: a male micro USB connector and a male micro HDMI connector. On the RPi, the HDMI connector is a full sized female connector and the USB connections are normal sized female connectors.

FIGURE 4. RPi lapdock connection.
The HDMI interface is taken care of by a HDMI male to micro HDMI female adapter I found on DealExtreme for $4.10. Unfortunately, I wasn’t so lucky on the USB side of things. I needed a short USB cable with a female micro USB connector on one end and a full size male connector on the other. I ended up buying two cables with the required connectors, cutting them apart, and then soldering the two cables together. Figures 4 and 5 show what the finished configuration looks like. Normally, I connect the RPi to the lapdock with the HDMI adapter and my custom cable. I then plug my wireless adapter into one of the USB ports on the lapdock, and sometimes a Flash drive into the other.
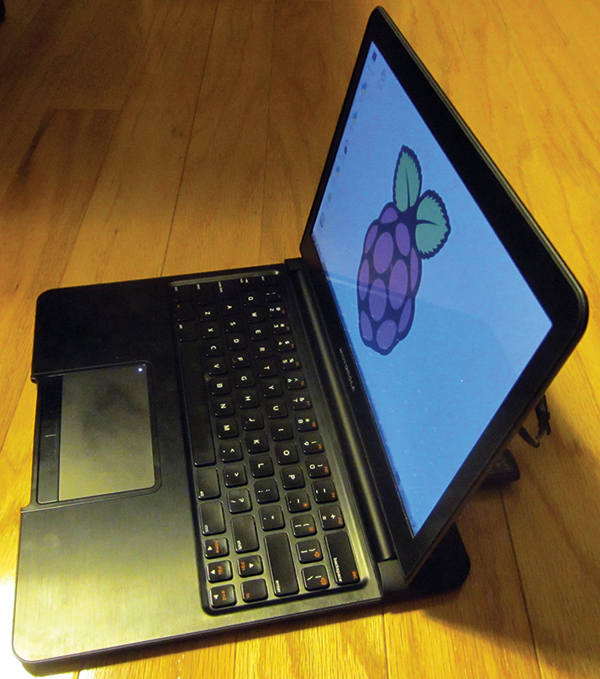
FIGURE 5. RPi lapdock running the graphical desktop.
A First Application
If you followed the directions given in this article, you probably have a working RPi that you are now wanting to do something with. For your first application, how about a simple web server that can deliver multimedia content (images, videos, text, music files) on your local area network. Would you be impressed if I told you this can be done with just one line of code? Try this:
- From a shell window, create a subdirectory off of your home directory; something like website, for example. Use the following command: mkdir website.
- Copy the files index.html and underconstruction.jpg available at the article link into this new directory. You can either use the scp command to copy the files between machines, or copy the files to a USB Flash drive, then connect it to your RPi and copy the files from there.
- Change to your new directory using the command cd website.
- Execute the following one line command: python -m SimpleHTTPServer.
- From a computer on your local network, hit port 8000 on your RPi. If your IP address is 192.168.0.13, for example, in your browser’s address bar type http://192.168.0.13:8000.

FIGURE 6. Simple webserver home page.
If all is well, you should see the image in Figure 6. You now have a functioning web server to play with.
Conclusion
The Raspberry Pi represents a breakthrough in low cost computing power. It is a nice platform for learning about computers and Linux, as well as for multimedia and other computing/math/graphics intensive applications. I hope the Raspberry Pi Foundation succeeds in its quest to bring more people into computer science as it is a great career to have; at least it has been for me. Next time, I will show you how to turn your RPi into an Internet radio and music file player. Until then, have fun with your new piece of Raspberry Pi! NV
Resources
The Raspberry Pi Foundation
www.raspberrypi.org/about
The MagPi — a Raspberry Pi magazine
https://www.raspberrypi.org/magpi/
An introduction to simple Linux commands
http://elinux.org/CLI_Spells
Craig can be contacted at [email protected].
For more on Raspberry Pi. visit our webstore at store.nutsvolts.com for related books.