Over the past several episodes, we've been learning to use the Arduino handheld prototyper — a device that lets us design prototypes on a breadboard with the Arduino proto shield and then communicate with the I2C mini terminal. This is all tied together with a plastic base so that we can carry the entire development system around in our very own hand (Figure 1).
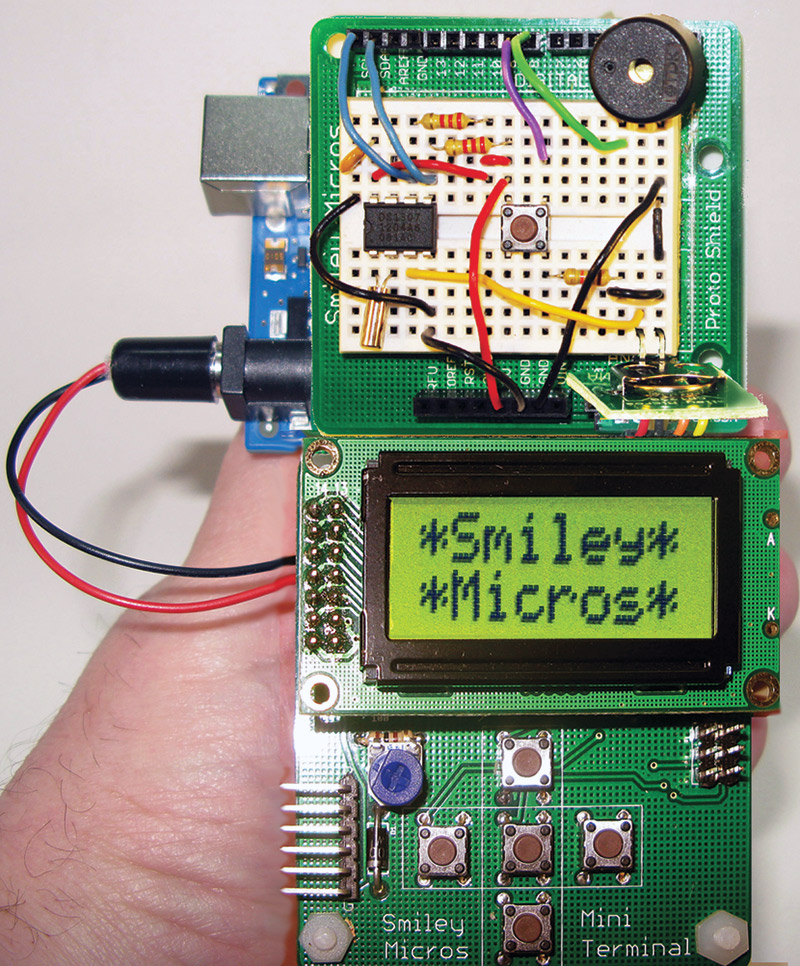
FIGURE 1. Arduino handheld prototyper.
Last time, we continued with the fresh air controller design and learned how to use the LCD and keys to communicate with the user. We also added a real time clock and learned how to show the date and time on the LCD. I recommend that you reread the last several articles in this series so this installment makes more sense. (You can access Parts 1-4 in the sidebar to the right.)
Data Logging
In the good old days, data loggers recorded info using a pen on a slowly moving strip of paper which produced a strip chart with X and Y parameters that depended on what was being recorded. For example, Figures 2, 3, and 4 show a fully mechanical device that measures temperature and humidity, and records the data using pens on a chart that slowly rotates on a drum.
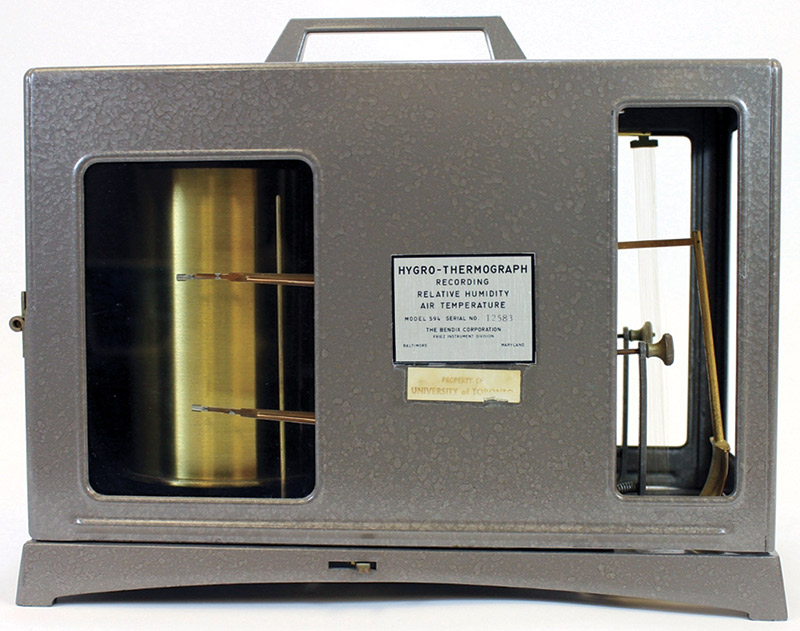
FIGURE 2. Mechanical temperature and humidity recorder.
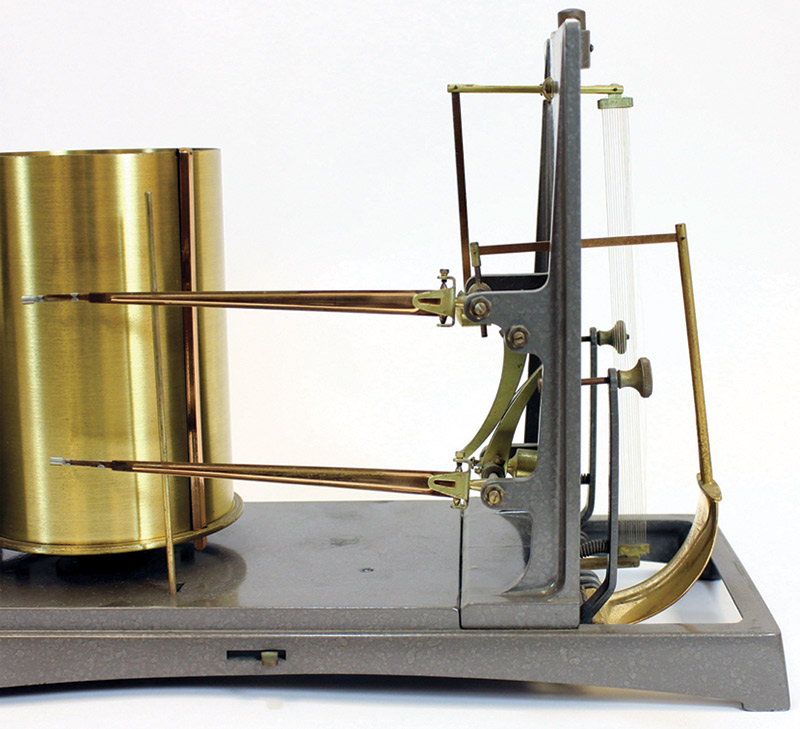
FIGURE 3. Mechanical temperature and humidity sensing.
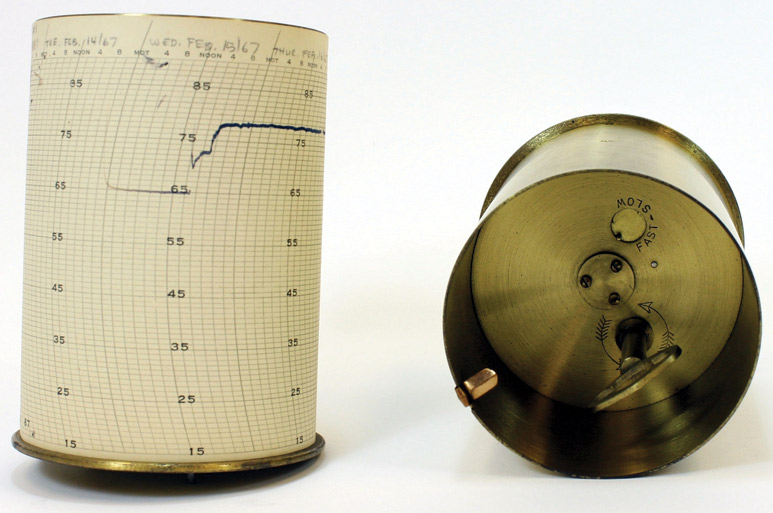
FIGURE 4. Mechanical temperature and humidity logging.
As you can see in Figure 3, there is a key for winding up the drum so that it will run unattended for a week.
Temperature changes cause a bi-metal strip to deflect a pen, and a bundle of hairs (yes, hairs) stretch or contract depending on humidity — also deflecting that pen. These systems are still sometimes in service in places like art museums where they have served adequately for many years to keep delicate artwork within a narrow range of temperatures and humidities. Now, of course, we use electronic sensors connected to microcontrollers to do the sensing as in our fresh air controller example. We only need to add the equivalent of the pens and strip chart by recording the sensor data to computer memory. (Though you may end up pulling out a few hairs of your own.)
Recording Data With an Arduino
How much data can an Arduino hold? Arduinos now come with an ATmega328p which has 32K bytes of in-system self-programmable Flash program memory, 1K bytes of EEPROM, and 2K bytes of SRAM. Theoretically, we could use any of these to record data. We learned about computer memory — especially that on AVRs — back in Workshops 23-27.
Of the three available types of memory, Flash — which is the largest — seems the most tempting to try to use to record data, and indeed it can be used as such. If your application is relatively small and you have relatively little data to store (but more than can be accommodated by the EEPROM or the SRAM), then Flash looks especially attractive. Unfortunately, while it is relatively easy to store program data at compile time [we have discussed storing preset data like strings using the features in pgmspace.h], it gets quite a bit more complicated to store data in Flash at run time. The bootloader does this as a matter of course, but it has to take special measures involving special timing and erasing large blocks of code and so forth that make adapting these procedures to saving data a byte at a time a bit obtuse. If there is one thing we know, it is that we are using the Arduino to avoid obtuse.
If writing data to program memory at run time was easy and a good idea, there would already be a plethora of Arduino libraries to do just that, but there aren’t. So, we will only look at using the SRAM and EEPROM on the Arduino; we’ll then graduate to external SD cards which do have a plethora of Arduino libraries and are a cheap and easy way to store LOTS and LOTS of data. But first, SRAM.
The SRAM
SRAM is re-writable essentially for all time and eternity. However, we are short on SRAM because it is the most expensive type of memory, and we are given the minimum deemed necessary to run the microcontroller [ATmega328p: 2K (2048 bytes)]. That said, if our data needs are small and/or we can dump the data to a PC quickly, then we can easily create an array in SRAM for our data storage. Of course, what is ‘small’ and ‘dump quickly?’
Let’s say small means we are allocating a fourth of the SRAM which is 512 bytes, and dump quickly is to be determined. We’ve already discussed that one of the main attractions of our handheld prototyper is that it doesn’t need to be tethered to a PC. If we are tethered to a PC, then our data memory isn’t a problem. We just continuously upload the sensor data as we get it and let the PC deal with it.
Since we want to record data in isolation from a PC, let’s arbitrarily demand that it only be connected to a PC once per day. That means we can record our 512 bytes in 24 hours, or 21.333 ... samples per hour — roughly one sample every three minutes. If we want to record the temperature and humidity, then we can do that about once every six minutes. If we want both the indoor and outdoor data, we can record it about once every 12 minutes. Is that bad? Not in my humble opinion. We should hope that the outdoor and indoor climate is changing slowly enough that 12 minutes isn’t too much.
So, can we improve this? Of course. One way is to observe that neither the temperature nor the humidity will change more than a few points in a few minutes. We can again arbitrarily say that the temperature won’t go up more than one degree in two minutes, and that the humidity will only change by one percent in two minutes. This means we can expect a maximum rise or drop of six degrees or percent in our 12 minute sampling interval.
Neither is true if a storm hits, so you’ll have to build in some sort of exceptions which we’ll get to later. Other than those rare exceptions, you should only need to record a difference of a few integers from the last reading at each new reading.
This gives us the opportunity to record temperature or humidity in a byte — capable of coding 256 values — then next only record the difference + or – in the next reading that (as we saw above) will be much smaller than the 256 a byte can hold. We can use a four-bit half-byte called a nibble to store the change. We’ve seen bytes before as both hexadecimal and binary numbers such as:
Decimal: 165
Hexadecimal: 0xA5
Binary: 10100101
The nibbles are as follows:
First hexadecimal nibble: 0xA
Second hexadecimal nibble: 0x5
First binary nibble: 1010
Second binary nibble: 0101
Of course, there is no way to split the decimal value into nibbles which is one of the reasons we use hexadecimal in the first place.
Using nibbles, we can record changes between zero and 15 — the values that can be coded by four bits. We assume this will be enough to cover the changes over the previous value. However, we have also added for the complexity that the change can be positive or negative, so we’ll need our nibble to be a signed data type (+ or -) that can range from –8 to 7.
For example, if we take a temperature reading that is 73 degrees and in the next sample the temperature is 70 degrees, we only need to save –3 in a nibble. Then when we extract the data, we record the 73 degrees as our first data point and we subtract the –3 to get our next data point, and so on for each subsequent data point.
Theoretically, we should only need to record the full byte once and from then on we only record the change in the following nibbles. This nearly doubles the number of samples we can log.
So, what are signed nibbles and how do we use them? The most significant bit (leftmost) in the nibble will be used for that sign: 0 for positive and 1 for negative. Table 1 shows how each bit in each nibble translates to the signed decimal value we will use.
| Bits |
Decimal |
| 0000 |
0 |
| 0001 |
1 |
| 0010 |
2 |
| 0011 |
3 |
| 0100 |
4 |
| 0101 |
5 |
| 0110 |
6 |
| 0111 |
7 |
| 1000 |
-8 |
| 1001 |
-7 |
| 1010 |
-6 |
| 1011 |
-5 |
| 1100 |
-4 |
| 1101 |
-3 |
| 1110 |
-2 |
| 1111 |
-1 |
TABLE 1. Signed nibbles.
Later, we’ll write the code to use these values to derive each data point based on the original stored byte.
Now We’re Talking About Nibbles?
Okay, now I’m lost. This is hardly the first time we’ve gotten so deep into a side issue that I’ve nearly lost track of what I’m doing, so let’s refresh.
What we are doing is trying to store as much of our sensor data in an Arduino as is reasonably possible. To do that, we’ve decided that we will store an initial value for our data and then store a smaller nibble sized value for the changes. (That process is the side issue I referred to.) It isn’t really about the Arduino handheld prototyper or sensing data; it is a convenience for storing more data than we might otherwise be able to store. So, let’s concentrate on fully understanding this and write a little test program for packing and unpacking nibbles. Then, we’ll get back to the main thread of things.
Packing and Unpacking the Nibbles
Since we will be packing and unpacking nibbles in bytes in a byte array, we are creating a virtual nibble array that is twice the size of a real byte array. It’s virtual because we don’t actually have a nibble array; we are making up our own so that we can store and retrieve nibbles by an index number just like we would store and retrieve any other data type in a legal array. We will store the even numbered nibbles from our virtual nibble array into the high nibble of a byte in the real byte array, and we will store the next nibble — the odd one — in the low nibble of the same byte.
For example, if we want our virtual nibble array to store 0xA in the first location, 0x5 in the second, 0x4 in the third, and 0x7 in the fourth, we would pack the 0xA into the high nibble of the first byte of our byte array and then pack the 0x5 into the low nibble of that byte. We would pack the 0x4 in the high nibble of the second byte in the array and the 0x7 in the low nibble. If we had nibble sized arrays, they would look like this:
nibble_array[0] = 0xA;<br />
nibble_array[1] = 0x5;<br />
nibble_array[2] = 0x4;<br />
nibble_array[3] = 0x7;
These values would actually be stored in a real array as:
real_array[0] = 0xA5;<br />
real_array[1] = 0x47;
Now, our job is to figure out how to pack and upack the nibbles from the virtual nibble array into a real byte array. To do this efficiently, we are going to have to use some of the more arcane C operators: % (modulo), & (AND), >> (right shift), and << (left shift). Let’s take a moment to review those.
The % operator finds the remainder of a division. We will pack our nibbles in the bytes by pairing two nibbles from the virtual nibble array. Each even index numbered nibble will be stored in the high nibble of a byte; the odd indexed nibble will be stored in the low nibble of a byte.
We can use the modulo operator to find out if our index is odd or even by noting that any even number divided by two has no remainder (equals 0), while any odd number divided by two will have a remainder. We don’t care what the remainder is, only that it exists. So, we can use an if statement which will be true if there is a remainder and false if not:
 if ((nibble_index % 2) == 0) {<br />
    // number is even<br />
 }<br />
 else {<br />
    // number is odd<br />
 }
Now that we can determine if the nibble index is even or odd, we will use the & and the >> and << operators to pack and unpack the nibble in the correct position in the byte. Let’s look at the packNibble function to see how this works:
void packNibble(uint8_t * array, uint16_t<br />
nibble_index, uint8_t value)<br />
{<br />
  // the actual array position is 1/2 the<br />
  // nibble position<br />
  uint16_t array_index = nibble_index/2;<br />
 <br />
  uint8_t temp = array[array_index];<br />
 <br />
 if ((nibble_index % 2) == 0) {<br />
    // number is even<br />
    temp &= 0x0F; // clear the high nibble<br />
    temp += (value << 4);    // add to the high<br />
                // nibble<br />
 }<br />
 else {<br />
    // number is odd<br />
    temp &= 0xF0; // clear the low nibble<br />
    temp += value;<br />
 }<br />
  array[array_index] = temp;<br />
}
The packNibble function takes a pointer to the byte array that we use to store data in SRAM — the nibble_index — and the nibble value. First, we get the array index by dividing the nibble index by two. Thus, our nibble index is 256 and our array index will be 128.
Next, we get the value already stored in the array at that index value and store it in a temporary byte. Then, we decide if the nibble index is odd or even. If it is odd, we clear the high nibble in the array byte by using the & operator with 0x0F to mask the high nibble to 0. Then, we move the nibble value four binary positions to the left to put it in the high nibble:
temp &= 0x0F; // clear the high nibble<br />
temp += (value << 4);  // add to the high nibble
Or, if it is the even nibble, we clear the low nibble by ANDing (&) 0xF0 with the value to mask the low nibble to 0. Then, we add the value to the byte without needing to shift it since it is already in the correct position:
temp &= 0xF0; // clear the low nibble<br />
temp += value;
Finally, we place the temp byte back in the array. Unpacking the nibble from the virtual nibble array is similar:
uint8_t unpackNibble(uint8_t * array, uint16_t<br />
nibble_index)<br />
{<br />
  // We are storing two nibbles in each byte of<br />
  // the array so the array index is 1/2 the<br />
  // nibble index<br />
  uint16_t array_index = nibble_index/2;<br />
 <br />
  // Get the array byte to unpack the nibble<br />
  uint8_t temp = array[array_index];<br />
 <br />
 // Determine which nibble we want and return it<br />
 if ((nibble_index % 2) == 0) {<br />
    // number is even<br />
    return ((temp & 0xF0) >> 4);<br />
 }<br />
 else {<br />
    // number is odd<br />
    return(temp & 0x0F);<br />
 }<br />
}
As before, we decide if the virtual nibble index is even or odd. If it is even, we AND the byte with 0xF0, shift it four positions right, and then return that value:
return ((temp & 0xF0) >> 4);
If it is odd, we just mask off the high nibble and return the value:
return(temp & 0x0F);
How simple is that? Well, not so simple really. Having a working program to demonstrate a complex principle is always a help. So, I’ve written a test program that demonstrates these principles. The output to the serial monitor from running the test is shown in Figure 5.

FIGURE 5. Nibble_test output.
Using the EEPROM
The Arduino (with the ATmega328P) has 1,024 bytes of EEPROM that was designed to store data when the device is turned off. Since we decided to dedicate 512 bytes of SRAM for our data array, we can use the EEPROM to dump our SRAM in two blocks which triples the total amount of data we can log. This gives us 1,536 bytes which (with nibble packing) can theoretically store 3,072 data samples.
I say theoretically because we do have to store some full bytes for the origin bytes. Still, this is not a lot of data from some perspectives, but it is much better than the 512 bytes we were allowing ourselves with the SRAM and no data packing. We are very fortunate to have an Arduino library for EEPROMs that we use by including EEPROM.h in our code. Then, we can read and write to EEPROM using the write functions EEPROM.read and EEPROM.write. The only thing we need now is to figure out how we want to structure the three blocks of data (one in SRAM, two in EEPROM) so that we can deal with them as a cohesive unit.
What Data Do We Need to Store?
Well, obviously since we’ve been talking about indoor and outdoor temperature and humidity, we need to store those values. Less obvious is that for our nibble packer, we need to store the initial full values followed by the packed nibbles. We need some way to tell which are the full bytes and which are the nibble bytes.
We will also need to deal with the case where real data falls outside our nibble range. (We arbitrarily decided that our data will never vary more than –8 to +7 points between samples, but what happens when Mother Nature disagrees?) We will need to know when (the date/time) the samples were taken, as well. This tells us we need to store and retrieve several types of data, so let’s look at this a little closer.
Initial Temperatures and Humidities
We will need to store the initial values for the indoor and outdoor temperature and humidity:
uint8_t origin_intemp<br />
uint8_t origin_outtemp<br />
uint8_t origin_inhum<br />
uint8_t origin_outhum
Changes in the Initial Values
We have the arrays of nibbles which we must define as eight-bit bytes; later, we will write a function to pack and unpack them:
// We will pack our data as nibbles into 512<br />
// byte of SRAM structured as four arrays<br />
uint8_t inTemp[NIBBLE_ARRAY_SIZE]<br />
uint8_t outTemp[NIBBLE_ARRAY_SIZE]<br />
uint8_t inHum[NIBBLE_ARRAY_SIZE]<br />
uint8_t outHum[NIBBLE_ARRAY_SIZE]
Dates and Times
Oh darn! We also have to record the date and time information for each and every sensor reading. That thing is 32 bits (four whole bytes or 16 nibbles), so that is going to more than eat up all that memory we just saved ... unless we get clever again. How about we just record the datetime variable once when we first start sampling. Since we will know the sampling interval, we can use the origin datetime and calculate the date/time when the sample was taken by multiplying the sample number times the sample interval.
If, for instance, it is sample number 37 and the interval is 12 minutes, then we add 12*37 = 444 minutes to the origin date/time. If the origin time was noon, then sample 37 was taken at 12:00 + 444 minutes (seven hours, 24 minutes) = 9:24. Wow! Now, all we need is a single 32-bit datetime variable and a defined sample period to keep track of all the sample dates and times:
// We decided to read the sensors once every 12<br />
// minutes<br />
#define SAMPLE_TIME 12
// knowing the SAMPLE_TIME interval we can<br />
// calculate each<br />
// sample datetime<br />
datetime origin_datetime;
Nibble Array Size
We defined four arrays for the nibbles. Since earlier we arbitrarily decided that our data log would be 512 bytes, we must apportion our data into that size memory so that the four origin bytes and the datetime variable (along with the arrays) totals 512 bytes. The datetime is 32 bits which is four eight-bit bytes; the four initial byte-sized sensor readings give us another four bytes. That added together gives us eight bytes that we have to store at the beginning or our sampling. We have 512 – 8 = 504 bytes left for our nibbles; 504 divided by four nibble arrays gives us 126 bytes per array, so we define:
#define NIBBLE_ARRAY_SIZE 126
Remember that the 126 bytes will store twice that — 252 nibbles.
Let's Use a Data Structure
As discussed previously, we will fill up our SRAM and then transfer the values to EEPROM, giving us three separate sets of data. Since each of these sets is structured the same, we can benefit from defining a single data structure. We will first fill the SRAM instance of this structure and then when it is full, we will copy the raw bytes from it into the first 512 bytes of EEPROM.
We will then clear the SRAM memory for the structure and begin our second set of sampling data. When the SRAM fills up again, we will copy the data to the second 512 bytes of EEPROM, and again clear the SRAM and start sampling over. We will use three instances of the following data structure:
struct fac_log {<br />
datetime origin_datetime<br />
uint8_t origin_intemp<br />
uint8_t origin_outtemp<br />
uint8_t origin_inhum<br />
uint8_t origin_outhum<br />
uint8_t inTemp[NIBBLE_ARRAY_SIZE]<br />
uint8_t outTemp[NIBBLE_ARRAY_SIZE]<br />
uint8_t inHum[NIBBLE_ARRAY_SIZE]<br />
uint8_t outHum[NIBBLE_ARRAY_SIZE]<br />
}
If the SRAM fills up a third time before we download the data to the PC ... we didn’t plan well, did we? We could figure out a way to trash the oldest data and keep only the most recent stuff until somebody downloads it, but we are already getting too complex. So, let’s just stop sampling data and leave it up to the user to figure this part out.
Then a Storm Hits ...
So, now we’ve got a handle on the data during normal times, but what about that exceptional case of a storm passing through and making a change outside of our –8 to + 7 range? Again, we’ll have to make an arbitrary assumption and just declare that if any value falls outside our range, we will declare an exception by setting all four nibbles at that sample time to –8.
Let’s assume that we will never see all our sensor values drop exactly eight points from one interval to the next under normal conditions, and we’ll use this ‘fact’ to create an exception state that the software can see in the stored data and then compensate for it.
Even if the rare case happens that all four values do — in fact — drop exactly eight points, we only lose a little data space since the solution to the exception involves storing four new initial bytes. So, really, all we’ve done is unnecessarily reset our starting values. However, the data will still be correct for the subsequent readings.
Logging the Exception
Under the condition of any sensor reading byte being outside the nibble range of –8 to +7, we will record the four nibbles (two bytes) as 0x88, 0x88. We will follow these two bytes with four new full byte initial values for each of the indoor and outdoor temperature and humidity readings. After this reset, we will resume packing the data in nibbles.
Reading the Exception
When the software that reads the downloaded sensor data sees the two bytes for a single sensor reading, it will respond to those values as an exception, discard the values, and then read the next four bytes into the initial sensor reading. It will use them as the actual sensor reading for that time period. We’ll assume each subsequent reading will be in nibble format and used to calculate the true reading from the prior value. These unpredictable exceptions mean that we won’t actually know how much data we can store until we’ve finished since the exceptions will take up extra space. We can hope not to see many exceptions and if we do, well ... we can always write more code.
Again — Too Much!
Exceptions? I’m already confused by all the different kinds of data we are using! We’ve got an origin date/time, an origin indoor temperature, an origin outdoor temperature, an origin indoor humidity, an origin outdoor humidity, and then nibbles for the changes in indoor and outdoor temperatures and humidities. Now, we also have a special exception state that resets stuff ... my head just sprung a leak.
Next time, we’ll hook this up to the sensors and vastly extend the amount of data we can log by using an SD card. This will turn our modest handheld prototyper into a real beast capable of logging gigabytes of data! NV