Recap
We discussed bootloaders a bit in Smiley’s Workshop 22 (Busy as a BeAVR), and learned about the debt they owe to Baron Munchhausen’s bootstraps. Now, we’ll get more practical and build on our last installment, AVR Memory Part 4 – Writing to AVR Flash, where we learned how AVR Flash memory is structured and how to write to it. We tested that knowledge with the SmileyFlashWriter.c program. This time, we'll build on this to create our own bootloader. You’ll need access to the source code in Workshop26.zip to follow some of the instructions.

FIGURE 1. STK-500 with ATmega644.
Using the STK-500
EduBootAVR - A Bootloader Written in C
A bootloader is a program that is used to download other programs. It usually resides in a special part of memory and is invoked when the device comes out of reset. It responds to data being sent — usually over a serial port — from an external device. The bootloader and the external device use a communication protocol that allows them to conduct transactions that mostly involve sending pages of binary program code to be written to the device application program section. For our demonstration, we will use avrdude on a PC to communicate with the AVR bootloader via the USART. As we will see shortly, avrdude is a very versatile tool that can handle many different programming protocols. We will be using the AVR109 protocol in avrdude but we will implement only those commands necessary for uploading program memory. There are other tasks that could be implemented such as allowing us to read and write EEPROM, but since we want to keep this bootloader small and simple, we won’t add those functions.
Deciding to Run the Bootloader or the Application
A bootloader is used to upload application programs. When you’ve uploaded an application, you then have two programs on your AVR: the application that begins at Flash memory location 0x0000 and your bootloader that begins at the NRWW (see last month) high memory location you’ve selected for the particular device (such as 0x3E00 for an ATmega328). Now, you have to decide which program you want to run when your AVR starts up. Generally, your system should be designed to run the application and only run the bootloader when you actually need it to upload some code. You could do this by having a function in your application that allows you to call the bootloader, but what if your application gets trashed? Then how will you upload your code? Atmel designed the AVR so that those with boot sections can have the device start up in that boot section if the BOOTRST fuse is set. With that fuse set, when the AVR starts after reset it loads the bootloader start address (also set by fuses) and starts the program from there.
The standard way to start up a microcontroller that is using a bootloader is to have the bootloader start and let it check for some indicator that it is needed. You could have the bootloader wait to see if an external programmer is trying to talk to it via the USART; after a brief pause with no attempt at contact, the bootloader can decide it isn’t needed and execute a jump to the application code at 0x0000. The downside of this technique is that you want the wait to be long enough to realistically allow a bootloader communication to begin, but not so long that a user might think something has gone wrong. [Remember that folks using microcontrollers expect instant response and aren’t used to turning them on, then getting a cup of coffee while it boots like we expect with PCs.] Usually, we would check to see if the bootloader is needed in less than a second, and then switch to the application. Another method to tell the bootloader to stay active is to designate a pin state. You could, for instance, tell it to check PORTC pin 7 and if it’s high, run the boot code; if it’s low, run the application. This solves the time problem since it can be done in microseconds, but it adds the cost of designating a pin in hardware that has a switch or jumper to set its state. So, each method comes with a cost; one is time, the other is extra hardware.
Use Hardware to Select the Bootloader
You could have a hardware design that has a pushbutton connected to a pin that you intend to use for the application program. There is no reason that you can’t also use this to tell the bootloader to run. Just have the bootloader check that pin when it starts up out of reset. If it is pressed, then run the bootloader; if not, then run the application which can then take over the button for its own use since it is no longer needed by the bootloader. The following code snippet (which we do not use in EduBootAVR) would use a pushbutton that sets PORTD pin 7 to ground when pressed, or is pulled up to VCC when not pressed.
Place these definitions in the header:
#define BOOT_STATE_PIN PIND<br />
#define BOOT_STATE_PIN_NUMBER PIND7
Place this code in the bootloader main() function:
// Use bootloader or application code?<br />
// If BOOT_STATE_PIN_NUMBER is low,<br />
// use bootloader.<br />
if( !(BOOT_STATE_PIN &<br />
(1<<BOOT_STATE_PIN_NUMBER)) )<br />
{<br />
    // run the bootloader code<br />
}<br />
else<br />
{<br />
    // jump to the application code<br />
}
Use Software Timeout to Select the Bootloader
We want to set some kind of timeout so that when the bootloader starts up on reset, it will wait for some short period. If nothing is talking to it in a valid protocol over the USART, then it will jump to the application section. This is what we use in our bootloader. We set a count based on the clock frequency divided by 16 (this is arbitrary and for the 16 MHz board would give a maximum count of one million). Then, we check to see if we have any new USART traffic. If not, we increment the counter until it reaches the maximum. A million may seem like a lot, but remember that this puppy is making this check about every clock cycle so it does it a million times in a fraction of a second. We run this count in the receiveByte function which calls application_ptr() to jump to the application if it counts out. Otherwise, it returns the received byte.
uint8_t receiveByte( void )<br />
{<br />
  uint32_t count = 0;
  // Wait for data to be received<br />
  while ( !(USART_CONTROL_STATUS_REG_A &<br />
  (1<<USART_RECEIVE_COMPLETE)) )<br />
  {<br />
    if(count++ >= (F_CPU >> 4))<br />
    application_ptr();<br />
  }
  // Get and return received data from buffer<br />
  return USART_DATA_REG;<br />
}
The application_ptr() is not actually a function, but is a pointer to the first address in Flash, 0x0000, and is defined as:
// Function pointer to jump to the applicaion<br />
// memory section<br />
static void (*application_ptr)( void ) = 0x0000;
Okay, pointers like this are kind of weird, but don’t worry, we’ll discuss them eventually (if we haven’t already). For now, it works, so go with it.
Other Bootloaders
There are bunches of AVR bootloaders out there, and I can’t vouch for which is the best. Best is just too hard to judge. There was a long thread on www.avrfreaks.net [Google ‘smallest bootloader site:avrfreaks.net’]. On AVRFreaks.net, there are many bootloader projects around, but probably the two most discussed are ‘blips 4 bootloader’ by Steve Childress and ‘fast tiny & mega uart bootloader’ by Peter Danneger [Google these using site:avrfreaks.net]. There is a quite good avrfreaks thread ‘[FAQ][C] Bootloader FAQ’ that discusses the pdf file: AVR Bootloader FAQ by Brad Schick and Cliff Lawson. I’m not providing links because avrfreaks links are very long, so you’ve got some Googling to do.
Please note that the bootloader we are designing for this article won’t work with the Arduino using the Arduino IDE. It works just fine for the Arduino board with avrdude and the script provided here, but the Arduino IDE is hardwired to use an ‘avr isp’ type bootloader. If you use this bootloader with an Arduino then want to restore the original bootloader, you can get a copy at: www.ladyada.net/library/arduino/bootloader.html.
The AVR109 Bootloader Protocol
Atmel has promulgated several bootloader protocols — as have others — and again I can’t vouch for which is the best, but I’ve chosen AVR109 [www.atmel.com/atmel/acrobat/doc1644.pdf]. This application note is accompanied by the source code written for the IAR compiler. I haven’t bothered to port it to gcc since I’m only interested in a subset of the commands available. This protocol is the AVR side of the equation and the PC side is covered by the application note: AVR911 Open Source Programmer. It is compatible with the AVRProg utility that comes with AVRStudio [I use AVRProg for the Butterfly in my C Programming book, but for this Workshop we’ll use avrdude which also speaks AVR109]. This protocol covers reading and writing Flash and lockbits and EEPROM and reading Fuse Bits, but we will only look at the Flash.
AVR109 Commands We Use
The heart of our bootloader is the function AVR109CommandParser() shown next. This function contains a switch statement that calls one of the AVR109 commands, depending on the command byte received over the serial port. Not all the AVR109 commands are used since only those chosen are needed for a simple bootloader. Most of the function names are the same as the command name and are somewhat self explanatory [autoIncrementAddress() is called by the command byte ‘a’ which tells the bootloader to auto increment the address — whoa, this code is almost self-documenting!]. [This is a joke since anyone who claims their code is self-documenting is wrong and should be ignored from that point forward (as should their code). They are also dangerous (as is their code), but we’ll save that for another rant.]
// Note that the function name is the command<br />
// except where otherwise commented.<br />
void AVR109CommandParser()<br />
{<br />
  uint8_t cmd;
  while(1)// Loop forever<br />
  {<br />
    cmd = receiveByte();
    switch (cmd)<br />
    {<br />
      case ‘P’: // Enter program mode<br />
      case ‘L’: // Leave program mode<br />
        sendByte(‘\r’);<br />
        break;<br />
      case ‘a’:<br />
        autoIncrementAddress();<br />
        break;
      case ‘A’:<br />
        setAddress();<br />
        break;<br />
      case ‘e’:<br />
        chipErase();    <br />
        break;<br />
      case ‘T’:<br />
        selectDeviceType();<br />
        break;                <br />
      case ‘s’:<br />
        readSignatureBytes();    <br />
      break;            <br />
      case ‘t’:<br />
        returnSupportedDeviceCodes();    <br />
        break;<br />
      case ‘S’:<br />
        returnSoftwareIdentifier();    <br />
        break;            <br />
      case ‘p’:<br />
        returnProgrammerType();    <br />
        break;            <br />
      case ‘b’:<br />
        checkBlockSupport();    <br />
        break;<br />
      case ‘B’: // Start Block Flash Load<br />
      case ‘g’: // Start Block Flash Read<br />
        startBlockAction(cmd);<br />
        break;<br />
      case ‘E’:<br />
        exitBootloader();<br />
        break;                                    <br />
      default:<br />
        if(cmd != 0x1B) sendByte(‘?’);<br />
        break;<br />
    }<br />
  }<br />
}
Some of these functions are required by avrdude when running in the AVR109 mode, though several don’t do much and wouldn’t really be needed if you want to write your own PC side bootloader and use it with a device that you already know about. You wouldn’t need to get the identifying info such as the signature byte, the programmer type, nor would you need to see if it supports blocks. Neither would you need to tell it to enter or leave the programming mode since what else would it do?
In that latter case, all we do is return a ‘\r’ that lies to avrdude so that it will continue working. Why write our own when avrdude is a great and free program? I’m not going to try to write another version of it just to save a few bytes of code. Remember that this bootloader just barely gets in under the 1,024 byte limit and the next lower limit is 512 bytes, so we’d have to eliminate half the code to have a chance of getting there (and that isn’t likely). If you really need to go that low, check out some of the assembly language bootloaders and PC side programs that communicate with them.
The critical action takes place in the startBlock Action(cmd) function:
void startBlockAction(uint8_t cmd)<br />
{<br />
  uint8_t tempRec;<br />
  uint16_t tempSize;
  tempSize = (receiveByte() << 8)<br />
  | receiveByte();<br />
  // dummy read for type - we only do flash<br />
  // NOT EEPROM<br />
  tempRec = receiveByte();<br />
  if(cmd == ‘B’) blockFlashLoad( tempSize );
  else blockFlashRead( tempSize  );<br />
}
This function — depending on whether cmd is ‘B’ or ‘g’ — calls functions to load or read the Flash. The load function is pretty much the same as the Flash load function we discussed last month for the SmileyFlashWriter. The blockFlashRead() function uses the avrlibc pgm_read_byte_near(address) function similar to what we saw in Workshop 25.
void blockFlashRead(uint16_t size)<br />
{<br />
    uint8_t data;<br />
    do {<br />
        // read_program_memory(address,0x00);<br />
        data = pgm_read_byte_near(address++);<br />
        // send byte<br />
        sendByte(data);<br />
        // reduce number of bytes to read<br />
        // by one<br />
        size—;    <br />
                                <br />
    } while (size);    // loop through size<br />
}
Keeping the Bootloader as Small as Possible
When we compile EduBootAVR with AVRStudio/WinAVR with our usual settings, we get a code size of 1,086 bytes. Oh, darn, the boot section boundary is at 1,024, so it is 62 bytes too large. Can we get the code smaller? Could we rewrite the program hoping to find something that will save us 62 piddly bytes? Well, we might, but there are other ways to save some space with a bootloader.
Eliminate Some of the Start Code
When we use AVRStudio with WinAVR to compile files, we get a gift of having necessary startup code added for us. This includes the interrupt jump table. But what if you aren’t using the interrupts? Well, you can eliminate it. Since we aren’t using interrupts in the bootloader, let’s dump the jump table! We do this by opening the Project Configuration Options window Custom Options pane, as shown in Figure 2.
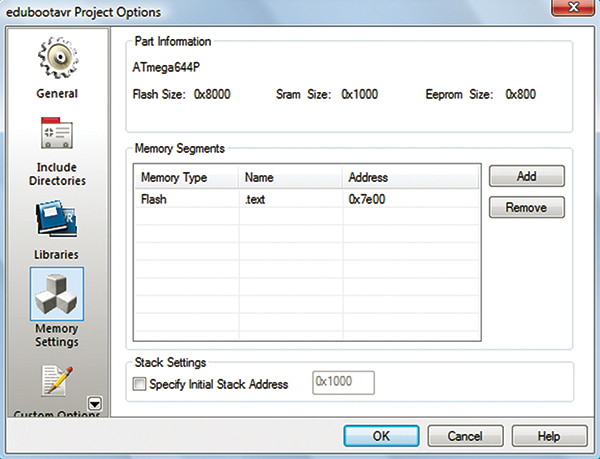
FIGURE 2. Project Options Custom.
We write ‘-nostartfiles’ in the ‘Add’ test box, then click ‘Add’ so that ‘-nostartfiles’ appears as shown in the figure. This also removes some startup code that we do need, so we have to add it back by putting the following code snippet right before the main() function:
// From Peter Fluery AVRFreaks Aug 10 2005 -<br />
// to remove interrupt Vector table<br />
// put -nostartfiles in LDFlags, add the<br />
// following function saves wasted space<br />
void __jumpMain (void) __attribute__ ((naked)) __attribute__ ((section (“.init9”)));
void __jumpMain(void)<br />
{   <br />
    asm volatile ( “.set __stack, %0” :: “i”<br />
    (RAMEND) );<br />
    asm volatile ( “clr __zero_reg__” );<br />
        // r1 set to 0<br />
    asm volatile ( “rjmp main”);<br />
        // jump to main()<br />
}
Now when we compile the code, we get 958 bytes which will fit in the desired boot section. We could stop here, but there is also another way to save some space.
Use a Different Optimization Level
We can keep the code unchanged and instead of using the default optimization of –Os, we can use –O1. You change this as shown in Figure 3. Just select –O1 from the Optimizations drop box. When you compile using this optimization, you get 986 bytes which would also get you inside the limits.
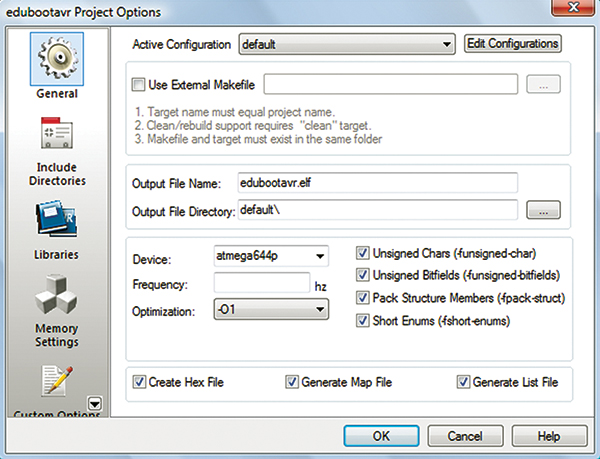
FIGURE 3. Project Options General.
If you use both, you get 854 bytes, providing you with even further headroom. There may be even more ways to save space, but we are already down 170 bytes, so why bother? If you really want to get it smaller, check out the assembly language bootloaders mentioned earlier.
EduBootAVR Source Code
The source code for this month’s article is located in Workshop27.zip as usual, and – not so usual – it is also located on Google Code Project Hosting: https://code.google.com/p/edubootavr/source/browse/#svn/trunk.
This is my first attempt to provide a Collaborative Open Project — a concept that we’ll dive into next month.
Using the STK-500 to Program the ATmega644
We will use the STK-500 to program our ATmega644 chip. The setup is shown in Figure 1. I strongly suggest that you read AVRStudio Help\AVR Tools User Guide; click on the STK-500 and read about it. You’ll see that there are many things that the STK-500 can do, but we’ll just use it to do ISP programming on an ATmega644 chip in a socket on the board. In Workshop 22, we saw how to use the Dragon to program an ATmega644 on a breadboard (BeAVR40 design) using a hardware setup that would make Medusa look cute. If you got that working, then you can just follow the directions there and forget about the STK-500.
However, if you have access to an STK-500, you may have an easier time since you can plug the ATmega644 into a socket and then use a 12-pin cable that comes with the STK-500 to program the chip (thus saving Medusa for the Kraken). It is much simpler to set up and therefore less problem-prone than the other way.
In AVRStudio, click the Connect Dialog as shown in Figure 4.
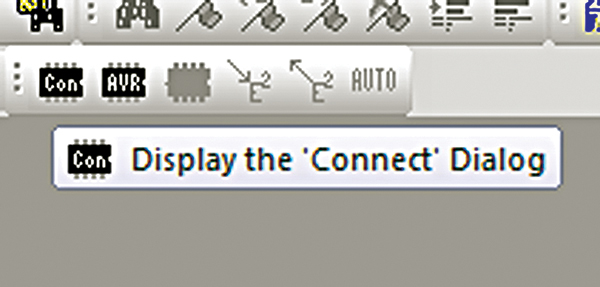
FIGURE 4. Connect Dialog.
In the Select AVR Programmer window shown in Figure 5, highlight STK-500 and Auto, and click Connect. (If it complains that it can’t find the STK-500, make sure that you are using a COM port in the acceptable range.)
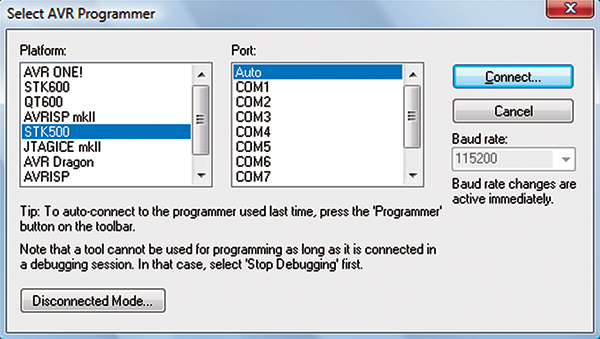
FIGURE 5. Select AVR Programmer.
In the Programmer Main tab, read the signature just to verify that you really are communicating with an ATmega644 (as shown in Figure 6).
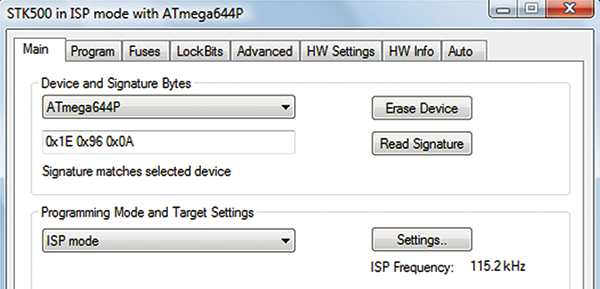
FIGURE 6. Programmer Main Tab.
In the Fuses tab (see Figure 7), set the BOOTSZ to $7E00 and check the BOOTRST fuse.
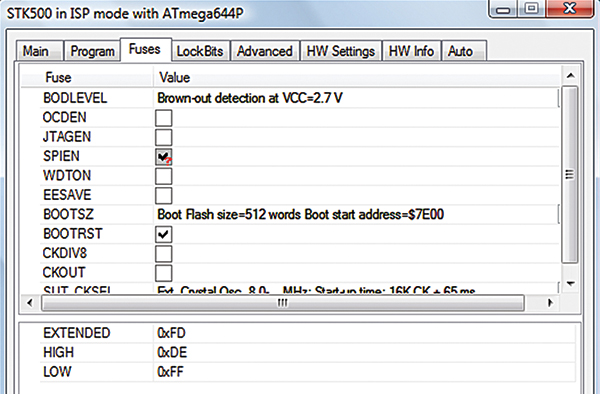
FIGURE 7. Fuses Tab.
Finally (as shown in Figure 8), open the Program tab and make sure you are pointed to the hex file; then click Program.

FIGURE 8. Program Tab.
Using EduBootAVR
Great! Now we have our own bootloader that we can use to upload programs. Let’s take the ATmega644 that we just used the STK-500 to load the bootloader and put it on a breadboard like the BeAVR shown in Figure 9 (discussed in detail in Smiley’s Workshop 22 – Busy as a BeAVR).
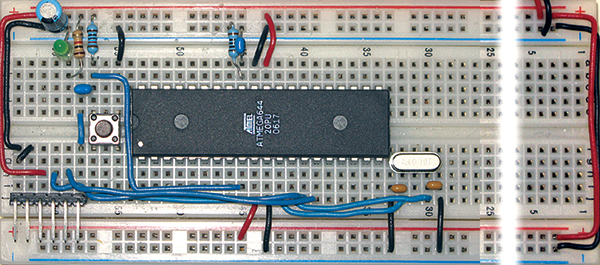
FIGURE 9. BeAVR40.
In earlier Workshops, we’ve seen how to use bootloaders with various programs. This includes AVRProg with the Butterfly; the Arduino IDE with the Arduino; and avrdude with several things. We’ll finish off this episode by using avrdude in the Command Prompt. We’ll do this cookbook style since we’ve seen the details before.
- Make sure that you have the code from Workshop 25 located at: C:\pgmtest. We will upload this to our application section using edubootavr.
- Make sure that you have compiled pgmtest for the ATmega644 (BeAVR40).
- Find the Command Prompt program (probably under Start\All Programs\Accessories\Command Prompt).
- Open Command Prompt and type in: cd C:\pgmtest\default (if that is where you’ve put that code) and hit return to take you to the pgmtest default directory where pgmtest.hex resides.
- Find the COMx port your BeAVR40 is talking to.
- Open NotePad and type in: avrdude -p m644p -c avr109 -P COM3 -b 57600 -v -F -D -U flash:w:pgmtestBeAVR.hex.
- Copy that and paste it to the Command Prompt as shown in Figure 10.
- Hit enter and it should upload pgmtest as shown in Figure 11.
- Open Bray’s Terminal and reset the BeAVR40 which should show the text in Figure 12.
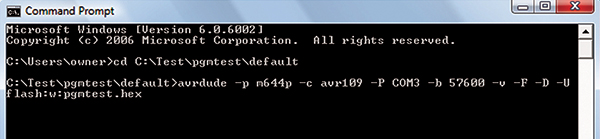
FIGURE 10. Command Prompt.
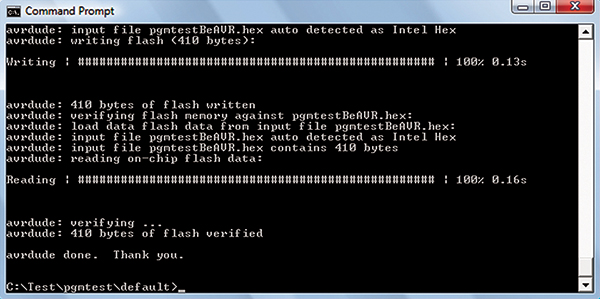
FIGURE 11. avrdude Verifying.
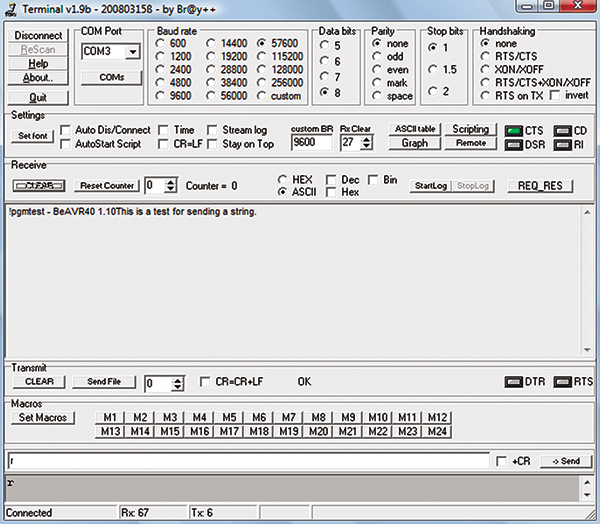
FIGURE 12. Bray’s Terminal.
So, now you know all about AVR memory. If you thought this was edifying, then don’t forget to check the Nuts & Volts Webstore where you can get books and project kits to help you learn and have some fun doing it. NV