A theremin is a musical instrument that is played by waving one’s hands in midair over the instrument itself. There is no physical contact between the player and the instrument. Typically, movement of the right hand controls the pitch of an oscillator over many octaves, while movement of the left hand controls the volume; from full off to full on. Because the pitch and amplitude controls are continuously variable, it is incumbent upon the player to use his/her hands to hit the perfect pitch with the proper dynamics as required for the piece being played.
Of course, this makes playing a theremin very difficult as anyone who has ever attempted to do so will tell you. Proficient theremin players must have perfect or near perfect pitch to play traditional musical compositions. Otherwise, the result is just weird noise. It’s easy to understand why many describe the sound of a theremin as uncanny, sinister, ghostly, unnatural, unearthly, supernatural, and/or otherworldly. But hello! This is also what makes theremins so cool.
Background
I have been fascinated by theremins ever since I first heard them in low budget 1950's sci-fi movies when I was a kid. Eerie etherial theremin sounds always occurred right before the alien or monster made its appearance on the big screen and whenever the movie's level of suspense and intensity needed to be heightened. This was an appropriate use of a theremin as its sound was as alien to people as were the monsters in the movies.
Since that time, theremins were rarely used until they showed up again in rock and roll music. A theremin-like device was used in the recording of the Beach Boys song, “Good Vibrations,” and it’s this sound most people associate with a theremin today.
Theremins actually have a long and sordid history involving the USSR, the KGB, and possibly even the IRS. The following brief history of the theremin was taken from the Zeppelin Design Labs manual.
Léon Theremin (1896-1993) was working on early radio designs for the Soviet government when in 1920 he accidentally built a device that emitted a weird but pleasant sound. He developed it into a musical instrument which he initially called the Thereminvox. In 1927, he left the USSR to tour Europe in promotion of his invention, performing to large audiences and receiving mixed reactions. His tour took him and his wife, Katia to New York where he opened a laboratory and studio, patented the theremin, licensed its manufacture to RCA, performed with the New York Philharmonic Orchestra, performed at Carnegie Hall with a theremin ensemble, and invented an electronic cello.
In 1930, he conducted the first-ever concert of an electronic orchestra. In the early 1930s, the Soviet consulate demanded Theremin divorce Katia. He proposed to his young and beautiful protégé, Clara Rockmore; she turned him down and Theremin instead married Lavinia Williams, a young and beautiful dancer in his employ. In 1938, he suddenly disappeared — his wife said he had been kidnapped by Russian agents.
Clara Rockmore rose to prominence as the world’s pre-eminent thereminist; in the ‘40s, a podiatrist thereminist named Hoffman made a living cutting records and performing the soundtracks for such classic films as “The Day the Earth Stood Still;” in the ‘50s, a trombonist named Tanner put Hoffman out of work with his electro-theremin: a different device that sounded similar but was much easier to play.
In 1966, Brian Wilson of the Beach Boys hired Tanner to perform on “Good Vibrations,” unaware that the instrument used was not actually a theremin. Tanner’s device was destroyed by an earthquake; Theremin’s second wife, Lavinia died in Haiti of food poisoning.
Meanwhile, sometime in the 1950s, Rockmore and her husband visited Moscow, and made contact with Theremin by a bizarre chance encounter. After 25 years of silence and mystery, she received a message to meet Léon on a subway platform, where they spoke for a few minutes. It turns out Theremin’s disappearance may have had more to do with the IRS than the KGB.
What is known for sure is that when Theremin returned to Russia, he was arrested and dispatched to a series of labor camps. He wound up in a secret Soviet laboratory where he developed spy gear for the KGB. He was sort of released in 1947, but “volunteered” to keep working with the KGB until 1966.
Nothing much happened with Theremin or theremins during the 1970s and 1980s.
In 1991, Léon — then 95 years old — returned to New York where he gave concerts, received awards, was chauffeured around in a limousine, and was reunited with Clara Rockmore. It’s not clear that he remembered her. He died in Moscow in 1993, aged 97.
You couldn't make this stuff up. As many long-time readers of this magazine know, I have built many different musical instruments in the past and have written about some of them here in the pages of Nuts & Volts.
It should come as no surprise that I have built a fully analog theremin for my own uses; it’s shown in Photo 1. I used this very theremin in recording a cover of the Tom Petty song, “Running Down a Dream” (which is available at craigandheather.net/MyCDs/9-SongsILike-2013/11-RunningDownADream.wav if you care to listen to it).
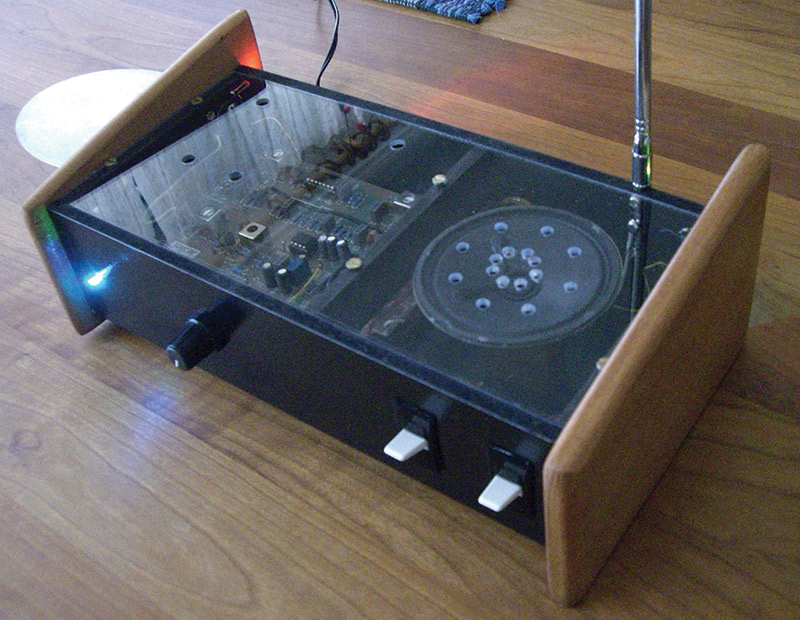
PHOTO 1. The analog theremin I built.
How Theremins Work
A traditional theremin features a pair of antennas that act as the capacitors in a resonant circuit. As mentioned earlier, as the player moves his/her hands, capacitance changes affect the pitch of an oscillator and its volume. Analog theremins like the one I built are subject to drift and stability problems, and need to be recalibrated before every use.
In my case, I turn the theremin's power on, let it stabilize for about an hour at room temperature, and then run through a process of tuning to bring the theremin into stable operation. As long as power remains on, the theremin is quasi-stable. However, if power is removed, the tuning process would need to be performed again. This is quite a pain and limits the usefulness of my theremin. The Zeppelin Design Labs Altura Theremin MIDI Controller (shown in Photo 2 and described in this review) takes a different approach altogether.
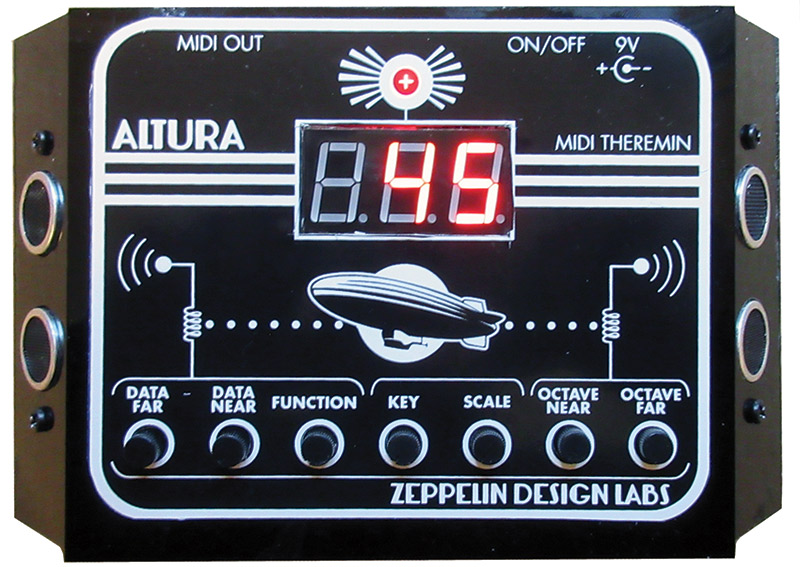
PHOTO 2. My fully assembled Zeppelin Design Labs Altura theremin MIDI controller in a black acrylic case.
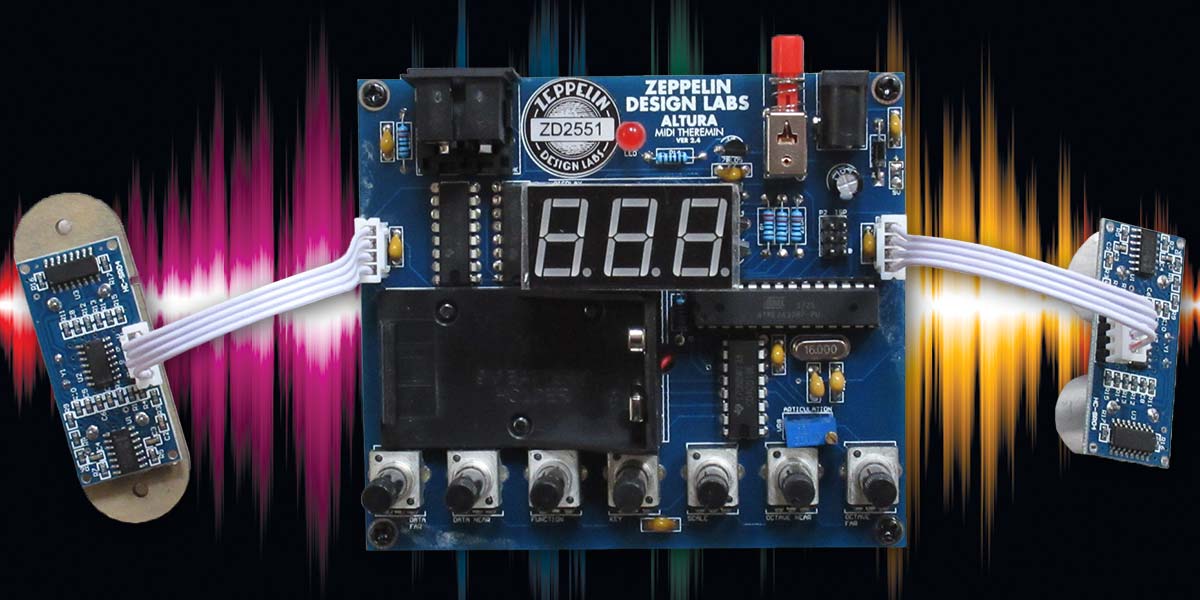
First, instead of using a quasi-stable oscillator whose pitch is modified by the player’s hand capacitance, it uses sonar range finder modules to ascertain the position of the player’s hands. Secondly — and equally important — the Altura theremin doesn't produce any sound of its own. Instead, it creates MIDI events that are passed onto externally connected MIDI devices like a synthesizer or MIDI sound module. The synthesizer interprets the MIDI events and produces the actual sound.
For this review, I connected the Altura theremin to a Roland GAIA synthesizer and to an Alesis QS-8 keyboard/synthesizer. Both worked well. It could also be connected to the MIDI Buddy project I described in the February 2015 issue of Nuts & Volts.
The advantage of Zeppelin Design Labs approach, of course, is the analog circuitry of a traditional theremin is replaced with digital circuitry in the form of a microcontroller, resulting in an instrument that is stable every time it’s powered up, and doesn't need calibration before being played.
Some might say a disadvantage of this device is that it doesn't make any sounds on its own. I would counter that argument with the fact that the Altura theremin can be made to sound like any instrument the attached synthesizer can produce: from a piano to a trumpet to bag pipes to a nylon string guitar, to even sounding like a flying saucer — making this instrument much more flexible in what you can use it for.
Plus, with the proper use of Portamento (the ability to glide smoothly between notes), the Altura theremin can emulate the classic sound of an analog theremin as well.
Building the Kit
The Altura theremin kit I used for this review arrived well packaged and damage free. The kit itself was fully contained in a plastic sack as shown in Photo 3.

PHOTO 3. The theremin kit package.
Photo 4 shows the bags of parts and Photo 5 shows the parts laid out for inspection before assembly.
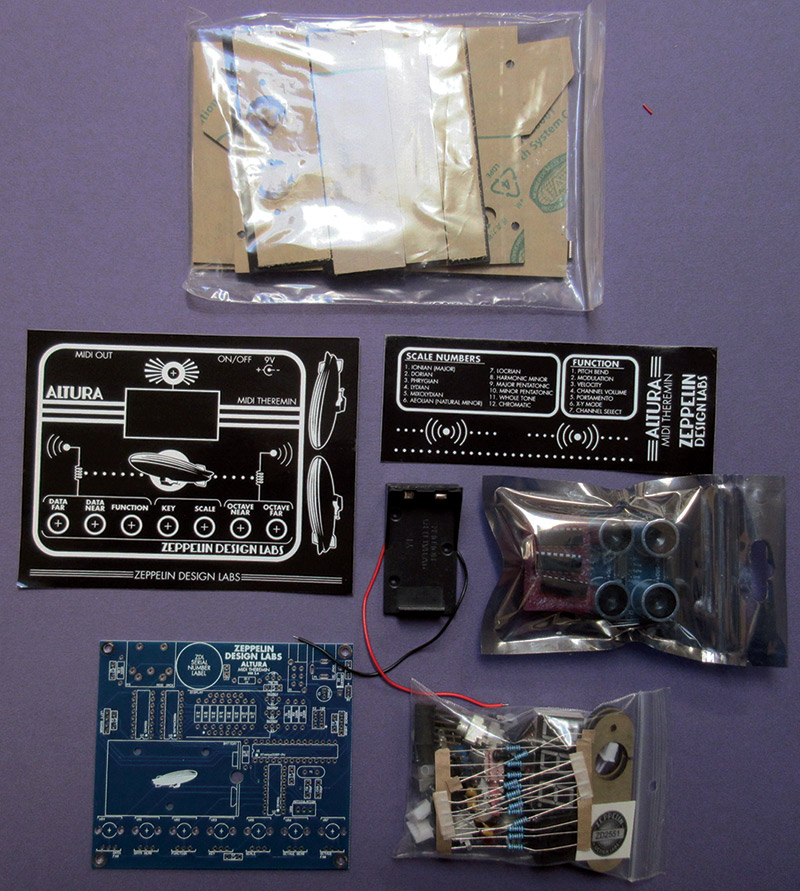
PHOTO 4. Bags of parts (the bag at the top holds the parts for the acrylic case).
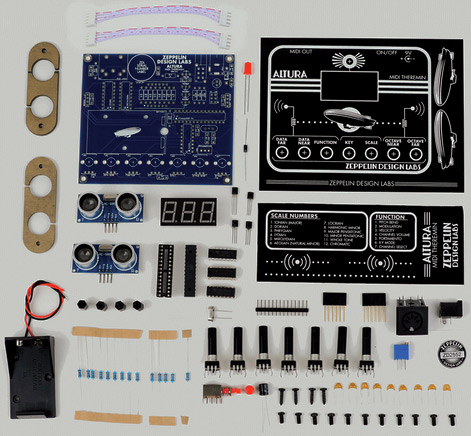
PHOTO 5. Parts laid out for assembly.
The instructions for putting the kit together are online instead of being delivered on paper with the kit, and for the most part are very well written with ample photos of each step of the assembly process. One thing that caused me some concern during the assembly process is the instructions referred to diodes (plural) in one step where only a single diode is used in the kit. Before I realized this was a mistake in the documentation, I searched through all the discarded packing materials looking for a second diode which didn't exist. Thankfully, the complete schematic of the theremin is provided in the online documentation so I could verify there was only a single diode used in the design.
The parts used in the theremin's construction seemed to be of high quality, and this was proven out when I plugged in the finished hardware and it worked (kind of) the first time. More on this in a moment.
It goes without saying that you must have some level of soldering proficiency to assemble this kit. The thru-hole construction with lots of room between most components makes soldering easy.
As a precaution, I used my ohmmeter to check the values of all the resistors before soldering them into place. I also oriented all resistors and capacitors in the same direction where possible (but that’s just me). Photo 6 shows the fully assembled theremin.
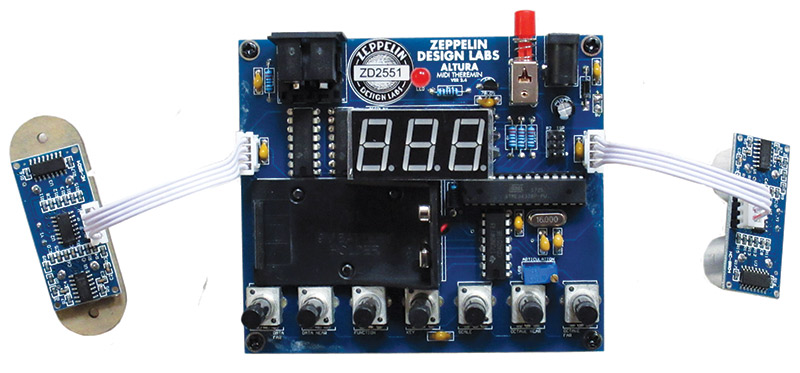
PHOTO 6. The fully assembled circuit board with connected sensors.
Building the Enclosure
The Altura theremin can be packaged in two different ways: either by following the detailed plans in the assembly manual for building a case out of cardboard (from a cereal box or from card stock); or by buying and building the optional plastic acrylic case.
Packaging electronics in cardboard is better than nothing, but it doesn't offer a whole lot of protection to the underlying circuitry.
Still, it’s a low-cost alternative that as long as you are careful transporting and using the theremin, it can keep your musical creation relatively safe. An Altura theremin packaged in a green card stock (cardboard) case is shown in Photo 7.
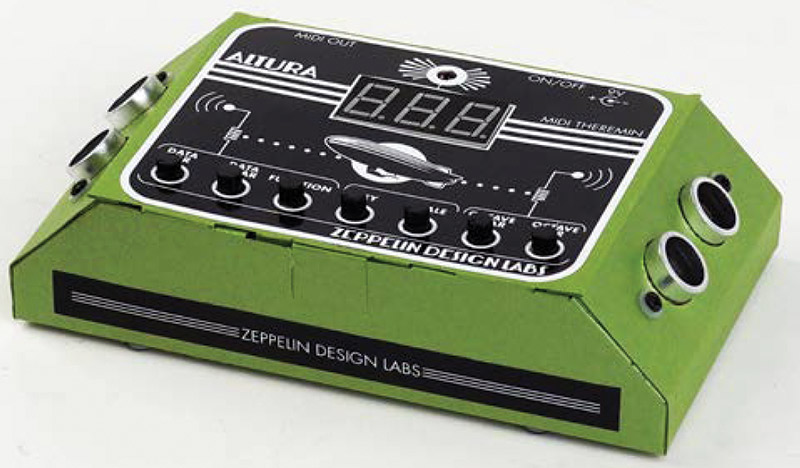
PHOTO 7. The completed theremin in a cardboard case.
As you can see, the case can turn out fine if you are careful in the construction process. The review kit came with the acrylic black plastic enclosure that is glued together using Super Glue™. The parts which make up the acrylic case are shown in Photo 8.
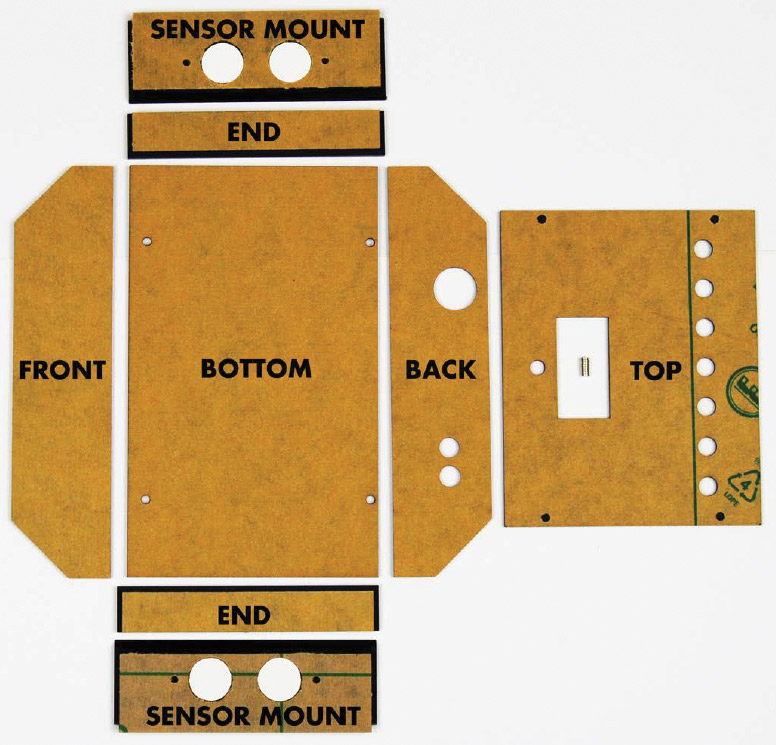
PHOTO 8. Acrylic case parts. All parts come covered with adhesive paper for protection during construction.
For the record, let me state once and for all time, I hate Super Glue — even the gel version which I used to construct the case. I say this because even though I left the paper covering the acrylic plastic pieces on as long as possible during the construction process, I still managed to get super-glued fingerprints on much of the case. (Good thing the kit comes with a lot of stickers which went a long way towards covering up my glue indiscretions.)
The top of the acrylic case is held in place by eight small (but powerful) magnets which are glued to the top and the case with — you guessed it — Super Glue. The orientation of the magnets is critical because you want the magnets to attract and therefore hold the top firmly in place.
Before gluing, you must mark the top of each magnet so that you can place that mark up when attaching the magnets to the top and down when gluing the magnets to the case. I put a dab of glue into each of the eight wells (four on the bottom of the top and four on the top of the case) and I used toothpicks to position the magnets. You cannot use metal implements for this because these magnets will stick hard to any magnetic material.
Using the MIDI Theremin
With the construction of the theremin kit complete, it was time to see if it worked. There is always a moment of anxiety when you first turn things on, but if you don't see smoke you can relax. First up, I made sure the power pushbutton switch was in the off position, I then installed a nine volt battery and — per the instructions — I rotated all seven of the potentiometers to their off (extreme left) position.
When I turned the device on, I was relieved to see the software version number being displayed. This meant the microcontroller was working and probably the rest of the circuitry was as well.
Next up, you must set what the instructions refer to as the “articulation.” Articulation adjusts the minimum time between notes somewhat similar to the quantize function in a sequencer. This adjustment serves to strike a balance between responsiveness and stability.
Articulation is adjusted by rotating a trim pot on the circuit board to an initial value of 45 as shown on the three-digit display. This number represents the delay between right-hand sonar sensor distance readings, with higher numbers meaning a longer pause between readings (less articulate but more stable), and lower numbers meaning a shorter pause (more articulate but less stable).
Once the articulation value is set, you probably don't need to touch it again unless you are trying to optimize it for your playing style. The fact that I could adjust this value was further proof the theremin circuitry was working.
The next step is to connect the theremin to a synthesizer device so you can hear it in action. I mentioned previously that I thought the device was kind of working. That’s because it seemed to work for a while and then just stopped.
After scratching my head for a moment, I decided the problem was probably the battery I was using to drive the unit. As an experiment, I connected up a 9V wall wart to the unit (with the negative connection to the center power connector pin). Everything became stable and worked like a charm.
I didn't have access to the Zeppelin Design Labs Macchiato Mini-Synth for which this theremin was designed, but I did have two professional synthesizers that I tested with. Connections are easy and only a single MIDI cable plugged into MIDI out on the theremin to MIDI in on the synthesizer is required.
By default, the theremin transmits on MIDI channel 1 so you must make sure the connected synth is receiving on that channel as well. Or, set the synth to OMNI so it listens for MIDI events on all channels.
Seven potentiometers control the operation of the Altura theremin. The FUNCTION control selects which function of the theremin to manipulate, and the other six controls are used for configuration of the selected function. The three-digit display always shows the current settings.
Table 1 describes what functions do what. Needless to say, there are a large number of possible control settings that should satisfy most tweakers.
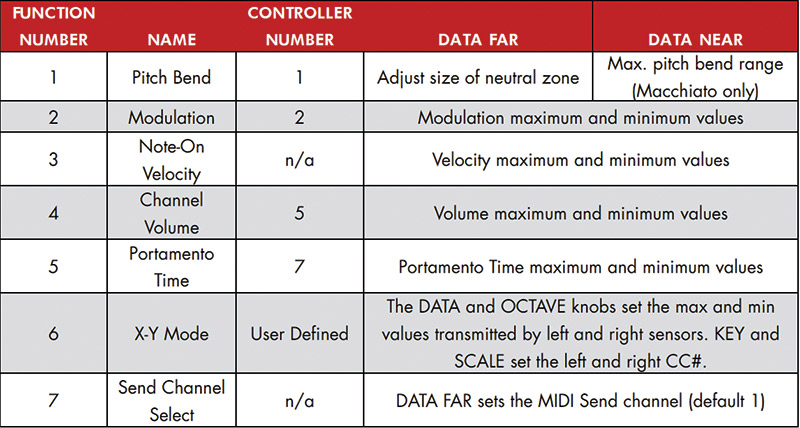
TABLE 1. Altura Control Functions.
The possible control settings are too numerous to list here, but the online manuals available from Zeppelin Design Labs covers them all in detail. Of particular interest to musicians are the scales this theremin supports.
A scale is defined by the intervals between adjacent notes as you make your way up an octave from one root note to the next. Table 2 shows the 12 supported scales.
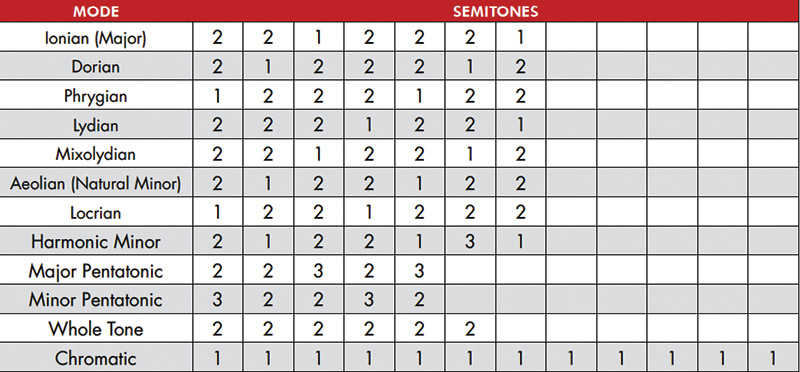
TABLE 2. The Altura theremin scales (2s represent whole steps between notes and 1s represent half steps).
It’s important to understand that while a traditional theremin allows infinite frequency variations between notes, the Altura theremin maps your hand movements into notes of the selected scale. This means it’s not possible to play a bad note or at least a note that is outside of the selected scale.
Looking Ahead
Zeppelin Design Labs supports the open hardware and open source software models. They plan to publish a design for a case which can be 3D printed, and they make their code freely available at www.github.com/zeppelindesignlabs for perusal and/or modification.
The code was developed in the Arduino integrated development environment (IDE), so you can modify the code to your heart’s content and upload it to the Altura theremin via the ISP header on the printed circuit board. Updates to the theremin's code from Zeppelin Design Labs would be applied this same way.
Conclusion
Was this kit fun and easy to build? You bet. Does this theremin have enough functionality to keep you entertained for a long while? You bet. Is the theremin easy to master? I would have to say no.
Playing the Altura theremin in key is much easier than with a traditional analog theremin, but you still need a good musical ear and good hand coordination to play a song without error.
Is the effort necessary to master this device worth the investment in time? I definitely think so. I already have some ideas on how I will incorporate the Altura theremin into my next round of recordings. NV
If you have questions or comments about the Altura theremin you can email [email protected] or consult their forum at http://zeppelindesignlabs.com/forums. If you want a kit of your own, just click the link below to order..