Recap
This Workshop marks a milestone in the development of the avrtoolbox. It is the end of the beginning. We have discussed some useful software engineering concepts and applied them to processes for an Open Source project (http://code.google.com/p/avrtoolbox). We have applied these processes to the development of the libraries in libavr. Now, we will finish this beginning by learning about the venerable C standard library. We will look in detail at one of the venerable functions from that library: printf() (as it has been tweaked by avrlibc to work on the AVR); and we will look at some other standard functions that we’ll apply to writing a simple command line interpreter. Our demonstration program will prove very useful for our future software development and testing.
The C Standard Library
The C standard library isn’t actually a library, but is the standard for an interface specification that library writers must use to write C runtime libraries that conform to the ISO C standard library specification. (There are other slightly different standards from other organizations.) These specifications are much like the functional requirements specifications that we discussed in the June ‘11 Workshop. Even though it is a specification and not a library, in general use when you see C standard library or C library, folks are talking about a specific software implementation. In our case, most of this is available in avrlibc (www.nongnu.org/avr-libc).
If you read a lot about generic C and the standard library, you may be somewhat confused when you try to use these standard functions with microcontrollers. This will be especially true if you come from a background of using C with PCs. The reason for this confusion is that C was written for a computer with lots of RAM that held both the program and the data. However, RAM is expensive compared to ROM, so for microcontrollers — that must be as cheap as possible — the use of RAM is minimized and is only used for data while the program resides in a separate part of memory (Flash EEPROM in the case of the AVRs; see the Workshops from June through October ‘10 for a detailed discussion).
Since C was written for systems with lots of RAM, many of the original library functions weren’t written with the idea of husbanding scarce RAM resources. However, the avrlibc does a great job of providing special versions of the standard library functions that are optimized for limited memory use. Be aware that there are some C functions that even though they are available, you should avoid them and use simpler custom alternatives. For instance, I never use malloc() to allocate memory on the stack (which uses the RAM). It is available and I’d use it without a second thought on a PC (or even one of the larger AVRs like the ATmega256 with 8K RAM, but not AVRs like the ATmega48 with 512 bytes of RAM). For micros, RAM hungry functions like malloc are known to get folks in trouble, so I avoid them.
I also avoid some functions that use a lot of program memory like any functions that require floating point numbers. For instance, the standard I/O function printf() can take formatted floating point data types, but this inflates the code by a couple of thousand bytes. Even though that is in the cheaper program memory, I prefer to use alternatives to floating point wherever possible. The avrlibc manual discussion on printf() and the many ways they get around the floating point problems is very long and dense, so I’ll try to simplify this later when we go into the details of our libavr implementation of printf() that builds on avrlibc.
Finally, there are a bunch of standard input functions based around scanf() that we will shun like the plague that it is — just take my word for it.
There are a bunch of sub-libraries declared in header files in the C standard library: <assert.h>, <complex.h>, <ctype.h>, <errno.h>, <fenv.h>, <float.h>, <inttypes.h>, <iso646.h>, <limits.h>, <locale.h>, <math.h>, <setjmp.h>, <signal.h>, <stdarg.h>, <stdbool.h>, <stddef.h>, <stdint.h>, <stdio.h>, <stdlib.h>, <string.h>, <tgmath.h>, <time.h>, <wchar.h>, and <wctype.h>. Note that one of these is <stdlib.h> that is confusingly called the C standard library (but actually, it is but one of many).
One of the jobs we often have when writing C programs is getting input from users and providing feedback to them. In typical simple embedded systems, this often involves buttons and LEDs. More complex systems may have keypads and LCDs. For our purposes — which are primarily educational — we assume that since the user will have a PC to use for development and uploading code, that we can also use that PC for communicating with the embedded system user via a terminal program, allowing us to use the PC keyboard and screen for input and output. This gives us the luxury (burden?) of using actual human readable sentences.
For example, we might want to have a standard sentence with a variable in it such as “The temperature is X degrees Fahrenheit” where X is a variable for the temperature. We want to have a way of reading a temperature with our microcontroller, then putting that value in X before sending it back to the user to read on a PC terminal: “The temperature is 70 degrees Fahrenheit.” As a preview, we would do this using the stdio.h library function: printf(“The temperature is %d degrees Fahrenheit.”,temperature_variable) — where the ‘%d’ tells the printf() function to write the value from temperature_variable.
Before we implement our version of the stdio.h function printf(), let’s take a look at stdlib.h to get an idea of what these libraries really are and how they are written.
Using stdlib.h
You can probably visualize lots of situations like the one above where you might want to use stock constant text phrases mixed with variable data. The stdlib.h has some functions that will help. Let’s look at a few and see how they are implemented.
A Few Practical Examples: strlen, atoi, itoa, and reverse
Since folks who either didn’t like to type or more likely were short on memory wrote these functions, the names are a bit more cryptic that those we use for our avrtoolbox functions — strlen is used to get the ‘string length,’ atoi is used to convert ‘ASCII to integer,’ itoa is used to convert ‘integer to ASCII,’ and reverse (which has a readable name) is used to reverse the order of characters in a string, which might sound like an odd thing to do. However, as we’ll see in a moment, it is quite useful.
Let’s write them ourselves (with some help from K&R):
int strLen(char s[])<br />
{<br />
    int i;<br />
    <br />
    i = 0;
while(s[i] != ‘\0’) ++i;
    return i;<br />
}
In strlen, we accept a pointer to a string which is an array of characters with a terminal character ‘\0’. The while statement evaluates each character, incrementing the index, i, until the terminal character is found. The return value is the number of characters, not including the terminal character. Well, that wasn’t rocket science, was it? It is a simple solution to a simple problem, but some of these functions are very clever, such as atoi.
Before you look at the atoi function, take out your paper and pencil computer and come up with an algorithm for converting an ASCII character string of numerals into an integer. For example, convert the string of char data types “1234\0” to the integer 1234. Give this some thought and see what you come up with. I’m serious now. Do it or the rest of the ink in the article will fade away and you’ll have an expensive drawing pad. Need a hint? Look at www.asciitable.com and note that the characters for 1, 2, 3, and 4 are sequential integer numerals 0x31, 0x32, 0x33, and 0x34.
//NOTE: “borrowed” from K&R p. 43 atoi function<br />
int atoi(char s[])<br />
{<br />
    int i, n;<br />
    <br />
    n = 0;<br />
    for(i = 0; s[i] >= ‘0’ && s[i] <= ‘9’; ++i)<br />
        n = 10 * n + (s[i] - ‘0’);<br />
    return n;<br />
}
The atoi — ASCII to integer — function converts a string of ASCII characters representing the integers 0 through 9 into an integer number equivalent to the string. If you didn’t figure this one out yourself, then use your paper and pencil computer to run the function with char s[] equaling “1,2,3,4,\0” to see how it works. Note the condition in the for statement will cause the loop to bail if one of the characters is not equal to or between the characters 0 and 9. This gets us out of the loop, but not out of trouble. In a robust function, we would have some kind of error reporting mechanism so that code calling atoi could know that it sent a bad string, and so the calling function could build in some way to recover. We’ll get into all that some other time and be careful not to make mistakes now. (Famous last words.)
The conversion algorithm relies on the convenient fact that the ASCII characters for integers are represented by a sequence of numbers. ‘0’ is 0x30 in ASCII; ‘1’ is 0x31; and so on. So, if s[i] = ‘1’ (the character), we get (s[i] – ‘0’) = 1 (the integer). That is, we subtract the character 0, which has a value of 0x30 from the character 1 which has a value of 0x31, leaving us with the number 1. Voilà: ASCII to integer.
We start with n = 0, so the first time through the 10*n = 0 and the character are converted to the 1’s position in the integer. For each subsequent pass, the n has a value so we multiply it by 10, providing the 10’s, 100’s, and so forth.
You were asked to think about this algorithm before looking at the atoi function. Don’t be concerned if yours wasn’t as simple and elegant as this one. Mine wasn’t. It takes a while to start thinking like a computer. (Then your brain turns to silicon and people avoid you.) Just be glad other clever folks have thought about this and are willing to give you a good solution.
Now, think about the problem of reversing the characters in an array. How would you do this? Try it on the pencil and paper computer, then look at the reverse function:
//NOTE: “borrowed” from K&R p. 62 reverse function<br />
// reverse: reverse a string s in place<br />
void reverse(char s[])<br />
{<br />
    int c, i, j;<br />
    <br />
    for (i = 0, j = strLen(s)-1; i < j; i++, j—){<br />
        c = s[i];<br />
        s[i] = s[j];<br />
        s[j] = c;<br />
    }<br />
}
This is pretty straightforward. Put the first char from the array in a box, then put the last character in the array in the position of the first character. Then, take the stored character and put it in the last position in the array. Move your index in one position on both ends and repeat. So what? Well, we will use this to convert an integer to an ASCII number. As before — given the hint that we will use the reverse function — see if you can figure out how to write this integer to the ASCII function. My concept worked, but wasn’t even close in the quality of the actual function in K&R. Oh, well:
//NOTE: “borrowed” from K&R p. 64 itoa function<br />
void itoa(int n, char s[])<br />
{<br />
    int i, sign;<br />
    <br />
    if ((sign = n) < 0) // record sign<br />
        n = -n;            // make n positive<br />
    i = 0;<br />
    do {    // generate digits in reverse order<br />
        s[i++] = n % 10 + ‘0’; // get next digit<br />
    } while ((n /= 10) > 0); // delete it<br />
    if (sign < 0)<br />
        s[i++] = ‘-’;<br />
    s[i] = ‘\0’; // add null terminator for string<br />
    reverse(s);<br />
}
In my attempt at this, I never thought to do it backwards then reverse the string. First, store the integer in the sign variable and we get the sign of the integer by using the if statement to see if the integer is less than 0. If so, we multiply it by –1 to make it positive. Then we use do while, because we want to have at least one digit. Now, get out your paper and pencil computer and run the number 1234 through the do while loop, since no amount of explaining will be as effective as running the numbers yourself. Don’t be tempted to succumb to boredom and blow this off; you should be able to understand this at this point in your C education. And it will be on the test.
Using printf()
If you are prone to insomnia and this article isn’t yet a cure for you, then I suggest you look at the verbiage on printf() in the avrlibc manual. It is a lot to wade through, but fortunately we’ll make using printf() with the usart as simple as we can. In fact, we’ve already made it pretty simple back in Workshop 35 where we discussed some Arduino-like elementary functions and included the serial_out function that was a sneaky wrapper for printf() that hides much of the complexity from the easily spooked novice programmer.
Our implementation of printf() is in the usart library we looked at last month, so in order to use it all we have to do is include the usart.h header and we are good to go. If you want to know what is going on under the hood, you can look at the usart source code in http://code.google.com/p/avrtoolbox. Let’s not forget that lecture above about floating point — don’t try to use it with this version of printf. If you do, you’ll just get a ? returned instead of the expected number.
The parameter list for printf() is a bit different from what we’ve seen before since the list is variable with the number of parameters dependent on the number of format conversions you are doing in the string in the first parameter. An example for using printf():
uint8_t  my_day = 21;<br />
uint8_t my_month[] = {‘J’,’u’,’l’,’y’,0};<br />
uint16_t my_year = 1980;
printf(“Your date of birth is:\n Day %d \nMonth: %s \nYear %d.”, my_day, my_month, my_year);
which shows in the terminal as:
Your date of birth is:<br />
Day 21<br />
Month July<br />
Year 1980
This example should give you a feel for what is going on. You write a sentence and insert format characters preceded by % that match the variable list that you want to have formatted to be output as text. (Note that if you want to output a percent sign in your text, you’ll need to use ‘%%’.)
Storing Text in Program Memory Space
The one problem with using printf() is that the text is loaded into RAM. Remember that RAM is expensive so we don’t want to use it unless it’s necessary. In the case of constant text, it isn’t necessary. We can use a special version of printf() that takes constant text from the cheaper Flash program memory space. This is taken care of for us with functions from avrlibc.
The following shows a string that is stored in RAM versus one that is stored in program memory. Note the addition of the _P to printf and that the parameter list begins with PSTR with the string contained in the following parenthesis:
printf(“printf()Hello, World! - from RAM\r”);<br />
printf_P(PSTR(“printf()Hello, World! - from program memory\r”));
You can also use printf_P with constant strings defined outside of functions, usually at the top of a module or in a header as follows:
// This is a program memory string defined outside any function<br />
// Used for testing sending a program string in test 7 below<br />
const char PGM_STR1[] PROGMEM =  “This is a program memory string defined outside any function.\r”;
printf_P(PGM_STR1);
Let’s use some of these C standard library functions in a practical example.
A Command-line Interpreter
We will use a few selected C standard library functions in our command_line_demo program (in the trunk\avr_applications directory from http://code.google.com/p/avrtoolbox) to give you a better feel for using the standard libraries and to provide this great little tool for future software development. We start by defining a protocol for issuing commands to a microcontroller. In our case, we want to send a text name for the command followed by some data, and we want to be able to issue a sequence of commands in a script that will give the micro a whole list of things to do. Imagine, for instance, that you want to program a robot arm to go through a sequence of motions. You might want it to get a part and put it into a bin, so you might want it to go up 10, left 20, down 10, pick up 1, up 10, right 20, down 10, drop 1. This implies that you have six commands up, down, left, right, pick up, and drop. For each command, you have some data that tells it how much of the command to do.
Let’s decide on a protocol that takes commands as comma-separated units with the text command first, a space, the data, and then a comma to separate command units. We will also decide to use the ! character to tell the micro that the command sequence has ended and to start processing the script. For example: COMMAND3 123,COMMAND4 321,COMMAND6 65535,HELP 123,!
Some of the stuff in command_line_demo.c is fairly advanced, but I’m going to assume that you can do pretty much what I do and if something doesn’t quite make sense, you’ll use it anyway since it works. My intention here is to provide a template that can be easily modified for use in other programs.
In the demo, we have the command name and function name associated with each other in a constant data structure stored in program memory space. For example, the text COMMAND0 is associated with the name of the function to call when you receive that text, command0():
const CMDS COMMANDS[] PROGMEM = {<br />
{“COMMAND0”,command0},<br />
{“COMMAND1”,command1},
{“COMMAND2”,command2},<br />
{“COMMAND3”,command3},<br />
{“COMMAND4”,command4},<br />
{“COMMAND5”,command5},<br />
{“COMMAND6”,command6},<br />
{“HELP”,help},<br />
{0,NULL}<br />
}
In a real application, COMMAND0 might be something like goleft and the associated function could be my_go_left_func(). These names are entirely arbitrary and should be whatever makes sense to you. In the demo case, we have six generic commands and a help command. At this point, you should mark this spot and go peruse the source code in avrtoolbox to get a feel for what it is doing. In order to make our command-line interpreter work, we use the C standard library functions that I’ve listed along with the line number for each in the source code:
Line 99 uses strchr from string.h. This function returns true if the string in the first parameter contains the character in the second parameter. In this case, the string is in the USART receive buffer and the character is defined by the constant TERMINATOR which, in our case, is !.
// Load until terminator received<br />
if(strchr((const char*)usart0_receive_buffer,TERMINATOR))<br />
{<br />
    parse_command();<br />
    usart0_receive_buffer_clear();<br />
}
Line 168 uses strcmp from string.h. This function compares two strings and — contrary to all logic — returns a 0 if they are the same. The reason for the 0 is arcane so just try to remember that in this case, false is true. Also note that the way we get the first string in the parameter list is even more arcane since it requires some serious twisting to get the string from program memory so that it can be compared to the second parameter in RAM. I won’t pretend that I’ll remember how to do this next time I need to do this, so I’ll just look back and copy how it is done here:
if( !strcmp( (char*)pgm_read_word(&COMMANDS[i].PTEXT),command) )<br />
{<br />
    // Get the function and call it<br />
p_func = (PGM_VOID_P)pgm_read_word(&COMMANDS[i].PFUNC);<br />
    p_func(atoi(data));<br />
    valid = true;<br />
}
Line 173 uses atoi from stdlib.h. Notice that in the above code snippet, we are using the atoi function discussed above to convert the data from the ASCII to an integer that we are now sending to the command which is disguised as ‘p_func.’ Yes indeed, this is getting dense. In Line 172, we turned the command function name from our COMMANDS structure into a pointer to the particular command function indicated, and loaded it to p_func. If the function is named my_func(uint16_t my_data), then we now have an alias to that function that feeds the results of the atoi function on the ASCII string data as the parameter for my_func. The line p_func(atoi(data)); is the same as if you used my_func(atoi(data));.
Line 204 uses strcpy from string.h. Here we do something simple: We copy the receive buffer into another buffer that we will use to parse the command script. This solves the problem of what we would do if we were in the midst of parsing the receive buffer and received more data that might cause it to wrap around and trash some of the data. This also brings up an important safety tip: Don’t send a script that is longer than the receive buffer!
strcpy((char *)buf,(char *)usart0_receive_buffer);
Line 212 uses strlen from string.h. This tells us the length of the buffer so that we can run our for loop through it one character at a time.
for(i = 0; i < strlen((const char *)buf); i++)
Line 230 uses isalnum from ctype.h. Here, we test to see if the character in temp_buf[j] is alphanumeric which is what we have restricted our commands to use.
if(isalnum(temp_buf[j]))
Line 249 uses isdigit from ctype.h. In a similar vein, we check to make sure the data is all digits, so we can use atoi to convert it into an integer.
if(isdigit(temp_buf[j]))
Finally, printf_P from stdio.h is used all over the place.
These are just a few of the many useful (and sometimes bizarre) functions that you will find in the C standard library, so someday when you’ve got more time, do take a look at the avrlibc manual and see what else is available.
Testing by Using Scripts in Developers Terminal
We will use my Developers Terminal to test the command_line_demo by sending it a script that follows our command protocol. Then we will use four additional scripts, each with a different sort of error to make sure the program works as required.
Script 1 – Correct command.
COMMAND3 123,COMMAND4 321,COMMAND6 65535,HELP 123,!
Script 2 – Error: Non-alphanumeric character in command field.
C@OMMAND3 123,COMMAND4 321,COMMAND6 65535,HELP 123,!
Script 3 – Error: Non-digit in data field.
COMMAND3 1A23,COMMAND4 321,COMMAND6 65535,HELP 123,!
Script 4 – Error: No space between command and data fields.
COMMAND3 123,COMMAND4321,COMMAND6 65535,HELP 123,!
Script 5 – Error: No comma between two command units.
COMMAND3 123 COMMAND4 321,COMMAND6 65535,HELP 123,!
Script 6 – Error: No script terminating character.
COMMAND3 123,COMMAND4 321,COMMAND6 65535,HELP 123,!
We will put these scripts into an XML file so that we can load them into Developers Terminal and send them with a single click with the Send Macro feature. You’ll want to get the XMLData.xml file from the avrtoolbox command-line directory and put it in the directory with your Developers Terminal executable. If you don’t yet have Developers Terminal, you can get it under the avrtoolbox pc_applications directory. Note that this Terminal is an outgrowth of the discussions in Workshops 18, 19, and 20, and the details are in my book Virtual Serial Port Cookbook that you can get along with the associated hardware projects kit from the Nuts & Volts Webstore at http://nutsvolts.com.
When you open your serial link to the command-line interpreter and reset the micro or type HELP, you’ll see the output shown in Figure 1.
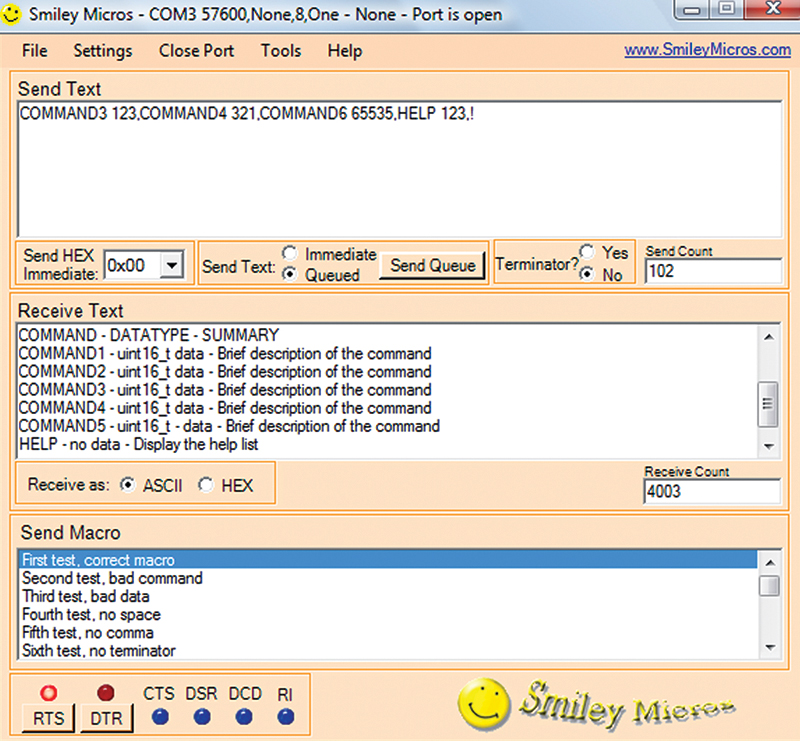
FIGURE 1. Developers Terminal showing help.
This serves for now as a template for the real help that you’ll want to show with your version of this software. When you apply this to a real program, you will likely want names more descriptive than COMMAND0 followed by some text that says something more informative than “Brief description of the command.”
We test the code by intentionally sending scripts with errors. When we click on each error macro, we see the output shown in Figure 2.
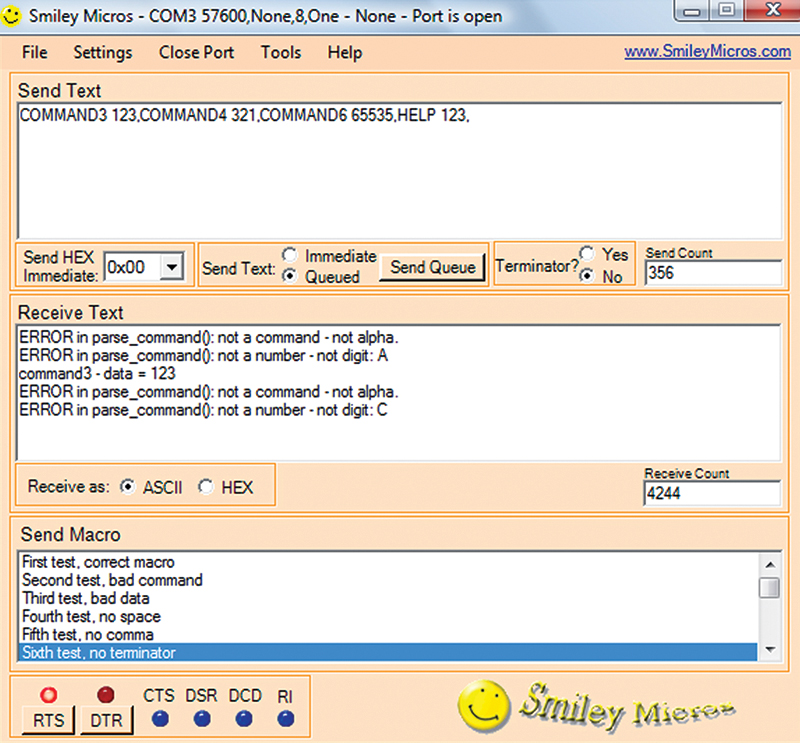
FIGURE 2. Catching script errors.
Note that the third line shows that the first command was handled correctly since it has no errors. Further note that the ‘Sixth test, no terminator’ macro results in nothing showing on the Receive Text box since the command_line_demo has no way of knowing that we think we have sent it a valid script. So, it sits spinning its wheels waiting for the TERMINATOR character (hint — it isn’t a former governor of California). This is not a rigorous validation of the code. For one thing, it won’t catch improper use of the SEPARATOR and TERMINATOR characters, but it is certainly good enough for now. If you find a problem, well, you’ve got the source code.
If we want to convert the demo to a real application like the robot pick and drop we mentioned above, we would modify the COMMANDS array as shown next:
const CMDS COMMANDS[] PROGMEM = {<br />
{“UP”,move_up},<br />
{“DOWN”,move_down},<br />
{“LEFT”,move_left},<br />
{“RIGHT”,move_right},<br />
{“PICKUP”,close_gripper},<br />
{“DROP”,open_gripper},<br />
{“HELP”,help},<br />
{0,NULL}<br />
}
We would write the indicated functions: move_up(), move_down(), move_left(), move_right(), close_gripper(), and open_gripper(). Now, all you have to do is call them with a command-line script. Simple, huh? Well, I think so, and you are going to see this thing a lot in the coming episodes where I’ll use it for lots of software and hardware micro machinations.
Next time, I think we are going to take a look at digital input and output, so stay tuned and find out. NV
If you just can’t wait and want to get a leg up on all this serial stuff and real C programming for the AVR, then try my C Programming book, Butterfly projects kit, and the Virtual Serial Port Cookbook from the Nuts & Volts shop.