C Programming • Hardware • Projects
Recap
Last time, we finished busting up the Arduino and began reassembling the resulting ruins as the BreadboArduino. We learned to use it with the regular free Atmel tools AVRStudio/WinAVR and a helper tool that I provided: AVRUP to ease the use of AVRDude. Now we can move on to more capable software and hardware (okay, IMHO) without forever trying to explain the word Arduino. Keep in mind that I love the Arduino for beginners, and wrote the book, An Arduino Workshop that along with the Arduino Projects Kit (both available from Nuts & Volts) are, in my totally unbiased opinion, the absolute all-time best possible starting point for beginners. But enough of my public display of humility.
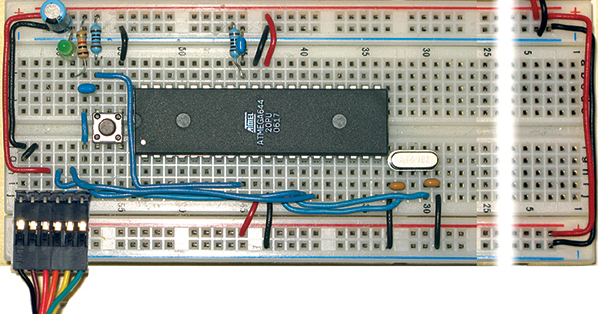 |
| FIGURE 1. BeAVR prototype. |
This time, I introduce the BeAVR (Breadboard enabled AVR). The hardware version shown in Figure 1 looks suspiciously like the BreadboArduino on steroids. That’s because the BreadboArduino uses the 28-pin ATmega328 and the BeAVR uses the 40-pin ATmega644. That’s twice the memory and 12 more I/O pins! You can’t be too rich, too thin, have too much memory, or too many I/O pins. And, yes, we are going to be as busy as a BeAVR.
So Why a BeAVR?
BeAVR is an open source design concept for AVR hardware and software. The hardware schematics can be implemented on a breadboard (as we will see first) or on a PCB which we will introduce next time. We’ve seen most of the software in earlier workshops; the main addition will be to use a bootloader for the ATmega644. So, what’s a bootloader?
Baron Munchhausen and the Bootloader
 |
| FIGURE 2. Baron Munchhausen. |
In the early part of the 18th century, the exact date is unknown; Baron Munchhausen saved himself from drowning in a shipwreck by pulling himself out of the sea by his own bootstraps. A particularly miraculous feat since (as you may have noticed from his bust shown in Figure 2) he had no arms. In homage to this great man, computer folks have used the term ‘bootstrapping’ to mean the emergence of a complex system by starting with simple components and progressively developing greater complexity on top of them. In our case, a bootstrapper (a.k.a., bootloader) is a small simple program that can be used to load and run a large complex program.
I like to brag about how many years ago, I wrote an 81 byte machine code bootstrap program for the 8051 that I input by hand (my hand, to be exact) using DIP switches into an SRAM chip powered by a lantern battery. Note that SRAM is volatile memory and forgets everything the moment power is removed. This tiny program allowed me to download a hex file to the 8051 from an original IBM PC over an RS-232 connection. I learned a lot — mainly how difficult it was to input a lousy 81 bytes using DIP switches — and I tended to do things the hard way for some (yet to be explained) reason. I also invented several new words when I knocked the alligator clips off the battery in the midst of one of my test runs causing the SRAM to immediately forget everything I’d told it. After finding where I had thrown all the pieces, I joined the rest of the world and started using non-volatile memory in the form of an EPROM (Erasable Programmable Read Only Memory) which has memory that will remember what you told it if the power has been removed. The EPROMs I used were kind-of cool because the IC had a transparent window in the top showing you the silicon chip memory inside. This wasn’t for your personal voyeuristic entertainment though. It was so you could shine a UV lamp onto the memory and erase it.
This operation took a while, the software test procedure generally went like this: fail, pull out the EPROM, stick it in a UV eraser, go get a cup of coffee and watch a soap opera, load the next iteration of the code using an EPROM programmer, fail, pull out the EPROM ... it was actually even more boring that it sounds. Then, some genius figured out a way to erase the EPROM with electricity thereby creating the EEPROM (the additional E stands for Electrical).
EEPROM is a kind of memory that won’t go brain dead if you pull the alligator clip off the lantern battery, and you don’t need a special eraser to erase it. The next innovation was Flash EEPROM, more commonly known as Flash memory. This memory was much cheaper than regular EEPROM because it erased memory in large blocks rather than a byte at a time. It’s the kind of memory you usually find on memory cards and USB Flash drives. This innovation is one of the reasons that we have AVRs. The guys who designed the AVR wanted program memory that could be both non-volatile and easily erasable, so they got with the folks at Atmel (who were making cash on Flash). So, what does this have to do with Baron Munchhausen? Well, the AVR architecture has some special features that allow us to use Flash memory as a bootloader.
All right, that was strange, but the points were: A bootloader allows you to program a microcontroller without an external programmer; and Flash memory is great for a bootloader because it is non-volatile so you can use lantern batteries and alligator clips without cursing and throwing things.
Chicken or Egg
A bootloader is a program that allows you to upload a program without having an external programmer. However, the bootloader IS a program, so how do you program it onto a micro? Well, you use an external programmer. But — you ask — if the reason for a bootloader is so you don’t need an external programmer ... but you need one to put the bootloader on the micro ... Wait a minute! This is confusing! The answer is that if you have an external programmer, then you don’t need a bootloader — but if somebody is kind enough to program the chip with a bootloader for you, then you don’t need an external programmer.
In the last episode, we relied on SparkFun (www.sparkfun.com) to put a bootloader on an ATmega328 for our BreadboArduino. But now, we are going to look at how to put a bootloader on an ATmega644. Atmel has several really good programmers that would fit our needs: the AVRISP mkII; the Dragon; and the STK-500 — in order of cost and capability. Since we will be using ISP (In System Programming), any of the three would suffice. I’ll go with the mid-priced (~$50) option to save space.
Building the BeAVR on a Breadboard
To make this truly open source, I thought it best to build this first on a breadboard — which is about as open as you can get — then next time, take the design to a PCB. I had all sorts of fun building the prototype on a breadboard. (And by fun I mean real pain and suffering.) Since this is open source, you too get to share in the fun.
BeAVR Schematic
The BeAVR schematic shown in Figure 3 is much like the BreadboArduino from the last episode with the ATmega328 swapped out for an ATmega644.
 |
| FIGURE 3. BeAVR schematic. |
Is a Programmer a Person or a Machine?
When I’m sitting at my laptop writing code in either the Arduino IDE or AVRStudio editors, I’m a programmer and I’m programming. After I compile the code and upload it to the AVR, I use a programmer for programming the IC. So, yes, there is a bit of confusion with the words programmer and programming. From one view, it is a human activity and from another it is a machine activity. We will see how to use an Atmel AVR Dragon as our hardware programmer. If you can get your hands on an AVRISP or an STK-500, there is no need to get a Dragon since both will do ISP programming just as well.
AVR Dragon
 |
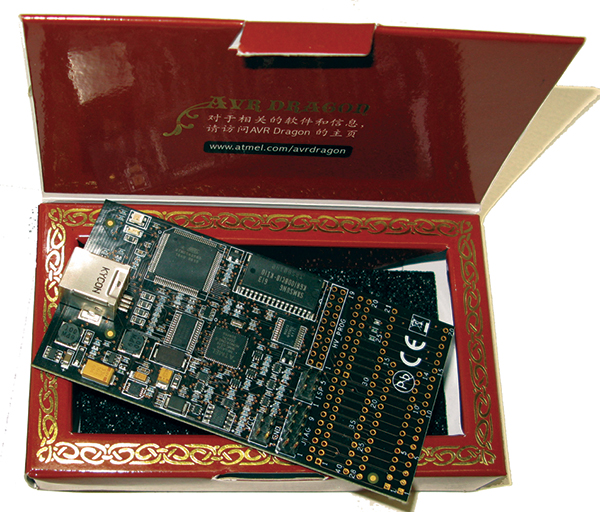
| FIGURE 4. AVR Dragon box. |
I’ve got to admit that the AVR Dragon provides the best out-of-box experience I’ve ever had with a programmer — mainly because the box is so darn cool (Figures 4 and 5). The cover has a Norwegian and a Chinese Dragon biting each other’s tail. (There just has to be an interesting story behind that.)
 |
| FIGURE 5. AVR Dragon out of the box. |
Unfortunately, once you get it out of the box, the trouble starts. Don’t get me wrong, this is a great little board and very economical, but you’ve got to do some serious homework to use all its features. Plus, you need to purchase additional parts to make it do anything. Neither the jumpers nor the socket shown in Figure 6 come with the Dragon.
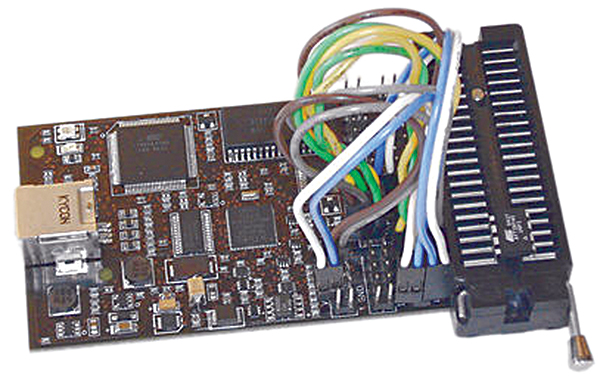 |
| FIGURE 6. Dragon with jumpers. |
That shouldn’t be considered a fault since these items would raise the cost and frankly, anyone using the Dragon should already know how to acquire and use the extras. One warning: Do not touch this board when it is powered. Some earlier Dragons failed when touched, and while the problem is supposed to be fixed, why on earth would you want to touch a powered-up board, anyway? Just keep your hands to yourself mister!
Dragon Rider
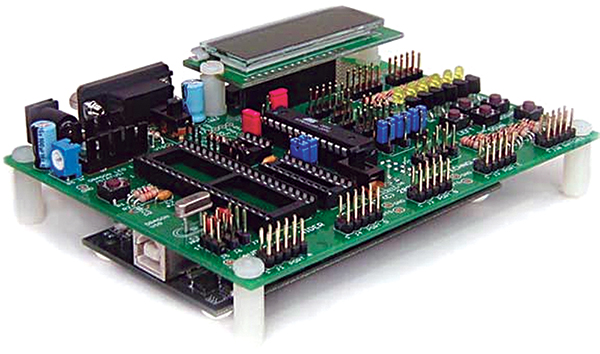 |
| FIGURE 7. Ecrostech Dragon Rider. (Photo used with permission of Graham Davies of Ecrostech). |
Frankly, the Dragon — while economical — is a bear for the novice to set up. You will need various jumper wires, cables, and sockets that don’t come with the board. One really good solution to this problem is to get the Dragon Rider kit from www.ecrostech.com as shown in Figure 7. This solution more or less turns the Dragon into an STK-500 but with USB and an LCD, so it is well worth considering.
Dragons, Medusas, and BeAVRs?
We will use the Dragon to put the bootloader on the BeAVR then we will use that bootloader for future programming efforts. We are going to go the cheapo route and directly wire the Dragon ISP port to the BeAVR SPI port. [BTW, SPI is not a typo. The ISP (In System Programming) goes through the SPI (Serial Peripheral Interface).]
 |
| FIGURE 8. AVR Tools Help. |
I happened to have a six-wire IDC cable lying around and a six-pin male header, so I chose the method shown. Before getting started on this, I suggest you open the AVRStudio Help\AVR Tools (Figure 8), find the section on the Dragon, and read it. I summarize some of the more relevant stuff for our venture. In Workshop 21, we were introduced to AVRStudio and WinAVR. You can get them at www.atmel.com/dyn/products/tools_card.asp?tool_id=2725 and http://winavr.sourceforge.net/download.html.
Medusa?
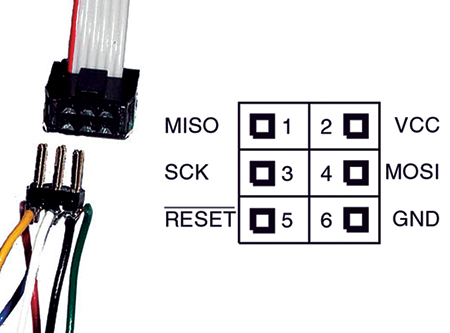
Talk about a bad hair day ... how would you like to have to comb out that curly top? Our Medusa isn’t quite as bad, but let me tell you up front, it will get ugly before it gets pretty, and it might just turn you into stone in the process. You will need to solder six 4” AWG 22 solid core wires to the base of a 2 x 3 0.1” male header (without short-circuiting them — and that is a trick!) as shown in Figure 9.
 |
 |
 |
| FIGURE 9. ISP connections. |
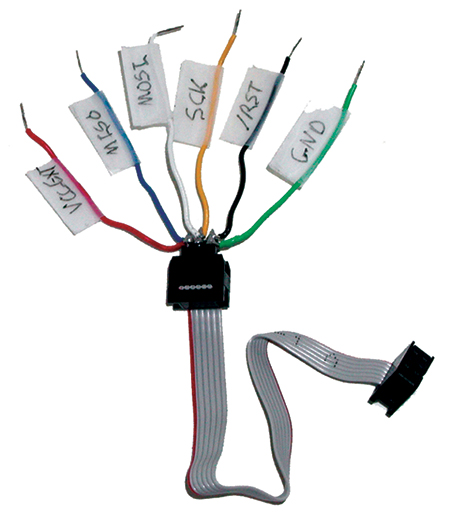
FIGURE 10. The Medusa ISP cable. |
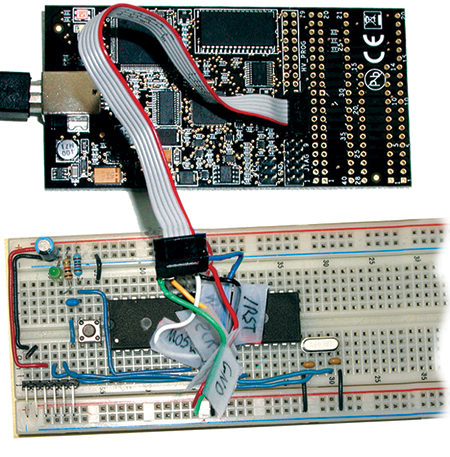
FIGURE 11. Dragon Medusa programs BeAVR. |
Then, you will want to add “Scotch” tape (actually, any nationality tape will do) flags to each wire and mark them with the SPI signal names as shown in Figure 10. I suggest you get a multimeter and check continuity for each wire. Make sure it conforms to the signal as it starts at the Dragon, passes through the Medusa, then arrives at the BeAVR. Figure 11 shows the finished rat’s nest. Let’s be honest, I didn’t wire this correctly the first time I tried, but eventually got it right. Cheap has a price.
Using AVRStudio to Upload the Bootloader
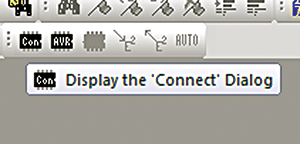
The AVRStudio Programming Front-End — as AVRStudio calls it — allows you to use several hardware programmers, including the Dragon. Let’s do this cookbook style. Click on the ‘Display the ‘Connect’ Dialog’ as shown in Figure 12.
 |
 |
| FIGURE 12. AVRStudio Display Connect Dialog. |
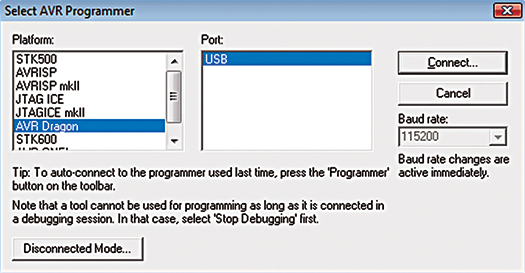
FIGURE 13. Select AVR Programmer. |
In the resulting ‘Select AVR Programmer’ window shown in Figure 13, highlight the AVR Dragon and USB.
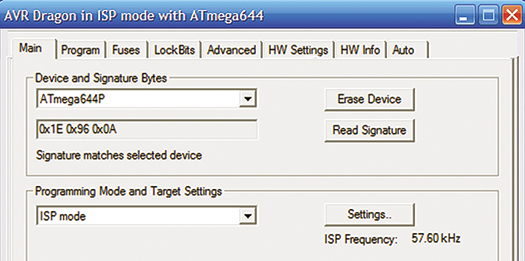 |
| FIGURE 14. AVR Programmer - Main Tab. |
Open the ‘Main’ tab as shown in Figure 14 and push the ‘Read Signature’ button. If you see the three hex numbers shown in the window and it says ‘Signature matches selected device’, then you are in business. If not … something’s probably not right about your hardware setup.
 |
| FIGURE 15. AVR Programmer - Fuses Tab. |
Open the ‘Fuse’ tab as shown in Figure 15. Click the boxes and set the settings EXACTLY as shown in the picture. This is where you get the opportunity to turn your ATmega644 into a brick if you get it wrong. (Bricked AVRs can be unbricked with high voltage programming which is — as they say — ‘a whole ‘nuther topic.)
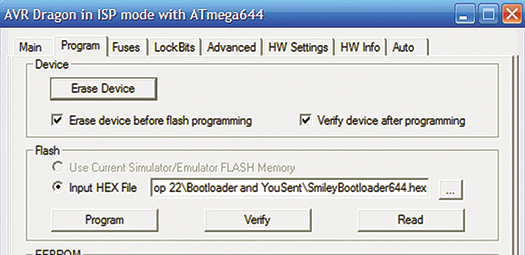 |
| FIGURE 16. AVR Programmer - Program Tab. |
Finally, open the ‘Program’ tab as shown in Figure 16 and browse to find the input hex file (which should be the SmileyBootloader644.hex you got from the Workshop22.zip file). The text box at the bottom should tell you that you succeeded.
Talking BeAVR
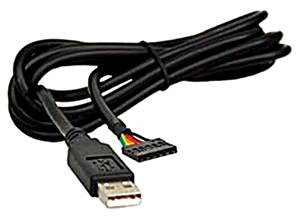 |
| FIGURE 17. FTDI TTL-232R-5V USB-to-Serial cable. |
Notice in Figure 1 in the lower left corner there is a connector with six wires heading out of the photo. That device is the FTDI TTL-232R-5V USB to Serial cable that you can get from www.ftdichip.com/Products/EvaluationKits/TTL-232R.htm or from www.adafruit.com. Or, you can substitute the SparkFun FTDI Basic Breakout – 5V DEV-09115 (you will have to move a couple of wires on the breadboard for this one, so pay attention). Either of these options will allow you to talk to the BeAVR serial port using the PC USB.
Our first use for this will be to upload YouSent.hex (located in Workshop22.zip) using AVRUP-V1 (Figure 18), as was discussed in our last episode. Please check the www.smileymicros.com website because I am working on an upgrade for AVRUP and may have further instructions for the BeAVR by the time you read this.
 |
| FIGURE 18. AVRUP-V1. |
Using YouSent
Open the device in Simple Terminal (available from www.smileymicros.com) and send a character. The Receive box should show ‘You sent: x’ (where ‘x’ is the character you sent).
That's it for now. Next time, we'll continue with the BeAVR and introduce a version of the design for a PCB — and this BeAVR will have fangs! NV
Table 1. BeAVR bill of materials.
| Sch. Part |
Description |
Mouser Part # |
| IC1 |
ATmega644 |
556-ATMEGA644-20PU |
| H1 |
Right Angle Header |
517-500-01-36 |
| Sch. Part |
Description |
SparkFun Part # |
| Q1 |
Crystal 16 MHz |
COM-00536 |
| S1 |
Mini Pushbutton |
COM-00097 |
| C1, C2 |
22 pF Capacitor |
COM-08571 |
| C3, C4, C5 |
100 nF Capacitor |
COM-08375 |
| R1 |
10K ohm Resistor |
COM-08374 |
| R2, R3, R4 |
1K ohm Resistor |
COM-08980 |
| LED1 |
Red LED |
COM-00533 |
| |
Breadboard |
PRT-09567 |
| |
Hook-up Wire (22AWG) |
PRT-08025 |
Corrections
Note - It has just come to our attention that the AVRUP file mentioned in this article is not available on our website or at smileymicros.com. We're trying to get hold of it and will post it here when we do. If you are needing that file, send an email to [email protected] requesting it, and we'll forward it or a link when we get it.