Any of you that have followed my N&V articles over the past 10 years certainly know by now that I am a test equipment freak. This stemmed from a couple of reasons. Early on in getting my start in electronics and while still in the process of getting my education, I did what many other students were doing at that time — dabbling in radio and TV repair. This not only produced a small income to help with tuition fees, but also gave us invaluable hands-on insight to the actual working conditions of various circuits.
I had also started a small ship-to-shore electronics service business along with the above. With this array of devices waiting for repair, I was literally drooling over high quality test equipment to make my job easier, but school tuition pretty much kept my back to the wall financially. So, I had to do with what I had, or design and make up barebones test gear on my own. Bottom line is that I never lost my love or desire for quality test equipment.
The other reason was that in designing my own equipment or eventually buying commercial equipment, I was blown away by the quality of workmanship and cleverness of design. As far as I was concerned, quality test gear design and construction was the yard stick by which all other circuits were measured.
As time passed, my interest increased further in this area, mainly due to the design challenges it presented and the rewards of completion. A couple of years later and as luck would have it, I was hired by an R&D company that specialized in test equipment design and prototyping. As the old saying goes, “ I never had to work another day in my life.”
Now, I am not trying to say that test equipment should be the ultimate goal in your electronics interest. However, once the initial architecture is laid out for any design, test equipment will be required for both the starting point and ending point for those projects. It all comes down to standards and a point of reference (try building a house without the use of a tape measure or level).
Since I have written many articles on test equipment construction, I thought I would back-track this time and look at this from a different perspective: Why do we need TE (Test Equipment)? What variety of TE do we require? What is the best progression of adding TE? And, last but not least, what are the economics of arriving to a fully equipped test bench?
I will address all these issues as sanely as possible based on my 40 years of building, acquiring, and using TE. This article will be mainly pointed towards analog electronics, but much of this spills over to digital use as well. Even with digital design and when all the “number crunching” is completed, it still comes down to analog electronics. This is especially true with ever-increasing speeds now employed — not to mention I/O ports to the real world such as sensors, etc. In reality, there is only one wave shape in the physics of electronics: the pure sine wave — which is analog!
All other wave shapes are an algebraic addition of many sines waves added together versus time. For example, a perfect digital square wave is really derived from a fundamental sine wave and all its odd harmonics (hundreds to thousands) that have decreasing amplitude with each increasing order of harmonic content — again, analog! (Be sure to check out Richard Agard’s article "Understanding Harmonics Using Simulation").
All in all, I can hardly imagine an electronics enthusiast without some sort of test bench. This can be as simple as a folding table and a couple of hand tools, along with a cheap DMM (Digital MultiMeter). Or, it can be as elaborate as a spare room just loaded with TE and a full complement of tools and accessories to go with it. This wide span of facilities depends on which direction(s) your hobby takes you, how deeply you get into it, and the years of involvement.
Interestingly, a lot of top rated engineers in the past all had very elaborate setups right in their own home. Most of them agreed that some of their best ideas originated there due to a quieter and more relaxing atmosphere than the typical workplace. So, location in your own home is something to keep in mind.
So, why do we need test equipment in the first place? Well, for a multitude of reasons, such as initial design and prototyping of the circuits we build; final adjustment and checkout of the same; troubleshooting various existing devices; characterizing individual components from passives to electromechanical to whatever; even repairing and calibrating the test equipment itself — just to name a few. Without TE, we would be working in the dark most of the time without any standard to refer to.
After acquiring even just basic TE, it will make your hobby enjoyment increase tenfold, and enjoyment is the primary reason we got involved in electronics!
The Startup Bench
The very first thing to consider is bench location. For many of us, this can be a problem. You will want a quiet location away from heavy foot traffic. This could be a heated garage, basement, or a small spare room, but wherever it’s located it should stay fairly dry and without large temperature swings. When space is at a premium, I have seen some pretty clever setups that used a generous sized work bench with tightly fit compartments for parts and equipment storage. When not in use, a wall hinged drop-down table with a cloth skirt attached hid it from view, and then it doubled as a utility table for normal household activities.
Another setup I’ve seen was a shallow but fairly wide closet in plain view in my friend’s den. It was well lit and AC powered. If company arrived, he merely closed its folding doors — out of sight and out of mind. In my first residence, I only had one choice and that was a pass-through foyer between the kitchen and dining room. By using a variation of the above techniques, it kept my wife happy. Then, came our first real home and I divided a fairly large laundry room in two and had a room all to myself, albeit small.
The next two homes I built from scratch. I incorporated that same style for location, with each home having a larger lab area than the previous one to work in. These ended up at the very end of the house, and with easy access to the garage for any accompanying chassis work and such. Except for laundry day, this was the quietest area in the house.
In selecting a test bench, consider a couple options. If you plan on sitting the majority of the time, you will want it at a height of 30”. If you’ll be standing the majority of the time, you want a height of 36”. If you’ll be mostly standing but with occasional sitting, you can just use a bar stool.
You can never have enough outlets, so you may want to add a couple of power strips. One word of caution here is do not buy the ultra cheap ones as even a moderate load will begin to drop line voltage due to high contact resistance throughout these units.
At least one full length shelf should be constructed over the bench for TE that is common for the majority of projects. The rest can be stored in a cabinet and pulled out when needed. Aside from good room lighting, a magnifier lamp is almost essential with the increasing flood of smaller and smaller components.
My test bench is a 30” high large metal office desk which I have modified to better suit my needs. I find that I spend most of my time sitting, and this desk does double-duty as a regular office desk for paperwork and such. I then merely set a 20” x 30” piece of laminated hardboard on it to convert it to a work area. The laminate stores very nicely between the bench and wall for quick access.
The Actual Test Equipment
For your first piece of TE, it goes without saying that it should be a digital multimeter. Your first DMM does not have to be top-of-the-line. Plus, you can use some of that savings for future TE. I use a high-end handheld DMM which rarely leaves the bench, but some time ago I purchased some China imports from Harbor Freight for $3.99 each that included batteries and leads. I use one as an auxiliary meter for the bench and the other stays in the garage for outdoor use. They actually perform quite well. The point here is that entry-level DMMs don’t have to cost a fortune.
The next most needed item is one or more power supplies. This is one item I would recommend buying the cheapest unit. I will cover this topic and my reasoning on it in more depth later in this article.
I hate to mention oscilloscopes this early in the setting up process, but almost every piece of TE from here on in will be greatly enhanced when used in conjunction with a scope. Not that you should run out to purchase one this early, but if the opportunity for a really great buy pops up, jump on it (more on this later).
Probably the next TE after the power supply would be a decent function generator. Even a stripped down version with just basic sine, triangle, and square waves and possibly with sweep capabilities, plus any additional features that may be of use to you is fine.
At this point, there is one item that I have found indispensable since I first got into electronics, and that is resistance and capacitance substitution boxes. These do not seem to be as popular as they were years ago, and you don’t see many around. When you do, the prices are higher, and the quality and ergonomics are lower.
I had bought two of each years ago, and they cover five decades of value. All of them are 1% tolerance and the resistive version uses 1/2W components. Only four or five switches gets you any value in their range in one ohm/pF increments. Many times, it is so much quicker to pop one of these into a circuit and dial to the end result you desire rather than go through a bunch of lengthy formulas to get the same result (timing circuits, etc.). However, you should have a rough ballpark figure of where you want to start.
When I bought these years ago, they were very popular and their cost was quite reasonable. Today, like I mentioned, the prices have sky-rocketed, probably from lack of sales. As an interesting side note to this, about 10 years ago I had a design project that needed a high powered resistive substitution box. I found one for sale that was somewhat beat up but in working condition. It covered six decades in one ohm steps with a tolerance of 1%, and was rated at 250 watts on any range. I haggled and got it for $75. A month or so ago, I happened to see a new one advertised for almost $2,000 (and I thought I overpaid at $75!).
Next on the list should be a frequency counter. Actually, a step up from this would be a universal counter. This is a traditional frequency counter but also a period counter (reciprocal of frequency). Plus, there are other frequency related functions that extend its usefulness.
Here is a branch-off point, depending on where your primary interests lie. I think an RF generator — even a low grade one — would be an asset no matter which way you go from here. Of course, I have already mentioned the ultimate piece of equipment (the oscilloscope) which I consider to be mandatory. If I was only allowed to own one piece of TE, it would be a good scope. I consider this as necessary as my right hand.
From this point on, the equipment needed will be determined by the direction you desire to go: radio frequency, logic circuitry, digital devices, robotics, and the list goes on and on. Each discipline will have its own specialized requirements for the TE needed.
As we acquire more skills and get deeper into any specific area of electronics, the TE will also follow suit and probably get more expensive. In one’s career span, the birth of new technologies will spawn a need for specialized TE that eventually will become useless many years later when that technology is superceded by even newer technology (analog TV and CRTs knocked out by digital TV and flat screens, for example). The few essential pieces of TE I have mentioned here will probably be around for a long time, however, as they basically measure the electrical properties of the science of electronics, and that is law.
Although hand tools are not TE, they are an integral part of the test bench, so I guess I should touch upon this subject. There are a myriad of tools out there for old and new technologies, with additional ones developed all the time. As to surface-mount, the tweezer style test probes are great, as are the tweezer soldering pencils. Beyond that, everyone has their own favorite gadgets to get the job done easier — even using tools that have no bearing for SMD.
I use a set of old aluminum spring-loaded heatsink clips to hold many of these devices in position for soldering. In more conventional circuitry and through hole, I generally only have a half dozen tools on the bench: a pair of 3” needle nose pliers; a quality flush cutter; a good pair of wire strippers; a few dental picks; and, last but not least, a good surgical hemostat. I use a fine-tip 35 watt solder iron for just about everything and a bulb type solder sucker from RadioShack, which is the most efficient type of sucker I have ever used (and it was dirt cheap).
In closing out this particular discussion, I have to say that the new “green” solder cannot even come close to the good old Kester 37/63, which just flows and grabs so much better. A good supply of random length clip leads and a few cables terminated in various connectors (BNC, SMA, F, etc.) are also mandatory items. These items will just naturally accumulate as time goes by.
Purchasing Commercial Test Equipment
When it comes to TE, there is just no substitute for quality brand name equipment, and there are dozens of top manufacturers out there. The only piece of TE I would recommend buying as new would be a moderate quality handheld DMM. All other top-of-the-line TE is just way too expensive and out of reach for most of us. So, that leaves us with buying used equipment; the go-to place here is eBay. There are various other websites on the Internet that handle used TE, so don’t neglect those. Also, if you are fortunate to live near periodic government auction sales, some incredible bargains can be had — sometimes as low as $1 per pound if buying by the pallet. eBay does seem to have a corner on the market as to TE sales, so I will dwell mainly on purchases through them. Before I get into specific equipment, I will walk you through a few general guidelines for buying.
First thing I would recommend you do is to not buy any equipment that is newer than vintage 1985. This may sound strange to you, but there are good reasons not to. From the late ‘60s through the mid ‘80s, there were big design changes in transitioning from vacuum tube to solid-state equipment which rapidly improved over these years. For sure, the ‘70s and ‘80s saw some marvelous TE equipment produced by the big name manufacturers, and a lot of it can still compete with newer equipment.
Then, enter the digital age from the late ‘80s and onward. Older technology was now being replaced with more up-to-date digital designs. Knobs and switches were being replaced by buttons and membrane switch pads. Features and accuracies were scaling upward at an accelerated rate. This was all fine and good — to a point — but had a lot of drawbacks for the home laboratory style of electronics.
Along with all the improvements going sky high, so were the prices. The cost alone for a lot of this TE even on the used market is enough to drive you away. Also, the operation of all this equipment was becoming more complex due to the multitude of features now included. If you do end up purchasing a lot of the newer TE, you will probably end up paying for a lot of features you will never use and/or never understand their use to begin with.
The manuals for the higher end units can be as many as 400 pages, and require more time to read and study. Of course, you will need to refer to the manuals often for the seldom used functions and procedures that slip your memory.
Most will perform just about any operation you can imagine within their intended purpose, but may be slow to set up even for a quick simple test. The worst part of all this is that certain TE is almost impossible for the average (or even way above average) enthusiast to work on.
Even finding part’s locations can be very time-consuming. With the ever-increasing board population of SMD parts along with parts getting tinier every succeeding year, your chances increase of causing more problems in the troubleshooting process than the one problem you are originally trying to fix. The traces are so small and close on a lot of these boards that one minor twitch of the test probe can wipe out several circuits. Without “smoke,” you will never know it happened, so you are still looking for one problem when, in fact, there are now multiple issues.
Many of these units may have a fairly large footprint and will take up a lot of valuable bench real estate, so all-in-all are better suited to large research centers.
The only occasion I had to repair this type of construction was when I was called to troubleshoot a late model microwave baseband modem, of which (in older models) I was very familiar with. Upon opening the bottom panel, I could not believe my eyes. It looked like the board had been coated with glue, and then a pound of rice pored over it and set to dry. These were SMD parts of the “04” size. I could hardly tell where one part ended and the next one started. I just closed it up and walked away.
My point is that I would never want to own newer TE with this type of construction. If it went sour on me or was that way to start with, I could never make it right. Even in original manufacturing, human hands cannot construct these boards, so that is left up to robotic “pick and place“ machines.
Now that I have covered good reasons not to buy newer equipment, let me talk about good reasons to buy older TE. For the most part, this equipment will have features and quality specs that will probably be much more than adequate for any project you use it on. They will use through hole or stand-alone parts that are easy to locate, identify, and replace in regards to repair and/or calibration. Although somewhat lacking the accuracy and features of their more modern “brothers,” they are simple to use and fast to set up for quick tests. They require no software (or proprietary software). In short, they are a much more repairable unit than newer TE.
One caveat here is that even though most of the parts are of the over-the-counter type, some will be difficult or impossible to obtain. Hewlett-Packard may have an occasional “hybrid“ part in their units. Hybrids are special circuits that are made up like an IC by using discrete components, and are usually sealed in a metal container, are unrepairable, and unobtainable. Although, the parts do occasionally appear on eBay for an exaggerated cost.
Some engineering groups will rebuild these for a fee and by possibly trading in the old core. The only other choice is to buy a “junk” unit dirt cheap just to retrieve that part. Certain Tektronix equipment doesn’t use hybrids but may have special-run ICs that can sometimes be hard to obtain. These parts rarely go bad, fortunately. Wavetek almost always uses over-the-counter parts. Don’t let me scare you off with these remarks; it’s just something to keep in mind.
One item I have not mentioned that sooner or later will be essential is the operator/service manual that rarely comes with used equipment. This makes correct usage on the TE so much easier to learn, plus the repair instruction and road maps for locating parts are essential. Also, calibration and proof of performance tests give peace of mind when everything meets factory specs. You can go as far as needed or desired with whatever TE you have on hand to do this. There are some specs that you would need a boxcar of test apparatus for checking, but a lot of them are (for the most part) of minor importance for most of us and not of great concern for everyday use.
These manuals can go for $25 - $40 apiece, but there is a website called BAMA (Boat Anchors Manual Association) that has a ton of manuals for free download. You can always research the Internet for any information floating around out there, or check out Internet services that sell manuals on discs for $5 - $15. My favorite here is ARTEKMEDIA. They’re a little higher in price, but provide excellent reproduction work. I have printed up manuals from their discs that rival the best of the originals.
Now, it’s time to start buying. Although I have cautioned you about buying newer TE and sticking with the somewhat older equipment, nothing is engraved in stone here. You may find newer stuff that was made to order for you at a decent price and guaranteed. Also, there is equipment dating back to the early ‘60s that has excellent specs and a proven track record. The Tektronix “500” series scopes and the Hewlett-Packard “600” series RF signal generators are all solid performers. They are a bit power hungry with their tube design with bulky transformers and, of course, are quite large and heavy by today’s standards.
Odds are that any used TE will have some defects. This could be as simple as a blown fuse, burned out pilot light, or an ugly scratch on the front panel, or something more involved on the interior. The TE I have purchased on eBay all had problems, but basically they were minor. A bad power supply, for example, could be lytic, have dirty connections, a bad power switch, or others. All of these are simple fixes to get it working.
Once the unit is powered up and working, I will take a very quick assessment of its operating condition, such as if the mechanical controls are operating okay and if basic functions are at least working. Then, I get busy with a can of contact cleaner and scrub all mechanical parts including accessible connectors.
Barring any needed repairs beyond that, I always go to the limit with a full proof-of-performance check and some calibration adjusting, along with a thorough cleaning and paint touch-up.
These checks will show any other problems that need addressing. For the most part, I find this enjoyable and rewarding work. I mention this so if you do have a minor problem on your purchase, don’t be surprised. Many sellers offer a 10 to 30 day return and refund if you’re not satisfied with the purchase.
The half dozen TE units I mentioned earlier are the basic items you will want no matter what direction your specific interests take you. When making a decision on any of these units, give some thought to the level of quality you need for current projects and also the level you may want down the road. There is no sense in paying for expensive features you may never use. Of course, accuracy is one important criteria and this subject is worth dwelling on for a bit.
Accuracy without stability is meaningless. I can adjust any given crystal oscillator to a single digit of a PPM (parts per million). Is that accurate? Of course it is! However, 10 minutes later, it may have drifted out of specification; 24 hours later, it may not even be in the same ballpark because of lack of stability. So, when the seller says its accurate, that accuracy has to be defined and may have different definitions for different situations.
For most of our projects, 100 PPM will be more than satisfactory for some parameters and even 10% is good enough for many others. On the other hand, for high level research center projects, any error greater than fractional PPB (parts per billion) might be far too inaccurate. Usually, you can find an accompanying manual to download to check out the factory specs for suitability to your usage.
The general appearance of the TE in available photos can tell a lot about its history. Are there damaged controls on the front panel, large dents on the housing, or a totally grimy and gouged panel? It’s probably been abused in its life then.
Beware that it may need more than average repairing. Look at the metal connectors for corrosion and/or deeply embedded dirt and mildew — this most likely means it had long term storage in a damp environment (again, a warning sign of possible circuit board degradation). Some photos show units with so many stickers and labels on them, it gives them a beat-up look. However, these may be calibration, departmental, and company IDs that just accumulated over the years; a careful eye can see through this for assessment.
Read the seller’s assessment carefully and take everything with a “grain of salt.” Some folks are honest and some are not. One common copout is “we do not know the condition due to lack of apparatus to test it.”
At any rate, these are the guidelines I have used in my purchases and I’ve been quite successful. I have only been stung once due to an unobtainable custom band switch, but I bought the unit for such a cheap price that I kept it as a part’s donor for a similar unit.
Other items may be advertised as “will not power-up.” I love these sales as the price is usually vastly reduced. Granted, it could be something as serious as an expensive burned out power transformer, but the odds are it is more likely in the 120V primary section that only needs a quick and simple fix.
After looking over an ad thoroughly and deciding to buy, I determine ahead of time what is the maximum amount I am willing to bid on it. I leave eBay and let it do the automatic bidding for me, so I don’t have to play games with other bidders.
Another piece of advice is don’t get caught up in a bidding frenzy. It is humorous to see folks go crazy with this. On several occasions, I have seen two identical items that had very comparable images and descriptions. One started at $100 and the other at $9.99. The cheaper one attracted an army of bidders, and the bids escalated rapidly. As the auction reached day 3, the frenzy was on and the bidding was up over $150 while the other unit still sat there at $100 with no bids. The auction week passed and the initial $9.99 unit winning bid was $225. The other unit closed without a single bid — go figure!
Let’s touch bases now on the initial items I mentioned that I considered essential, and give you my favorites for each category. Starting with the DMM, although there are many quality ones out there, my favorite has always been Fluke Aside from being high quality, they just seem to take a beating and bounce right back. Every industrial environment I have been in, Fluke was the meter of choice. When purchasing a DMM — be it bench or handheld — I would not recommend buying one with more than a 4-1/2 digit readout. The reason is that these will suffice for today’s lower standard supply voltage (3.3 VDC and 1.8 VDC) powered chips, and still have all the accuracy you would normally need. To go beyond that, they are getting into extreme accuracy and resolution, and require regular calibration checks to maintain any confidence of that high level (which can get expensive).
As to power supplies, I have never bought a commercial supply. Right from the start, I have designed and built my own, beginning with a high voltage vacuum tube model and several lower voltage “stick built” solid-state types. Not long after that, in the early ‘70s with the advent of the 78xx series of regulator chips and the LM317 ICs, they became one of the simplest and easiest circuits to put together — especially if you had a junk box of salvaged power transformers.
All-in-all, I built 15 regulated supplies ranging from lower voltage/500 watts to 300 volts/30 watts. They have come and gone over the years, and currently I have settled on just four in my lab: 0 to 300 VDC at 100 mA; 12 VDC at 10 amps; dual 0 to 20 VDC at one amp with 5 VDC added; and one small low voltage auxiliary supply.
These have served me well in all my projects in the last 10 years. All but the 12V/10 amp units are shown in Figure 1.
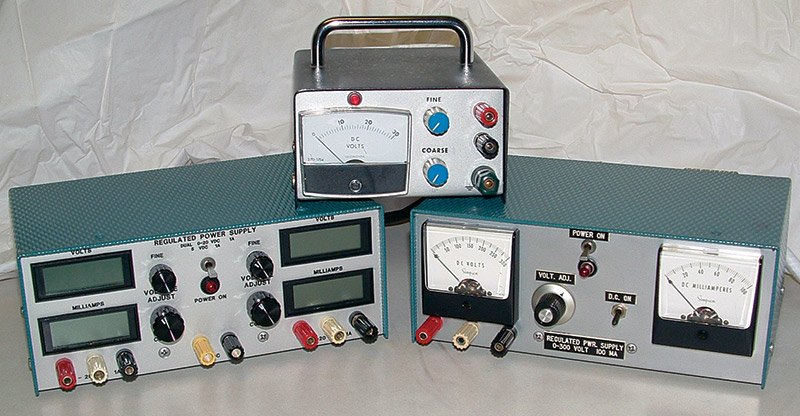
FIGURE 1. Lab built supplies.
They all perform well, look good, and have saved me a lot of money. They’re not all that difficult to build, so you can do the same. If you are just jumping into electronics, you may want to buy a simple inexpensive supply just to get you started. Then, you can build your own as needed. One word of caution here. In recent years, linear supplies have gone out of favor due to the more efficient switch mode type of supply. However, when you have AC outlets everywhere, efficiency is not a great concern. The last thing your test bench needs is another source of RFI, so stay with the linear supplies.
When it comes to function generators, Waveteks from the ‘70s are my first choice. Entering the ‘80s, Wavetek merged and changed ownership so many times, it was hard to keep track of just who they were. Unfortunately, the later model plastic case equipment I have used seemed to be of lesser quality. I have had good results with the ‘70s vintage all metal enclosure units, though.
One of my favorites is the model 111. It is just a basic function generator with sine, square, triangular, and positive or negative pulse outputs — all of which can be externally swept. The high end is only 1 MHz, but it is made in one sweet little package occupying very little bench space. It is accurate and of very high quality construction. I also like the model 114 which has all the above, plus internal sweep capabilities as shown in Figure 2.
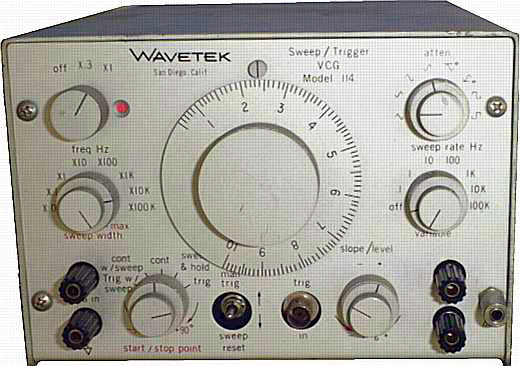
FIGURE 2. Wavetek Model 114.
Actually, the model 110 through model 142 are all of equal quality and construction, with each one having their unique additional features and upper limit frequency generation (10 MHz on the 142). Expect to pay between $30 - $180, depending on the model and condition.
Hewlett-Packard radio frequency generators (in my opinion) are the best out there. Their early history is steeped in leading RF products, partly by acquisition of other high-end companies in the field. In this category, my choice is the HP8654B shown in Figure 3. It is without a doubt the finest L-C (inductor/capacitor tuned) generator I have ever used or owned.
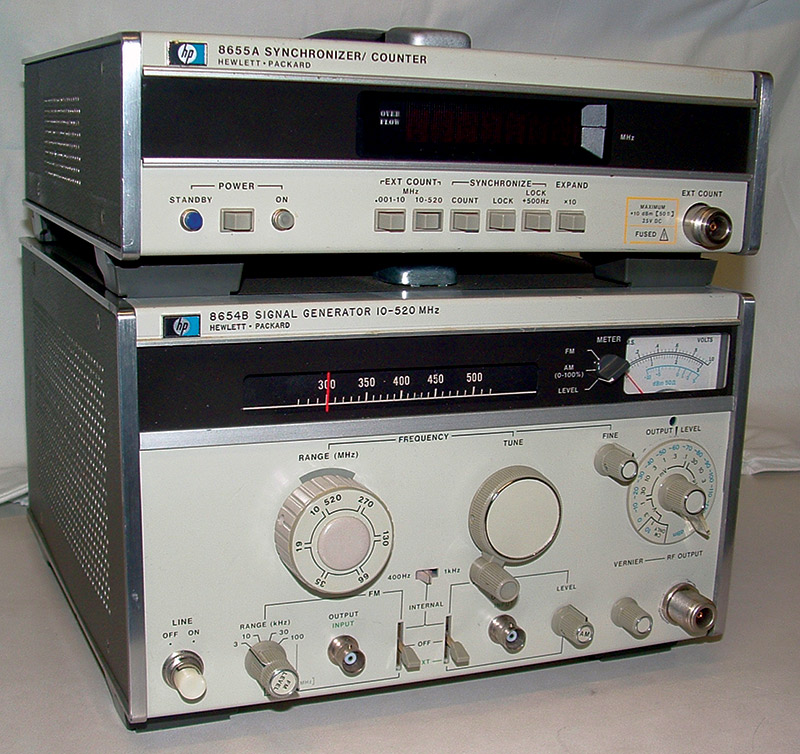
FIGURE 3. HP8654B and HP8655A.
It covers 10 MHz to 520 MHz in six bands, putting out a beautiful sine wave of up to +13 dBm (about 2.8V P-P). Attenuation is continuously variable all the way down to -130 dBm. It has calibrated AM modulation 0-100% and calibrated FM modulation 0-100 kHz (a rarity on many RF generators). It is the smoothest tuning and most stable of any L-C type generator I have ever used. Also, a proof-of-performance check showed it beat most factory specs by a factor of 4:1. There is an adjunct unit (HP8655A) counter/synchronizer that is available for this that nestles in nicely right on top of it (the upper unit in Figure 3). It phase-locks the RF generator in 500 Hz resolution steps to 1 PPM stability, and also reads out frequency. It’s a nice package with only a moderate footprint. However, the down side is that its low frequency cutoff is 10 MHz. Expect to pay $125 - $275 for the generator alone, and maybe $40 - $100 for the synchronizer unit.
The HP8640 is another good generator similar in specs to the 8654, but it does tune down to 450 kHz. It also has a built-in frequency counter and a larger footprint. Expect to pay $250 - $600 for this one. There are add-on units available that tune the 8,654 down to 100 kHz, and then 8,640 up to 1,040 MHz, but are somewhat rare to come by.
While I am on the subject of RF generators, I just have to mention the HP8601A shown in Figure 4.
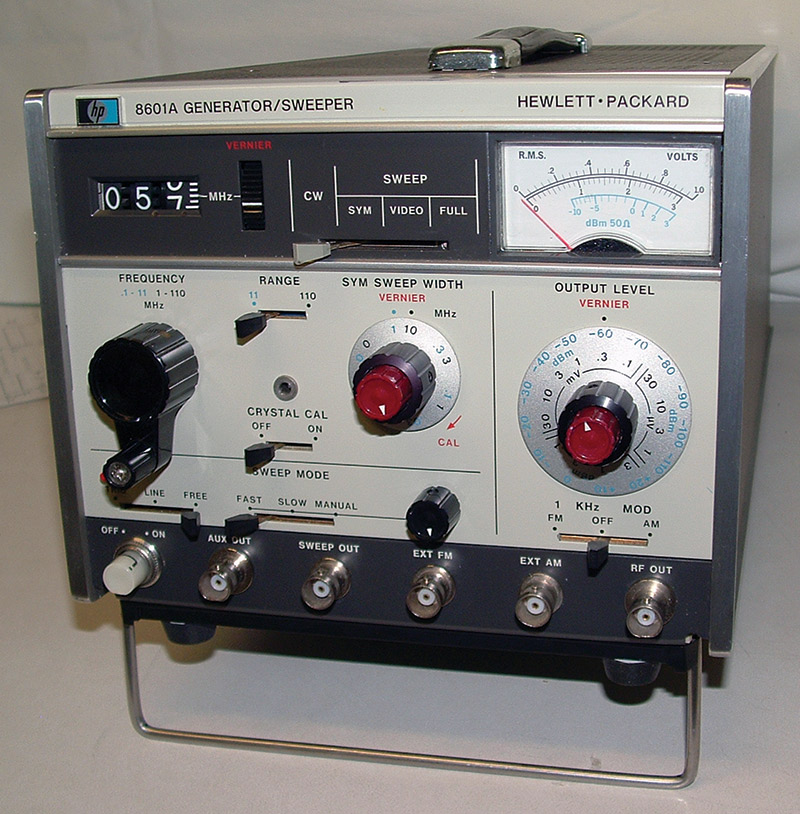
FIGURE 4. HP8601A.
This is a sweep generator that thinks it is an RF generator. Although most sweep generators don’t really have or need the accuracy, stability, or precision attenuators that one would expect in a strictly CW (continuous wave) signal generator, this one does. It has excellent accuracy, stability, and a large range of attenuator settings. There are two band ranges of 100 kHz to 11 MHz, and 1 MHz to 110 MHz. The sweep function is super linear. If this one is acceptable for your upper frequency limit, check it out. Current winning bids on these are $100 - $225.
Next up is frequency counters. No particular preference here, as there are scads of them out there. You can’t go wrong with HP, General Radio, and other big names. There is probably a counter made to suit any purpose, and if you opt for a universal counter you will gain period counting along with some other neat functions. (Even the worst of counters would be suitable for projects that do not require high accuracy, resolution, or frequency.)
Here, you want to determine your needs as to RF work, audio work, etc., and how far you want to resolve the frequency of interest. I would look for at least a seven-digit display with decent sensitivity and have it extend to at least 100 MHz with no worse than 10 PPM accuracy. I prefer LED readouts, but I use both that and the LCD readout in my lab. Prices are all over the place ranging from $30 - $400, depending on the hobbyist’s level of work.
Now for the “King of the Hill” — oscilloscopes! My clear cut choice here is the Tektronix 2465 series shown in Figure 5, with bandwidths ranging from 300 MHz to 400 MHz.
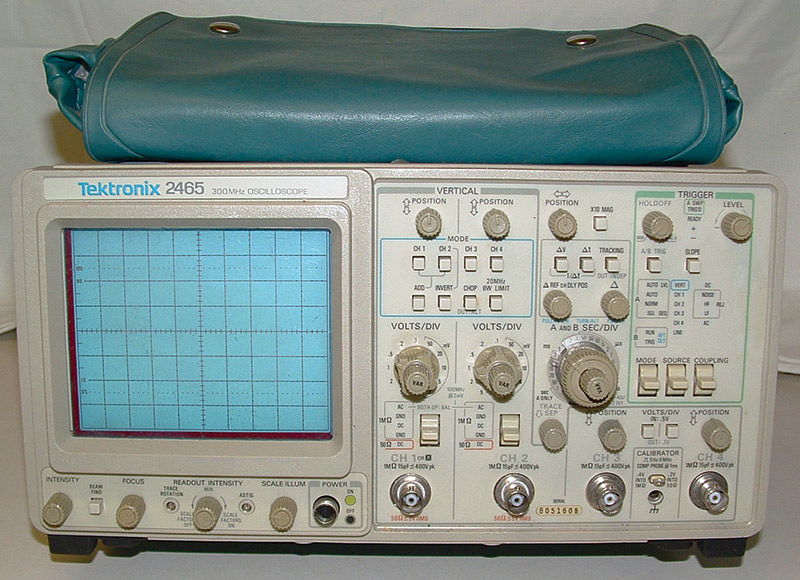
FIGURE 5. Tektronix 2465.
Also, there’s the 2445 series with the same features, but a bandwidth of 150 MHz is a nice scope if the lower bandwidth fits your needs. This may be the last of Tektronix’ pure analog scopes that have a touch of digital features included, such as cursors to indicate period and amplitude along with the current function settings printed out on the screen. It’s very quick to set up and operate, with good sensitivity and a wide bandwidth. It also features two 50 ohm input channels for accurate readings at high frequencies, and is a fairly small footprint for a CRT display scope.
There is one caveat here. There’s a history of the X axis (horizontal) sweep driver chip failing. This chip was a special run just for this series, and is now unobtainable. However, this defect may only occur in one out of every thousand units. Expect to pay $200 - $500 for the 2465, and $100 - $250 for the 2445, again, depending on the condition. I reluctantly paid $500 for mine but it had been recently calibrated and has performed superbly for me.
Analog scopes have what is known as a Gaussian roll-off in regards to the frequency response curve. This is a gradual and steady drop in display amplitude vs. frequency, occurring a little before the corner frequency (3 dB point). Even though this drop-off occurs, I calibrated my scope on every range and both channels, all the way to somewhat beyond 500 MHz. Now, I just use lookup tables for any frequency displayed, and use a simple correction factor to know exactly what the true amplitude is to the displayed level.
In general, analog scopes will have a perfectly flat amplitude response for about one third of their specced 3 dB bandwidth. This one is no exception, and actually is perfectly flat out to about 120 MHz. I only mention this as something to keep in mind for any scope you decide to purchase.
I have not mentioned the later model flat screen digitized scopes because they can get pretty pricey, although Rigol and Tektronix have recently come out with some low-end models that sell in the $500 range. These scopes have a pretty flat frequency response within their rating, but follow a different response curve than the Gaussian noted above. Known as the “cliff effect,” upon reaching the end of their stated bandwidth, the signal rapidly drops off to nothing and does not stretch out the usefulness as the Gaussian would.
I have only had occasion to use these newer scopes a couple of times. What I loved about them was the ability to store wave forms in memory for later comparison, and also to display and hold very long period wave forms. However, I felt there was too much clutter and information on the display which — at least for me — bothers my concentration on the one thing I am looking for. Most of the time, I like to see one quick trace and move on.
What to Buy and When to Build
As stated earlier, there is just no substitute for high quality test equipment, but there are many instances where it is very justifiable to build your own. Again, I would definitely recommend you build your own power supplies as needed over time. With today’s chips available for that purpose, superior performing supplies can be built easily and cheaply to exactly suit your own requirements. Other reasons would include the following:
- TE that you cannot afford at the time, but can use a decent “starter” unit.
- TE that you only have need for occasionally, for non-critical tests.
- TE where you only need the very basic functions.
- TE for one specific testing purpose.
The above TE would include, for example, simple function generators of limited high-end frequency; RF generators for limited tests such as a 455 kHz and 10.7 MHz IF generator; basic multi-waveform generator; current sources; and test jigs just to name a few. There seems to be an application specific chip available to get you started for any of the items you would want to build.
Other very doable and useful projects could be timers, period counters, and metered variacs just to name a few. In fact, there are only two items in my basic list that you would never want to attempt: the DMM and the oscilloscope. All the rest can be built to fairly decent standards. There is just a personal gratification in completing a useful and professional looking project that can’t be described.
One point about construction that I consider mandatory is a practical and handsome enclosure and front panel with neat artwork. I see so many DIY projects that never get past the solderless breadboard with leads and controls hanging off of it in a totally ugly fashion. It leaves you guessing what does what. For my money, I would not even start a project like that. A finished and enclosed unit is just so much more enjoyable to use and store that it is definitely worth the extra effort. Since most metal commercial enclosures are expensive, it almost goes without saying that you should build your own. I always have my eyes open for any kind of enclosure that has been scrapped as it may suit one of my projects.
I once fished a very small toaster oven out of a curbside trash can that I spotted on my way to work. A little metal rework and fresh paint transformed it into a beautiful case for the project I was completing at the time.
More often than not, I end up making one from scratch. I usually use the softer grade of aluminum for its easy bendability. Almost all woodworking tools — especially those with carbide blades — will machine this stuff like a knife going through butter. I use the following thicknesses:
- 0.02” — Shielding and small subassemblies
- 0.03” — Small panels and cover plates
- 0.06” — Front panels, cover plates, and small chassis
- 0.125” — Chassis only
Along with common hand tools and a pop riveter, a small nibbler tool (about $7 - $8) comes in handy — especially for square holes. That and a “poor man’s brake” (made from miter-edged 1x lumber clamped into a bench vise as described in some of my previous N&V articles) completes my so-called sheet metal shop.
As to TE circuits available, the Internet is full of them, along with numerous magazine articles over the years. You could even peruse past editions of N&V under my name for several that I have contributed. I guess the final factor here is not so much what you can afford to buy, but rather what you can justify to buy. This will be the predominant answer in the buy/build decision.
Conclusion
I hope this article has given a better insight on the why, when, and how of test equipment for your bench, and some of the caveats to look out for. I know I may catch a certain amount of flak here for some of my thoughts but it has all stemmed from my real world experience, and that I cannot deny. For some, they may think the older equipment I favor is junk, but this has all proven to be high quality TE, and foremost, it is repairable by most enthusiasts. Granted, the newer TE specifications may far exceed the performance of the prior, but are those higher specs necessary for most of us?
Consider two things here. One is repairs that I am sure even the best of us could not accomplish. This alone could be double the cost of the original purchase price. Two is directed toward highly accurate pieces of TE. Accuracy does not come cheap. Also, the stated high accuracy at the time of manufacture is meaningless down the road without periodic calibration checks — an expensive proposition.
Add in the cost of repair when one of these parameters won’t pull in to spec on its own, and the total cost could be astronomical. NV
