Every Halloween the black lights come out, the strobes fire, and the fog machines fog. All this serves to restore our neighborhoods to the creature-ridden phantasms we all enjoy! Personally, I don't know why we can't have black lights, strobes, and fog in our houses most days, but I suspect there may be some reason related to common sense or sanity …
As a haunter, I've come to philosophically believe that our friends and neighbors secretly want and need to have a good fright this time of year. In fact, I tremble to think of the psychological damage that could be done if we shirked our responsibility once a year! (Well, that's my story and I'm sticking to it.)
This article also covers some really entertaining animatronic principles and characters that make wonderful projects any time of year — even without the scare.
The Set-up for "Delight and Fright"
"Delight and Fright" is an animatronic project designed to use a little psychological game to surprise your friends and neighbors (in an entertaining way). It has an element of a "con" to it, which is something I always like.
The idea is very simple, and consists of two easily constructed yet lifelike characters. The first character's job is to intrigue your audience. He's what we'll call "the bait." For this, we'll construct Sigmond the animatronic seagull. (Sigmond is one of my favorite projects for any time of year.)
Sigmond's motions are random and mesmerizing. In this scenario, Sigmond is carefully lit and operating in a tree or bush. His head, neck, and beak move in a very lifelike way. Your victims — I mean neighbors — will be quickly drawn in and intrigued upon seeing him. I've seen groups of people clamor up to within a few feet of Sigmond and be completely mesmerized for 10 minutes at a time!
After Sigmond draws them in, they will relax and be completely disarmed seeing this cute little creature chattering away in your tree … little do they suspect that Sigmond is just our "set-up guy" for our "evil" plan! Lurking below innocent Sigmond's perch is "Martha" a fast-moving, high-jumping ghoul!
When your audience is in just the right position, Martha shoots out from behind her tombstone with a blood curdling shriek and scatters your guests in the best Halloween style.
Martha is what is called a "pop-up" in the animatronic business. This is a simple robot that springs from behind a tombstone or the like. Martha is a bit more complex than the simple "head on a stick" pop-ups you may have seen, and her design will allow her to actually leap up and over the front of her tombstone!
An important note: With careful button control, Martha can be brought up very slowly (when needed) so as not to scare the very little ones who might attend your haunt. Often times, I've found the youngest visitors are the first to befriend Martha and delight in the fright she gives their parents! Martha also makes a good dancer for the little ones if she's bounced up and down to some Halloween music.
Seagull Electronics
Figure 1 shows the basic schematic for our animatronic seagull. This circuit will provide random, interesting, and lifelike movement for your gull. (It can also be used as a "look alive" type circuit for a variety of other creatures who you might want to assemble with similar motors.)
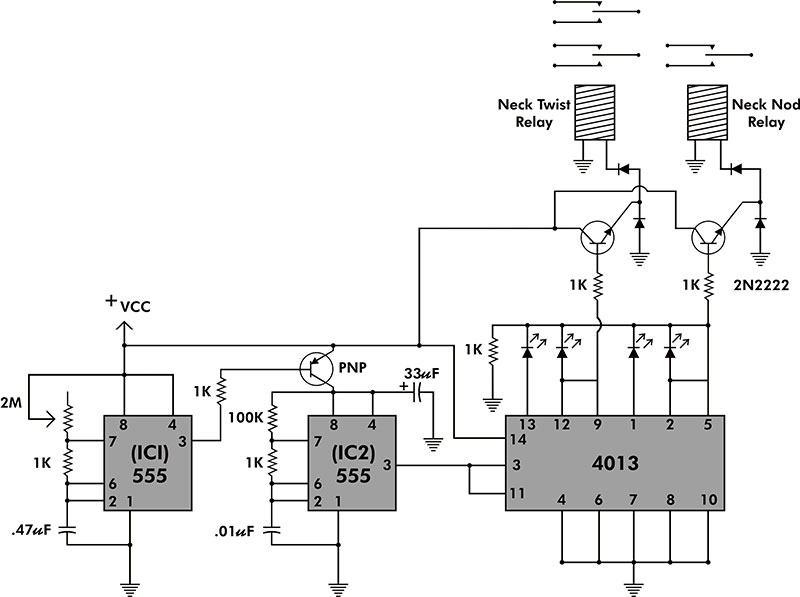
Figure 1.
The circuit is simple enough for ordinary perfboard construction (Figure 2) and fits easily in a small enclosure.

Figure 2.
Any general-purpose transistors and blocking diodes can be used. Voltage isn't critical. I happened to use six volts. We'll go into greater detail on the gull robot itself (shown in Figure 3), but in general, our circuit will need to control two small hobby motors and a solenoid to accomplish all our actions.
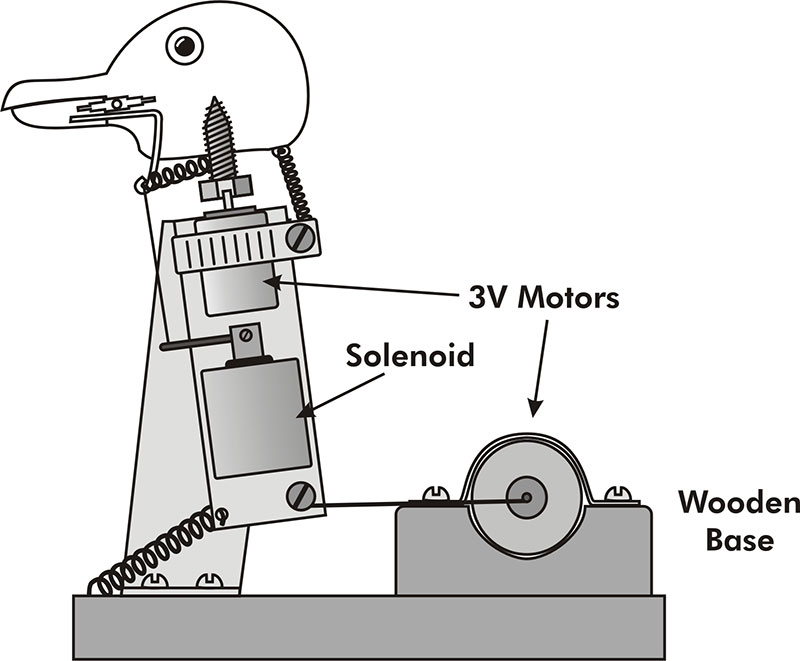
Figure 3.
A quick look at the circuit shows how this is accomplished. IC1 is a 555 which will send a stream of slow pulses at a rate determined by the two meg potentiometer. Each pulse will trigger one movement of the character, so by adjusting the two meg pot, you can dial in what seems to be the most lifelike rate of motion. (A bird moves pretty quickly, so don't be shy in turning this up.)
IC2 is also a 555, and serves as a "randomizer." Each pulse from IC1 briefly turns on IC2, which sends a rapid stream of pulses to the 4013 dual flip-flop. The 33 µF capacitor holds a small charge which very briefly powers IC2 between pulses from IC1. This bleed off of the 33 µF cap is erratic enough to make each flip-flop wind up in a random position every time!
Four LEDs are attached to the 4013 and display the random positions selected. (I think this is a lot of fun to watch.) You'll notice that with each pulse from IC1, the LEDs leap to random irregular positions.
Note: I hooked this same circuit up to a 4017 decade counter and found its outputs to be randomized as well. I think this would be very useful for a variety of applications from an eye-catching display, to controlling the random position of a servo (with a third 555 configured for PWM).
The 4013 controls two small relays. One relay (DPDT) operates the motor for neck twist; the second relay (SPST) operates the neck nod.
The neck twist relay is a double pole/double throw relay. You should configure this relay so that when the contacts switch, they alter the direction of travel of the neck motor by reversing its polarity. This is easily done by first attaching the motor leads to the common or swing arm connections on the relay.
Next, attach the + and - leads of your power source to the outside relay contacts in such a way as to reverse voltages to the motor when the relay moves from its open to closed position.
The neck nod relay should simply be connected so that power is sent to the neck nod motor when the relay contacts close.
If your relays are fairly loud, you will need to locate the circuit board some distance from Sigmond. Background music and a box for the circuit usually takes care of any unwanted clicking.
You can certainly substitute power transistors, MOSFETs, or any other solid-state device for the relays, if you choose.
You will need to have some speed control of the motors to prevent damage. Rheostats will work fine, or one of the many motor controls seen in other Nuts & Volts projects. What I actually did for speed control was extremely simple.
I just grabbed a handful of big power resistors (from 1 to 25 ohms) and while the gull moved, I played with putting them in series with each motor until I found a perfect resistance/speed. This being determined, I then bought a power resistor of the right value to go in line with the motor.
Even though the motor is only 3V, use beefy power resistors (at least 10 watts or better) when doing this. One problem with power resistors is if they get hot, their resistance will change and bang the gull's head around.
The Seagull's Mouth Circuit
In order to pull off the "bait and switch" routine, it's not really necessary to have your bird's mouth move and — in building the robot itself — this is probably the only delicate mechanism to assemble. So, you may decide to skip the moving mouth if this is strictly a Halloween quickie.
If you'd like a bird that serves other animatronic purposes (perhaps far beyond Halloween), I do think your bird should do some talking for himself.
Figure 4 shows a simple circuit to turn audio pulses into mouth movements.
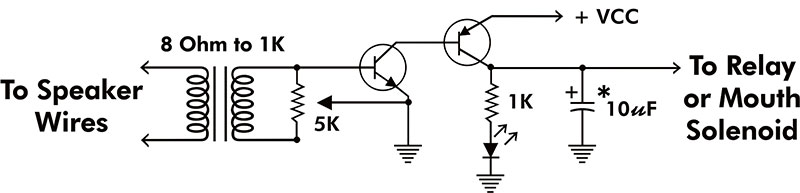
Figure 4.
A speaker output is connected to one side of an eight-ohm to 1K audio transformer. A 5K pot on the other side controls sensitivity. The 10 µF capacitor smoothes out pulses. (You may want to experiment with much larger caps here depending on what you're driving.)
The entire circuit can be connected to a small relay to drive your seagull's mouth solenoid.
Note: You can use a power transistor or MOSFET instead of a relay, if desired. Simply replace the PNP transistor with this device. Your MOSFET will need a pull-down resistor of perhaps 10K at its gate. Also, a small electrolytic cap might be needed between the NPN transistor's collector and +VVC to smooth out the response.
In the case of Sigmond, his mouth closes when the solenoid is on. So, I used the normally-closed contact on the relay to invert the output of the circuit. If driving a relay or solenoid directly, I'd also recommend adding a blocking diode to the output of the circuit to protect it from a voltage spike.
After assembling the circuit, I usually hook up the eight-ohm side of the transformer to the speaker leads of a stereo. I then tune in an all news channel and adjust the potentiometer until the LED flickers well with the voice. Leaving your talking seagull connected to the radio for a few hours makes a great burn-in test and is often very funny.
Over time, I've built a lot of mouth circuits; some better than others. There are additional mouth circuits and ideas at http://www.noonco.com/cyberreaper.
The Seagull Body
Referring again to Figure 3, notice the simple mechanical construction of the seagull. You certainly don't have to stick to my exact design.
My seagull's head was constructed by purchasing a block of balsa wood from the local hobby store and carving it into the shape of a head. Even if you've never done this kind of thing before, I'd suggest you give it a try. This gull was my first carving and I found it astoundingly easy! A few pieces of sand paper will shape a large block of balsa wood in no time!
Other options are to find ready-made heads at craft stores or even sporting goods stores (where they are sold as decoys).
The gull's eyes are sold at any craft store and the gull's body is simple papier-mâché. Adding a section of fur from the craft store conceals the gap between the gull's neck and body.
The seagull's upper beak was carved and attached with glue, and his lower beak was attached to the head with a small hinge.
Better hobby stores sell little hinges (resembling hose barbs) that can be stuck into the wood.
Also pushed and glued into the lower beak is a short piece of coat hanger wire. When the solenoid pulls a string attached to this wire, the seagull's mouth will close. A small spring pulls the mouth open when the solenoid is off.

Sigmond.
The gull's head is attached to a small hobby motor by a screw. The motor is attached to the screw by first drilling a tight-fitting hole in the head of the screw, adding a drop of super glue to the hole, then tapping the motor axle into the hole with a small hammer.
The neck motor is secured to a thin flat piece of metal with a hose clamp. A solenoid was also attached to the same metal with a few screws from behind. This whole assembly is attached to a second metal plate behind it by a single screw (behind the neck motor) that acts as a pivot point.
For both metal plates, I used very thin high carbon steel that I got from tie straps placed around some lumber. By keeping these very thin, the head will bounce a bit from side to side, creating additional motion. A small spring at the back of the gull's head limits the motion of the head from left to right to prevent any Linda Blair action from the gull.
Again, if this is a "Halloween quickie," you can always substitute elastic for the springs.
Last, a second hobby motor is mounted on the wooden base. This motor has a small belt that goes from its axle to the bar to which the motor and solenoid are mounted. When this motor spins, it winds the belt around its axle and causes the gull's head to nod forward. A spring returns the head to an upright position when the motor is off.
The belt can be constructed by cutting a strip from an old cotton tee shirt or like material. To prevent it from unraveling, I rub in a little silicone glue on one side of the belt. The belt is attached to the motor axle with a few wraps and a little glue.
The motors I used were low torque 3V hobby motors. These are good for several hundred hours of operation. Don't use motors that are too strong or you may tear your belt or stretch a spring.
Martha's Body
I've never been a fan of pop-ups that just have a head on the end of a cylinder. Martha is a lot more fun! She also shows how an air cylinder with just a few inches of travel (called stroke) can move a character several feet, and in an interesting pattern.
Martha's head is made from a Styrofoam "wig stand" available at any better wig supply. The Styrofoam head is attached to the metal bars by first sinking the bar into the Styrofoam, then holding it in place with silicone glue. Any Halloween mask can be fitted over her face.
Martha's swing pattern will not only allow her to jump up several feet, but will actually bring her up and over the front of the tombstone. Figure 5 shows Martha in the crouched position, and Figure 6 shows her completing her jump. (I've pulled back Martha's long flowing cowling so you can see the mechanism.)
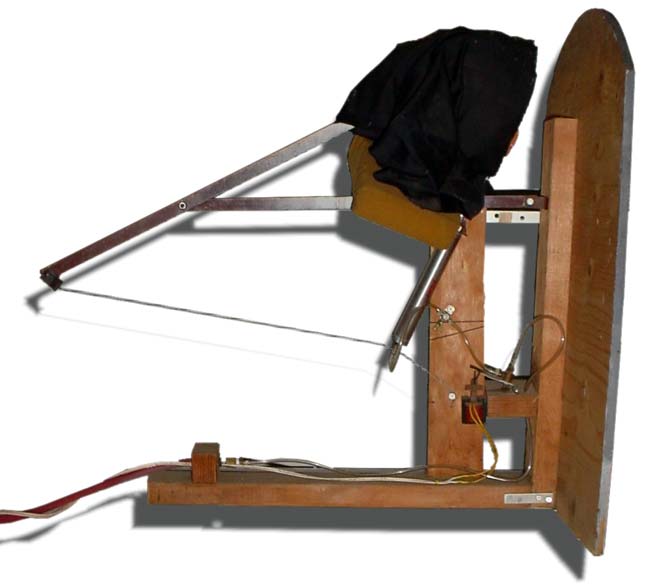
Figure 5.
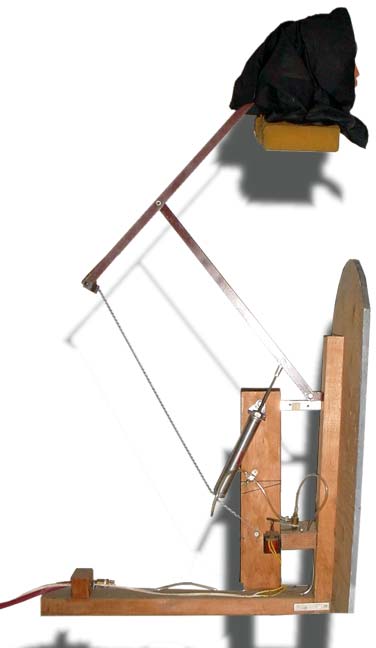
Figure 6.
A piece of foam rubber glued to the bottom of her head forms her shoulders. Figure 7 shows a front view of Martha completing a jump.

Figure 7.
The mechanism is very simple. Two metal bars are attached by a bolt at a pivot point as shown. The back of the top bar is attached to the wooden frame by a cable. The air cylinder itself is attached at the nose with an "L" bracket. (This bracket must be able to swivel.)
When the cylinder extends, the bars and cable make a "floating quadrilateral" and lift the head up and over the tombstone, exaggerating the motion of the cylinder greatly.
Air Cylinder Basics
If you're interested in any kind of robotics and have never worked with air cylinders before, have I got a treat for you! Air cylinders are easy to hook up!
To have a complete system, you only need a compressor, a hose, a flow control, and a valve. (A water trap and in-line oilier should also be used if the cylinders will be in long-term operation. These are available anywhere air tools are sold.) A small cylinder, perhaps just 3/4 inches in diameter can exert a force of 40 pounds at 100 PSI. Air cylinders are clean (no oil like hydraulics) and will probably outlast you and me if just used seasonally.
Martha uses a single air cylinder for her jump. I happened to use a 3/4 bore/four inch stroke cylinder. These dimensions are not critical since you can change the point at which the cylinder attaches to the bar to get more or less angle/jump.
I would recommend using a home air compressor with a tank of eight gallons or more. With an eight-gallon reservoir, you'll get dozens of jumps between times the compressor must run to charge the tank.
However, if you don't have a compressor, never fear! Stores like Walmart and just about any auto parts store have 12V compressors for reasonable prices. I've hooked these compressors up directly to single cylinders and have been able to operate the cylinder nicely.
A real Halloween "quickie" setup is to run the hose from the 12V compressor right to the cylinder. Poke some holes in the hose with a needle. Now, when the compressor starts, up goes the cylinder! When the compressor stops, the air leaks out the holes in the hose and down comes the cylinder. If you want her to come down faster, poke more holes!
Remember to keep the hose between the 12V compressor and the cylinder short or there will be a delay in jumping. And don't worry too much about compressor noise, the sound of the compressor is usually covered by the screams.
The "right" way to hook things up is almost as simple as the quickie: Connect the air hose from your compressor to what's called a three-way valve. Pneumatic three-way valves provide air to the cylinder when activated, and allow air from the cylinder to exit when it's turned off. Next, run the line from the three-way valve to a flow control or needle valve. (These usually screw right into the cylinder.)
That's all there is to it! When the three-way valve is turned on, up goes Martha at a rate determined by your flow control (this is adjusted with a screw). When the valve is turned off, down comes Martha. Three-way valves can be manual or 12V, 24V, or 120V in operation.
The Scariest Effect!
One friend who I built a "Martha" character for said she experienced the scariest effect. When I shipped Martha to her, I removed Martha's head so it wouldn't be damaged. In replacing her head, my friend forgot to use glue.
Martha behaved herself for most of the evening scaring crowds as expected. However, a group of "tough" kids showed up and began causing trouble. Right on cue Martha popped up and due to the lack of glue, her head flew off and landed in the lap of a tough kid! My friend said the whole group ran screaming from the yard!
On with the Show!
You could easily rig Martha to jump using a motion detector, however, I believe that automatic mechanisms lack the finesse for the perfect scare. They just never seem to trigger at the perfect time.
I personally like a set of pushbuttons to control any and all jumpers in a show. With Martha jumping by pushbutton and Sigmond moving and cawing away, you're ready!
The last two elements to be added are sound and lighting. With Martha, a shriek is critical to a good scare.
Finally, you'll want some background music playing, and the usual Halloween touches to set the overall mood.
With this, you've armed your haunt with good bait and a big surprise!
Happy Haunting! NV
Parts List
| Seagull Motion and Mouth Circuit Parts |
| (7) 1K resistors |
| (1) 100K resistor |
| (1) Two meg potentiometer |
| 1) .47 µF capacitor |
| (1) .01 µF capacitor |
| (1) 33 mfd electrolytic capacitor |
| (2) 10 µF capacitor |
| (1) 8 ohm to 1K transformer |
| (5) Red LEDs |
| (6) Diodes (any general-purpose blocking) |
| 3) NPN transistors (2N2222 or any general-purpose) |
| (2) PNP transistors (any general-purpose switching. If driving a relay or mouth, use a transistor rated for your load.) |
| (2) 555 timers |
| (1) 4013 flip-flop |
| (2) 5V SPST relays |
| (1) 5V DPDT relay |
| (1) 12V continuous duty solenoid |
| (2) 3V hobby motors |
| Misc. Six volt power source, a rubber washer (capable of handling some heat) to attach to the solenoid rod to prevent "clicking," hardware shown in Figure 3 and discussed. |
| Martha Pneumatic Parts |
| (1) Pushbutton, wire, and power source (for air valve) |
| (1) Three-way air valve |
| (1) Flow control |
| 25' airline tubing |
| (2) 3/4 inch bore, four inch stroke pneumatic cylinder (or similar) |
| Misc. Buzzer, Styrofoam wig stand, plywood, 2 x 4, and all other hardware shown and discussed. |
Cylinders and other components can be purchased from Grainger (www.grainger.com) or McMaster-Carr (www.mcmaster.com).