When you think of MIDI controllers, you probably think of a keyboard. However, there are many reasons to have MIDI controllers in other form factors, not the least of which is fun! Over the years, there have been MIDI guitars, saxophones, flute/clarinets, and even trumpets. In this article, we will make a MIDI lyre.
A lyre is a harp-like instrument that is small and portable, and has a relatively small number of strings. It’s an ideal instrument to “MIDI-fy” because it’s already quite simple — and we will make it even simpler. Lyres have been around for thousands of years, so it’s definitely a form factor that has stood the test of time.
As you will see, MIDI enabling a lyre creates a simple elegant instrument that anyone can play. Also, the techniques presented here will allow you to create your own touch sensitive MIDI controllers in any form factor you can imagine.
The MIDI Interface
Before we can make a MIDI lyre, we need to know a little about MIDI. MIDI stands for Musical Instrument Digital Interface, and it’s a standard that has been around since the 1980s. Like the lyre, it has also stood the test of time (but not quite for so long!). You can find out all about MIDI at the MIDI Association (www.midi.org) where there is a wealth of information.
MIDI is ubiquitous, and you really have to try hard to find a modern synthesizer or electric piano that doesn’t support it. In fact, there are a wealth of MIDI instruments available, so you are really spoiled for choice.
A MIDI controller is anything that can send MIDI messages over one of the standard MIDI protocols to a MIDI enabled instrument. The messages cause the instrument to play notes, or otherwise modify its behavior in some standard way.
Note that the MIDI controller itself doesn’t make any sounds. All it does is command a MIDI instrument to make sounds. The MIDI lyre is a MIDI controller, so you will need to plug it into a MIDI instrument to hear anything. It’s not a stand-alone instrument.
A MIDI controller can control any MIDI instrument by sending it MIDI messages over a standard transport protocol. The original MIDI specification calls for a serial protocol at 31250 baud sent through a five-pin DIN connector. This is the protocol we will use here because it’s supported by the majority of MIDI instruments.
However, it is worth noting that there are other MIDI transport protocols in use; for example, MIDI over USB, Firewire, and Bluetooth LE. It would be an interesting follow-up project to modify the MIDI lyre to support one or more of these newer transport protocols.
A MIDI message is made up of an eight-bit status byte optionally followed by one or two data bytes. There are a large number of MIDI messages, but the only ones that concern us for the lyre are the MIDI Note On and (for completeness) Note Off messages. Note On causes the MIDI instrument to play a particular note; Note Off causes it to turn that note off.
The On and Off messages are shown in Table 1.
| MIDI Message |
Status Byte |
Note Byte |
Velocity Byte |
| Note On |
1001 nnnn |
0kkkkkkk |
0vvvvvvv |
| Note Off |
1000 nnnn |
0kkkkkkk |
0vvvvvvv |
TABLE 1.
Each message begins with a status byte where the most significant four bits of each message (1001 and 1000, respectively, in this case) indicate what the message means, and the least significant four bits specify the channel. There is a total of 16 MIDI channels, and you can assign a different instrument to each one.
We will be sending on channel 0000, so the MIDI status byte for Note On will be 10010000 (90 hexadecimal); for Note Off, it will be 10000000 (80 hexadecimal).
The next byte is the Note Byte which is a number from 0 to 127. MIDI defines 128 possible notes such that each increment by one represents a semitone increase in pitch. Middle C is (usually) MIDI number 60 and middle C# is (usually) MIDI number 61. We say “usually” because how a particular MIDI instrument is tuned is up to the instrument manufacturer.
The final byte in the Note On and Note Off messages is the Velocity Byte, which is a number from 0 (silent) to 127 (maximum volume). The MIDI lyre will always send at maximum volume (127) because it doesn’t have any touch capability for volume control.
A MIDI keyboard controller works by sending a Note On when a key is pressed and sending a Note Off when it is released. Depending on the voice selected, the note will stop immediately or decay at some preset rate when the key is released. That’s fine for a keyboard, but how do we simulate a plucked instrument using MIDI?
If you consider the action of plucking a lyre (or any other plucked instrument), it goes something like this:
- Touch string.
- Pull string from its equilibrium position.
- Release string.
The release of the string causes it to start vibrating, and these vibrations are transmitted to a soundboard fixed over a resonant cavity that amplifies the vibrations and creates the sound.
If we consider a touch event as a simple pulse (as shown in Figure 1), then a keyboard sends a Note On message on the rising edge of the pulse when a key is pressed, and a plucked instrument sends a Note On message on the falling edge of the pulse when a string is released. The keyboard also sends a Note Off message when the key is released.
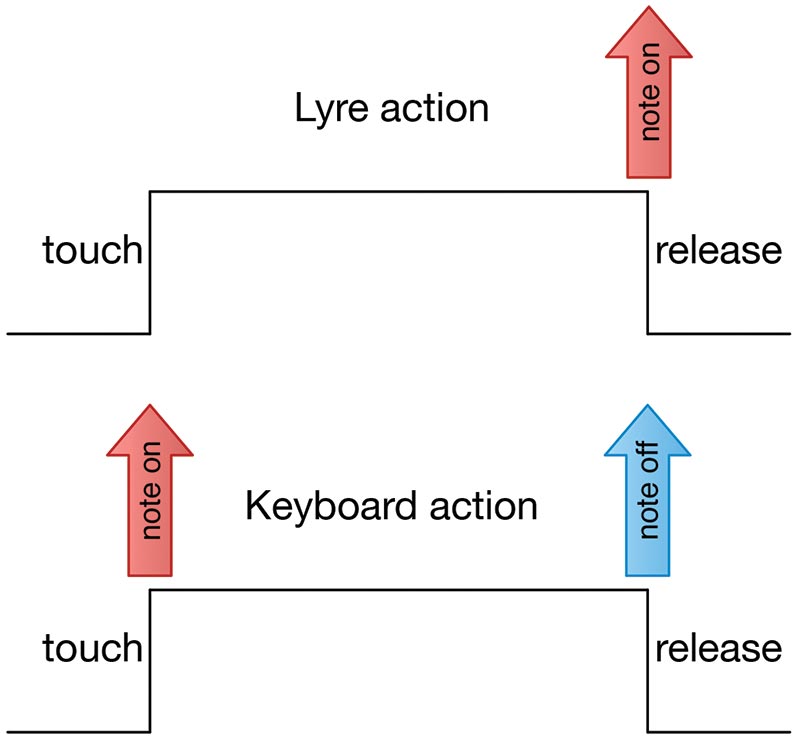
FIGURE 1. A touch shown as a simple pulse. Keyboards send a Note On event on the rising edge and a Note Off event on the falling edge. Plucked instruments send a Note On on the falling edge.
Does a plucked instrument ever send a Note Off message? Not really. For most plucked instruments, the sound usually fades away naturally.
Now that we understand a bit about lyres and MIDI, let’s consider the construction of the instrument itself.
Building the MIDI Lyre
There are two aspects to building the MIDI lyre: the electronics and the touch sensors. We’ll start with the electronics.
The electronics are comprised of an Arduino Uno, an Adafruit MRP121 capacitive touch sensor breakout board, a female MIDI socket, a couple of resistors, and a couple of tactile switches. The circuit diagram is shown in Figure 2.
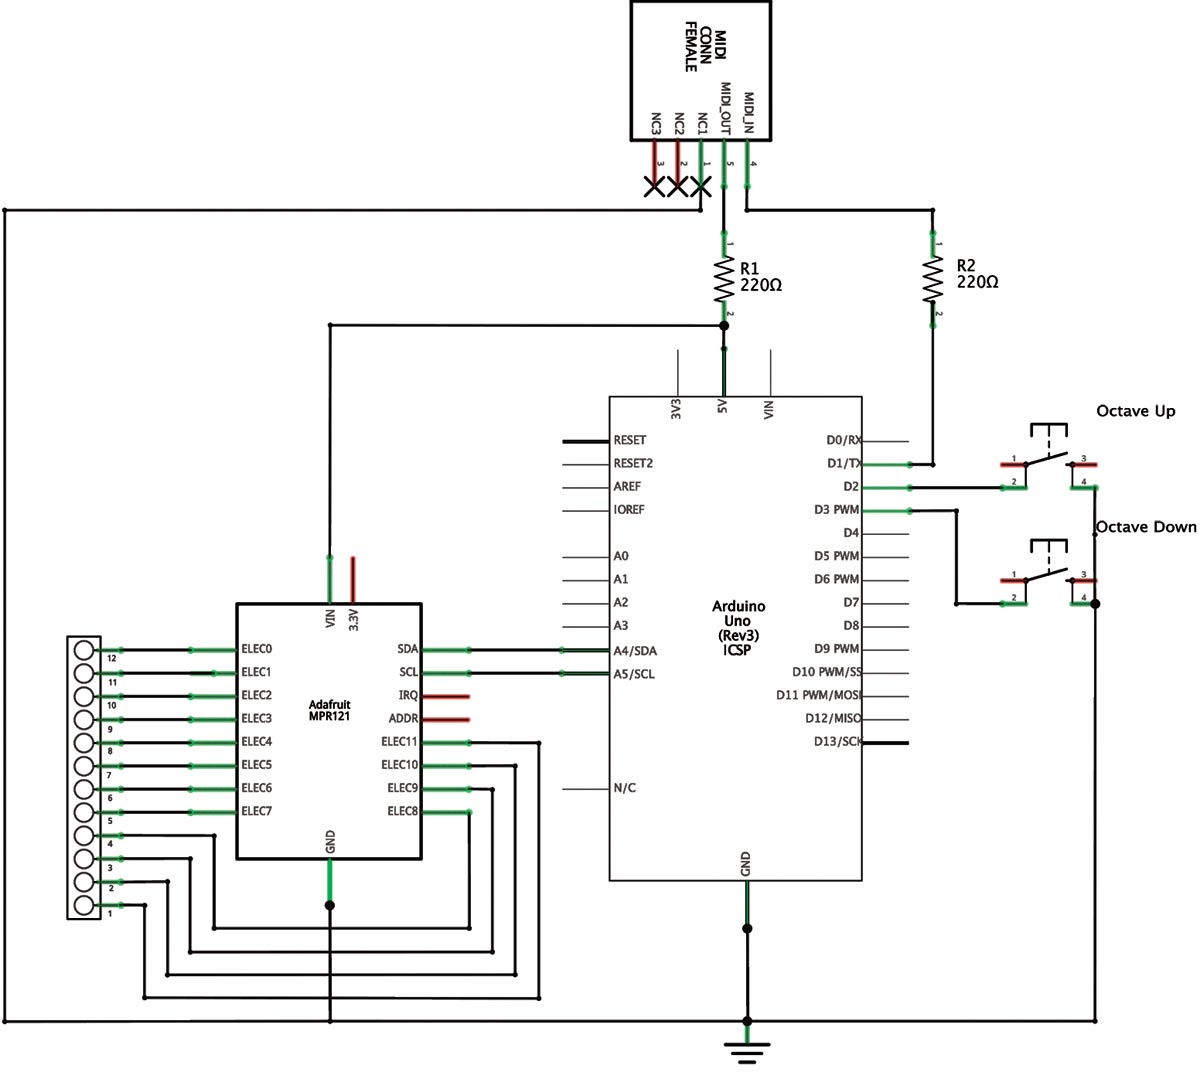
FIGURE 2. Circuit diagram of the MIDI lyre.
The whole thing is assembled on a half size breadboard as shown in the diagram in Figure 3.
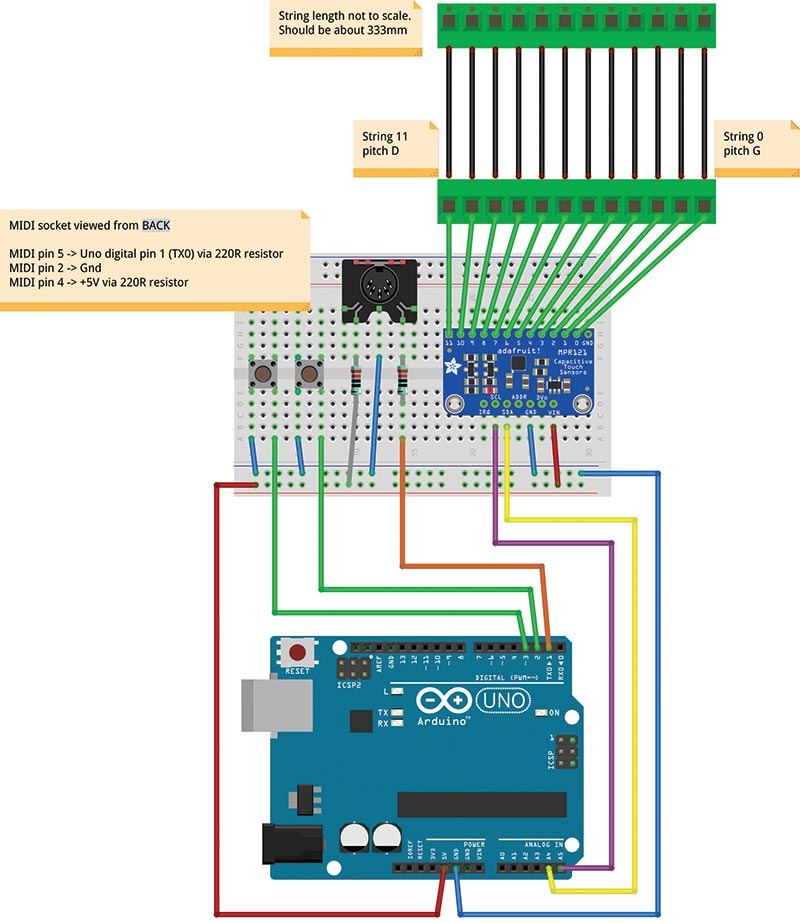
FIGURE 3. Fritzing diagram showing construction of the MIDI lyre on a small breadboard.
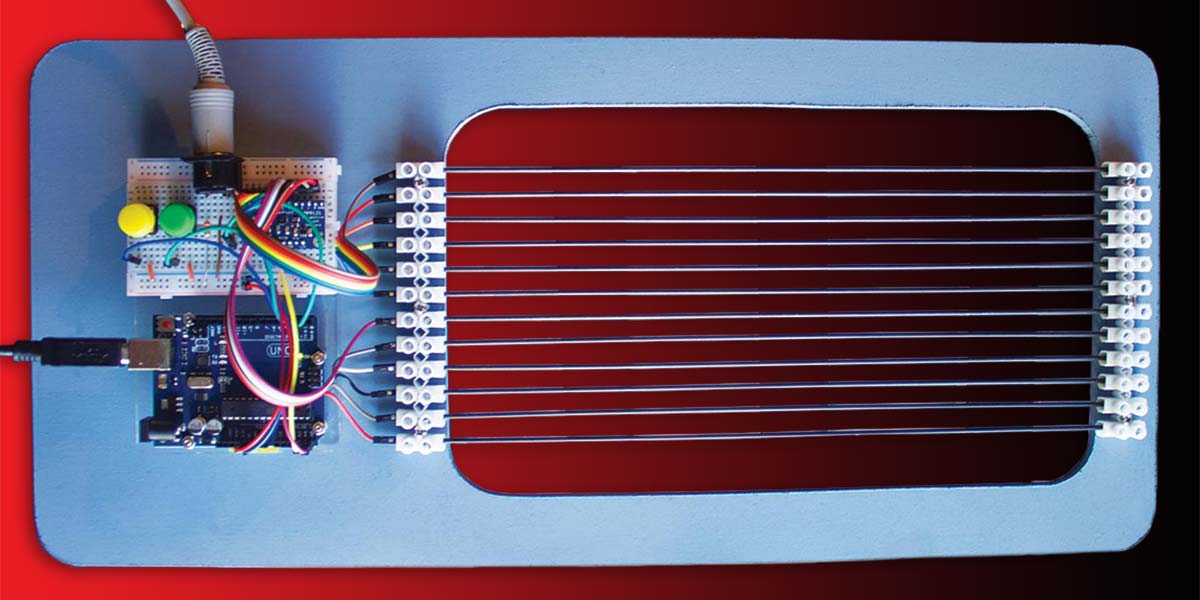
A photo of the assembled board is shown in Figure 4.
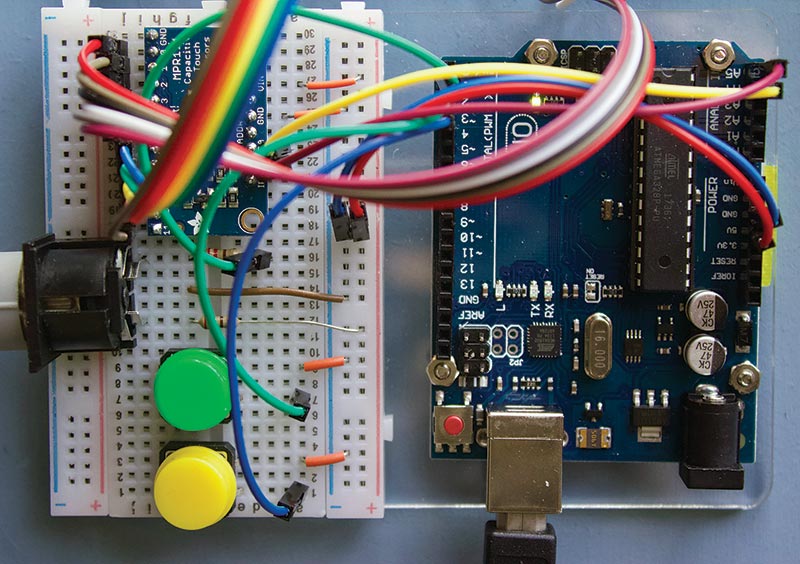
FIGURE 4. Photo of the finished MIDI lyre electronics. Note the two six-way ribbon cables that go from the MPR121 to the strings.
The first thing to do is to add the headers to the Adafruit MPR121 board. When you get the board, it comes with two headers that need to be soldered in place so that in can be inserted into a breadboard. You can find full details of how to do this at https://learn.adafruit.com/adafruit-mpr121-12-key-capacitive-touch-sensor-breakout-tutorial/assembly.
It’s very easy: Insert the long pins of both headers into the breadboard to hold them steady. Put the MPR121 board down on top of them with its top surface upwards so the pins go through the holes in the board and solder the pins in place. Make sure you have the board with its top surface upwards, and you can’t go wrong.
Once the headers are soldered on, insert the MPR121 into the half size breadboard as shown back in Figure 2 and add the jumpers for VIN and GND.
The next step is to place the MIDI socket on the breadboard. For convenience, I used a PCB (printed circuit board) compatible MIDI socket as shown in Figure 5 that plugs directly into a breadboard. However, you can also use a socket with solder tags depending on how you choose to construct your lyre.
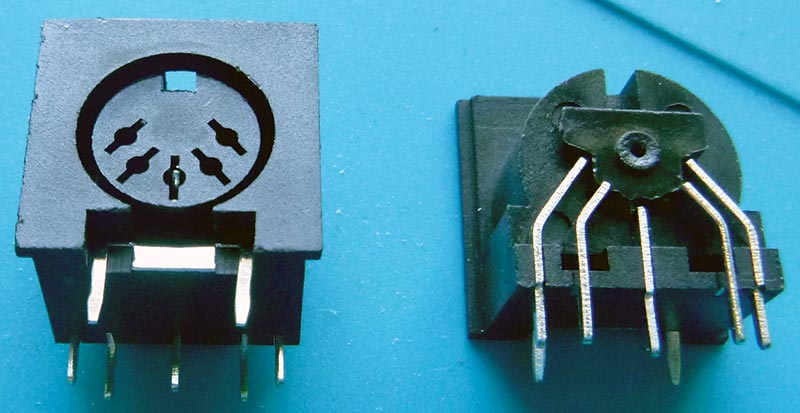
FIGURE 5. Photo of a female five-pin DIN MIDI socket suitable for mounting on a breadboard.
The MIDI socket is a five-pin DIN socket, but there are three different flavors of five-pin DIN with different arrangements of pins. Make sure you get the MIDI version which is DIN 41524, 5/180°. This means there are five pins with pins at 0°, 45°, 90°, 135°, and 180°. Figure 6 shows a MIDI socket from the back (the cable plugs into the other side), so you can see exactly how to wire it up. Notice that the pin numbering is not consecutive!
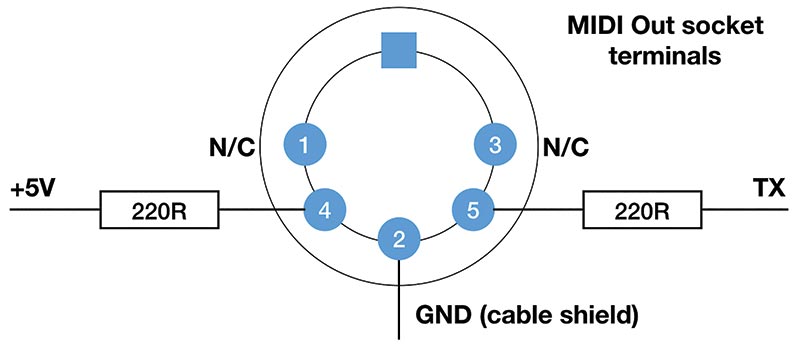
FIGURE 6. Diagram to show correct wiring of a MIDI out socket. Note that the socket is viewed from the back so you can see exactly what pins to connect to.
Plug the socket into the breadboard, then add the jumper between pin 2 and GND; a 220R resistor between pin 4 and +5V; and another 220R resistor on pin 5 to a free row of contacts. Next, you can add the octave up and down pushbuttons. Any sort of momentary action pushbutton will do. I used tactile switches that are compatible with the breadboard. These are readily available from the usual sources. One pole of each switch goes to GND, and the other will eventually go to a pin on the Arduino. These pushbuttons are optional; the lyre will work just fine if you leave them out. However, you will not be able to change the octave.
Check all the connections on the breadboard carefully. When you’re satisfied they’re okay, you can attach the Arduino.
For convenience, I first attached the Uno and breadboard to a small Perspex carrier plate. You can see this in Figure 4. You can often buy an Uno, half size breadboard, and plate as a kit.
Connect the Uno 5V pin to the 5V rail of the breadboard, and the Uno GND pin to the GND rail. Connect Uno pin 1 (TX0) to the 220R resistor that goes to pin 5 of the MIDI socket. This is the serial transmit output from the Uno, and it’s where we will output our Note On events.
I used Dupont male-to-male 10 cm jumper cables to connect the Uno to the breadboard.
Now, connect up the MPR121. This communicates with the Uno using the I2C serial protocol, so you only need two wires. Connect Uno pin A4 to SDA (the data line) and Uno pin 5 to SCL (the clock).
That’s all the connections needed, and the electronics are now complete. Now would be a good time to check all the connections again!
Mechanical Construction
The MIDI lyre has 12 strings made of 2 mm carbon fiber rod. To make the strings, buy four pieces of 1 m long/2 mm diameter extruded carbon fiber rod. This is readily available for a few dollars in hobby shops or online because it’s often used in RC planes, cars, and drones.
Cut each rod into three equal 333 mm lengths using a hacksaw or (if you have one) a bandsaw. I find it useful to tape all the rods together using masking tape and then mark and cut them all at once. The rod is surprisingly easy to cut even by hand.
The length of the strings is not critical, so if you want to make them a bit shorter or longer, it should be no problem. In fact, 25 mm is also a good length because you can get four strings from a 1 m rod.
In an acoustic lyre, the strings are stretched over a bridge to a neck where they are tensioned by some sort of tuning machines that are usually simple pegs. To create the bridge and the neck of the lyre, use two 12-way terminal barrier block strips with a 12 mm spacing between terminals (this is usually the 15A rated model).
Make sure you get the simple kind of strip that has brass tubes in which the wires are secured with small bolts. Other fastenings are available, but they may not accept the 2 mm carbon fiber rods.
String spacing is not critical. It’s largely a matter of personal preference and what terminal block spacings are readily available. If the strings are too close together, it’s hard to play individual notes. If the strings are too far apart, it’s hard to strum the instrument.
I find that 12 mm is a decent compromise that allows me to use off-the-shelf terminal blocks. Of course, if you break the terminal block up into individual terminals, you can have whatever string spacing you want! In fact, you can arrange the strings however you want, and make a whole range of other instruments! For the MIDI lyre, it’s convenient to keep the blocks in one piece.
Stringing the MIDI lyre involves fixing each carbon fiber string between the bridge and neck terminal blocks. There is an easy way to do this and a hard way.
The hard way is (sadly) the more obvious way, so we need to discuss it so you don’t waste your time on it. This is to fix each string in the bridge terminal block and then try to get the other ends of the strings into the neck block. This is surprisingly difficult and very, very fiddly because the strings are already fixed at one end!
The easy way to string the lyre is as follows:
- Loosen all the nuts on the neck terminal block so the holes are completely open.
- Slide each string through the block to about its halfway point.
- Offer the end of each string up in turn to the bridge terminal block and tighten in place.
- Slide the neck terminal block up to the opposite end of the strings and tighten everything.
This is a very quick and easy method because you can move the strings independently.
If you need to replace a string (highly unlikely), loosen all the bolts holding it, slide it out of the top of the neck block, and slide the new string in. It’s interesting to note that most string instruments have a preferred — and sometimes necessary — way of being strung, and the MIDI lyre happens to be no exception.
I remember spending an afternoon stringing a lute and getting halfway before I realized that I wasn’t going to get any further doing it that way.
A word of warning: Be careful when you tighten the nuts in the terminal blocks. You need to just catch each carbon fiber rod so that if you give it a little pull, it won’t come out. Although carbon fiber rod is immensely strong, it can be quite friable if crushed.
Once you have fastened the strings in place, you need to mark some of the strings to give you an indication of where particular notes can be found. Being a MIDI instrument, a small software change allows you to tune the lyre however you want, and I will indicate how to do this later. For now, I’ll describe the default tuning.
The MIDI lyre is a diatonic instrument. It’s tuned according to a C Major scale with no sharps or flats, i.e., the white notes on the piano keyboard. Diatonic tuning is very common for both lyres and harps and is particularly common for folk instruments. Diatonic instruments are easy to play because it’s impossible to play a “wrong” note that is not in whatever scale they are tuned to. The tuning of the 12 strings of the MIDI lyre is shown in Table 2.
| MIDI Lyre Default Tuning |
| String |
0 |
1 |
2 |
3 |
4 |
5 |
6 |
7 |
8 |
9 |
10 |
11 |
| Note |
G |
A |
B |
C |
D |
E |
F |
G |
A |
B |
C |
D |
| Color |
|
|
|
Red |
|
|
Blue |
|
|
|
Red |
|
TABLE 2.
String 0 is G and therefore a C Major scale starts on string number 4 as shown in Table 2. For any musical theorists, this puts the MIDI lyre in Mixolydian mode (like the mountain dulcimer) because although it is tuned to a C Major scale, the strings actually start at G.
You get a mode by playing a C Major scale beginning on different white notes as shown in Table 3. The normal C major scale happens to be Ionian mode.
| C Major starting on... |
Mode |
Scale |
| C |
Ionian |
C D E F G A B C |
| D |
Dorian |
D E F G A B C D |
| E |
Phrygian |
E F G A B C D E |
| F |
Lydian |
F G A B C D E F |
| G |
Mixolydian |
G A B C D E F G (the MIDI lyre) |
| A |
Aeolian |
A B C D E F G A |
| B |
Locrian |
B C D E F G A B |
TABLE 3.
Now let’s mark some notes. Take some red insulating or masking tape and wrap it around the top and bottom of strings 3 and 10. This marks the C notes. Next, take some blue tape and wrap it around the top and bottom of string 6. This marks F.
This is a standard way of marking the strings of a harp or lyre because it tells you where you can find lots of useful notes:
- The red strings are the tonic, C.
- The string before the blue string is the third, E.
- The blue string is the fourth, F.
- The string after the blue string is the fifth, G.
You can see that the thirds and fifths are either side of the blue string; this makes it very easy to find the C Major chord, CEGC.
Now that you have “strung” the lyre, you can connect the strings to the MPR121.
Connect each string to the appropriate pin of the MPR121 using 30 cm male-to-male Dupont jumper wires. These usually come in ribbons of 40, and the best way is to break off two ribbons with six wires in each.
One end of the wire is fastened in the terminal block and the other end plugs into the breadboard at the appropriate MPR121 pin. The MPR121 breakout board has 13 pins down one side. The first pin is GND (don’t connect this to anything); then we have pins labelled 0 to 11 that are the touch sensor electrodes. Connect string 0 to pin 0 and so on.
Everything should now be connected correctly. A completed MIDI lyre with electronics and strings is shown in Figure 7. Check your wiring again, and then you can program the Arduino Uno.
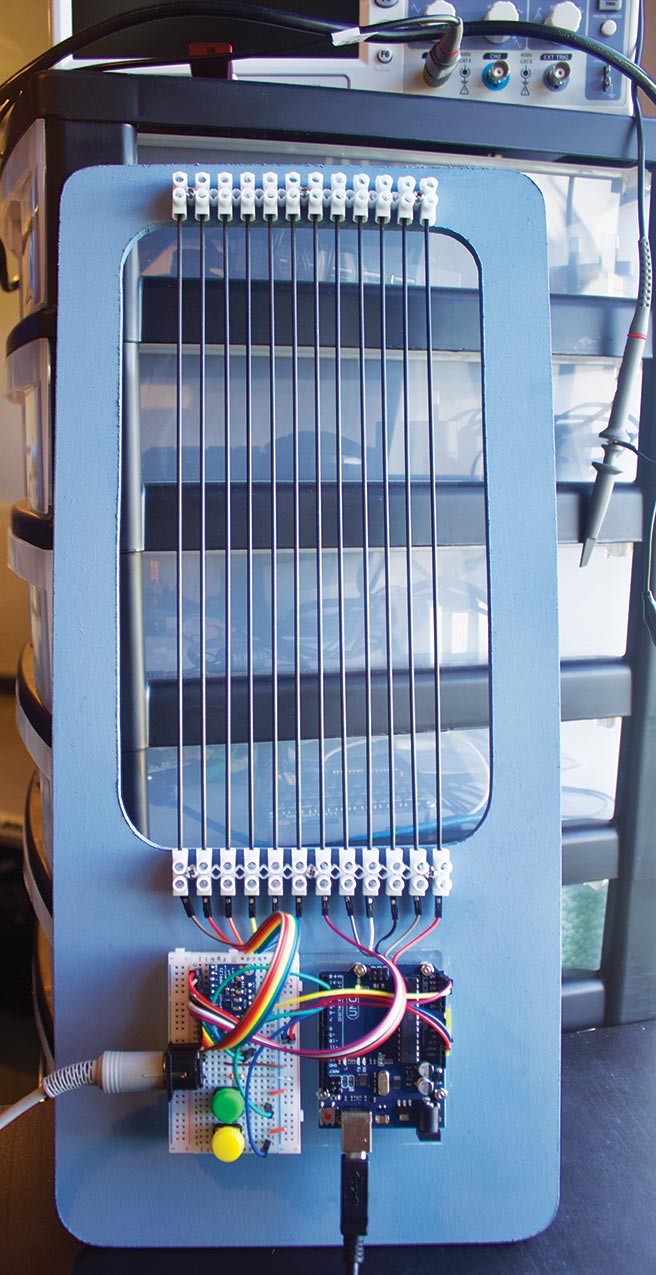
FIGURE 7. The completed MIDI lyre.
Programming the Uno
If you haven’t used an Arduino before, I suggest you go to the Arduino home page at https://www.arduino.cc and do a little reading. In particular, take a look at “Resources/Getting Started” for instructions on how you program the boards.
Arduino boards are best programmed using the new online web editor. Connect the Uno to your computer via USB and go to the Arduino Home at https://create.arduino.cc. Select “Arduino Web Editor.” The web editor should open and automatically detect your board. If not, select it from the drop-down menu. Go to Examples/Built in/01 Basics and load and run Blink. This is like a “hello world” for the Arduino.
If Blink runs okay, then you’re in business. If it doesn’t, then there may be something wrong with your setup or the Uno board. There is plenty of documentation and help available on the website.
You can find the software for the MIDI lyre with the article downloads. Grab the file and import it into the web editor using the Import button. From there, you can upload it to the Uno. Once it’s uploaded, connect the lyre to your MIDI instrument. If you touch and release a string, it should play something.
Warning: If you have your MIDI instrument connected while you are uploading the software, odd things will happen! This is because on the Uno the same serial port is used for MIDI and for USB. Therefore, to prevent spurious MIDI messages, always turn off or disconnect your MIDI instrument before uploading software!
If you take a look at the software, you’ll see that there are three global variables that you can customize. The first variable is tonic. This sets the key in which the lyre is tuned, according to Table 4.
| Tonic |
0 |
1 |
2 |
3 |
4 |
5 |
6 |
7 |
8 |
9 |
10 |
11 |
| Key |
C |
C#
Db |
D |
D#
Eb |
E |
F |
F#
Gb |
G |
G#
Ab |
A |
A#
Bb |
B |
TABLE 4.
The next variable is octave. As you might expect, this sets the octave in which the lyre will play. You can see how it is manipulated by the Octave Up and Octave Down buttons in the corresponding octaveUp( ) and octaveDown( ) functions.
The default octave is 5, which is a nice treble range, but, for example, you could instead default to a bass instrument by setting the octave to 3 or 4.
Finally, we have an integer array called majorScaleOfsets[ ]. This controls the pitch of each string relative to the tonic. Each integer in this array is the number of semitones that a string differs from the tonic. In the default tuning of the lyre, the tonic is C which is on string number 4 (remember that the strings are numbered from 0 to 11 to match the MPR121 electrodes). So, we have:
majorScaleOfsets[ 3 ] = 0
String 0 is the first string; this is tuned to the G below the tonic, so majorScaleOfsets[ 0 ] = -5, because G is five semitones below C.
You should now be able to see that by changing the values in majorscaleOffsets[ ], you can completely change the scale of the MIDI lyre.
For example, you might change it to play in a minor scale or even a chromatic scale (after all, there are 12 strings!). The current limitations of the software are that there must be zero or more semitones between each string, and each semitone is of equal size according to normal Western tuning, which is 12-tone equal temperament (i.e., 12 semitones in an octave where each semitone is the same size).
The software could easily be modified to play in different temperaments by sending MIDI pitch bend messages with each note. However, this is something for a follow-up project. If you’re interested in non-standard temperaments, then you should check out Scala at www.huygens-fokker.org/scala.
Operation and Testing of the MIDI Lyre
When you power-up the lyre, the Uno’s built-in LED will flash 25 times. Do not touch the strings during this time because the MPR121 is calibrating itself against background capacitance (no touch)! If the LED never stops flashing, then you have an error communicating with the MPR121, and you should check all your wiring.
Once the LED has stopped flashing, you can connect your MIDI instrument if you have not already done so. If you touch and release a string, the instrument should play a note.
Remember that the MIDI lyre does not send Note Off messages. Therefore, if you select a voice that has infinite sustain, the note will just continue to play.
The lyre only works with voices that die away naturally, such as piano, guitar, any plucked instrument, or tuned percussion such as tubular bells or gamelan.
If you have installed the Octave Up and Octave Down buttons, pressing Octave Up will take the lyre up one octave; pressing Octave Down will take it down one octave.
There are two important points to note about this: Firstly, not all voices work well at every octave; and secondly, changing the octave affects the next note to play, not the one that is currently playing.
Playing the MIDI lyre is done with a plucking type of motion that is a quick touch and release. If you touch a string, it will not sound until you release it. Touch sensor reliability can depend quite strongly on skin resistance, so if you have particularly dry skin, you might find that your touch is not always detected.
To solve this problem, you may need to moisten your fingers slightly before playing. In fact, it’s quite useful to keep a damp sponge or towel next to you while you play. You can play single notes or chords because the instrument is fully polyphonic.
The other way to play the lyre is to strum it by dragging your fingers across several strings. The instrument works very well in this mode. (In a future article, I’ll describe a simple modification that turns the MIDI lyre into an autoharp for playing strummed chords.)
Putting It All Together
Now that you have a working MIDI lyre, you need to package it all up in some way so that it’s easy to transport and play.
There are any number of ways you can do this, and provided you still have access to the strings, buttons, and ports, you can package it as you choose.
I like to make the instrument look like a lyre. The easiest way to achieve this is to mount the instrument on a U-shaped piece of MDF, Perspex, or ply as shown in Figure 7. I find 6 mm is a good thickness for the sheet material because it’s rigid enough without being too heavy. My MIDI lyre is shown in Figure 7.
I call this a “skeleton lyre” because I keep the electronics exposed so I can easily experiment and make changes. For a more robust instrument, you can cover the electronics apart from the buttons and ports.
The shape I have chosen is roughly based on the Saxon lyre from the seventh century C.E. that was found in a burial site at Sutton Hoo, England.
Figure 8 shows the plans for this instrument if you’d like to copy it. NV
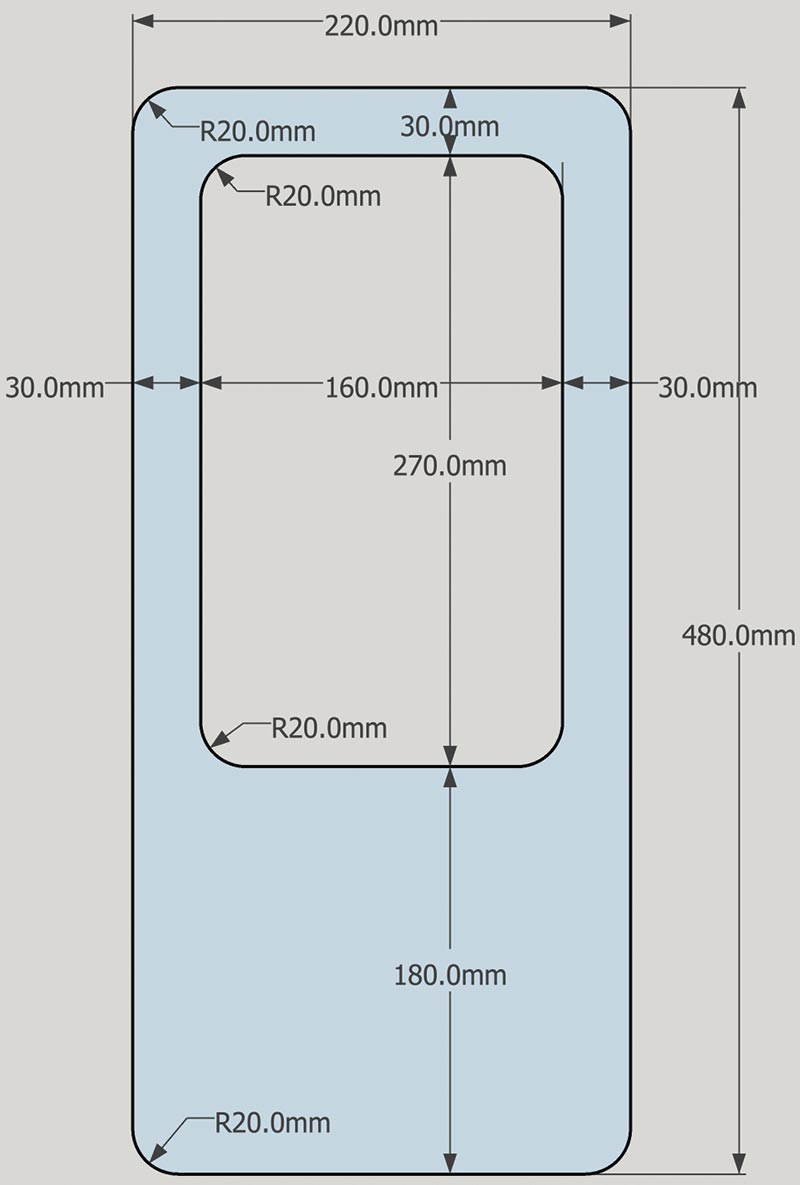
FIGURE 8. Plans for the MIDI lyre frame that are loosely based on the Sutton Hoo Saxon version.
About the MPR121 Capacitive Touch Sensor
The MIDI lyre uses the MPR121 touch sensor chip in a convenient breakout board by Adafruit.
The MPR121 is a sophisticated device that has 12 independent electrode inputs for capacitive touch sensing. It measures the total capacitance to ground, C, on each of its 12 electrode sensing channels.
On each channel, this capacitance comprises the background capacitance, Cb (usually about 10 pF or so) and the finger touch capacitance, Cx (usually about 1 pF). When the electrode is not touched, Cx is zero; when it is touched, it’s about 1 pF or so.
C = Cb + Cx
The chip measures Cb and establishes the baseline capacitance which corresponds to no touch. This baseline changes, so the chip dynamically recalibrates to compensate for this. When an electrode is touched and Cx is large enough, the chip registers a touch. When the capacitance falls to the baseline again, it registers a release.
It works by sequentially charging each electrode to a peak voltage, V, by applying a constant current, I, for a given time, T. It then measures V using a built-in 10-bit ADC (analog-to-digital converter), then shorts the electrode to ground ready for the next cycle.
Both I and T can be changed by altering the values of internal registers, but for this application, the default values seem to work well. We know that capacitance is defined as:
C = Q/V
where Q = I T is the amount of charge. Therefore:
V = I T / C
So, the peak voltage, V, is inversely proportional to the total capacitance of the electrode. You can see this clearly in the oscilloscope traces in Figure A and Figure B.
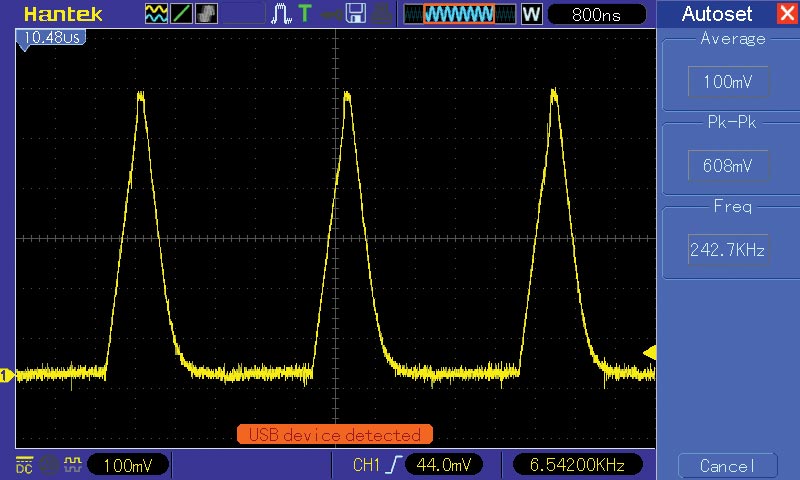
FIGURE A. Output on one of the MPR121 electrodes with no touch.
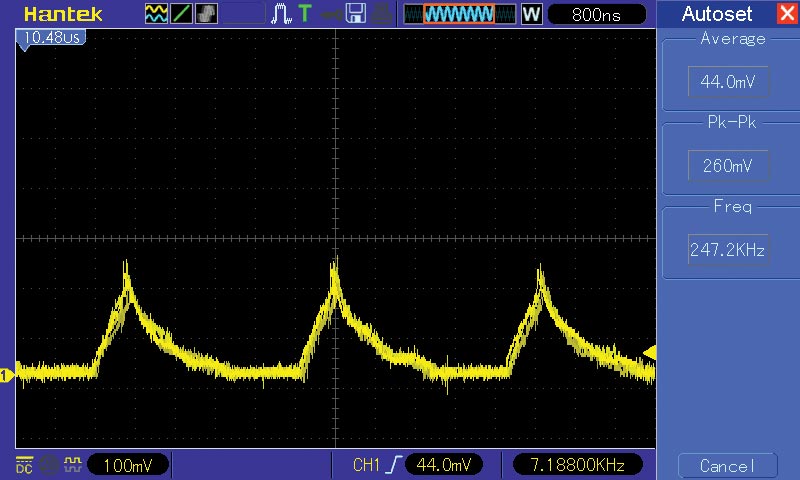
FIGURE B. Output on one of the MPR121 electrodes when touched. Notice the drop in peak voltage compared to Figure 8.
Figure A shows the peak voltage, Vb, on an electrode when C = Cb, and Figure B shows the smaller voltage, Vx, when the electrode is touched and C = Cb + Cx.
The difference between these two voltages, Vx – Vb, determines if a touch (or release) event is generated. Once a touch event is detected, it is published over an I2C serial interface.
Parts List
| DESCRIPTION |
QTY |
| Electronics |
|
| 1/2 size solderless breadboard |
1 |
| Arduino Uno |
1 |
| Perspex carrier plate for Uno and breadboard (optional) |
1 |
| Adafruit 12-key capacitive touch sensor breakout — MPR121 (PRODUCT ID: 1982) |
1 |
Tactile button (E Switch TL1100F160Q or similar) to fit breadboard
(SparkFun tactile button assortment 10302 is perfect) |
2 |
| Tactile button key caps (optional; included in SparkFun tactile button assortment) |
2 |
| 220R resistor |
2 |
DIN 41524, 5/180º mini-DIN connector, right angle, PCB mounting
(e.g,. CUI, Inc.; SDS-50J or SparkFun PRT-09536) |
1 |
| Dupont jumper wire connected 6 inch (approx) male to male (e.g., SparkFun PRT-12795) |
1 |
| Strings |
|
| 2 mm diameter x 1 m length extruded carbon fiber rod |
4 |
| 15A 12-way terminal barrier block (with screw fixings to take carbon fiber rod) 8 mm pitch |
2 |
Resources
The MIDI Association. Everything about MIDI.
www.midi.org
Details on the Adafruit MPR121 breakout board.
https://learn.adafruit.com/adafruit-mpr121-12-key-capacitive-touch-sensor-breakout-tutorial/assembly
Everything about the Arduino.
https://www.arduino.cc
The Arduino Web Editor.
https://create.arduino.cc
Scala software for non-standard temperaments.
www.huygens-fokker.org/scala
Adafruit MPR121 datasheet.
https://learn.adafruit.com/adafruit-mpr121-12-key-capacitive-touch-sensor-breakout-tutorial/downloads
Downloads
What’s in the zip?
Source Code