The Creality Ender 5 Pro is a great 3D printer and one I can highly recommend. This is the second 3D printer I've owned. The first was the Ultimaker 2+. The Ultimaker 2+ gets top reviews and I have found it to be a very fine 3D printer, which makes a good standard for comparison.
Living in Michigan in the summer and Florida in the winter made transporting the 3D printer between the two places inconvenient. With the higher price of the Ultimaker2+, I decided to experiment with a much cheaper 3D printer. After doing some online shopping and lots of comparisons, I settled on the Creality Ender 5 Pro.
I found an updated model with the all-metal feeder and quieter motors and electronics for $399 with a $40 discount available at the time. My choice of this model was largely influenced by its cubic structure, which appeared very solid.
The printer came well packed in soft foam. Assembly is needed, but it's fairly easy because the three main assemblies are simply screwed together with the four upright beams. This takes only a few minutes ,and the picture book instructions were quite adequate.
While installing the Z axis frame, I cranked a little too hard on one of the cap screws and it started to strip the threads in the frame. I noted that these screws didn't go all the way into the threads in the frame, so I purchased a replacement screw 5 mm longer. This took care of the problem. I believe M8x30 screws here would be a better choice.
The all-metal filament feeder is screwed into an upright with a type of T nut. Be sure the T nuts are turned horizontally to lock behind the 2040 extruded aluminum beams.
The Bowden tube and wires to heat the print head rub on the side of the frame just above the extruder. This will lead to problems and I suggest padding of some type. A different placement of the extruder would solve this problem.
The filament is changed manually. While compressing the extruder lever, filament is slid into the Bowden tube until it comes out of the preheated nozzle. The filament is simply pulled out of the Bowden tube after heating the nozzle.
Wire management is non-existent on this model. One tie-wrap was included, but you may want to use more. With some care, the wires can be routed out of the way. You'll notice that the majority of images of this printer you find online don't show any of the wiring.
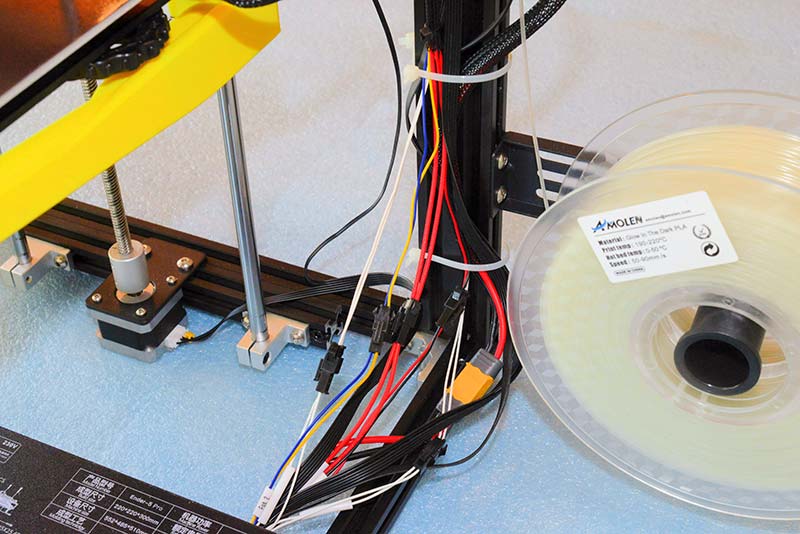
Figure 1. Wire management.
I did struggle for a time with getting the bed levelled, which is the important first step in any print job. The Ender 5 Pro has four bed levelling screws in the corners. I followed the directions and used a piece of ordinary paper from my printer. After many unsuccessful attempts at levelling, discovered the problem. The paper is soft and flexible. Referring to Figure 2, as I slid the paper back and forth, it wrapped around the nozzle. So, the nozzle pressure on the paper felt the same as I continued to turn the adjustment screw.
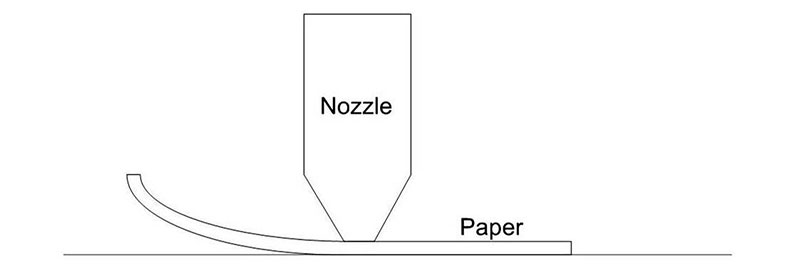
Figure 2. Using soft paper for bed levelling.
The solution was to use a piece of stiff paper with a polished surface that lays flat. Once I used this, I got good results. Moving to all four corners at least twice works well. Three points define a plane in space, and I prefer a three-point bed levelling system. It's easier to get one corner out of plane with four-point bed levelling.
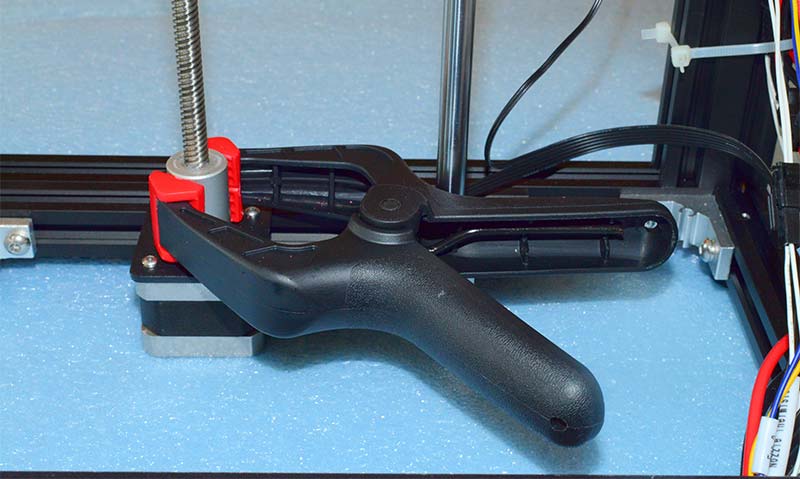
Figure 3. Using a clamp to freeze Z motion while bed levelling.
There are online comments about the bed moving downward during the bed levelling process. I experienced this as well. It's simply solved by attaching a plastic spring clamp to the Z axis motor coupling.
The XY motors are disabled during bed levelling, so the head can be moved to the four corners. The Z motor should lock the bed in place, but evidently this doesn’t happen. While this works well enough for bed levelling, it doesn't solve the problem of bed drop after a power outage.
If the bed stays in place after a power outage, the resume function is supposed to continue with the print where it left off at the power outage. Online comments report the tension on the spring on the Z axis tensioner needs to increase.
This can be done with 3D printed clips you can download at https://www.thingiverse.com/thing:3567212. I didn't test the resume function; instead, I rely on a backup power unit. I have a small relatively inexpensive unit that gives me about two hours of backup power for the Ender 5 Pro. I have saved many a print this way.
Another annoyance is that the home position lines up with the top of the frame of the cubic structure. This makes it difficult to see the end of the nozzle in this position. This probably is a result of maximizing the print build area which is a respectable 220 x 220 x 300 mm (8.66 x 8.66 x 11.8 inches).
My first print was a small box I use for digital clock enclosures. The quality of this first print surprised me. It was very good. The surface and detail were beyond my expectations and certainly on par with what the Ultimaker 2+ can do.
While printing this box, I did notice some vibration of the print bed when the head made sudden moves, as when slewing to another place on the print. A little searching on the Internet led me to find a number of comments on this problem with the Ender 5 series. The search also found a Thingiverse article with a download of braces to print entitled “Ender 5 bed supports (The Original "Super Struts")” at https://www.thingiverse.com/thing:3479330/. These looked like a good plan to me and I downloaded the files and printed them.
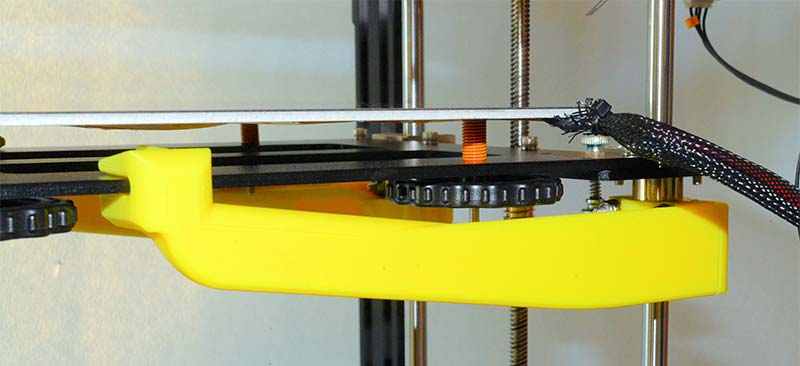
Figure 4. A "Super Strut" in place.
These bed supports are long and had to be oriented diagonally across the print bed. Printing these also caused some considerable vibration in the print bed and it was necessary to slow the print speed down to 50% to stop most of the vibration. Installing these supports with #8 machine screws was simple, although a bit of a tight squeeze. They have greatly reduced the vibration.
The filament reel mount is also attached to one of the uprights. Instead of using this, I like to place my reels at floor level and disconnected from the printer frame to avoid vibration. I created a simple spool holder from PVC pipe and find that the extra distance between the spool and the extruder helps straighten out the filament off the spool before entering the extruder.
I also opted to use a glass print bed, as that had been my previous experience and found it to work quite well. Mine was purchased from Amazon at https://www.amazon.com/gp/product/B07X3YGNFF/ref=ppx_yo_dt_b_asin_title_o03_s00?ie=UTF8&psc=1. A light coat on the glass from a glue stick works well to get the first layer to adhere.
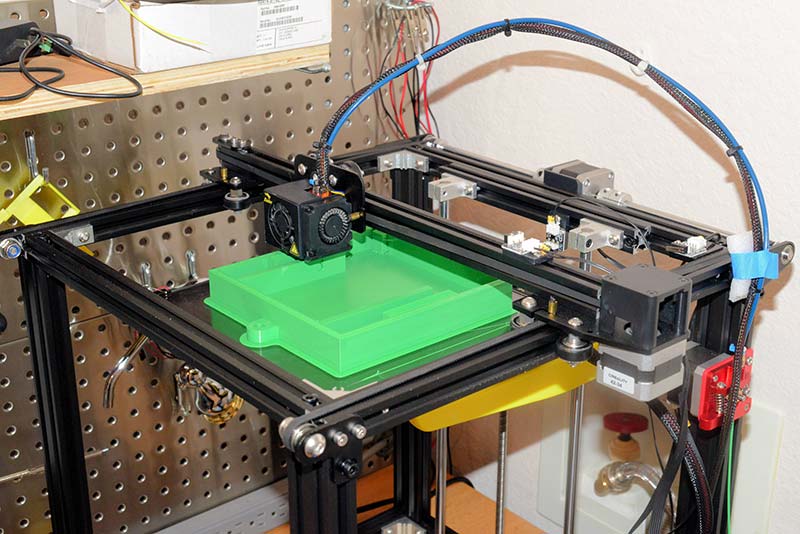
Figure 5. Printing a large enclosure for an underwater ROV.
The display with its single selection knob with a built-in pushbutton switch worked very well. I found the various menus to be intuitive and easy to use. Settings like nozzle temperature, bed temperature, and speed can be manually adjusted while printing.
Spare parts for a 3D printer are always a concern. Eventually, you’ll need to replace something. After doing a Google search for spare parts for the Ender 5 Pro, I was pleased to find multiple hits with a wide variety of parts.
I can highly recommend the Ender 5 Pro. The only major drawback is the bed vibration, which can be solved with the add-on supports. NV