Internet-of-Things (IoT) projects that use sensors, actuators, displays, or controllers can easily communicate through an MQTT (Message Queuing Telemetry Transport) server, or broker. The MQTT standard lets devices publish and subscribe to specific topics. When they use the JavaScript Object Notation (JSON) format to exchange information, software can easily interpret or parse it. The JSON standard defines a payload format that may include strings, values, objects, and Boolean “true” and “false.” (See the sidebar, MQTT Broker Setup and Note 1.)
In this tutorial, I’ll explain how to create and parse JSON messages. My software examples use the Arduino integrated development environment (IDE) along with the Arduino ESP8266WiFi and PubSubClient libraries. Example code is complete and ready to use in ESP8266 Wi-Fi modules. My experiments use an ESP8266 module as a publisher and another as a subscriber.
They communicate with each other via my Wi-Fi access point that connects them to a remote (free!) MQTT broker. No direct link exists between one ESP8266 module and the other.
MQTT Broker Setup
For experiments, I use a free “Cute Cat” MQTT broker account at CloudMQTT (www.cloudmqtt.com). This account allows as many as five users or connections, and it has a maximum data rate of 10 kbits/sec. Those limits will accommodate a small arrangement of IoT devices. Paid accounts start at $5 per month.
When you create an account, you receive a server name, a user name, a password, and a port number. I recommend you take a screen image of the “Instance info” and put it in your lab notebook. You’ll need that information so your IoT devices can connect to the broker, and you might need it for communication tests.
The example code requires them, along with your local Wi-Fi network name and password:
const char *ssid = “yourNetworkName”;
const char *password = “yourNetworkPassword”;
const char *mqttServer = “XXX.cloudmqtt.com”;
const int mqttPort = port number given by cloudMQTT;
const char *mqttUser = “cloudmqtt assigned userName”;
const char *mqttPassword = “assigned by cloudMQTT”;
Note: The port number is a numeric value, not a string.
Troubleshooting
If you need to troubleshoot or test communications to and from an MQTT broker, download and run the MQTTLens application from Google. You can run it within the Chrome browser.
This application requires the CloudMQTT log-in information or equivalent information from whatever broker you use.
- In the Connection name section, enter CloudMQTT.
- In the Hostname section, choose tcp:// and enter your mqttServer URL.
- In the Port section, enter the mqttPort number.
- Click on the Generate a random ID button. You’ll receive a long ClientID. Copy this ID and keep it handy.
- Check both Clean Session and Automatic Connection.
- If not already set, choose a Keep Alive time of 120 seconds
- In the Credentials section, enter your CloudMQTT User Name. Enter your CloudMQTT Password.
When you start MQTTLens the first time, it asks for Connection Details. Now you can monitor your IoT device communications and you also can transmit test messages.
Get the Software
The software that accompanies this article has many comments to help you understand what statements do and their function within each program.
The ZIP folder includes two program folders:
Program 1. sketch_TempHumid_JSON_Rev_2NV
Program 2. sketch_String_Decode_Rev_10NV
Each program requires your Wi-Fi router or hot-spot name and password. It also needs the MQTT broker information described earlier. The section of code for this information shows empty strings in which you insert your information. Do not leave blank space in the strings.
The ESP8266 modules provide an internal microcontroller, so you don’t need an external microcontroller board (Note 2). If you’re not familiar with the ESP8266 modules, you can find many online experiments and tutorials that explain how to use these popular inexpensive devices to connect to a WiFi hot spot. I used “D1 Mini” modules that cost under $5. There are also several articles by Craig Lindley on using the ESP8266 that have been published in Nuts & Volts.
The DHT22 temperature and humidity sensor make a good data source for ESP8266 and Wi-Fi experiments. You’ll need the DHT.h library and the Adafruit Unified Sensor Library.
I connected the DHT22 sensor’s serial output to pin D1 on the ESP8266 D1 Mini module as shown in Figure 1. Of course, you can use other I/O devices.
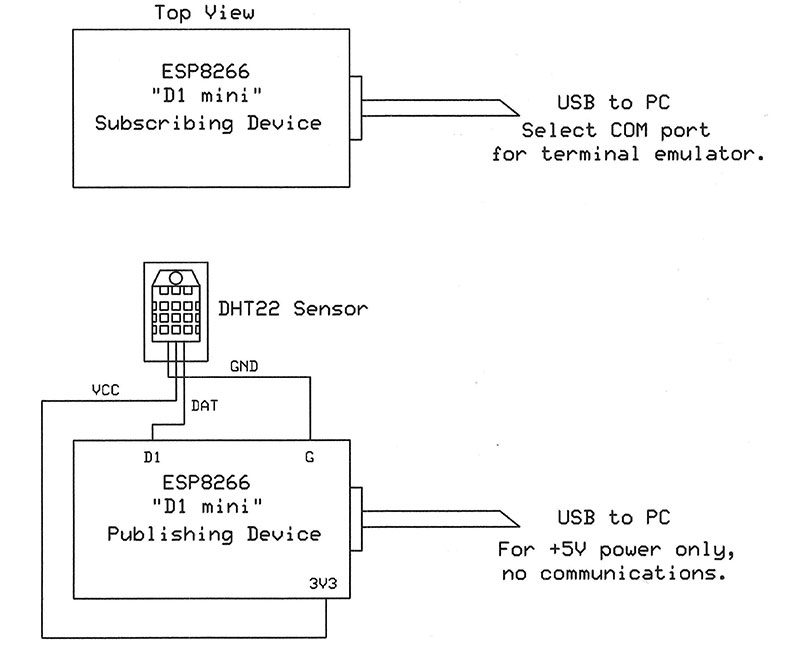
FIGURE 1. Circuit diagram for the publishing ESP8266 that connects to power and a DHT22 sensor module. The subscribing module connects to a PC that supplies power and a terminal-emulator program. The Arduino IDE’s built-in terminal works well.
MQTT: A Short Introduction
To communicate through an MQTT broker, each transmitting IoT device must indicate the topic of the communications it will publish. Likewise, each receiving IoT device must tell the MQTT broker what topics it wants to subscribe to. The Arduino PubSubClient library handles the details for us, so to subscribe to the topic ValveCtrl, for example, our software uses this statement:
client.subscribe(“ValveCtrl”);
An ESP8266 module that ran the statement above will receive all MQTT messages that include the topic ValveCtrl. The topic goes between quotation marks and is case sensitive. Thus, ValveCtrl and VALVECTRL represent different topics.
When an IoT device publishes information through an MQTT broker, it uses the following format which we call an MQTT message:
client.publish(“topic”,”payload”);
For example:
client.publish(“ValveCtrl”,”close”);
The MQTT broker will send the close string to only IoT devices that have subscribed to the ValveCtrl topic. The payload may contain a string or a value. Figure 2 illustrates several communications between IoT devices and an MQTT broker.
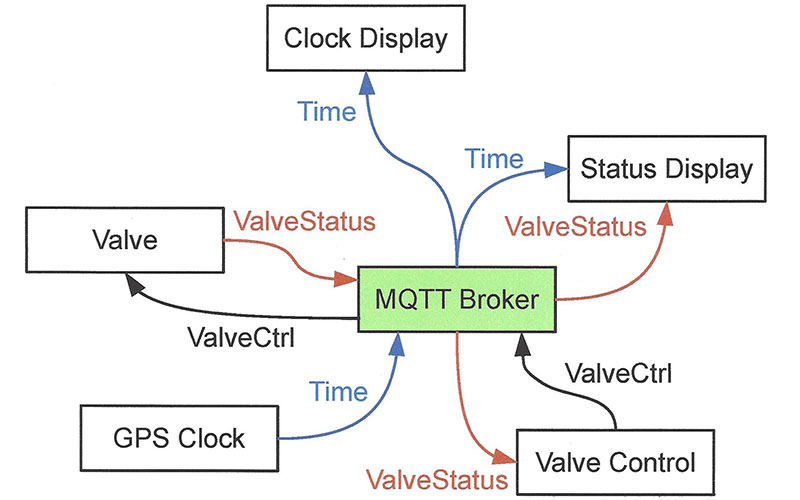
FIGURE 2. Five devices communicate information to each other through an MQTT broker. An MQTT message lets you format information in several ways.
In this example:
- The GPS Clock publishes Time information. It does not subscribe to any topics. Only the Clock Display and the Status Display subscribe to Time, so only they receive Time messages. Neither the Clock Display nor the Status Display publish information.
- The Valve device publishes ValveStatus information that the Status Display and the Valve Control devices subscribe to. Based on the ValveStatus data, the Valve Control module decides how to respond. Only the Valve subscribes to messages with the topic ValveCtrl, so it alone receives messages on this topic.
Set Up Subtopics, Too
The topics in MQTT messages may have subtopics, much as a PC’s hard drive has folders and subfolders. The following subscribe functions provide examples:
client.subscribe(“ValveCtrl/Valve1/On-Off”);
client.subscribe(“ValveCtrl/Valve2/On-Off”);
client.subscribe(“ValveCtrl/LEDS”);
The subscribe text may include the “wildcard” characters number-sign (#) and plus (+). A “#” in the text signifies a subscription request for all topics below a given level. Thus, the statement:
client.subscribe(“ValveCtrl/#”);
indicates this IoT device will receive all messages under the main topic ValveCtrl.
A plus sign (+) provides a wildcard for one subtopic level, so if you want to receive On-Off messages for only Valve1 and Valve2, you could use:
client.subscribe(“ValveCtrl/+/On-Off”);
Use a JSON Payload
Instead of publishing three MQTT messages — one for each of the three topics described earlier — a JSON payload lets you combine many sets of data in a single publish operation. My DHT22 IoT “weather station” measures temperature (degrees Fahrenheit and Celsius) and relative humidity via the Arduino DHT.h library and returns a floating-point value. For example:
float h = dht.readHumidity();
The ESP8266 “weather station” will publish the data that follow. I included the units in parentheses for clarity. They aren’t part of the payload.
h = 43 (relative humidity, percent)
c = 22 (Celsius temperature)
f = 71.6 (Fahrenheit temperature)
The JSON standard lets us send name-value pairs in the format:
“name”:”value”
“name1”:”value1”, “name2”:”value2”, “name3”:”value3”,..
You may use a string, “43”, or the value 43, to represent a numeric quantity:
“Humidity”:”43” or “Humidity”:43
A colon separates each name from its associated value, and a comma separates name-value pairs. A numeric value may use the characters plus or minus, a decimal point, and numerals 0 through 9. A JSON payload always starts with a left brace and ends with a right brace. Do not put spaces between characters!
In this next JSON payload example, I didn’t use the software variables h, c, or f. Instead I used a name:
{“Humidity”:43,”TempC”:”22”,”TempF”:71.6}
Remember, the MQTT message includes a topic and a payload. Only the payload contains information in the JSON format. I have included the topic and the JSON payload (underlined) in the following MQTT message:
client.publish(“Station1”,“{“Humidity”43, “TempC”:”22”,“TempF”:71.6});
If you try to send this MQTT message in a client.publish statement as shown above, you’ll have problems and wonder why. An MQTT message uses quotation marks to enclose the topic and the payload, but the JSON payload also uses quotation marks to identify names and values.
To avoid conflicts about which quotes “belong” to which information, the JSON payload must protect its internal quotation marks by “escaping” them. You have encountered the escaped characters \n and \r used in programs to cause a display to go to a new line or to return the cursor to the left margin.
In the same way, a backslash will escape quotes within the JSON payload. The underlined characters that follow show the properly escaped marks.
Software could publish this message.
client.publish(“Station1”,”{\”Humidity\”: 43,\”TempC\”:\”22\”,\”TempF\”:71.6}”);
A subscribing ESP8266 module receives the original JSON payload with the internal quotes intact; they’re no longer “escaped.” The name-value pairs may include any information you choose, such as: “fuel”:”gasoline” or “speed”:”km/hour,” and so on.
Create a JSON Payload
To create a payload in the JSON format, a program may simply concatenate strings. In Listing 1, the function dataUpdate reads values from the DHT22 sensor, checks to ensure it receives valid floating-point numbers, converts the floating-point numbers to strings, and then assembles a JSON payload. (You can probably think of other ways to create a payload.)
\\ Update the temp (F & C) and humidity readings
void dataUpdate()
{
float h = dht.readHumidity();
float c = dht.readTemperature();
float f = dht.readTemperature(true);
//Check for a data failure
if (isnan(h) || isnan(c) || isnan(f))
{
//Print error message
Serial.println(“Failed to read from DHT sensor!”);
}
String humidValue = String(h); //Convert float data to
String celsiValue = String(c); //strings
String fahreValue = String(f);
//Create JSON payloadout to send to MQTT server
//Refer to: JSON Style Guide
String payloadout = “{“;
payloadout += “\”Humidity\”:”;
payloadout += humidValue;
payloadout += “,”;
payloadout += “\”TempC\”:”;
payloadout += celsiValue;
payloadout += “,”;
payloadout += “\”TempF\”:”;
payloadout += fahreValue;
payloadout += “}”;
Serial.println(payloadout); //Optional print
char attributes[200];
//Create character array
//Publish the name and value pairs to server
payloadout.toCharArray(attributes, 200);
client.publish(“esp/test”, attributes);
}
//---- END of dataUpdate() function -----
LISTING 1.
Receive a JSON Payload
After an MQTT broker receives a message with the topic Station1, it will publish that message to all devices that earlier subscribed to the Station1 topic. The broker does not broadcast messages to all connected devices. Let’s assume an IoT weather station display called WX-Display subscribed to the Station1 topic, so it will receive Station1 messages. How does the WX-Display software handle the messages?
The PubSubClient library includes an object named loop and uses it this way:
void loophere()
{
client.loop();
}
This loop object executes during each run through the loophere loop. According to the library’s API documentation, the software in the WX-Display should regularly call this function to let the client “process incoming messages and maintain its connection to the server.” The loop does just that (Note 3). This loop object requires a callback function. For simplicity, think of this as an interrupt service routine that goes into effect whenever the WX-Display receives a new Station1 message. The callback function for an ESP8266 module looks like this:
void callback(char *topic, unsigned char *payload, unsigned int length)
{
put your message-parsing code here...
}
The callback function provides:
- char *topic: A pointer to the first character in the topic string.
- unsigned char *payload: A pointer to the first character in the payload.
- unsigned int length: The length of the payload.
With this information, software in the display can parse the received JSON payload and display the temperatures and humidity. You will see pointers as char* xyz, and as char *xyz. They mean the same thing: xyz is a pointer to character-type information. (For more information about callback functions, see Note 4.)
Parse Your JSON Payload
Programmers use JSON objects, or payloads, in many applications, so you can find a library of JSON parsing or decoding software for almost any language, including C++ for the ESP8266 modules. Although programmers have used the ArduinoJson library, I found it overly complicated for simple JSON Payloads that comprise name-value pairs.
That format will suffice for all but the most demanding IoT projects, so I created a function that parses name-value payloads. I called it JSON_Parse and here’s how it works.
The payload comes through to the WX-Display device with quotation marks intact:
String testString = {“Humidity”:43,”TempC”:”22”,”TempF”:71.6}
You cannot pass a string of characters to a C or C++ function, so the JSON_Parser function requires a pointer to the first character in the payload (Note 6). In the statement above, testString points to the left-hand brace ({). Now, the function call to JSON_Parse looks like this:
int returnCode = JSON_Parse(testString);
In effect, the variable testString equals the memory address for the first unsigned char ({) in the JSON string. The pointer testString + 1 gives us the address for the second character (“), and so on, one character at a time.
Unsigned characters have values between 0 and 255, which encompass all ASCII characters and codes such as linefeed (LF), carriage-return (CR), and bell (BEL). The function returns a returnCode value that indicates an error, if any.
The example code you can get in the article downloads produces information a terminal emulator will display as shown in Figure 3. In my experiments, I used the topic “esp/test,” and you’ll find it in the two example programs.
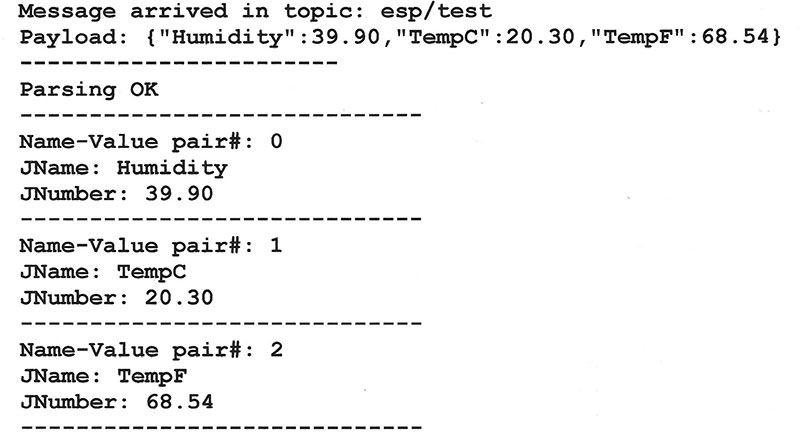
FIGURE 3. Output from the ESP8266 module that subscribes to the esp/test topic that provides the humidity and temperature data.
One program runs on an ESP8266 that published the DHT22 information. The second program receives messages with the esp/test topic, tests and parses them, and displays information on a terminal emulator.
Feel free to use the open source code in any way you choose.
How the Parser Code Works
My parser code requires three arrays to save name-value pairs and it needs a “big number” I’ll explain later. My example code set an upper limit of five name-value pairs, but you may change this as you wish:
#define arraySize 5
String JName[arraySize];
String JValue[arraySize];
float JNumber[arraySize];
const float bigNumber = 0xFFFFFFFFFF; //trillions!
At its start, JSON_Parser (the function) prints the MQTT message topic and JSON payload. You may remove or comment-out these lines.
Figure 4 illustrates the function’s operations in flowchart form. In this example and in the accompanying code, I use a payload from the DHT22 sensor. The SP8266 attached to the sensor produces a JSON payload that includes the current temperatures (°C and °F) and the relative humidity (%).
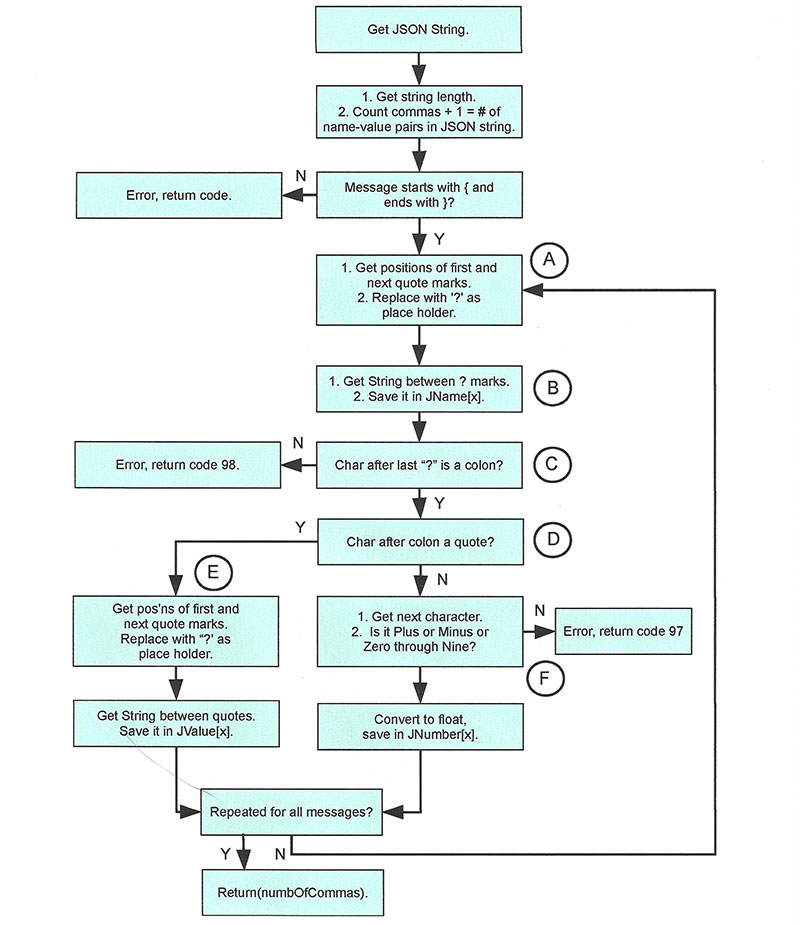
FIGURE 4. The JSON_Parse flowchart shows how a JSON payload gets split into name-value pairs and how it interprets numeric values and string values.
The JSON_Parse function first counts the commas in the payload and adds 1 to give us the proper number of name-value pairs. Commas separate name-value pairs and the DHT22 payload includes two commas for three name-value pairs.
The function also checks the payload for a left brace at the left and a right brace at the right. If the JSON payload doesn’t meet that requirement, the function returns error code 99.
In sections A and B in Figure 4, the function finds the first two quotes, replaces them with question marks (?), and extracts the string between them. This string gives us the first name, Humidity.
The question marks act as “fillers” that keep the original JSON payload string a constant length. The software will ignore them when it next looks through the payload for quote marks.
The name Humidity goes into array element JName(1). The payload now looks like this:
{?Humidity?:43,”TempC”:”22”, ”TempF”:71.6}
At point C, the function tests for a colon (:) after the last question mark. If the function doesn’t find a colon separator, it returns with error code 98. If it detects a colon, it next tests the following character.
If it finds a quotation mark (D), it performs the same operation used for the name (E): The two quotation marks get replaced with question marks and the value portion of the name-value pair gets placed in JValue[1].
The ESP8266-DHT22 JSON-payload shown just above, however, includes an “unquoted” numeric value, 43. Thus, the character after the first colon is not a quotation mark, so the function then tests the character at that location for a plus (+) or minus (-), or a digit between 0 and 9 (F). Detection of one of these characters indicates a numeric value. The 43 gets converted to a floating number and saved in JNumber(1).
The JSON_Parse function uses elements in three global arrays — JName[], JValue[], and JNumber[] — for each name-value pair in a payload. If the value arrives as a text string, the JSON_Parse function saves it in the JValue array.
If the value arrives as a numeric value, it goes into the JNumber array. The array used depends on whether you send a value within quotes or a numeric quantity without quotes.
When a numeric value goes into the JNumber[x] element, the JValue[x] element holds an empty string. Likewise, when a text value goes into the JValue[x] element, bigNumber (0xFFFFFFFFFF, or about 1.1 trillion) goes into JNumber[x].
In some cases, you might test the contents of JNumber[x] for a very large number and if so, assume the value went into JValue[x]. Or, it could test JValue[x] for an empty string and assume a numeric value went into the JNumber[x] array element.
In all cases, your application software should test the value returned from the JSON_Parse function and act upon any error code it finds. The example software tests the arrays and also tests for a returned error code. NV
Notes
- Download the MQTT v3.1.1 specification at http://mqtt.org/documentation. Many websites provide explanations and tutorials that discuss and demonstrate how to set up a free MQTT account as several companies. For the JSON standard, please visit www.ecma-international.org/publications/files/ECMA-ST/ECMA-404.pdf.
- Although you use the Arduino IDE to create programs that run in ESP8266 modules, the module does not include an Arduino-type microcontroller. It uses a custom MCU based on the Tensilica Xtensa instruction set architecture (ISA). For information, visit https://0x04.net/~mwk/doc/xtensa.pdf.
- For the PubSubClient library descriptions, visit https://pubsubclient.knolleary.net/api.html.
- https://www.geeksforgeeks.org/callbacks-in-c.
- “How are backslash escape sequences implemented in compilers?” at https://stackoverflow.com/questions/8633769/how-are-backslash-escape-sequences-implemented-in-compilers.
- Jensen, Ted, “A Tutorial on Pointers and Arrays in C.” Available as a free download from https://pdos.csail.mit.edu/6.828/2009/readings/pointers.pdf.
Resources
Santos, Rui, “ESP32 with DHT11/DHT22 Temperature and Humidity Sensor using Arduino IDE,” https://randomnerdtutorials.com/esp32-with-dht11-dht22-temperature-and-humidity-sensor-using-arduino-ide. Many thanks to Rui for his helpful online tutorials that started me on my ESP8266 projects.
“Overview of MQTT Protocol,” Kii Corp., https://docs.kii.com/en/guides/thingifsdk/non_trait/mqtt/protocol_overview.
For topic-name rules, see: “MQTT Essentials Part 5: MQTT Topics & Best Practices,” https://www.hivemq.com/blog/mqtt-essentials-part-5-mqtt-topics-best-practices.
Downloads
What’s in the zip?
Example Code