As described in the December 2015 issue of Nuts & Volts, the Mentor’s Friend is a retro computer that you build yourself and program in BASIC. It is easy to build and fun to play with, and it offers a superb technology mentoring platform you and your child (or grandchild) can build and use together to explore computers and programming.
Once you’ve built yours, here are five easy projects to get you and a young one started on a technology adventure. These have been selected to be engaging, and to give you and your student a hands-on introduction to different components of Color BASIC. For reference, you may find it helpful to read the “Intro to Color BASIC Commands” from the downloads at the end of this article. Have fun!
1. KEYNUM.BAS.
Color BASIC often takes user input from the keyboard as individual keystrokes, with each key represented by an assigned integer number. So it’s important to know what number represents each key. This first program does that translation for you, and as a bonus shows you the character glyph for any key press.
To input the program, type NEW <Enter> at the flashing rectangle cursor on your Amigo, then press <F1> on your keyboard to enter the Color BASIC editor. Next, type in the code that follows; press <Enter> at the end of each line. In the editor, you can use the arrow, <Home>, and <End> keys to navigate, and the <Backspace> and <Delete> keys to erase text.
When you’ve finished typing in the code, press <F1> again to return to Color BASIC and run the program. Don’t worry if you see a syntax error — just use the editor again to find and correct the offending line.
10 REM *** KEYNUM.BAS ***<br />
20 COLOR 63,22<br />
30 CLS<br />
40 LOCATE 10,0: PRINT “>>> Keycode Values <<<”<br />
50 LOCATE 1,2: PRINT “Press Any Key, or <CTRL> Q<br />
   to Return…”<br />
60 REM —- Get Keystroke —-<br />
70 A=INKEY<br />
80 IF A=0 THEN GOTO 70 REM <- No Key Pressed<br />
90 REM —- Show Value and Glyph —-<br />
100 LOCATE 18,18: PRINT “INKEY = “;<br />
110 PRINT A,<br />
120 LOCATE 16,20: PRINT “DISPLAY = “;<br />
130 DISPLAY A<br />
140 REM —- Again? —-<br />
150 IF A<>593 AND A<>625 THEN GOTO 70 REM <-<br />
    CTRL Q?<br />
160 CLS: END
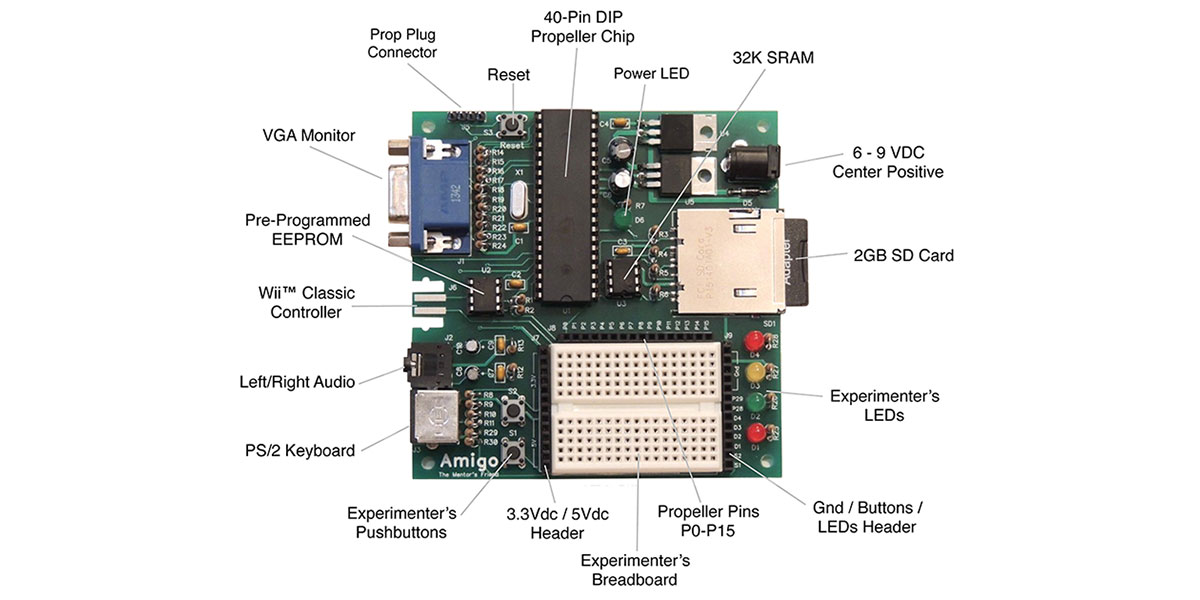
After you’ve explored the keyboard for a bit, press <CTRL-Q> to end the program. (In Color BASIC, you can also press <Esc> at any time to interrupt program flow.) Then, enter SAVE “KEYNUM.BAS” at the prompt. That will save your program to the SD card, so you can LOAD “KEYNUM.BAS” and RUN it when you wish. Remember that you can type DIR at the prompt to see a directory of the files on the SD card, now including KEYNUM.BAS (Figure 1).
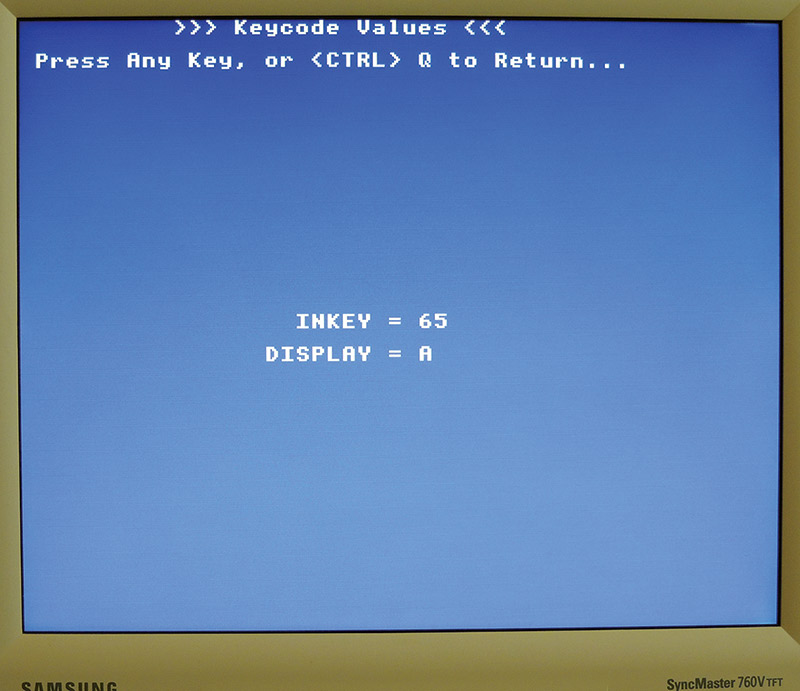
FIGURE 1. Knowing keycode values is helpful in Color BASIC.
Here’s what’s going on in this program:
- Lines 10, 60, 90, and 140 use the REM command (for Remark) to provide some internal documentation to explain what’s going on. It is good programming practice to provide “enough” documentation in your code. Also note the REM at the end of Line 150 — some (but not all!) Color BASIC commands allow a following REM on the same program line. Color BASIC ignores everything on a program line after the REM.
- Lines 20-50 set the screen color to white text on a blue background, clear the screen, and print the app title and user instructions. The LOCATE command positions the cursor at a specified column and row, where column is between 0 and 49 and row is between 0 and 36, inclusive. Note the use of the colon in lines 40 and 50 to place more than one Color BASIC command on the same program line.
- Line 70 uses the INKEY command to get an integer value from the keyboard buffer and store it in variable A.
- Line 80 checks the value in A. If it is 0, no key has been pressed, and program flow jumps back to line 70 to check again. If it is not 0, program flow continues at line 90.
- Lines 100-130 print the assigned integer and character glyph of the keystroke value in variable A. The semicolon at the end of lines 100 and 120 keeps the cursor positioned immediately after the printed text (no line feed/carriage return). The comma at the end of line 110 appends a tab character to ensure previous entries are completely erased. Note that PRINT A shows the integer in variable A, while DISPLAY A shows the assigned character glyph.
- Line 150 checks to see whether the keystroke was a CTRL Q or CTRL q. If it wasn’t, program flow jumps back to line 70 to wait for another key press. If it was, program flow continues at the next line.
- Line 160 clears the screen to indicate the program end to the user, then ends the program. The END command stops program execution and returns the Amigo to the “immediate mode” flashing rectangle prompt. Since Color BASIC stops program execution automatically when it runs out of program lines, END is not required but is considered good programming practice.
2. COLORS.BAS.
Sometimes you need to find just the right foreground and background colors for the screen text in your programs. This next program makes that process easy. Fire up the editor (press <F1>) to enter and run (<F1> again) this code:
10 REM *** COLORS.BAS ***<br />
15 COLOR 63,0<br />
20 CLS<br />
25 LOCATE 15,0: PRINT “>>> Color Values<br />
   <<<”<br />
30 PRINT “ “<br />
35 REM —- FOR/NEXT Loop Shows Colors —-<br />
40 FOR C=0 TO 63<br />
45 COLOR C,0<br />
50 PRINT C,<br />
55 NEXT C<br />
60 REM —- Get Colors; Print Sample —-<br />
65 COLOR 63,0<br />
70 PRINT “ “<br />
75 INPUT “Input Foreground, Background Numbers:<br />
   “;F,B<br />
80 COLOR F,B<br />
85 PRINT “ Sample Text “<br />
90 REM —- Another Sample? —-<br />
95 COLOR 63,0<br />
100 PRINT “ “<br />
105 PRINT “More (Y/N)?”<br />
110 A=INKEY<br />
115 IF A=”Y” OR A=”y” THEN GOTO 65<br />
120 IF A<>”N” AND A<>”n” THEN GOTO 110<br />
125 END
When you quit this program, don’t forget to copy it to the SD card with SAVE “COLORS.BAS.” Here’s what’s going on in this program:
- Lines 10-30 clear the screen and print the title in white on black.
- Lines 35-55 print each number from 0 to 63 in its assigned Color BASIC color. The FOR...NEXT loop starts variable C at a value of 0 on the first loop, then increments C by 1 on subsequent loops until C equals 63.
- On each iteration of the loop, line 45 changes the foreground color to the current value of C, while keeping the background 0 (black).
- Line 50 prints the current value of C in that current color combination, followed by a Tab character. (The comma after a PRINT statement tells Color BASIC to append a horizontal tab instead of a new line to whatever was just printed.)
- Lines 60-85 prompt the user to input values for foreground and background colors to sample, and stores those values in variables F and B.
- Line 75 is the INPUT statement which has the syntax INPUT “<text prompt>”; <variable1>, <variable2>,... INPUT is the command to use in your programs when you need to get an integer value from the user. The text prompt (if used) is enclosed in quotes, and a semicolon must separate the prompt from the variables. Multiple variables can be input if separated by commas. If the number of variables input by the user differs from the number expected in the statement, Color BASIC returns a syntax error.
- Line 80 sets the user-selected foreground and background colors.
- Line 85 prints a text sample in this color set.
- Lines 90-125 do a yes-no check on whether the user wants to try another sample, then direct program flow accordingly.
- Lines 95-105 print the user prompt in white on black.
- Line 110 gets a keystroke value from the keyboard and stores it in variable A. Each key is assigned a unique number value, which can be retrieved by the INKEY command after that key is pressed. If no key has been pressed, INKEY returns a value of zero.
- Line 115 checks to see whether the value in variable A is “Y” or “y.” If it is, program flow jumps to line 65 to get another user input.
- Line 120 checks to see whether A is “N” or “n.” If it is, program flow continues at line 125. If it is not, program flow jumps back to line 110 to get another keypress. Note that this latter branch includes the case where no key has been pressed (A=0).
- Line 125 marks the formal end of the program (Figure 2).
 .
.
FIGURE 2. The right color combinations can dress up your screens.
3. MENU.BAS.
As you learn Color BASIC, you’ll probably collect several programs that you run frequently. This program gives you a “Launchpad” for convenient access to those. Use the editor to enter and run this code:
10 REM *** MENU.BAS ***<br />
20 REM —- Print Menu Screen —-<br />
30 COLOR 63,19<br />
40 CLS<br />
50 PRINT “ “: PRINT “ >>> My Amigo Launchpad<br />
   <<<“: PRINT “ “<br />
60 PRINT “ F1 - Quit Launchpad”<br />
70 PRINT “ F2 - Screen Colors”<br />
80 PRINT “ F3 - Keyboard Numbers”<br />
180 REM - Add F4 - F12 Menu Item Print<br />
    Statements Above<br />
190 PRINT “ “: PRINT “ >>> Press Function Key to<br />
    Launch App”<br />
200 REM —- Get Keyboard Input —-<br />
210 k=INKEY<br />
220 IF k<208 OR k>219 THEN GOTO 210<br />
230 REM —- RUN Selected App —-<br />
240 GOTO 250 + (k-208)<br />
250 CLS: END             REM - F1<br />
251 RUN “COLORS.BAS”     REM - F2<br />
252 RUN “KEYNUM.BAS”     REM - F3<br />
253 REM - F4<br />
254 REM - F5<br />
255 REM - F6<br />
256 REM - F7<br />
257 REM - F8<br />
258 REM - F9<br />
259 REM - F10<br />
260 REM - F11<br />
261 REM - F12<br />
270 GOTO 210
When you quit the program, don’t forget to copy it to the SD card with SAVE “MENU.BAS.” Here’s what’s going on in the program:
- Lines 10-190 print the menu screen in white on a blue background. Line numbers 80-160 are not used in order to make room for future menu expansion for keys F3-F11.
- Lines 210-220 check for keystrokes until they find one between 208 and 219 (F1 to F12), then continue the program at line 230.
- Line 240 directs program flow to a specific line number, based on which function key was pressed. The GOTO command in Color BASIC can direct program flow to the result of an expression, as well as an explicit line number. Since the keystroke value in variable k is between 208 and 219 (inclusive), the expression 250 + (k-208) in line 240 evaluates to 250 to 261, and the GOTO directs program flow to the line number assigned to the selected function key.
- Line 250 is the option to exit the program. It clears the screen and ends the program.
- Line 251 instructs Color BASIC to load and run the COLORS.BAS program. Doing this removes MENU.BAS from program memory; we’ll need to make a minor change to COLORS.BAS (discussed later) to automatically return to the Launchpad program.
- Line 252 loads and runs KEYNUM.BAS. Again, we’ll need to make a minor change to KEYNUM.BAS to get it to restart the Launchpad.
- Lines 253-261 are stubs where you can insert additional RUN commands for keys F4-F12 to launch other programs. Add them in order, starting with F4.
- Line 270 sends program flow back to get another keystroke in case an undefined function key is pressed (Figure 3).
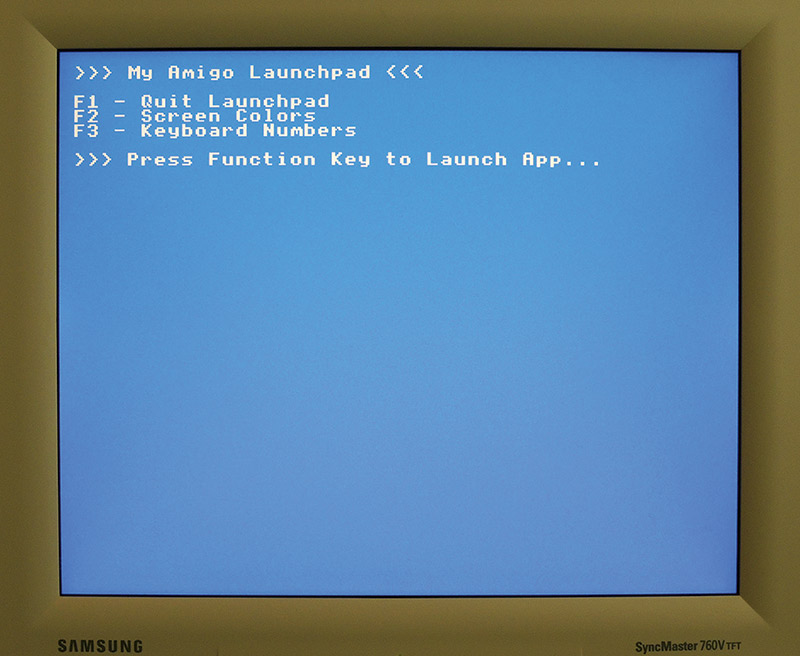
FIGURE 3. Add your own programs to MENU.BAS to customize your Launchpad.
As mentioned earlier, getting the target programs to restart the Launchpad app requires a slight change to each target program. For COLORS.BAS, replace the END in line 125 with RUN “MENU.BAS.” For KEYNUM.BAS, replace the CLS: END in Line 160 with RUN “MENU.BAS.” Do this for any additional programs you create and add to your Launchpad app.
I hope your Amigo Launchpad will help showcase your programming projects to family and friends!
4. FACES.BAS.
This little program exercises a couple of graphics commands and the random number generator to produce some artwork on the monitor. Use the editor to enter and run the code below.
You should see a piece titled “Faces in the Crowd,” and it won’t take you long to understand the name. Don’t forget to SAVE “FACES.BAS” after you’ve enjoyed the Amigo art for a bit.
5 REM *** Faces in the Crowd ***<br />
10 REM ... Your Amigo Does Art...<br />
15 REDEFINE 33,60,66,165,129,165,153,66,60<br />
20 COLOR 63,0<br />
25 CLS<br />
30 X=RND (100)<br />
35 Y=RND (75)<br />
40 C=RND (64)<br />
45 PLOT X,Y,C<br />
50 COLOR 63,0<br />
55 LOCATE 15,1: PRINT “ Faces in the Crowd “;<br />
60 PAUSE 100<br />
65 IF X<>50 THEN GOTO 30<br />
70 COLOR C,0<br />
75 LOCATE RND (50),RND (37)<br />
80 DISPLAY 33<br />
85 GOTO 30
Here’s what’s going on in this little program:
- Lines 5 and 10 provide a tiny bit of internal documentation.
- Line 15 redefines the exclamation point character (ASCII 33) for artistic use in our program. Each of the eight numbers following the 33 (and separated by commas) is the decimal value of one binary row of on-or-off pixels in the 8x8 pixel map for that character. These values (double-check when you enter them) will change the exclamation point character to a smiley face to give our artwork some punch. (A little REDEFINE.BAS program is included on the SD card in the Amigo kit from the Nuts & Volts webstore — check it out!)
- Lines 20 and 25 set a black background and clear the screen.
- The Color BASIC screen has 100 graphics columns numbered 0 to 99, and 75 graphics rows numbered 0 to 74. The PLOT command has the syntax PLOT <column>, <row>, <color>. Lines 30, 35, and 40 pick random integers for column, row, and color, and assign those values to variables X, Y, and Z.
- Line 45 plots a small square (one quarter of a text cell) at the randomly chosen graphics column and row, in the randomly chosen color.
- Lines 50 and 55 set the color to white on black, and prints the title of our artwork. We reprint the title every cycle of the program, just in case one of the random squares lands on our title.
- Line 60 pauses the program for 100 milliseconds to slow things down a bit for a good visual effect. You can adjust this value to your preference.
- Line 65 directs program flow back to line 30 to plot another random square, unless the value for X on that cycle is 50. In that case, program execution continues at line 70. (The value of 50 here is arbitrary, and could have been any permissible value for X.) You can set a different condition after the IF to plot more (or fewer) smiley faces.
- Line 70 sets the foreground color to the random value previously chosen for C, keeping the background color black.
- Line 75 moves the cursor to a random text column and row. We could have assigned the random column/row values to variables first (A=RND (50): B=RND (37): LOCATE A,B), but we’re not reusing the values. So, this way works just fine, and doesn’t tie up any of our Color BASIC variables.
- Line 80 displays the character whose assigned ASCII value is the number that follows. Since we redefined ASCII character 33 from the exclamation point to a smiley in line 15, DISPLAY 33 prints a smiley in the current foreground color at the cursor location (we could also achieve the same thing here with PRINT “!”). Multiple characters can be included in the same DISPLAY command, like DISPLAY 65,66,67.
- Line 85 directs program flow back to line 30 to plot another random square (and perhaps a smiley). Since the program has no end, it will remain in this endless loop until interrupted with the <Esc> key. Enjoy your Amigo artwork (Figure 4)!
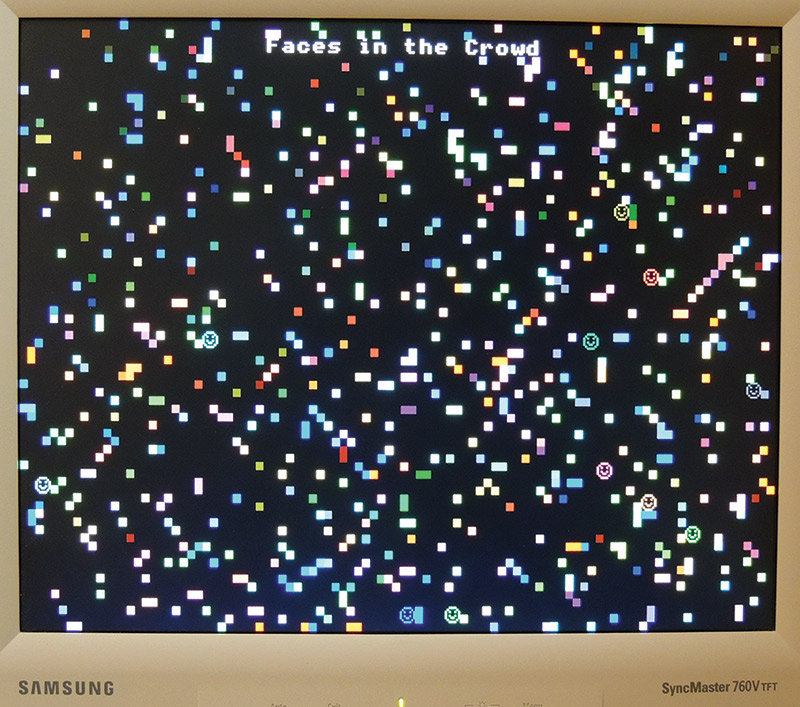
FIGURE 4. Your Amigo does art?
5. SOUNDFX.BAS.
This program takes keystrokes from the keyboard and uses them to drive the audio channel. You’ll need to connect a small powered speaker to your Amigo audio jack to hear the results. (Earbuds will do in a pinch.) Use the editor (<F1>) to enter and run (<F1> again) this code:
10 REM *** SOUNDFX.BAS ***<br />
15 REM ... Your Amigo Makes Music? ...<br />
20 COLOR 63,22<br />
30 CLS<br />
40 PRINT “               SOUND FX”: PRINT “ “<br />
50 PRINT “ Connect earbuds to your Amigo audio<br />
   jack.”<br />
60 PRINT “ Press most any key to generate a<br />
   sound.”<br />
70 PRINT “ Press <Space> to stop the sound.”<br />
80 PRINT “ Press CTRL Q to quit.<br />
90 PRINT “ Give it a try!”<br />
100 a=INKEY<br />
110 IF a=0 THEN GOTO 100<br />
120 LET b=a<br />
130 IF b>90 THEN b=b/2<br />
140 NOTEON b<br />
150 IF a=” “ THEN NOTEOFF<br />
160 IF a=593 OR a=625 THEN NOTEOFF : END<br />
170 GOTO 100
Again, when you quit this program, don’t forget to copy it to the SD card with SAVE “SOUNDFX.BAS.” Here’s what’s going on in this program:
- Line 20 sets the foreground color to white and the background to blue.
- Line 30 clears the screen to the current background color (now blue).
- Lines 40-90 print the program name and instructions.
- Line 100 gets a single character from the keyboard and places its integer keycode in the variable “a.” Color BASIC has 26 variables — A through Z — and each is case insensitive. So, variable “A” is the same as “a.” Some Color BASIC programmers use lowercase variables to make them easier to see in the uppercase commands.
- Line 110 checks the keycode in variable a. If it is zero, no key has been pressed, and program flow jumps back to line 100 to check again for a keystroke.
- Line 120 copies the value in variable a to variable “b,” so we can change the copy while preserving the original value. The use of LET is optional in Color BASIC value assignment, so we could have just said b=a without the LET.
- Line 130 checks the integer value in b and — if it is greater than 90 — divides it by 2 to produce a more mid-range sound. (Higher numbers with the NOTEON command in line 140 produce hard-to-hear high pitched sounds.) Note that when playing your Amigo synthesizer, you can use the Caps Lock key to change the tone reference for the letter keys.
- Line 140 uses the processed keycode to turn on a corresponding continuous tone. The note will continue until another NOTEON or a NOTEOFF command is received. Color BASIC will only play one note at a time.
- Line 150 checks the original keycode to see whether the CTRL Q key combination (in either upper or lower case) has been pressed. If so, it turns off any current tone and ends the program. (A tone will continue after the program ends unless it is turned off with NOTEOFF.)
- Line 160 checks the original keypress for a <Space>. If one is detected, it turns off any current tone.
- Line 170 directs program flow back to get another keystroke, and does it all again.
Enjoy your sci-fi synthesizer (Figure 5)!
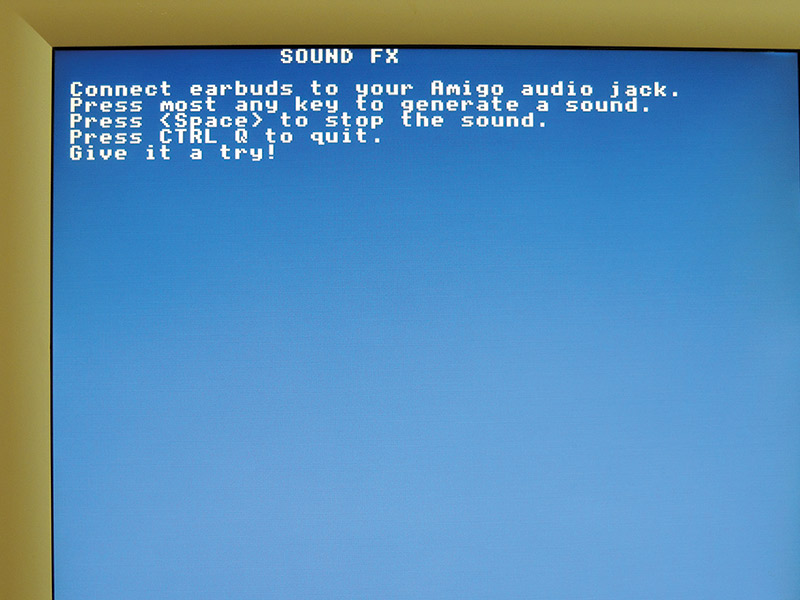
FIGURE 5. Just add earbuds for a simple sci-fi synthesizer!
That’s a Wrap
This completes the five easy projects for the Mentor’s Friend. I hope you and any young helpers have fun, and that these projects get you off to a good start with the Amigo and Color BASIC.
We’ll do some future articles that will cover more about Color BASIC, as well as some fun hardware projects to control with the Amigo. Until then, be well, my friends! NV
Building the Mentor’s Friend
As discussed in the December 2015 issue of Nuts & Volts, the Mentor’s Friend (nicknamed the Amigo) is a direct descendant of the Pocket Mini Computer (PMC) — a project by Jeff Ledger that combined the work of several Propeller gurus to offer a series of retro computers running a version of BASIC. When the PMC was no longer commercially available, Dane Weston developed a simplified replacement in mid-2015 to provide a homebuilt, BASIC-driven mentoring platform for Nuts & Volts readers.
Perhaps the easiest way to build your own Amigo is from the kit available from the Nuts & Volts webstore which provides everything you need, including the circuit board, all components (including an EEPROM pre-loaded with Color BASIC), and a 2 GB SD card with sample programs. However, if you already have a Propeller board with connectors for a PS/2 keyboard, VGA monitor, and 2 GB SD card, you can “roll your own” Amigo by downloading the Color BASIC source below, updating the I/O pin assignments to match your hardware, and then loading the compiled Color BASIC binary to the EEPROM on your board. Or, if you are truly ambitious, download the Amigo schematic (also in the dowloads), build out the circuits using your favorite construction techniques, then download the Color BASIC source or binary and Flash it to your EEPROM.
Regardless of the method you choose, please share your challenges and triumphs, or to ask for advice if needed. Good luck!
Dane Weston’s book on Color BASIC for the Pocket Mini Computer is available at www.lulu.com/shop/display-product.ep?pID=4536358.
Downloads
What’s in the zip?
Color BASIC Source Code
Amigo Schematic
Assembly Instructions
Intro to Color BASIC