Whether you’re a PICAXE aficionado who longs to progress to faster programs or are already a PIC devotee who wants something easier than assembler language to work with, here’s just the ticket. In this article, I’ll show you how to set up a complete integrated development environment (IDE) for writing, compiling, and burning Basic programs into just about any PIC microcontroller. This is a very slick affair, and the price is sure to please everyone!
If you’re new to the world of microcontrollers, then here’s the deal. With a system like this, you’ll be able to write a program in a language closer to what humans use (that’s Basic here), but be able to convert it to something the microcontroller likes (that’s machine code). Burning simply means storing the machine language equivalent you’ve just created inside the microcontroller; this puts the chip through its paces.
At the heart of it all is the Great Cow Basic compiler — perhaps one of the world’s best kept secrets. I learned of this fantastic program after Russell Kincaid casually mentioned it in one of his monthly Q & A columns.
As it turns out, the compiler is extensible and extremely versatile, yet absolutely free of charge. It represents the work of Hugh Considine with contributions by others, as well.
Great Cow Basic is essentially a command line compiler; in this form, it’s a bit clunky to use, but that’s good! Since Great Cow Basic (GC Basic from now on) has such a simple interface, it’s a snap to connect it to other programs.
I decided to hook it up to the inexpensive TextPad — a well respected programming editor. While many other text editors could be used, I really think this is the one with the greatest versatility and speed. As you’ll see, we’ll wind up with a slick IDE which looks and acts just like a system costing hundreds of dollars. You can actually download a free evaluation copy which is completely unfettered, but if you decide to keep using it then you really should pay the paltry $27 asked like I did years ago. I continue to employ TextPad for all manner of programming purposes (C++, C, Basic, assembler, Pascal, HTML, Javascript, Java, batch files), as well as the usual text sort of things like notes, letters, and recipes.
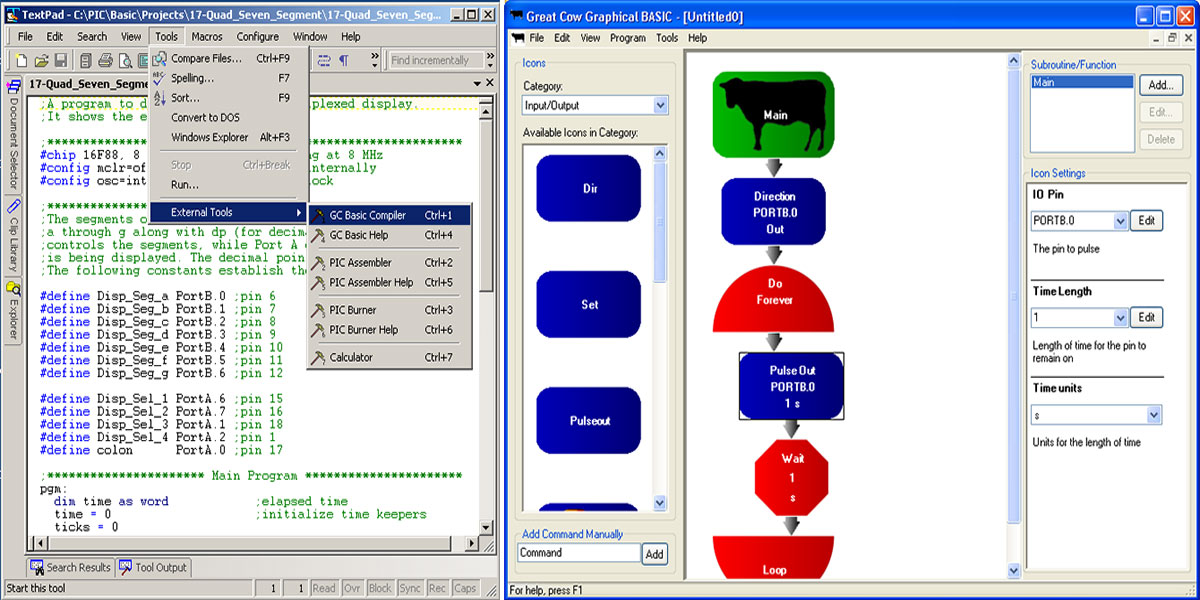
To whet your appetite, Figure 1 shows a screenshot of what my IDE looks like now.
FIGURE 1. This inexpensive system looks and acts like a commercial IDE.
You’ll notice that the pulldown menu has options for compiling, assembling, and burning — all from within TextPad. You might also observe that I’ve even worked in the Help files for all of these, along with the Windows calculator (handy for changing number bases). But there’s more!
If you inspect the source code in the background carefully, you’ll see that color syntax highlighting is also present; I’ll show you where this comes from, too. Naturally, everything is customizable.
What You’ll Need and Where It Goes
To turn this into a full-fledged PIC programming environment, you’ll require the following pieces of software:
- TextPad
- Great Cow Basic compiler
- MPASM PIC assembler
- Burning software for your PIC programmer
The first three items can be downloaded from the Web, while the fourth will no doubt come with whatever burner you buy. See the sidebar for the appropriate URLs.
You can find the various packages required to set up your custom IDE on the Web. Since software is often updated, I'll mention the version numbers of the programs I use. Really, hooking everything up should be possible both with earlier and later versions.
The instructions detailed in this article show how things look when connecting the software under Windows 7. The steps are similar for Windows XP (in fact, easier). I have run this IDE successfully on several different machines and operating systems.
Finally, the burning software you use is determined by your burner and probably comes with it, which was my case.
Begin by installing TextPad. Next, “install” GC Basic. This is really little more than copying some files over. I stored things in C:\Program Files (x86)\GCBASIC. I recommend spending a few moments rearranging the folders and files somewhat to keep things neat and tidy. Figure 2 shows how I apportioned things.
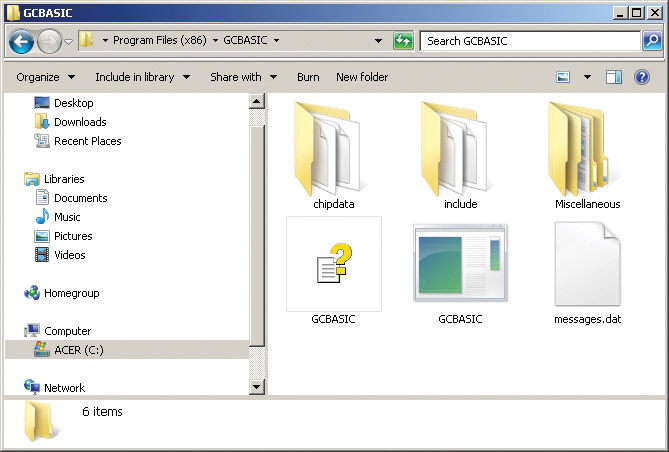
FIGURE 2. Rearrange and organize the GC Basic files.
The MPASM PIC assembler is also available free of charge directly from Microchip (the manufacturer of PICs). It’s part of the MPLAB IDE software, so install that suite next.
I’ll leave the burning software up to you since it depends on the programmer you own. Just so you know, I’m using a development board made by Matrix Multimedia and the burner software is called PPP.
Let’s put in the color syntax checking files now. You’ll find the one I concocted for GC Basic at the article link. You might as well get the one for PIC assembly language, too; look for it at the TextPad website. Store both of these files (they have .syn file extensions) in the TextPad\System folder.
You can pretty much install the TextPad, GC Basic, MPASM, and burning software wherever you want, making any changes to the installation process described below as needed. There is one thing that has to be rather specific, however. MPASM has a nasty quirk of not being able to deal with directory/filename combinations greater than 62 characters long. This means that you’ll want to keep all of your personal programming files close to the root of the C: drive just so the fully-qualified file name is short. Again see the screenshot of my arrangement in Figure 1.
The root directory is C:\PIC which is short and sweet. Observe, too, that this directory contains two batch files — MPASM.BAT and GCBASIC.BAT — which help TextPad search for errors and position the cursor on any found.
I’ve provided this entire directory for you, including the batch files and a sample to get you going. Download it from the article link and then copy the entire directory over to your hard drive.
We can now dig into the particulars of how to set up the various requirements. Let’s begin with a general Windows thing.
How the IDE is Used
To give you a feel for what to expect, here’s an overview of how a programming session might go. You begin by creating a Basic source file, and the color syntax highlighting will check your work as you go along. You’ll then save this file with a .gcb extension. Next, from the Tools pulldown menu in TextPad, you’ll select GC Basic Compiler. This will automatically invoke the compiler and create an assembler source file. A Command Results box reports the outcome. If there are one or more errors, these will be listed along with the offending line numbers. Simply double-click on one of them and the Basic source will be reloaded with the cursor positioned on the naughty line. On the other hand, if everything went smoothly then you’ll automatically be back in the Basic source file. Now, invoke the PIC Assembler from the Tools pulldown. TextPad is smart enough to apply the assembler to the assembly code just created (and not the Basic source).
Once again, if there are any errors you can double-click on them in the Command Results window and you’ll be taken to the offending line within the assembler file. If everything is hunky-dory, an executable .hex file with the same base name will have been created, and you’ll be returned to the Basic source code once more.
Select the PIC Burner from the Tools pulldown. TextPad will then invoke the burning software, and send the hex file along the programming cable. Assuming there were no hardware issues, your PIC is burned and ready to go!
You’ll note that with this setup, TextPad automatically applies each tool to the correct type of file. It also keeps your base name intact and appends the correct type of extension as required. You can use long Windows names, but must avoid titles containing spaces — this sometimes confuses the editor, compiler, or assembler. Here are the file types and extensions we’ll create for use by the IDE:
.gcb Great CowBasic source file
.asm Assembler source file
.err Error file
.lst Listing file
.hex Machine (hex) code file
By associating these file types with TextPad, you can open the files at once by simply double-clicking their icons in any folder view, say, from My Computer or Windows Explorer. You’ll note that I’ve kept the compile/assemble/burn stages separate. My reasoning for this is that after compiling, I like to inspect the generated assembly code first. If it looks good, then I send it to the burner. Of course, if you want, it’s easy enough to coerce GC Basic to not only compile, but to assemble and burn all in one fell swoop. A simple batch file is all it takes.
If this sounds interesting, then proceed with the following steps. While none of this is particularly difficult, it is important to follow directions carefully in the correct order, and thus profit from all the hours I spent deciphering how these guys interact. So, slow down, take a deep breath, and keep a pencil and paper nearby.
1. Create a Default Basic File Type
The first step is to get Windows to recognize the GC Basic source as a legitimate file type with its own extension. In these first actions, then, you’ll be working within Windows exclusively to set things up. Windows 7 is assumed throughout.
- Begin by saving a dummy program called “dummy.gcb.”
- Now, from Windows open Start/Control Panel/Programs/Make a file type always open in a specific program.
- Locate the .gcb extension and click the Change Program... button.
- Press Browse and locate Textpad.exe on your computer.
- Press OK, and then press Close.
- Repeat these steps if there are any other file types you think you might need. I like having .lst, .err, .asm, and .hex handy.
2. Make Double-Clicks Intelligent
Now, you’ll want to associate GC Basic files with TextPad. This means that when you’re looking at a directory and double-click on a GC Basic file, it will automatically open in TextPad.
- Invoke TextPad and close any open files.
- Select Configure/New Document Class from the menu bar.
- Enter the following as the Document Class name: GC Basic Source.
- Press Next.
- Enter the following as the default file extension: *.gcb.
- Press Next.
- Check the box for Enable Syntax Highlighting.
- The pulldown list should show the GCBASIC.SYN you installed earlier. Select it.
- Press Next and then Finish.
- Select Configure/Preferences from the menu bar.
- Select Associated Files in the selection tree on the left.
- Enter the following in the New Extension text box: .gcb.
- Enter the following in the Description text box: GC Basic Source.
- Press Add and then OK.
- Repeat these steps for any other file types you wish to associate with TextPad. I’ve got mine set up to recognize .gcb, .asm, .err, .lst, and .txt.
3. Include File Filters in TextPad
Next, you’ll want to append the *.gcb filter to the file menus. This will make it fast and easy to find and open GC Basic files. In other words, when you invoke a file open or file save operation, you’ll be able to specify filters or wildcards in the input box.
- Select Configure/Preferences from the menu bar.
- Choose File Name Filters from the selection tree on the left.
- Press New.
- Enter the following in the New text box: GC Basic Source (*.gcb).
- Enter the following in the Wild Cards text box: *.gcb.
- Use Move Up or Move Down to position your filters as desired in the drop-down list.
- Press OK.
- Repeat this for any other filters you may want; *.asm and .lst would be useful.
4. Adding the Compiler, Assembler, and Burner Tools
The time has come to connect TextPad with GC Basic for a truly integrated system. Pay very strict attention to every character, digit, and punctuation mark as you set things up here. You’ll also want to double-check any directory or folders that might be different on your system from mine.
- Select Configure/Preferences from the menu bar.
- Select Tools from the selection tree on the left.
- Press Add and then Program.
- Browse to your GC Basic.bat file and press Open.
- Press Apply and then OK.
- Rename the listing to GC Basic Compiler and press OK.
- Again, select Configure/Preferences from the menu bar.
- Expand the Tools branch in the selection tree and then select GC Basic Compiler.
- Fill in the box according to the screenshot in Figure 3. Most entries will be defaults. Obviously, change anything that applies specifically to your system that might be different from mine.
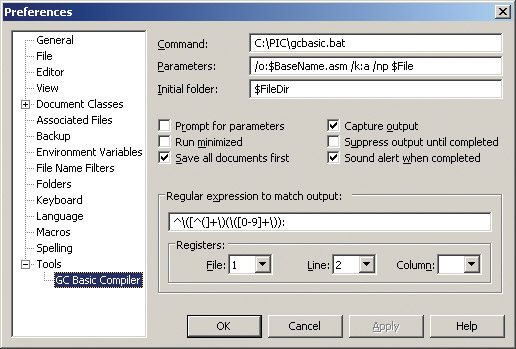
FIGURE 3. The tool entry box for the compiler.
You will follow similar steps to add the assembler tool. In this case, TextPad will invoke the MPASM.BAT batch file mentioned earlier. Remember, I’ve included this file in the article downloads for your convenience. The entry box for this in TextPad is shown in Figure 4.

FIGURE 4. The tool entry box for the assembler.
Next, install a tool to bring up the burner. Naturally, this will be specific to whatever hardware you’re using. Just so you can anticipate the sort of thing you’ll be doing, there’s a screenshot of my system in Figure 5.
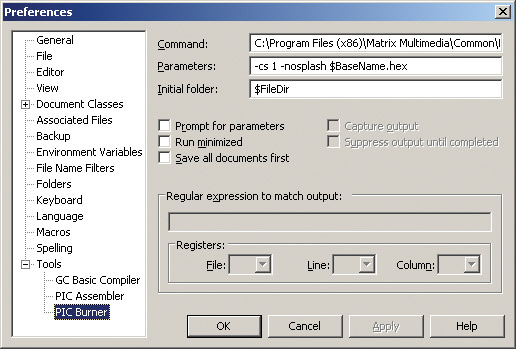
FIGURE 5. The tool entry box for my burner. Yours may differ somewhat.
5. Engage the Color Highlighting and Other Aids
We’ve got one final task to take care of before GC Basic is totally integrated. In particular, the color business for the syntax checking needs to be turned on. Keep in mind that you can always come back to this later if you change your mind about anything. As a good start, you might try green for comments, blue for keywords, red for directives, and black for all else. Here’s how to set things up.
- Again, while in TextPad close any open files.
- Select Configure/Preferences from the menu bar.
- Expand Document Classes in the selection tree on the left.
- Expand GC Basic Source in the selection tree.
- Choose Colors.
- Set the colors you wish for directives, comments, keywords, etc.
- Set any other desired features for GC Basic Source code at this time.
- Press OK.
A Few More Niceties
Since the designers of GC Basic have already created and included a Help utility in their package, a nice touch is to make it readily available in the TextPad toolbar. Here’s how to do that.
- Select Configure/Preferences from the menu bar.
- Choose Tools from the selection tree on the left.
- Press Add and then Online Help File.
- Navigate to the help file (it has a file extension of .chm) in the GC Basic folder and select it. Press OK.
- Rename the menu entry to GC Basic Help.
I also added tools to invoke Help for the assembler and burner. Help for the assembler comes with MPASM (part of the MPLAB package), and my PPP burning software also had a compiled Windows help file.
Finally, it would be handy to add the Windows tool Calculator which is great for working up number base conversions and so forth. This useful accessory comes with Windows, so again your investment in the system is minimal! I found it located in the Windows\System32 subdirectory. Figure 6 shows what the installation in TextPad looks like.
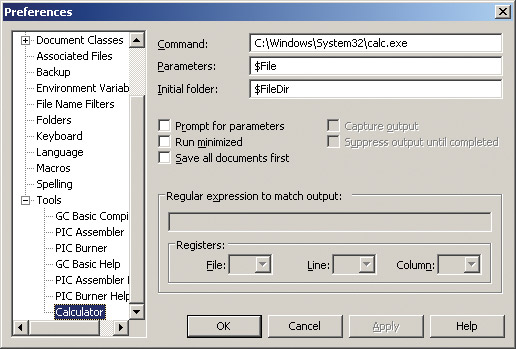
FIGURE 6. The tool entry box for the Windows calculator.
That ought to get you going with your new all-in-one Basic compiler IDE for the PIC. Yes, it took a couple hours of work, but can you believe such a system is possible for less than $30? BTW ... GC Basic can also be used with most AVR microcontrollers. NV
Downloads
What’s in the zip?
Batch and syntax files