Way back in the September 1969 issue of Popular Electronics Magazine, Don Lancaster presented a color organ which he called Psychedelia I that I thought was the coolest thing I had ever seen. A color organ — as you may know — is a device that splits music up into numerous frequency bands and modulates colored lights (typically one color of light per band) according to musical content. In honor of Don Lancaster (my electronics hero) I named this color organ, Psychedelia II.
In Don’s design, all of the functions of the color organ were done with analog circuitry, typical of the time. Don coupled transistorized active filters for frequency selectivity to triac, solid-state switching devices to control 110 VAC incandescent lights. All in all, a very nice design.
The problem I have with all analog color organ circuits I have ever seen or built is that as the musical material applied to the color organ changes, manual adjustments need to be made to sensitivity controls on each channel to achieve a pleasant, balanced display. This constant adjustment gets old after a while, so fixing this problem was one of the motivations for designing a digital color organ.
The other motivation was to implement the design with a very small but powerful microcontroller (see Photo 1) using a development kit from Texas Instruments that cost just $20. When I started down this path, I wasn’t sure it was possible. I now know it was.
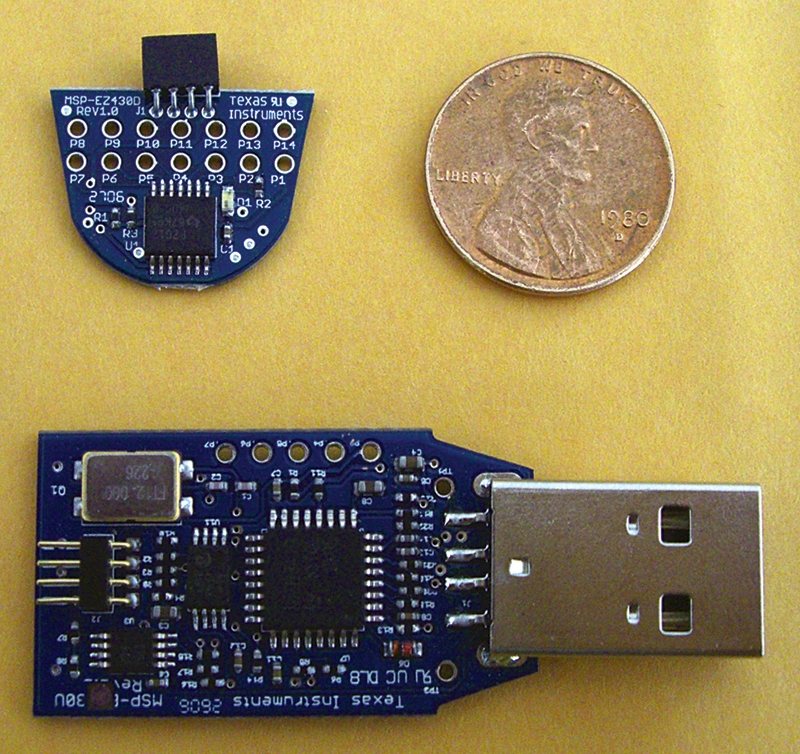
PHOTO 1. TI products used for the color organ. The MSP430F2012 target board in the upper left is the brains of the color organ. Its four pin connector plugs into the TI eZ430 USB development system, lower middle, for programming and debugging.
There is analog circuitry in my design, as well. In fact, the complete audio front end is analog. What is different about this design is that all of the frequency selectivity is provided by digital filters in the digital domain and the output devices are now low voltage super bright LEDs instead of incandescent bulbs. In addition, a digital automatic gain control (or AGC) was included to allow the color organ to adjust itself to varying musical material.
I described some of the technology used to implement this color organ in two previous articles entitled, “Floating Point Multiplication and Division without Hardware Support” and “Lattice Wave Digital Filters” for additional background information.
How It Works
This color organ has both hardware and software (firmware) components. Each will be described briefly here. For this discussion, the term microcontroller has been abbreviated as µC.
The Hardware
As shown on the schematics, the hardware consists of three sections: the analog front end, the power supply section, and the output section. The analog front end is where the audio signals from either a built-in condenser microphone or a stereo line input are processed in preparation for analog-to-digital conversion inside the µC.
The built-in microphone has its own high gain pre-amp whose gain is controlled by trimmer pot R5. Stereo line level input signals are summed into a mono signal as this color organ is a mono device. Whichever audio source is selected for use, its bandwidth is limited to less than one half the sampling frequency of 16,000 samples/second as required by the Nyquist criteria.
Numerous first order low pass filters distributed throughout the circuitry, along with a second order Sallen-Key active filter, help limit the bandwidth to reduce aliasing effects when the audio signal is digitized. All of the analog circuitry runs single ended from a single five-volt power supply.
Power for the color organ is provided by a wall wart power supply which provides between 8 and 12 VDC, depending on the load. Diode D1 prevents the DC power source from being connected backwards and causing damage. The raw DC is sent to the output section for powering the LEDs in the display. Two voltage regulators provide 5 VDC for the analog and TTL circuitry and 3.3 VDC for powering the MSP430F2012 target board.
On the output side, the 74HCT139 demultiplexes the pulse width modulation (PWM) signal from the mC used to control LED brightness. All four outputs are inverted in preparation for driving the output switching transistors. NOTE: 74HCT technology is required for reliably interfacing the 3.3 volt logic outputs of the µC with the five volt logic which follows.
Each color channel is driven by a switching power transistor. Resistors in each channel limit the current flow to around 200 mA to equalize maximum brilliance between channels. Resistor values in the output channels differ as a result of the differing forward voltage drops across the different colored LEDs. The output transistors run only slightly warm to the touch so heatsinks are not required.
There is hardware internal to the µC used by the color organ. Specifically:
- A 10 bit analog-to-digital converter (ADC) is used to digitize the audio with a sampling rate of 16,000 samples/second.
- Timer A is used to generate accurately timed PWM pulses to control the brightness of each output channel independently.
- The watchdog timer functions as a general-purpose timer to generate periodic interrupts used to synchronize the display process.
As you can see, the µC provides a lot of useful hardware for this application.
The Software
The complexity of this color organ is in the real-time nature of the software. There are three distinct threads of execution at work: the main thread, the sample acquisition and processing thread, and the display thread. (Consult the program listing for the details.)
The Main Thread
The main thread starts every time the µC powers up and performs all hardware and application initialization including:
- Setting up the port bits needed to drive the output demultiplexer.
- Setting up the ADC for operation and configuring a pin on the µC for analog input.
- Setting up the watch dog timer for generating periodic interrupts.
- Setting up Timer A for PWM operation.
- Initializing application variables.
- Enabling interrupts.
- Putting the ADC into the automatic single channel sample acquisition mode.
With initialization complete, the main thread enters an infinite loop doing nothing forever.
The Sample Acquisition and Processing Thread
This is where time-critical activities occur. You can visualize this code as having one input (the new sample) and four outputs (the output of the four color organ channels). This code runs 16,000 times per second. Each new sample is subjected to the following processes:
- Noise Gate — The noise gate monitors each newly digitized sample to make sure it is above a minimum value before being allowed to pass. Values smaller than the minimum are replaced with a zero valued sample.
- Decay Processor — The decay processor monitors the sample stream for long runs of zero valued samples. Two things happen when a lull in the audio is detected. First, all of the filter delay elements are reset to terminate any ringing of the filters and second, the AGC gain variable is set to unity (Gain = 0) causing the AGC processor to restart its gain control function. The decay processor guarantees the display goes dark between songs and in low volume passages.
- The AGC Processor — The AGC processor is made up of two parts: the AGC gain control element and the AGC state machine (SM). The SM can be considered the brains of the AGC processor; the gain control element, the brawn.
A Gain value of zero indicates unity gain and the samples flowing through the gain element are untouched. Each incremental value of Gain causes a sample to be left shifted. If Gain is 4, samples are left shifted four times for a gain of 16. The AGC manipulates sample amplitude by applying more or less gain to the samples as they flow through the AGC Gain element.
There have been many AGC designs over the years, but I may have invented a new variety by using a state machine to control gain. To understand the operation of the SM in detail, you should consult the code listing. Basically, the SM runs every sample period and has a total of four states. The SM runs to completion every 1/16th of a second or every 1,000 samples.
The result of the SM execution is the manipulation of the Gain variable used to control the AGC Gain element. The value of the Gain variable can change by at most, one; each execution of the SM which allows the gain to change up to 16 times a second as different program material is applied to the color organ.
Digital Filters
The four channels of the color organ represent four bands of frequency selectivity implemented using third order lattice wave digital filters. Each acquired sample is processed by all four filters. Table 1 gives the specifics.
| Color Organ Band |
Filter Type |
Frequency |
Filter Method |
Response Graph |
| Low |
Low pass |
115 Hz |
Chebyshev |
Figure 1 |
| Low-Mid |
Band pass |
600 Hz |
Cauer/Elliptic |
Figure 2 |
| Mid-High |
Band pass |
2.4 kHz |
Cauer/Elliptic |
Figure 3 |
| High |
High pass |
6.2 kHz |
Chebyshev |
Figure 4 |
TABLE 1. All filters were designed using LWDFDesigner.java, discussed in a previous article.
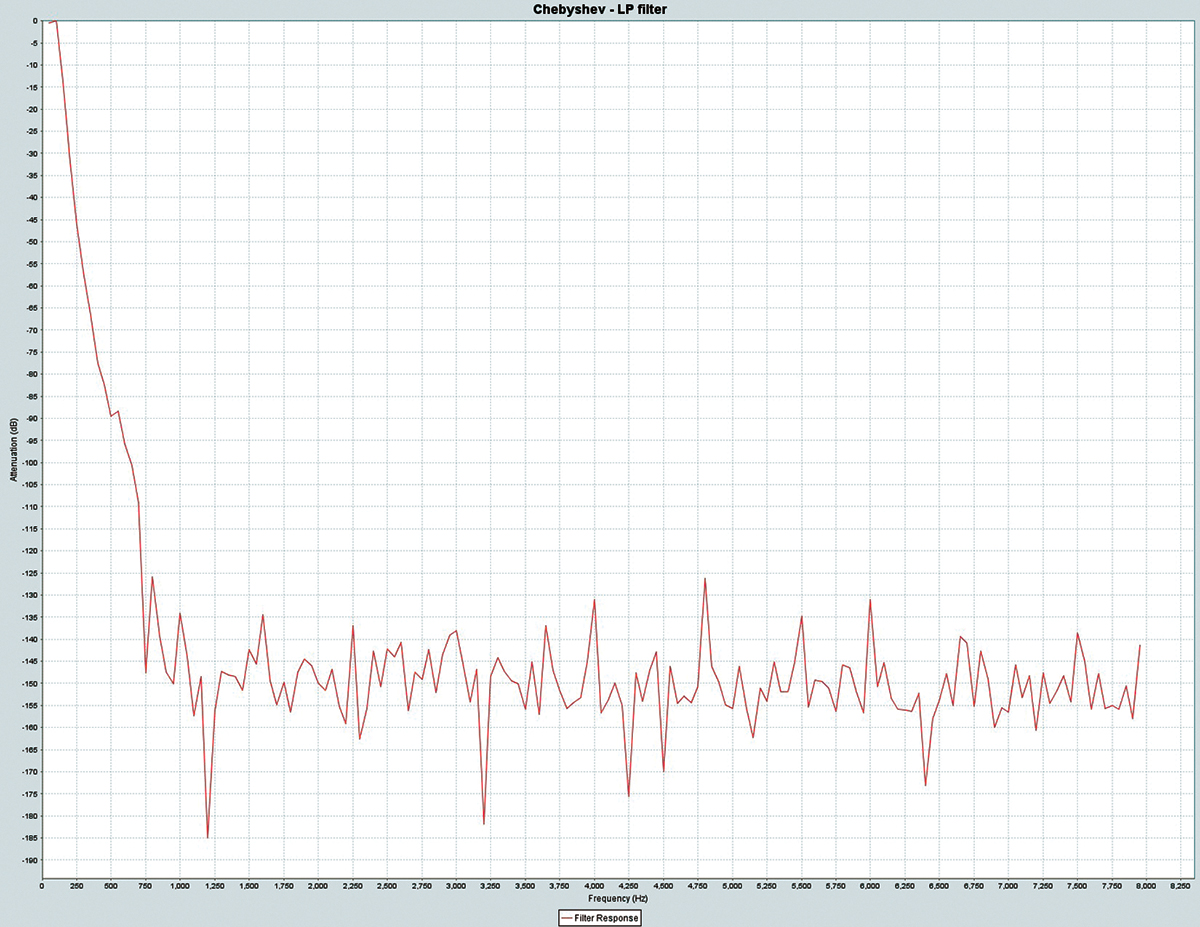
FIGURE 1. Low band filter.
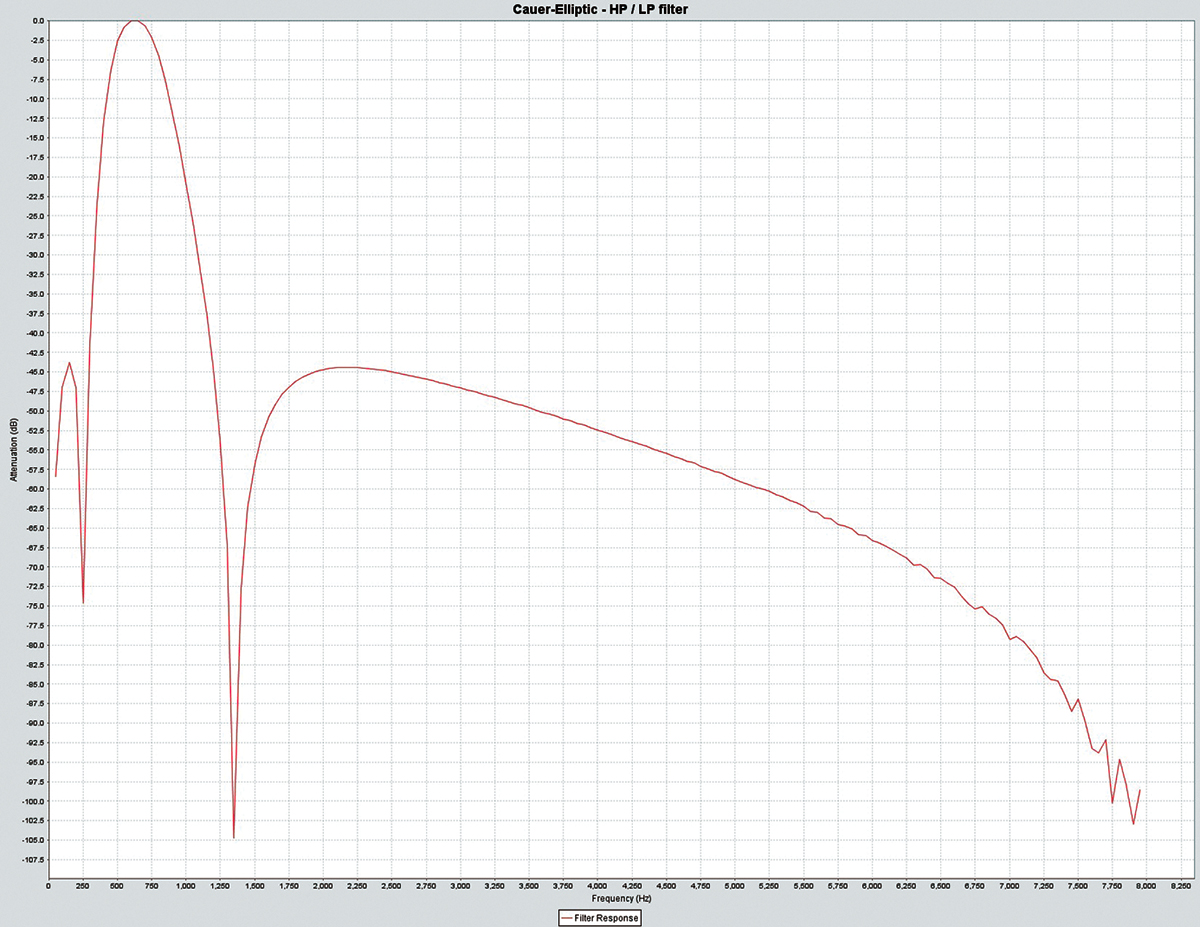
FIGURE 2. Low mid band filter.
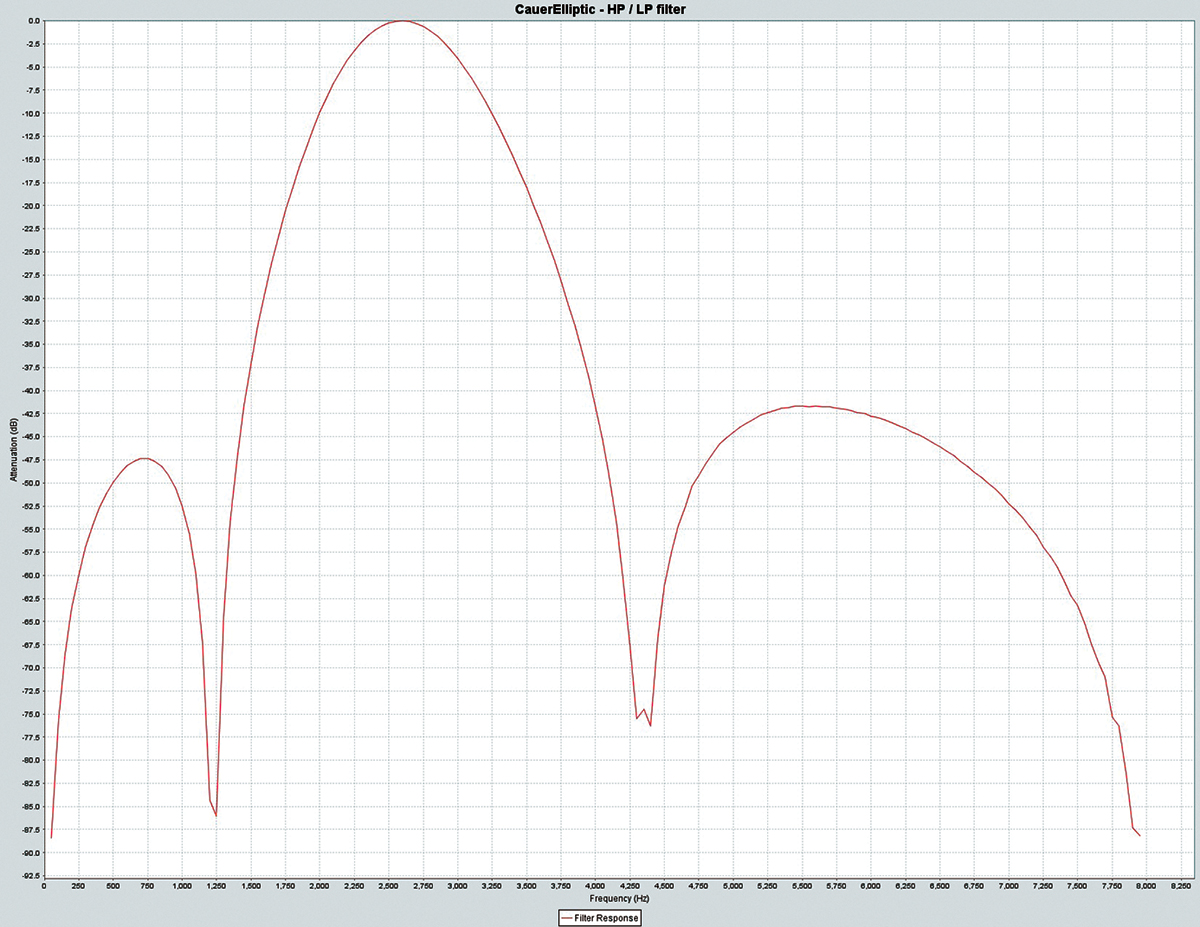
FIGURE 3. High mid band filter.
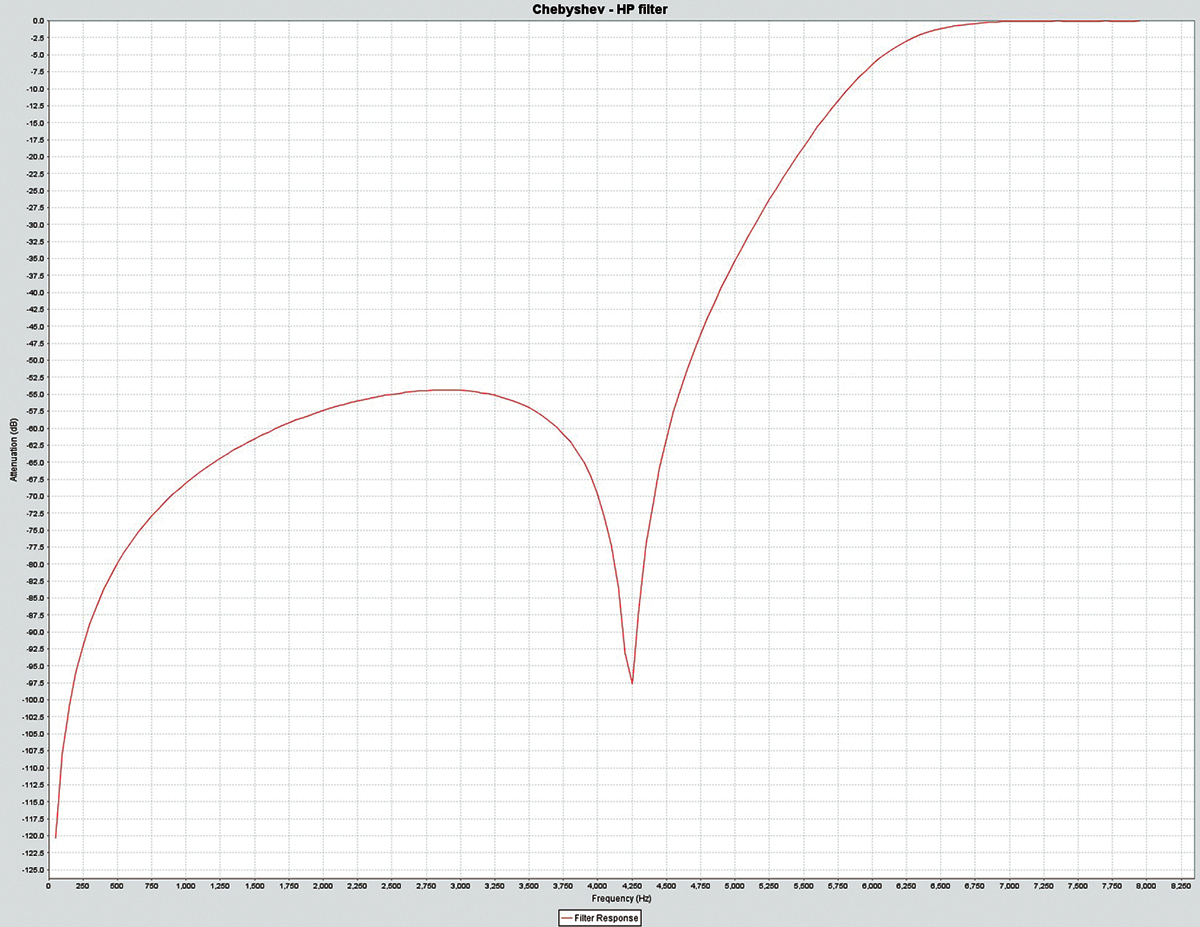
FIGURE 4. High band filter.
PWM Processing
The final step in the real-time processing of samples is the conversion of the filter outputs into a form that can drive the PWM hardware in the µC. The following operations are required:
- Sample value replaced by its absolute value.
- Sample is compared to a min threshold and, if smaller, is replaced by a value that causes the channel to remain off during its display period.
- Sample value is clipped to a maximum value, if required.
- Sample value converted into a range necessary for the PWM hardware.
- Processed sample is stored in memory for the display process thread.
The Display Thread
The display processor is executed every 256 microseconds by the watchdog interrupt. One channel of color organ output is done each interrupt. The display processor (see wdt_isr in the listing) performs the following operations:
- Disables Timer A’s PWM output line.
- Determines which channel of output to display from the value of Slot.
- Sets the output port bits to select the appropriate output channel from the demultiplexer.
- Fetches the processed PWM value for the selected channel and loads it into Timer A’s compare register.
- Resets Timer A’s counter and starts the PWM output.
- Increments Slot and returns from the interrupt.
Four new values of processed PWM data are stored in memory every 62.5 microseconds but the display processor only picks up one of these values every 256 microseconds for display.
Real Time and mC Resource Analysis
During the design of the software, I had to determine if the MSP430F2012 µC had the performance necessary to handle the color organ’s real-time requirements. Specifically, with the mC clock running at 16 MHz and a sample rate of 16,000 samples/second, there was a maximum of 1,000 instruction cycles available per sample period. Luckily, many of the instructions (all register to register instructions) execute in a single cycle. When I did my initial calculations, I found the processor was over-committed by some 20%, meaning the processing of the audio samples were taking longer than real time allowed. Needless to say, this is bad.
The easiest fix for this real-time overage would have been to eliminate one of the color organ’s channels, but I was reluctant to do that. Instead, I decided to optimize the real-time software so it could execute completely in the allotted time. Optimizations included:
- Moving 95% of the code in-line to eliminate almost all subroutine calls and returns.
- Moving all of the real-time code directly into the interrupt service routines.
- In-lining code for small subroutines that were used in multiple places in the code. In other words, I used additional code space to boost performance.
With these changes, I estimate the color organ is now using roughly 95% of the available CPU cycles. If you plan on making changes to the software, please keep this fact in mind.
In terms of the hardware internal to the µC, it is all being used except for a few port lines. There are about 240 unused bytes of code (Flash) memory remaining and, assuming a maximum of five levels of subroutine nesting (the stack uses RAM), there are about 57 remaining bytes of RAM. I think it is safe to say this color organ application uses up the MSP430F2012 µC almost completely.
Building One
This color organ can be built for approximately $100. MSP430F2012 target boards are available from TI (three for $10), but you will have to program them with the code provided. I made a 12” cable that plugs between the USB development hardware and the target board so I could program the µC in place after the color organ was built. You could, of course, program the µC first and then attach it to the color organ. Note two things:
- Resistor R1 on the target board should be removed to prevent a power supply conflict between the color organ and the USB development hardware. Removing this resistor means the target board will always be powered by the color organ’s power supply.
- There is an LED on the target board which will be on while the color organ is operational. The LED can be removed if this is a problem.
Build the color organ using the schematics and parts list as your guides. I used wire wrap, but you can build it anyway you choose. I built the main controller portion of the color organ on one pref board and the output section on another, but they could have been built on a single board.
Six connections are required between the target board and the color organ. Since the I/O pin holes on the target board are on .1” centers (the same as the perf board I was using), I pushed wire wrap pins through the perf board in the proper positions so that the target board could be slid on and soldered. The wire wrap pins not only provide the electrical connections but also provide the physical support for the target board.
I packaged the color organ in a triangular box I purchased. The box seemed about the right size for the 40 LEDs I was going to use for the display. I replaced the glass front that came on the box with diffusion plastic from the hardware store. The plastic I used causes the LEDs to appear like fuzzy circles of color about 1-1/4 inch in diameter. The back panel of the box has convenient swivel tabs that lock into slots on the box which make taking the color organ apart and putting it back together very easy.
The LED leads were bent around toward the LED and glued directly to the box’s rear panel. I laid out the LEDs in geometric patterns, but you can lay them out anyway you want. Wire-wrap wire was used to connect the LEDs together and to the output board.
The color organ’s control panel was built from a piece of sheet metal. The control panel has the line input jax, a condenser microphone, the mic/line switch, and the power switch. I decided to hard-wire the power supply to the unit, so I drilled a hole in the back panel and ran the power supply wire through it. I then tied a knot in the wire inside the box for strain relief.
Once your color organ is assembled, do the following:
- Plug in the wall wart and turn on the power switch to check the power supplies. You should have 3.3 VDC, 5 VDC, and a high voltage output between 8 and 12 VDC. If there is a problem with a power supply, find and fix it before continuing. Check for power and ground at each socket before installing the ICs.
- Program the µC with the provided software.
- With the mC programmed, you should see the LED on the target board light up (assuming you haven’t removed it yet). It should come on with the power and stay on indicating the display processor is running.
- Perform an initial calibration of the microphone preamp’s gain. This can be done by connecting a headphone through a capacitor (10 µF will do) to the preamp output and adjusting the trimmer for no distortion. After your color organ is working correctly, you may need to back down the preamp’s gain so the color organ’s display is not completely saturated when the mic source is selected.
- Connect a line input source and connect your headphone/capacitor between the arm of the mic/line switch and ground. You should hear the output of the microphone in the mic position and hear the line input source in the line position.
Once these checks are successful, you should have a working color organ.
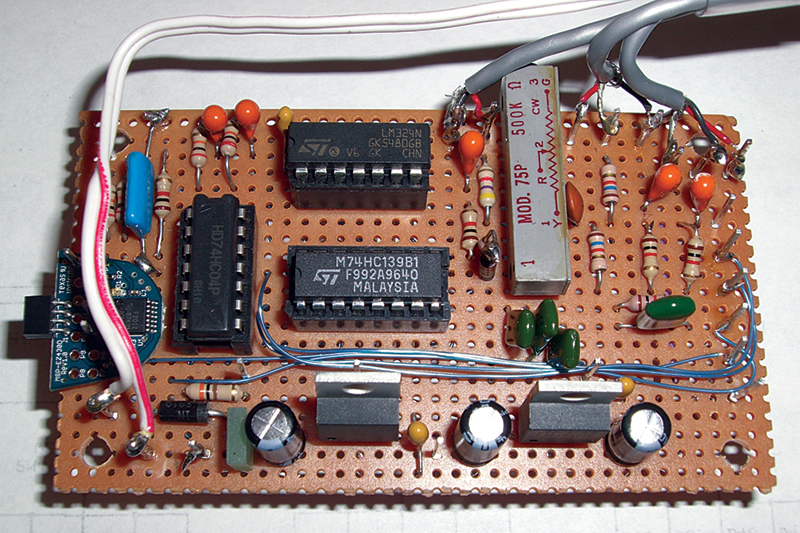
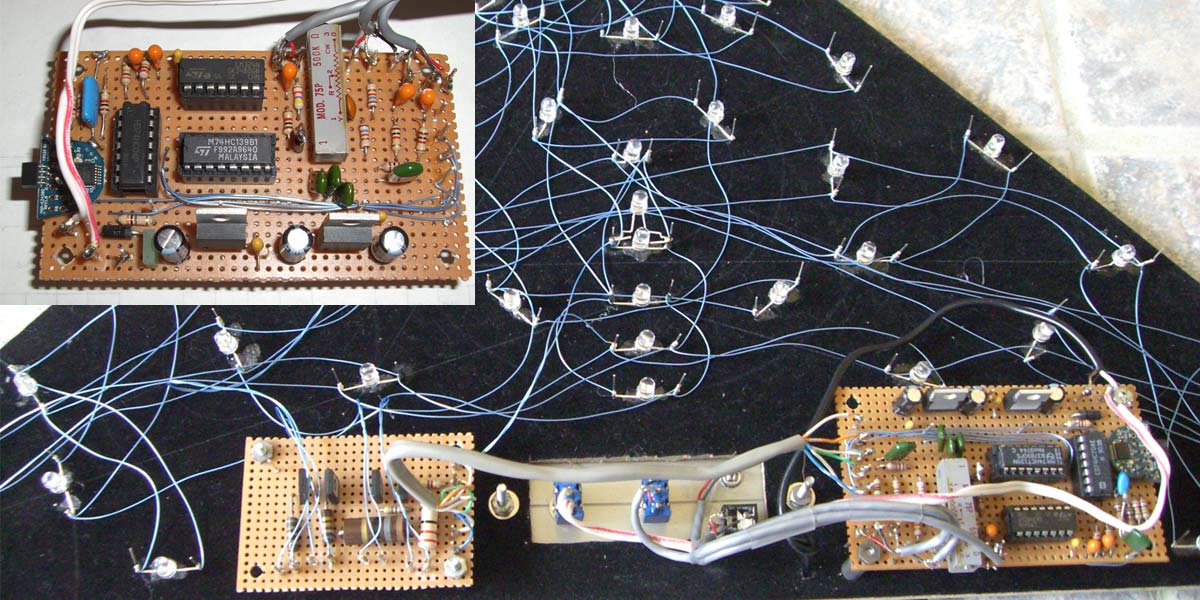
PHOTO 2. Color organ controller board. The µC target board is on the left side of the board. Power supplies are built across the bottom.
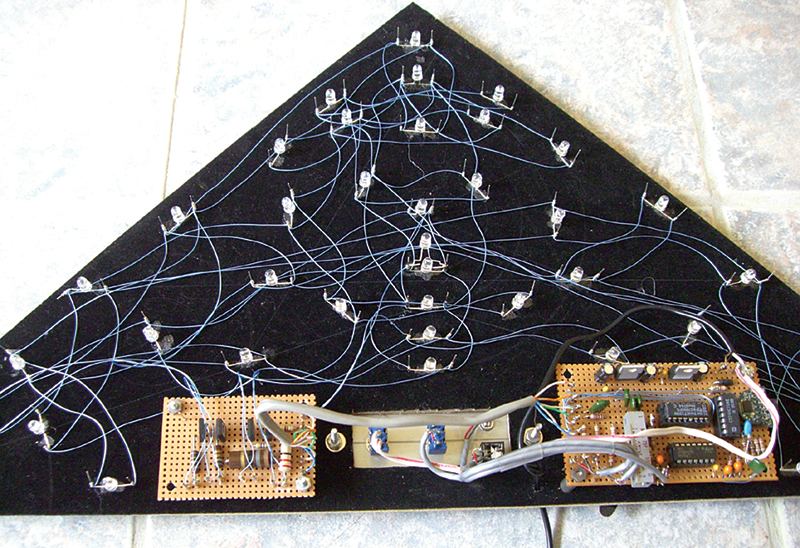
PHOTO 3. The color organ is built onto the rear panel of the display box. The wire out of the bottom is connected to the wall wart power supply. The output board is on the left, the control panel is in the middle, and the controller board is on the right.
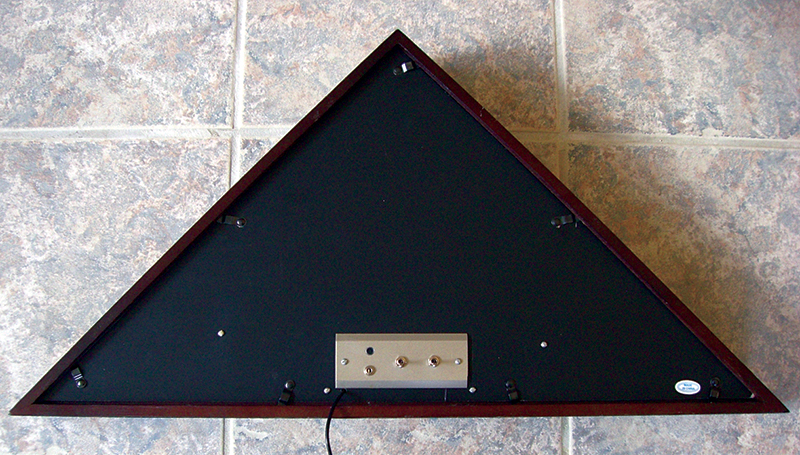
PHOTO 4. Rear view of the color organ. Black spot on the top left of the control panel is the condenser microphone. Below it is the line input jax. Next is the mic/line switch and furthest to the right is the power off/on switch. You can see the swivel tabs that lock the back panel into place.
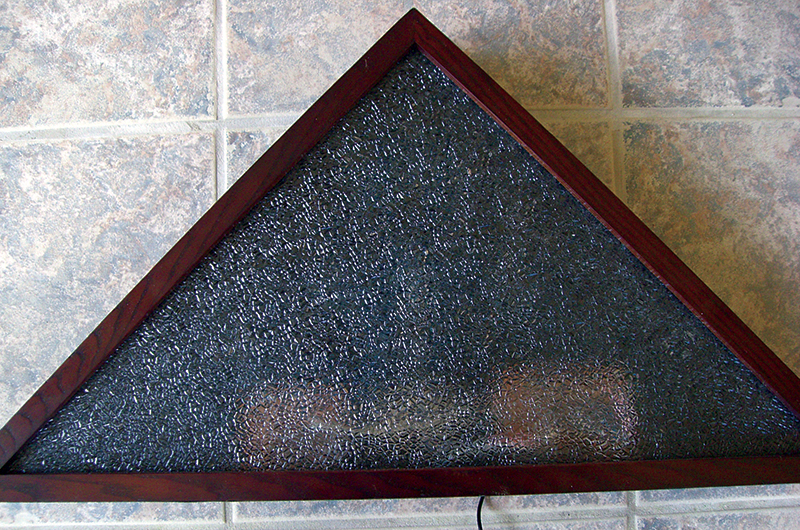
PHOTO 5. Front view of the color organ.
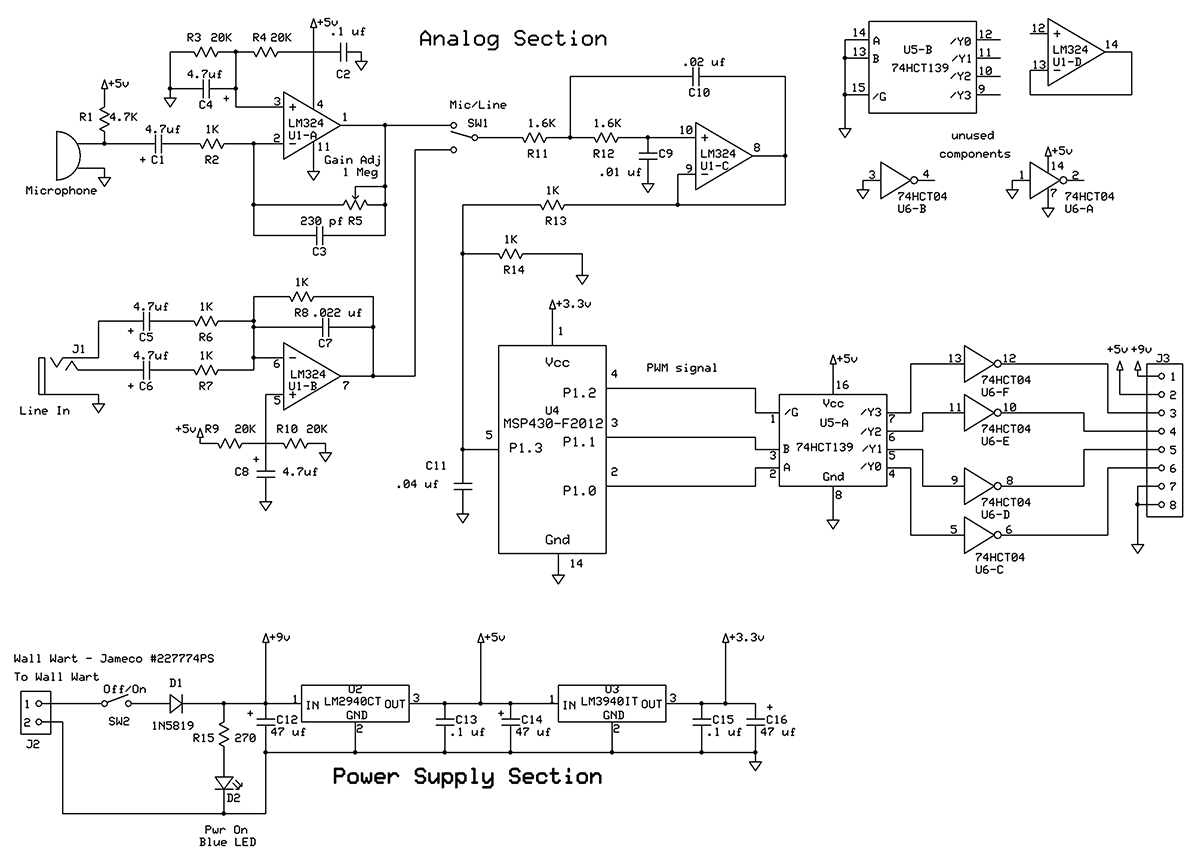
FIGURE 5. Color organ controller schematic.

FIGURE 6. Color organ output schematic.
Conclusions
I would say this color organ project was successful. The color organ performs the function it was designed to do and illustrates what can be done using DSP techniques on a very small µC Is the software perfect? Probably not, but it works. Does the color organ look cool in operation? Yes, it does.
The experience using the TI development tools was a very pleasant one. The $20 development kit and the provided software worked without a hitch and proves that TI has indeed brought µC development to the masses.
I do hope some of you build the color organ. It may not be the ‘60s any longer, but it is still fun to watch lights flashing to your favorite music. NV
COLOR ORGAN PARTS LIST
| Item |
Description |
Notes |
| C1,C4,C5,C6,C8 |
4.7 µF capacitor |
|
| C2,C13,C15 |
0.1 µF capacitor |
|
| C3 |
230 pf capacitor |
|
| C7 |
0.022 µF capacitor |
|
| C9 |
0.01 µF capacitor |
|
| C10 |
0.02 µF capacitor |
|
| C11 |
0.04 µF capacitor |
|
| C12,C14,C16 |
47 µF capacitor |
Polarized |
| R1 |
4.7K resistor |
1/4W 5% |
| R2,R6-R8,R13,R14 |
1K resistor |
1/4W 5% |
| R3,R4,R9,R10 |
20K resistor |
1/4W 5% |
| R5 |
1 meg trimmer |
10 or 20 turns |
| R11,R12 |
1.6K resistor |
1/4W 5% |
| R15 |
270 ohm resistor |
1/4W 5% |
| R16,R18,R20,R22 |
470 ohm resistor |
1/4W 5% |
| R17 |
22 ohm resistor |
1W |
| R19 |
18 ohm resistor |
1W |
| R21,R23 |
6.8 ohm resistor |
1W |
| D1 |
1N5819 diode |
Optional reverse voltage protection diode |
| D2,D33-D42 |
Blue LEDs |
RL5-B4630 |
| D3-D12 |
Red LEDs |
RL5-R5015 |
| D13-D22 |
Yellow LEDs |
RL5-Y5030 |
| D23-D32 |
Green LEDs |
RL5-G5023 |
| J1 |
Stereo 3.5 mm/1/8” jax |
Line input connector |
| J2 |
Two wire power jax |
Optional |
| J3/J4 |
Inter-board connections |
Optional |
| M1 |
Condenser microphone |
Jameco #160979 |
| Q1-Q4 |
2N4921 switching/power transistor |
Heatsinks aren’t necessary |
| SW1 |
SPDT |
Mic/line switch |
| SW2 |
SPST |
Power off/on switch |
| U2 |
LM2940CT |
Five volt, one amp voltage regulator |
| U3 |
LM3940IT |
3.3 volt, one amp voltage regulator |
| U4 |
MSP430-F2012 |
µC target board. Available from TI. (See Resources.) |
| U1 |
LM324 |
Quad op-amp |
| U5 |
74HCT139 |
Two to four demultiplexer |
| U6 |
74HCT04 |
Hex inverter/buffer |
CONTACT THE AUTHOR
Craig A. Lindley can be contacted via email at [email protected]
RESOURCES
The color organ source code file — colororgan.s43 — is available in the downloads for this article.
Information on the Texas Instruments eZ430 development kit is available at https://www.ti.com.
The LEDs used in this project were purchased from www.superbrightleds.com.
Other parts for this project were purchased at Jameco and RadioShack.
Downloads
Psychedelia II (Color Organ assembler source file)