Your computer and the Internet give you free access to over 100 web based shortwave receivers that you can use as if they were your own. Unfortunately, employing these radios to decode data transmissions can be very difficult or impossible — unless you know the secret. So, read on and we’ll guide you through the details of how to do it.
Web based shortwave radios are an amazing new implementation of software defined radios (SDR). These SDRs are free to use and widely available on the Internet. Even more remarkable is that they are located in countries all around the world.
An example of the worldwide spread of SDR radios is shown on Figure 1.
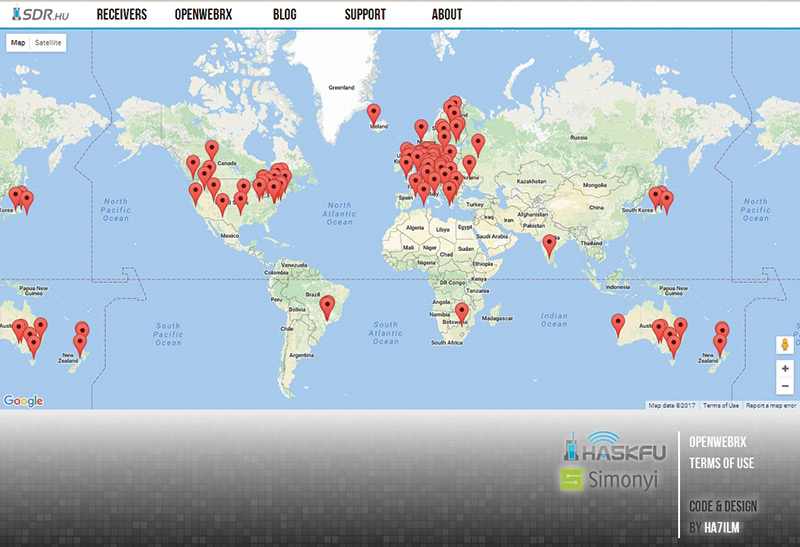
FIGURE 1. World map of Web based software defined radios.
If you’ve ever wanted to operate a receiver located in Sweden, Germany, Australia, Andorra, or Africa, now is your chance. Each location has its own antenna, receiver, and connection to the Internet. The dial frequency, mode (AM, SSB), audio bandwidth, and other features of the receiver are fully controlled by you.
A popular place to find these Web radios is WebSDR.org. A screenshot of a web based SDR located in Sweden is shown in Figure 2.

FIGURE 2. Screenshot of Web based receiver.
Using such a radio is truly incredible since you are operating it remotely from your own vantage point via the Web. Operating a radio located in another country can be both exciting and challenging. It’s definitely fun to hear the music and voices of these far off lands received from their own backyard. However, you need to be aware of time differences that may affect radio propagation.
For example, when it is daylight in your location it may be night at the other location. So, bear this in mind when you are receiving signals from the remote location.
When tuning through the bands — as with any shortwave radio — you will discover that there are some audible sounds that do not make immediate sense. There may be warbles, buzzes, and whistles that seem to vary and repeat. The unconventional sounds you are hearing are probably data signals. This is the other world of shortwave radio; one that does not use conventional sounds. It is the realm of audio data transmissions.
A while back, I discussed how to receive data signals with a low cost shortwave radio (N&V May 2015). Now, the concept takes on a new dimension since we are using virtual radios not in our possession.
As astonishing as it seems, many of these Web based shortwave receiver data signals can be processed and decoded using just your PC and some free decoding software. Yes, some signals are encrypted, and can’t be decoded. Fortunately, there are plenty of unencrypted data signals around to keep us busy for a long time.
However, as will be discussed later on, it does require a special trick to allow you to pipe the streaming audio signals from the Web to the decoding software. In this article, I will show you how to use these Web based shortwave receivers to access data transmissions and to get started in this exciting hobby.
A Closer Look at Data Modes
Data transmissions vary in complexity and contain a wide variety of information. Some are as simple as Morse code (CW) or Radio-teletype (RTTY), while others are more sophisticated, such as AMTOR or SITOR which are similar to RTTY. Several software decoding packages will be discussed later to help you get started with these modes. The good news is that they are free and can be downloaded from the Internet. Most of this application software can also decode the newer modes.
Some of the popular newer modes are Binary Phase Shift Keying (BPSK), Weak Signal Propagation Reporter (WSPR), and the weak signal digital modes JT65/9. These modes — developed by amateur radio operators — use low power, complex coding, and allow communication over great distances. Text messages are usually conveyed with these protocols. To convey images and graphics, commercial stations use radio-facsimile (FAX), while amateur stations use slow scan TV (SSTV) and EasyPal. We will discuss more about these software applications later on as well.
One of the things that all of these modes have in common is that they are audio modes. That is, the radio signals are first converted to audio signals using your radio receiver. If your receiver is connected to a PC sound card, the sound can be piped to your software decoder. This is usually as easy as selecting your sound card as input in the application software.
However, if you are receiving the audio from the Internet, things are not so simple. Let’s take a look at how audio is delivered over the Internet.
Internet Audio — Downloading versus Steaming
Don’t worry; this will not be a treatise on how the Internet works. Thankfully, many of the details of data transfer are hidden from the user and handled automatically. It is helpful to understand some concepts, however. Two major ways data is conveyed are downloading and streaming.
Computerized information (data) moves efficiently across the Internet by being broken up into little chunks known as packets. Each packet is independently addressed and travels separately, and different packets can travel by different routes.
When you download a file in the traditional way, you’re effectively asking a server to send you many packets one after another, and you have to wait for all of them to arrive before you can do anything with any of them. With streaming, you start to use the packets as soon as enough of them have arrived. That’s the essential difference.
You can think of streaming as playing during downloading, but technically the two things are different in many ways. Real time shortwave radio depends on streaming audio.
There are at least three popular streaming architectures: Real Player, Apple Quick Time, and MS Windows Media Player. Streaming files are downloaded a chunk at a time and deleted as soon as they are played. The goal is for nothing to remain on your computer. This is commonly done to avoid copyright issues.
Since the audio goes straight to the soundcard, it is not available to use in another software application. We’ll discuss how to deal with that later on, but first, what are Internet stops?
Internet radio suffers from intermittent stops because of the way that information travels across the Internet. Sometimes packets are lost along the way, or some packets arrive sooner than others (in the wrong order) and must be resent from the source.
All of this can cause a break, which is why there are “pauses” when listening to Internet radio.
Intermittent audio is most often associated with a slow or inconsistent Internet connection. So, having a faster connection may help. The good news is that because of the low audio bandwidth of shortwave radio, data can be received fast enough and decoded properly with normal or slightly slow connections.
reaks may occur, but often are not serious enough to affect the data decoding.
A big exception to this is decoding FAX images. Since they are synchronous transmissions, a break in audio associated with a lost packet can cause a breakup in the picture. An example is shown later. Nonetheless, it is still fun to experiment with this mode. We are still left with one problem. How do we get the audio to our application decoding software? We’ll take a look at this next.
Piping the Audio to Your Application
Your application software needs to have access to the incoming audio. In the good old days of Windows XP, there was a provision for recording all audio sounds heard on your computer. This included Internet sounds. Built into the sound card architecture was a feature called Stereo Mix. This could be used to transfer or pipe the audio to other applications. Since then, most OS versions have either eliminated this feature or have hidden it so well that most users can’t find it.
In the past, to get around this problem, hardware solutions were used to patch from the speakers to the microphone input.
This solution did work, but sometimes had unintended consequences such as being unable to monitor the audio. Fortunately, virtual audio cables (VAC) appeared on the scene. VACs are basically software implementations of this same idea of patching hardware — but using software. There are advantages to using VACs.
A real adapter usually has a digital-to-analog converter (DAC) and an analog-to-digital converter (ADC) in its signal path, which causes unneeded DAC and ADC conversions if they are physically connected together. VACs do the conversion without these extra conversions, and also allow you to monitor the signals.
The concept of virtual audio cables has been around for several years, and there are a number of commercial products available that will do a good job. However, they are not free and may be complicated to implement. Perhaps the most popular commercial software is Virtual Audio Cable 4. The trial version of this product has been used with good results.
Luckily for us, there is a free product available that also uses the concept of virtual audio cables. This virtual audio mixer is known as Voicemeeter.
It is able to manage every audio related item in your computer, including the speakers, microphone, soundcard, and Internet audio. So, if you want to patch the Internet audio to your decoding software, it is easy to do. It’s available from http://www.vb-audio.com/Voicemeeter/index.htm.
Installing and Using Voicemeeter
Begin by downloading and installing the Voicemeeter program. According to the website, it supports MME, DX, KS, WDM, and ASIO interfaces (XP, VISTA, WIN7, WIN8, WIN10, 32/64 bits). It has been tested here with XP, Vista, and WIN7, and works well.
Figure 3 shows a screenshot of the Voicemeeter mixer front panel.
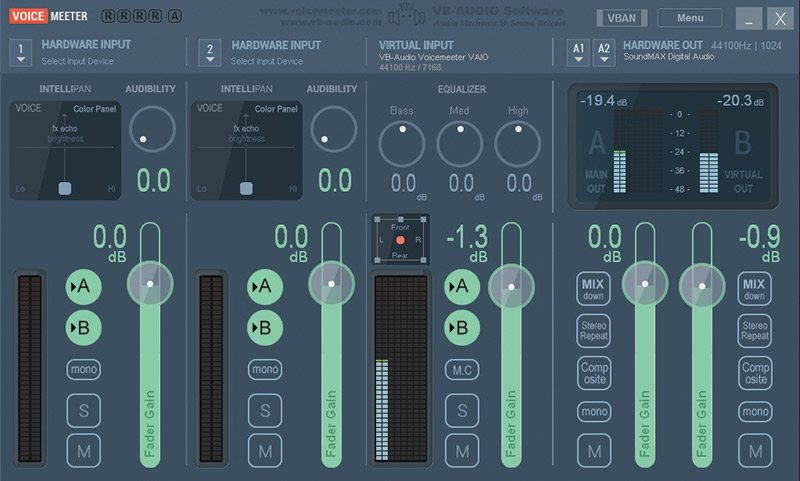
FIGURE 3. Block diagram of shortwave data receiver.
Please note that Voicemeeter is a normal Windows program that happens to include a virtual audio cable. When it is installed, it will create a new input audio device and a new output audio device in your computer’s system device list called VoiceMeeter VAIO. This is the virtual audio cable.
To use the virtual cable, it must be selected as the default device in both the playback and recording devices in Sounds and Audio Devices. This option is usually found from the Windows Control Panel. It is important to remember that the virtual audio cable will be available only when the Voicemeeter mixer program is running.
Voicemeeter works by using the virtual audio cable to pipe the audio from the input (virtual cable) to the output (virtual cable) where it can be used by other applications or hardware. Figure 4 shows how the pieces fit together. Since all system sounds and Internet sounds are flowing into the virtual cable, they can be piped to software decoding applications and to the speakers for monitoring.
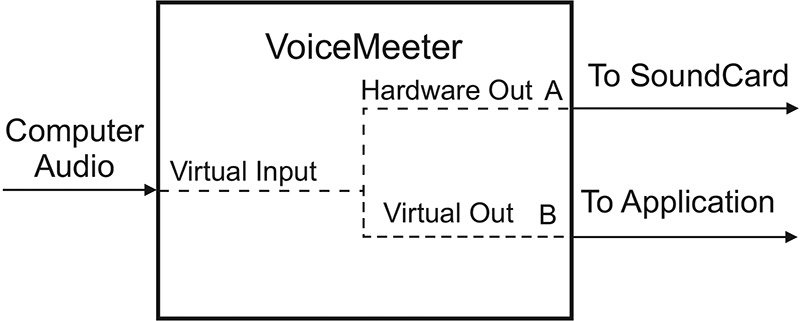
FIGURE 4. Virtual cable using Voicemeeter.
Figure 3 shows my setup. Hardware Inputs 1 and 2 are not used. The virtual input has controls for mixing, volume, and two outputs: A and B. When enabled, these outputs are piped to the main out (A) and virtual out (B) of Hardware Out. Use A1 or A2 to select your soundcard to monitor the sound.
In the decoding software, all that is necessary is to select the VoiceMeeter VAIO virtual cable as the input. It will be available since it looks just like a real system device. Now, you are all set to go without having to use an external cable.
Connecting to a Web Based Shortwave Radio Station
We want to check that Voicemeeter is working properly before we attempt to decode signals. Make sure the virtual cable is set as the default device in Sounds and Devices in the Control Panel as noted above. Now, start Voicemeeter and check that the virtual input is being piped to A and B. Select the audio soundcard you are using in A1. That’s it.
Next, go to one of the websites mentioned at the start of the article. Select a station you would like to hear. You should now hear the sound on your computer speakers. Look at the level meters in Voicemeeter. They should be moving up and down with the sound.
Getting to Know Your Remote Receiver
Spend some time getting acquainted with your web receiver’s operation. There will generally be means to adjust the audio bandwidth, select the receive frequency, and select the mode such as CW, SSB, or AM. Also handy is a spectrum plot showing active stations.
Commands may take a few seconds to execute, so don’t be in a hurry to rapidly change things. Try to plan which frequencies you will look at and set the appropriate bandwidth for the mode.
Sometimes the sound will stop for some reason and can’t be restarted. This is probably because WebSocket has stopped working. WebSocket is a computer communications protocol implemented in web browsers and servers. The easiest way to restart your audio is to close your receiver window, wait a few seconds, and try it again.
The Web radio will also work nicely with your laptop when it is connected to the Internet using Wi-Fi. Taking your laptop with you on vacation is also another way to enjoy this hobby when away from home.
Grid Squares
A geographic coordinate system used by amateur radio operators and others around the world is the Maidenhead Locator System (MLS). It is also commonly referred to as grid locators or grid squares.
The MLS compresses latitude and longitude into a string of characters to allow position information to be transmitted with limited precision. This is very useful when determining distances and angles of radio transmissions. Almost all Web based radio stations use grid squares.
Many Web logging sites such as PSKreporter and WSPR also use grid squares. Most data decoding programs have the means to automatically send grid squares, as well as frequency information and a call sign or name directly from the program. You must be careful to use the grid square of the Web receiver you are using since that is now your location. To find the location of a grid square, use www.levinecentral.com/ham/grid_square.php. For example, grid square EN61ev is Chicago.
CW, RTTY, and BPSK
There are two programs that work well for these modes. They are MULTIPSK and Fldigi (Fast and Light Digital Modem Program). Both are free and can be downloaded from the Internet.
Fldigi is a free program developed by radio amateurs. Figure 5 shows Fldigi in action receiving SITORB. It handles many other modes as well, and has numerous features including a built-in spectrum display and audio filters.
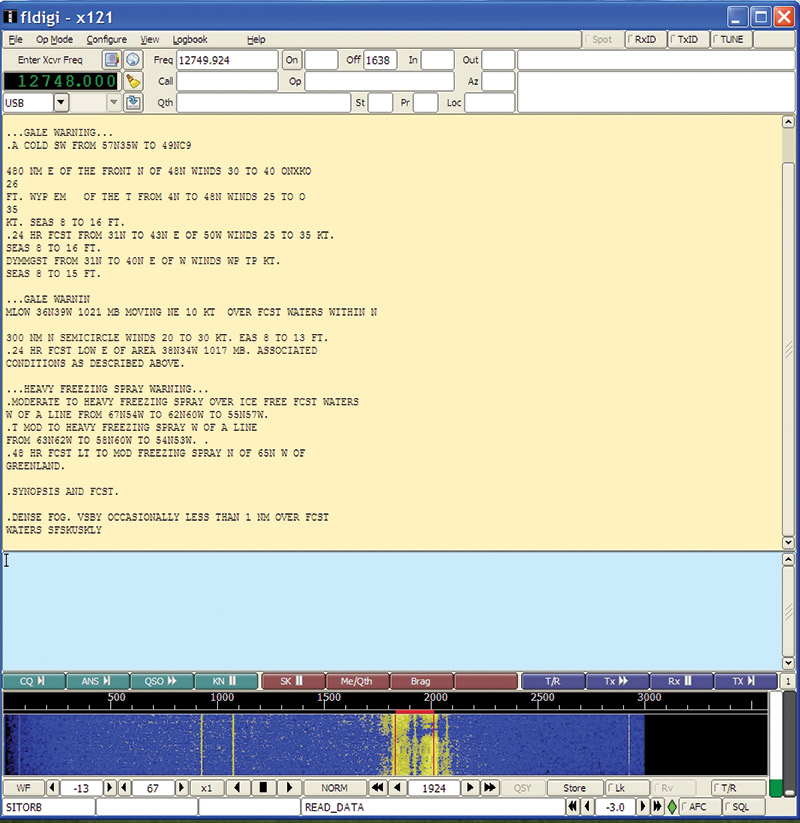
FIGURE 5. SITORB data received with Fldigi software decoder.
You can also enter your frequency, call sign, or name, and enable automatic reporting to PSKreporter. Fldigi can be downloaded from www.w1hkj.com.
Check the Internet for frequencies where these modes can be found. For example, Morse can be found around 14.000 MHz; PSK-31 at 14.070 MHz; and SITOR at 12.577 MHz.
MULTIPSK works well for these modes too, but it has a more complicated user interface. If you spend some time with it, you will find it is easy to use. It has several other modes and features not found in Fldigi. MULTIPSK can be found at http://multipsk.fr/.
WSPR, JT9, and JT65
These modes are used for weak signal communication. Oftentimes, these signals are so weak they are not perceptible by ear. These modes are used in special segments of the ham bands. For example, WSPR can be found on 14.095600 MHz and JT65 can be found on 14.076000 MHz. Note the precision of the dial settings. See Figure 6 for a JT65 screenshot.
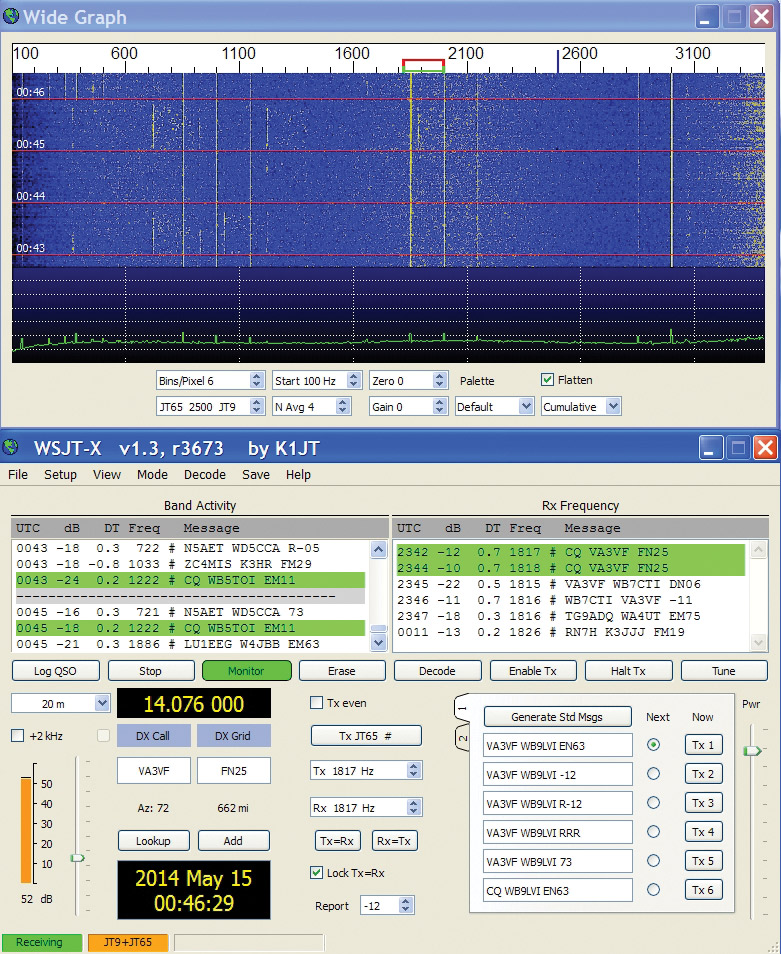
FIGURE 6. JT65 decoding window.
Included with the programs are dial frequencies for all bands. WSPR has its own website for reporting spots, while JT9/JT65 uses PSKreporter.
Weak signal modes require coordination of your PC with Universal Coordinated Time (UTC) to within one or two seconds. Make sure to set your computer clock accordingly and check it often.
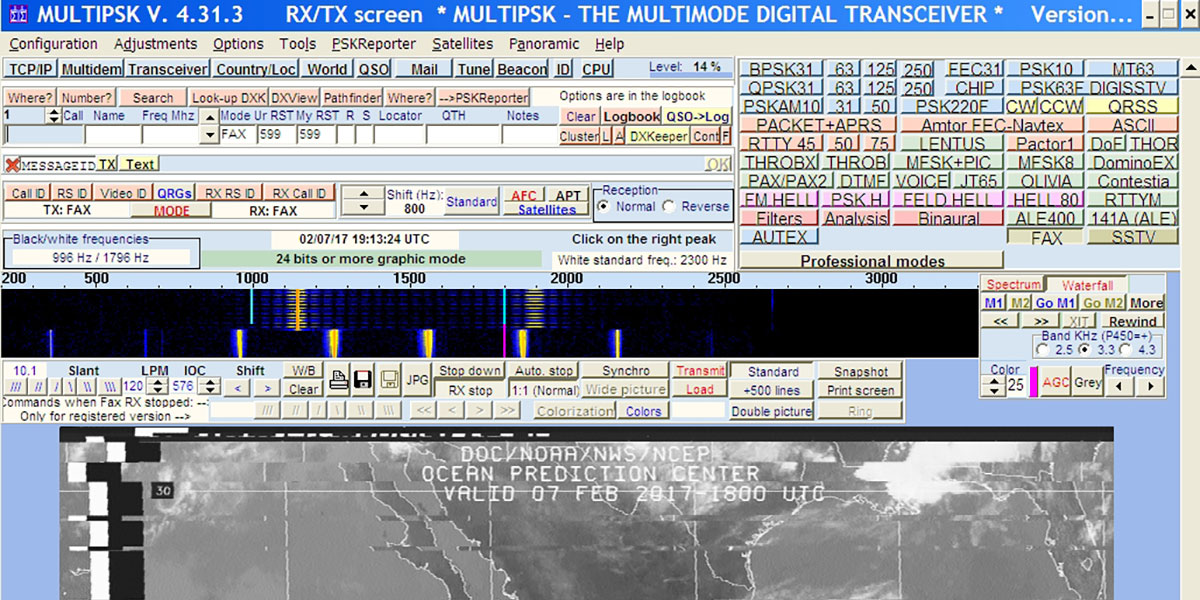
Software for FAX, SSTV, and EasyPal
FAX can be received with MULTIPSK or Fldigi. Figure 7 shows a satellite image received with MULTIPSK. It is over the Pacific Ocean south of Mexico. The picture has several breaks — probably caused by errant Internet packets as mentioned earlier.
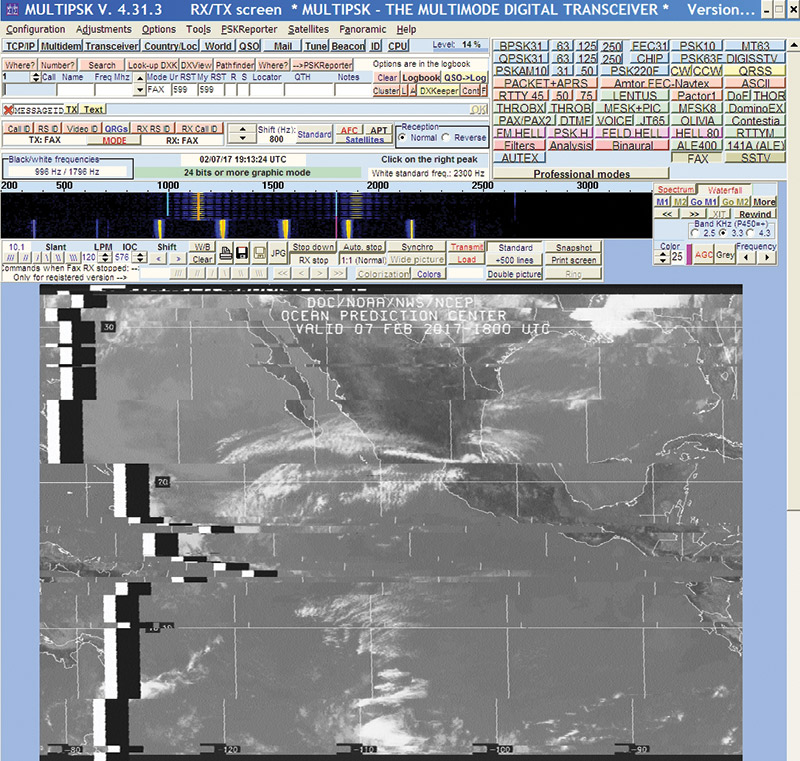
FIGURE 7. Satellite FAX image received with MULTIPSK.
Nonetheless, receiving these FAX images is interesting and gives you an idea of how many packets are lost over time.
Fax signals can often be found around 12.748 and 12.788 MHz. Slow scan TV signals can be found around 14.230 MHz. Several programs are available on the Internet for SSTV including MULTIPSK.
One of the newer picture modes is EasyPal, which transmits pictures digitally. It can be found at 14.232 MHz. Perfect pictures can be received if the signal manages to make it through the noise. Search for it on the Internet.
Final Comments
It can be challenging to utilize radio receivers located around the globe. Hopefully, you have learned a little bit about how to receive and decode Web based shortwave data signals.
With the methods shown here, you should be able to get your station working with a minimum of fuss and no cable hardware.
So, sit back and start having fun with your virtual radios. NV