As a techie, I have accumulated a lot of hardware over the years, and it pains me when I have to get rid of things that are old but still potentially useful. Such was the case with a laptop computer that had a broken hinge, broken Wi-Fi, and a broken sound system. It seemed destined for the scrap heap, even though it could still function as a portable computer.
Because of my desire to recycle, I decided to give the laptop a second life inside a shadow box picture frame that I could hang on the wall. I had wanted to buy a digital picture frame for a while, but this approach seemed much better because the frame would contain a complete, network-accessible computer that could run any applications I desired. My mind began racing with all the possibilities for a laptop picture frame (LTPF).
A Word Of Caution
I should caution you that a project like this is for those who feel comfortable tearing computers apart, and that have been successful in putting them back together into working order. A single careless step can send the laptop to the trash heap once and for all, so careful, deliberate work is definitely called for.
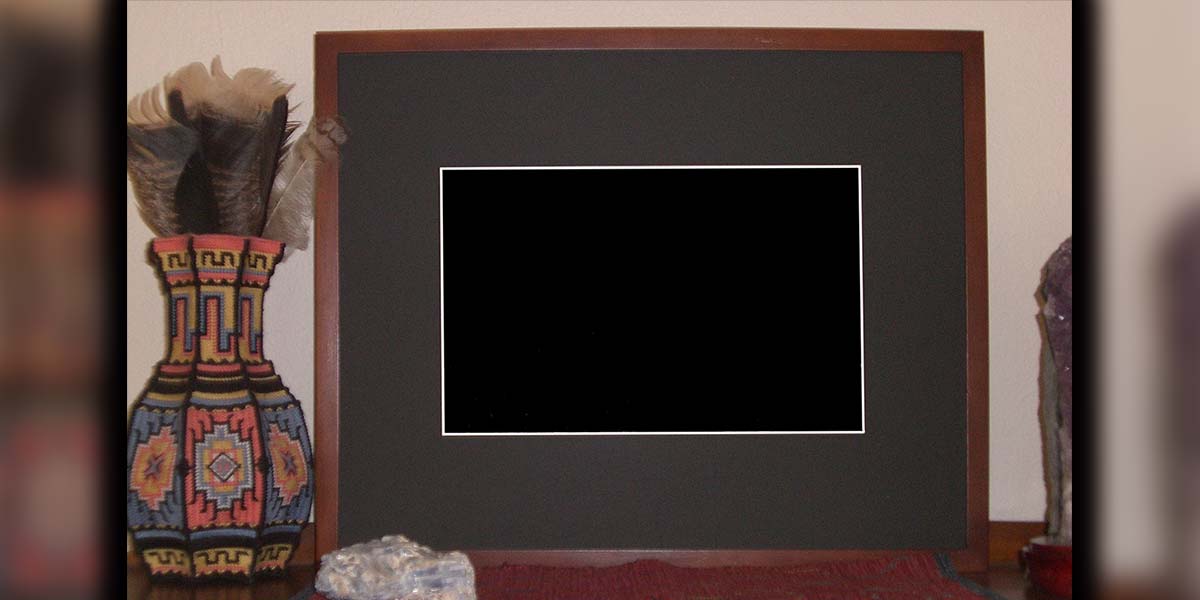
I should also say this article describes the steps I went through to build a LTPF from a Gateway computer. The laptop you use will probably be different so you will need to adapt the information here accordingly. Photo 1 at the top shows my finished LTPF.
What You Will Need
- A functioning laptop computer with a good LCD display, Wi-Fi capability (either built in or provided by a USB adapter or PCMCIA card), and power supply. The larger the display, the better (in my opinion).
- A shadow box type picture frame large enough to contain the laptop hardware. I used a wooden shadow box I bought from Hobby Lobby. Its dimensions are: 21” W x 17” H x 2 3/8” D.
- A matte to fit the frame with a cutout the size of the laptop’s display. More on this shortly.
- Two pieces of 1/4” MDF (medium density fiberboard) cut to fit into the frame.
- Duct tape or other strong tape.
- Quick set epoxy (the two-tube mixing kind).
- A 3/8” wooden dowel for making standoffs/spacers.
- An assortment of small wood screws and four 2” flat head machine screws, washers, and nuts.
- A power switch. (In my case, I used a momentary contact SPST pushbutton switch.)
- Some hookup wire.
- Soldering iron, drill, saber saw, and other miscellaneous tools and supplies.
First Comes Destruction
I had to completely disassemble the laptop and get rid of all extraneous parts to squeeze the laptop circuitry and the LCD display into the shadow box I wanted to use. Before disassembling the laptop, it is important you measure the display area as accurately as possible. In fact, measure it twice or three times to be sure you get the measurements right. This is the area of the display between the plastic parts that frame it, where content can be displayed. You will understand why this is important shortly.
Next, take a deep breath and begin disassembling your laptop. You should do the disassembly on a clean flat surface and try to minimize your movements to avoid static. A grounding strap — while not absolutely required — would be a good precaution.
For some reason, I found the whole disassembly process really fun. Take your time and be careful not to damage anything. Your laptop was designed to snap and screw together so you must perform that process in reverse. If things seem stuck and won’t come apart, you have probably missed a screw somewhere; look closely and you will eventually find it.
Special attention is needed when you disassemble the display. You need to remove everything to get to the raw LCD panel. Remove all of the plastic surrounding the display, the hinges, and even the metal bracket used to mount the LCD panel. You should be left with the LCD panel, its cable(s) with connectors and, in my case, a backlight controller built onto one of the cables.
When all is said and done, you will end up with a pile of parts; some you will need, most others you won’t.
The stuff you will need includes:
- LCD panel with its cables and backlight controller (if separate)
- The laptop’s logic board with RAM and Wi-Fi board (if not built in)
- All fans
- Power switch assembly
- Hard drive
- Power supply (brick)
The stuff you don’t need includes:
- Battery
- Keyboard
- Track pad
- CD-ROM drive
- Modem
- Small mountain of plastic and metal parts, screws, and fasteners
Then Comes Construction
The first step is to make or buy a matte that fits into the shadow box frame that has the opening cut to the exact dimensions of the display area measured previously.
Next, cut two pieces of MDF so that they both fit easily into the shadow box. One of the MDF pieces is used to mount the display and the other is used to mount the laptop’s logic board. Line up one of the MDF pieces with the matte and trace the cutout area onto it. Using a saber saw, cut out the opening for the LCD display. After cutting, sand the edges smooth and verify your LCD display will fit into the cutout.
Once you are satisfied with the fit, paint the MDF (without the LCD) the same color as the matte. Let this dry completely before continuing with the construction.
Cut four wooden spacers from the dowel to the length necessary to hold the second MDF panel above the display which will be mounted in the first MDF panel. Strategically position the spacers to uniformly support the sandwich made from the two pieces of MDF. These spacers will be epoxied to the back of the display board MDF. Drill holes in the logic board’s MDF panel for the machine screws protruding through the display MDF and the spacers. A washer and nut on each screw will hold things together. Alternatively, you could use short wood screws to secure both MDF panels to the spacers.
On a clean flat surface, place the display’s MDF panel face down and drop the LCD display into it making sure the front of the LCD display is face down, as well. Cut strips of duct tape and run them along all sides of the LCD display, joining the metal rim of the display to the MDF (see Photo 2). Press firmly on the tape to remove air bubbles. Flip this assembly over and again run tape on all sides of the display. The duct tape will hold the display firmly in place for a long time.
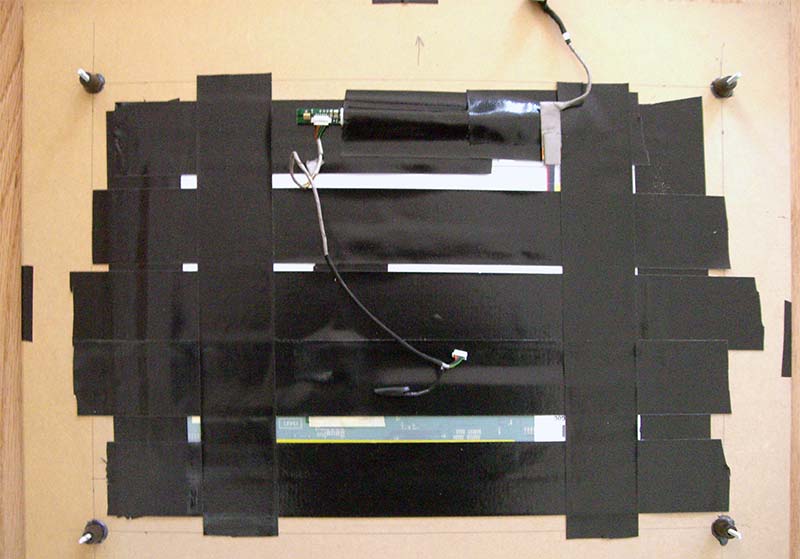
PHOTO 2. LCD display taped to front MDF panel.
Turn the assembly back over and epoxy the spacers into place on the rear of the display MDF. Drill the holes in the spacers after they have dried in position. You may want to run some more duct tape to secure the display cables to keep them from flexing too much. You must, however, leave enough slack in the cables so they can be reattached to the logic board.
With the display board finished, place the logic board’s MDF panel on the spacers and determine where to drill a hole or holes for the display’s cable(s) to pass through in the most natural and stress-free way. Mark and drill these holes with sufficient size to allow the cable(s) and connector(s) to pass through the logic board’s MDF panel. You may want to drill a series of 1/4” holes in the logic board’s MDF panel to allow air flow for cooling.
Now that you have determined where the display cables feed through, it is time to position and mount the logic board from the laptop (see Photo 3). Orient the logic board so the display cables can be plugged in without stretching or stressing the cables. I chose to fabricate small wooden spacers to act as standoffs for mounting the PCB to the MDF. I marked the position of the PCB mounting holes onto the MDF and then epoxied the 1/4” wooden spacers into position. I drilled small pilot holes in the spacers for the wood screws used to secure the PCB to the MDF panel. I then attached the logic board to the MDF panel.
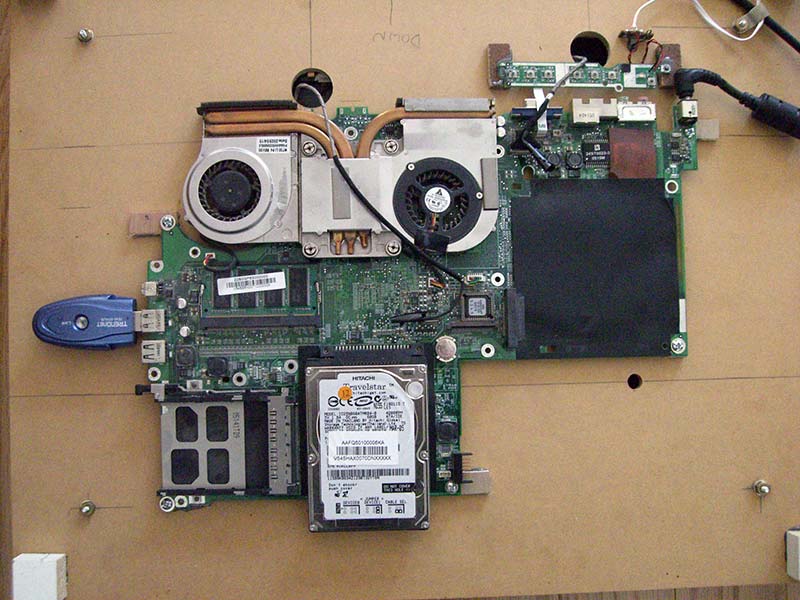
PHOTO 3 . Logic board mounted to rear MDF panel, the USB wireless adapter is the blue thing on left. The hard drive is at the bottom. Dual fans cool the CPU. The power switch assembly is in the upper right below round hole.
In the laptop I used, the power switch was mounted to its own PCB which attached to the logic board with a flexible ribbon cable. I therefore chose to mount this power switch assembly close to the logic board so that the flexible cable could be plugged back in. I mounted it using the same technique I used for mounting the logic board’s PCB.
At this juncture, it would probably be a good idea to make sure the computer still works before buttoning things up. Plug all of the components back together, make sure the hard disk is in place, connect up the power supply cable, and press the power button. If all is well, your LTPF should boot into the OS. If it doesn’t, recheck all cabling until you find the problem. After getting the LTPF to boot, screw the two MDF assemblies together and verify this sandwich can be easily inserted into the shadow box frame.
The final step in the hardware construction process is preparing the real panel of the shadow box. I decided to cut a hole in the back panel to allow the power cable to pass through. You could, of course, wire in a connector for the power but I didn’t think it was necessary. Next, I drilled a hole to mount the pushbutton power switch in a convenient position. In addition, I drilled an array of 1/4” holes in the real panel for cooling purposes. After all of the holes were drilled, I spray-painted the rear panel flat black for a professional touch.
Next, I soldered some 24 gauge twisted pair wire to the power switch and soldered the other end across the original power switch on the power switch assembly. This way, either switch can be used to cycle the power. With these steps complete, it is time for final assembly.
Place the shadow box face down and insert the matte into it. NOTE: The glass from the shadow box is not used. Next, place some double-sided tape on each side of the LCD display. This tape will prevent the matte from slipping out of position due to gravity when the LTPF is hung. Carefully insert the subassembly sandwich (see Photo 4) into the shadow box and line up the display with the matte. Press the matte down so it adheres to the tape. Make sure the cutout in the matte lines up with the LCD.
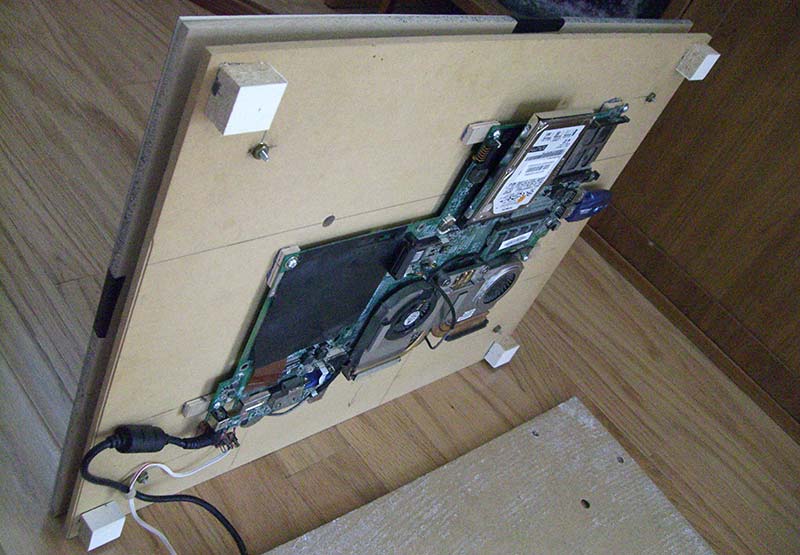
PHOTO 4. The sandwich assembly made up of the front and rear subassemblies.
I cut four wooden spacers out of 3/4” stock and epoxied them into the corners of the logic board’s MDF panel. These spacers prevent the sandwich from moving within the frame as it is now wedged into place with the rear panel of the shadow box (see Photo 5). You may or may not need these spacers in your LTPF.
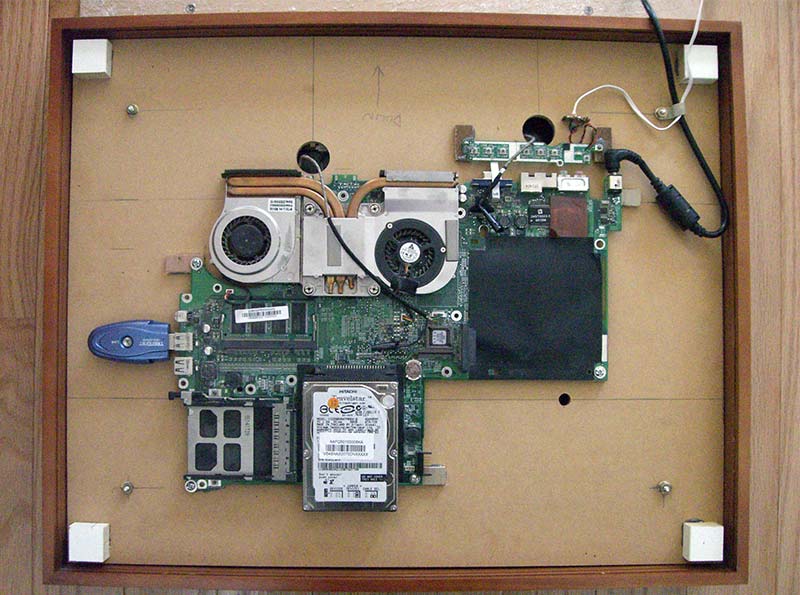
PHOTO 5. Sandwich assembly placed inside shadow box. Note spacers in corners.
Finally, run the power cable through the hole in the rear panel and plug it into the logic board’s connector; secure the rear panel to the shadow box.
You can now pat yourself on the back for a construction job well done. Software is next.
Controlling The LTPF
Since I had discarded the keyboard and the track pad during the laptop’s disassembly process, I needed a way to control the computer’s operation. There are at least two ways to do this. You could connect a wireless keyboard and mouse to the laptop (via USB) for control and use a USB Flash drive to move files back and forth to it. With this approach, the LTPF behaves like a normal, non-networked PC.
As for me, I wanted my LTPF on my local wireless network so I could control it remotely. Since the onboard Wi-Fi was broken, I used an inexpensive USB wireless adapter plugged into one of the laptop’s USB ports. The approach you take is up to you.
Since my LTPF was running Window’s XP Professional, I chose to use Microsoft’s Remote Desktop software to control it across the network. See the Resources sidebar for info on setting up the remote desktop along with other options for remote control software.
LTPF Software
The first decision you need to make is which operating system your LTPF will run. I stuck with XP Professional. You could, however, run some dialect of Linux such as Ubuntu if you are more comfortable in the Linux/Unix realm. The remainder of this software
discussion is focused on Window’s applications so if you choose some other OS, you have some work to do.
I had two applications in mind when I built my LTPF. First was to provide a slide show of personal photographs like the digital picture frames you buy. For this application, you can use any slide show software you have access to. One choice is the free Flickr screensaver which allows you to display photos from a local directory on the LTPF or to pull in photos from the Flickr website. Again, Resources has some pointers for you.
The second application I wanted to run is one I wrote called Art Rays which is described in the sidebar.
Login was a problem I needed to overcome right away as I didn’t want to have to log in to the LTPF every time I turned it on. Microsoft came to the rescue here by providing a program called TweakUI which — among other things — can direct an XP box to log in as a specified user every time it is powered up. So, I created a user (LTPFUser) with a password and told Window’s via TweakUI to log in this user “automagically.” The remote desktop software used for remote control also uses this login for access.
If you have an application you wish to execute as soon as your LTPF starts up, you need to place a shortcut to the application in the Start Folder of the user (LTPFUser, in my case).
Other Project Possibilities
If the sound system works in the laptop you use, you might want to mount the speakers extracted from the laptop into the LTPF. That way, you could play sound during a slideshow or you could use it for pranks where voices seem to come out of nowhere.
If you have a laptop with a broken display, you might disassemble an external LCD monitor and couple it to the laptop via a VGA cable, and then mount both assemblies inside the picture frame.
In terms of other applications for your LTPF, you could run an RSS reader and display stock market graphs, weather data, or other feeds of interest.
This was a fun project for me and it turned out nice enough to hang in our living room. I hope your LTPF turns out as well and that you come up with your own interesting and creative ways to use it. Cheers! NV
About the Author
Craig Lindley is a degreed hardware engineer who, until recently, had been writing large-scale Java applications. Now in retirement, he designs and builds the projects he wants to. He can be contacted at [email protected].
Art Rays

A ray traced image generated by Art Rays.
The Art Rays program enables your LTPF to generate dramatic imagery without human intervention. In other words, Art Rays allows your LTPF to generate its own art dynamically. (And you thought only Bill Gates could have this type of thing!) Art Rays uses raytracing to produce unique, one-of-a-kind, three-dimensional images. See the photo for an example Art Rays’ image. In fact, I have written a version of Art Rays called Art Rays Lite as an iPhone app available in the iTunes app store. Check it out if you have an iPhone or iPod Touch.
Of course, you have to appreciate ray-traced images to enjoy what Art Rays does. There isn’t enough space here to even start to describe the variety and types of images Art Rays generates. As they say, a picture is worth a thousand words so I have made a video of Art Rays images available on YouTube. Check it out to help you decide whether to install Art Rays or not.
Art Rays is based on MegaPOV which is itself based on the amazing POV-Ray — a free raytracing program. You should download POV-Ray, then read and agree to the license agreements before installing and using Art Rays. NOTE: Art Rays is provided for personal use only. No commercial use of Art Rays or Art Ray images is permitted without written permission from the author.
To install Art Rays, get the file from the article downloads and unzip it into the root of drive C: on your LTPF. Next, create a shortcut to the file c:\artrays\ArtRays.bat and place it into the Start folder of your LTPF user. Art Rays will then run automatically when you power-up your LTPF.