Proficiency in sending and receiving Morse code — while no longer required for licensure -- is the best way to experience traditional ham radio. I could review the technical superiority of Morse code (practiced as CW, or continuous wave) over other modes of communications, but the bottom line for me is that communicating with dits and dahs in a jumble of noise and other communications signals is just plain fun. Let’s face it, any grade school student with a cell phone can talk and text with anyone else on the planet with a similarly equipped smartphone.
Compared with simply speaking or even typing with both thumbs, learning Morse code can be a difficult time-consuming endeavor. I still remember the RadioShack Morse code course on 33LP that followed an antiquated approach to teaching, starting with “dit,” “dit dit,” “dit dit dit,” “dit dit dit dit,” “dit dit dit dit dit” (e, i, s, h, 5), and so on. I memorized that LP, focusing on individual letters at five words/minute.
As a result, it took me years to learn to copy entire words and phrases in my head at up to 35 words/minute. Fortunately, times have changed, and Morse code teaching techniques and the associated technologies have matured.
Today, there are dozens of freely accessible websites and free or inexpensive apps for Android and iOS tablets and phones that provide sophisticated and efficient Morse code training. My favorite browser-based program is LCWO.net or Learn Morse Code (CW) Online.
My go-to for iOS devices is Morse-it, which sells for about $5 by the time you purchase the key add-ons. These programs support the modern use of words and phrases transmitted at 20 or more words/minute, with adjustable space between letters and words.
There’s also no shortage of microcontroller-based trainers, starting at about $15 for poorly documented kits on eBay, to the excellent $95 MFJ-418 Pocket Tutor. I own several of the inexpensive Chinese manufactured kits, and they’re fine for limited practice of random letter groups and call signs. After an hour or two, however, these limited inexpensive boards end up in my desk drawer.
The MFJ-418 is an excellent trainer, but, like the other trainers, there’s no provision for teaching you how to send Morse code.
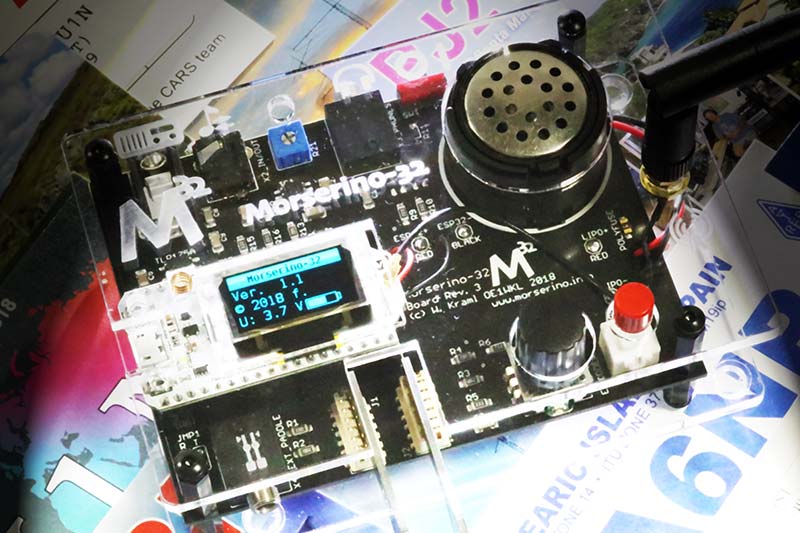
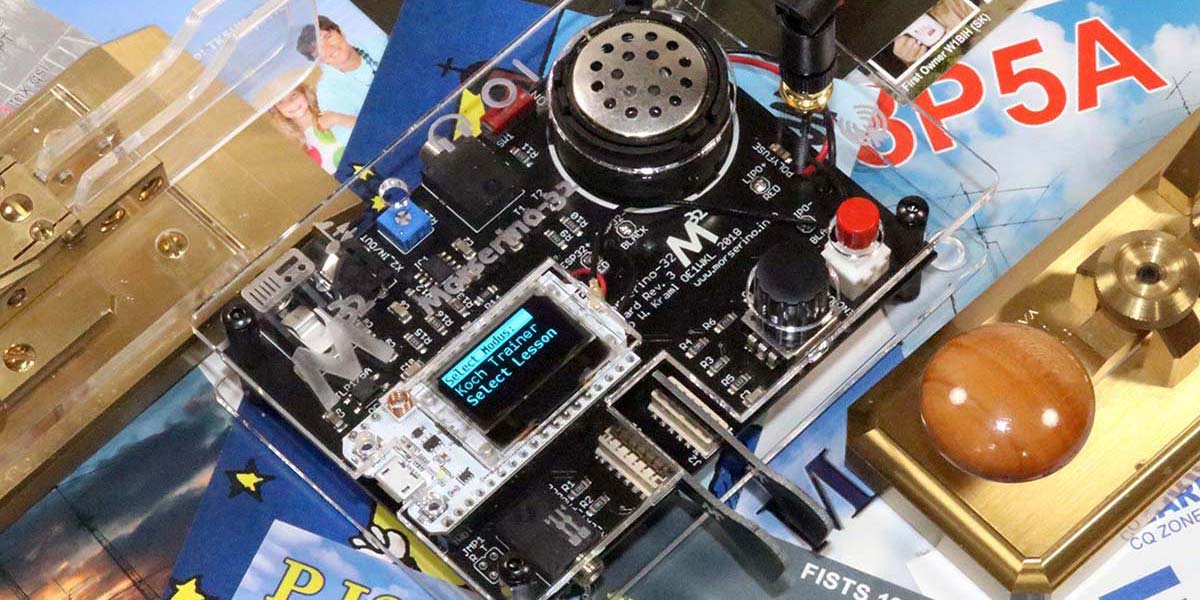
PHOTO 1. Morserino-32 at startup.
THE MORSERINO-32
The focus of this review is the Morserino-32: a feature-packed microcontroller-based send and receive trainer, available from Willi Kraml OE1WKL for $99, including shipping from Austria. So, what’s so special about this kit? Well, the Morserino-32:
Is tactile interactive — Unlike other hardware trainers in this price class, the Morserino-32 is tactile interactive. That is, it’s a great trainer for both sending and receiving Morse code. In Echo mode, it sends you a few Morse characters and — using the built-in paddle or your own external paddle — your task is to exactly duplicate the characters. To me, the Echo mode is worth the full cost of the kit. Unfortunately, this mode doesn’t (yet) support a straight key.
Is a kit — I love kits, and this one doesn’t disappoint. There’s no shopping around for components from various vendors. The only exception is a 600 mAh 3.7V lithium polymer (LiPo) battery with Molex connector ($9 for two, Amazon) if you don’t have access to a USB port. The acrylic enclosure is attractive and functional, and the ergonomics are good. An hour should be more than enough time for you to solder about a dozen components on the printed circuit board (PCB).
Is open source — The source code, schematic, bill of materials, and related documentation are freely available for non-commercial use through GitHub (https://github.com/oe1wkl/Morserino-32). If you know your way around the Arduino IDE (integrated development environment) — probably the easiest to use and most popular IDE for microcontrollers — then you can program the Morserino-32. I think the kit is reasonably priced and hassle free, but you’re free to download the software and to follow the schematic to create a trainer with your own parts.
Is a great platform to learn ESP32 programming — With over 4,000 lines of thoroughly documented source code and a plethora of features, the Morserino-32 makes for an excellent platform to learn ESP32 programming. As a reminder, the inexpensive ESP32 (see Photo 2) is an impressive chip with two cores, a 32-bit architecture, a CPU frequency of 160 MHz, 512 KB RAM, and 16 MB Flash memory. One core supports Wi-Fi/Bluetooth, leaving the other core for custom programming.
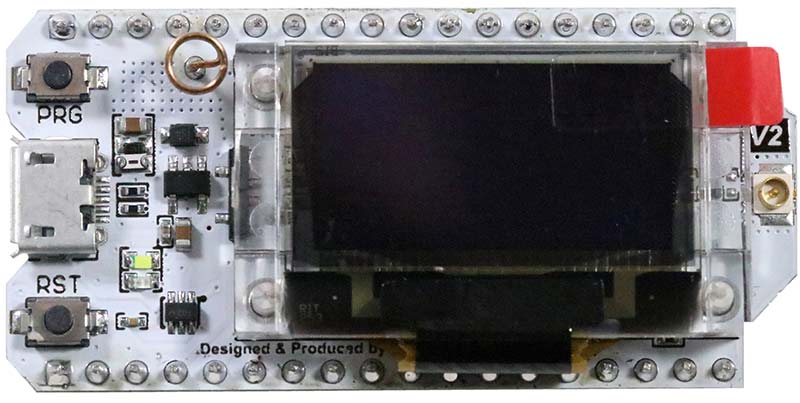
PHOTO 2. Top side of the ESP32 with OLED screen.
Works with straight keys & paddles — You have the option of using a straight key or an iambic paddle for the exercises. What’s more, there’s a built-in set of paddles that minimize the materials you need to bring to practice sessions.
Is popular — As of March 2019, over 500 Morserino-32 kits had been shipped to 25 countries. At that time, there were over 126 kits on the waiting list.
Is supported — Given the relatively large number of units sold, it’s not surprising that there’s an active support group, an extensive FAQ section, printable PDF user and construction manuals, and a dozen or so demonstrations on YouTube.
Got its start with Kickstarter — The Morserino-32 Kickstarter project launched October 24, 2018. The fundraising was phenomenally successful, at 340% of the initial ask.
I’m a big fan of the Kickstarter paradigm, in part because the design is thoroughly vetted by supporters.
FEATURES
For a full set of features of the Morserino-32 Morse trainer, go to their website at www.morserino.info/morserino-32.html. The most significant features to me include:
- Based on the ESP32 microcontroller with Wi-Fi, Bluetooth, and LoRa (Long Range Wi-Fi).
- Built-in capacitance-sensing iambic keyer (5-50 wpm). Version 1.2 will support up to 60 wpm.
- OLED display, 128x64, monochrome.
- Multiple power supply options including LiPo batteries with built-in charger and standard USB.
- Connections for headphones, keys, and paddles, and audio in.
- Completely configurable, with open source software.
- An Echo Trainer function that requires you to respond to a CW word prompt by repeating the word with a paddle.
- A CW decoder from straight key or an audio input, such as your receiver.
- A CW transceiver based on LoRa at 432 MHz for learning how to conduct a QSO or radio exchange, and for group training. You’ll need more than one unit to try this.
- Firmware that can be updated over Wi-Fi.
- It’s compact — the case is about 3-1/4 x 4-3/4 x 1-1/2 in without paddles attached, or about the size of a standard paddle or straight key. It fits well (with the paddles removed) in a Pelican 1060 case, with room for the detached antenna, the included USB charging cable, and a set of ear buds.
ASSEMBLING THE KIT
As shown in Photo 3 and Figure 1 (the PCB and the parts placement guide, respectively), this is a “paint by numbers” project. Because each component has a unique lead configuration, it’s virtually impossible to mount components where they don’t belong. That doesn’t mean you can be sloppy, however.
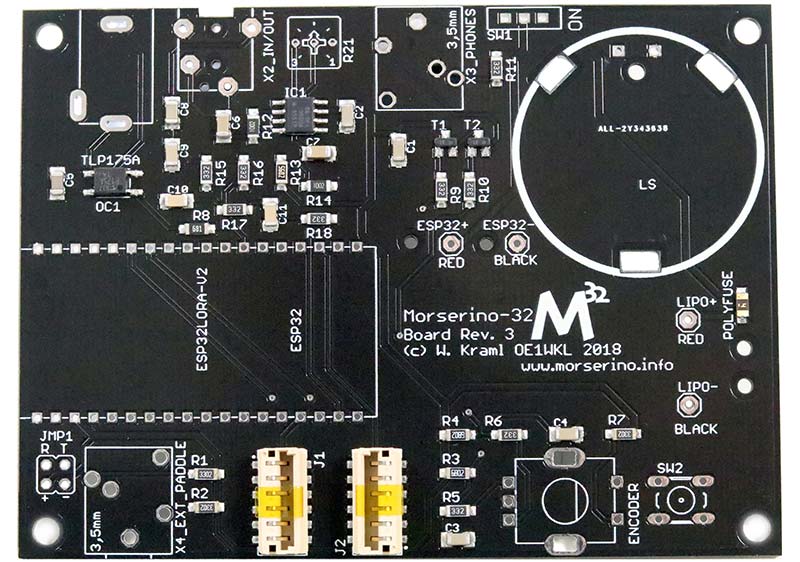
PHOTO 3. Printed circuit board prior to soldering.
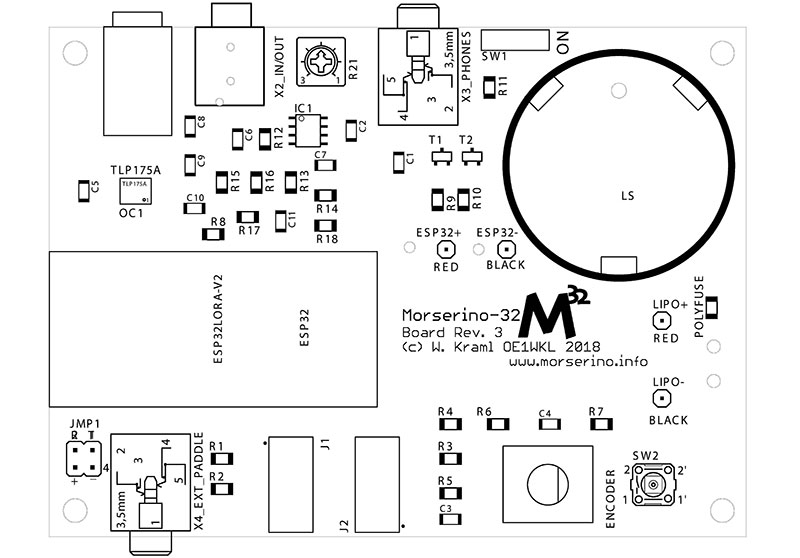
FIGURE 1. Parts placement guide. (© 2018 W. KRAML, OE1WKL.)
The acrylic cover is a tight fit; you’ll have to mount the switches and knobs so that they are perfectly orthogonal to the PCB surface. Note the surface-mount resistors, capacitors, transistors, and chip that are pre-mounted on the board. This is about as easy as it gets for a solder kit.
You won’t be needing your SMT kit. As shown in Figure 1, the components to mount on the board are large and easily handled.
The possible exceptions are the two connections to the ESP32. You’ll have to supply power to the ESP32 through a small cable on the underside of the chip, as in Photo 4.

PHOTO 4. All parts to be mounted are relatively large and easily handled.
The other potentially challenging connection is on the top side of the kit, where the miniature coax cable for the antenna mates with the chip (Photo 5). I used the eraser head of a pencil to apply pressure to the connector, and it snapped into place.
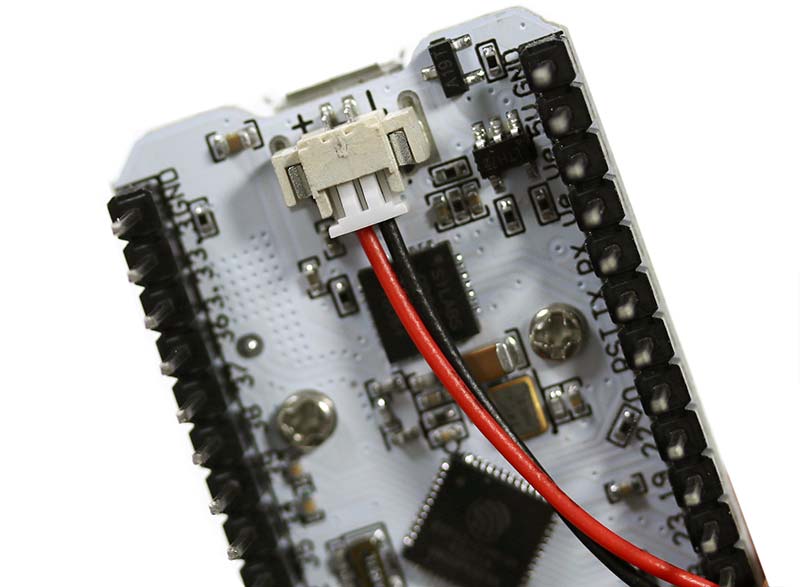
PHOTO 5. Power lead on the underside of the ESP32.
OPERATING THE MORSERINO-32
Starting the Morserino-32 is as simple as sliding the power switch to the on position. If you have either a charged LiPo battery or the USB power cable connected to a live source, then the OLED screen will announce the version number of the firmware. I worked with version 1.1.
There is a potentially intimidating list of functions easily accessible through the intuitive OLED-based menu system. Most of your interactions will be with the black encoder and red momentary contact switch. If you’re the owner of a modern transceiver, then you’ll quickly learn to work the two components to select mode, set volume, speed, and other parameters.
This is possible because the encoder performs different functions, depending on the number of times it’s pressed and the arc of rotation.
Don’t forget — if you want to evaluate the user interface before you commit to the kit or to build one on your own, simply consult the user manual available online.
The small speaker produces more than enough volume for practice, and the removable paddles are surprisingly very good, considering the cost of the unit. Even so, I prefer to use my Schurr straight key and paddles (shown in Photo 6) with ear buds for practice at home. The built-in paddles are more than sufficient for practice in my hotel room when I’m traveling for work or vacation.
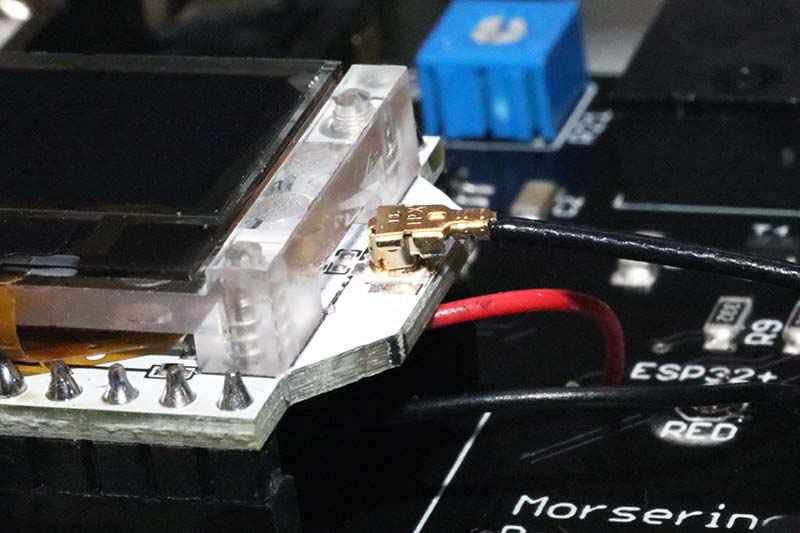
PHOTO 6. Antenna cable attached to the socket on the side of the ESP32.
NEXT STEPS
I view my Morserino-32 as a work in progress. Everything works as advertised, but I know added functionality is just around the corner with the next software mod — whether it’s an official release or one of my own design.
As far as software functionality goes, I’ve started tinkering with supporting the straight key in Echo mode. For now, the straight key is supported only by the CW Decoder mode. From a hardware perspective, I’m thinking about substituting a larger OLED display for the existing unit. I’d like to try and operate the Morserino-32 on a shelf next to my transceiver, as opposed to on my desk.
I also have several experiments planned with the long-range Wi-Fi. I’ve ordered a second Morserino-32 for a friend that has agreed to learn Morse code so that we can test communications between two units.
My hope is that he’ll develop an interest in Morse code communications beyond the confines of an office building and go for his amateur radio license.
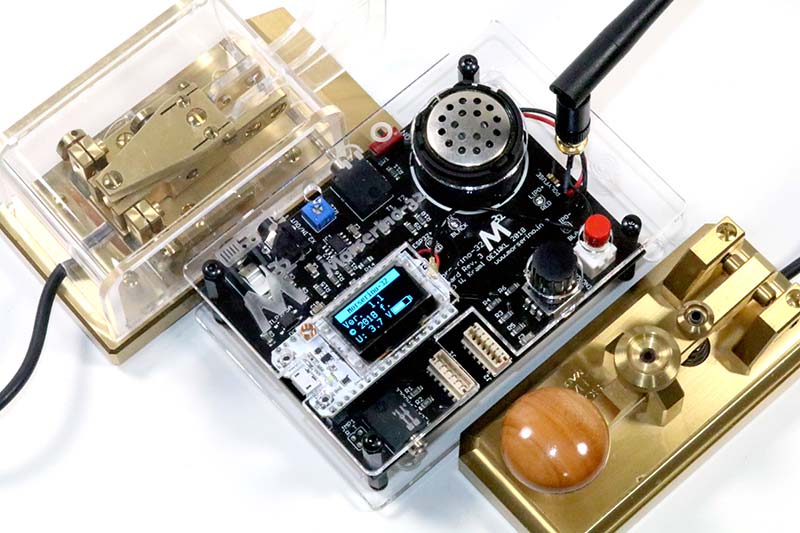
PHOTO 7. Antenna cable attached to the socket on the side of the ESP32.
MORE INFORMATION
For more information on the Moserino-32 project (including how to subscribe to the user group), check out the official website. You can also contact Willi Kraml OE1WKL at [email protected]. As you’d expect from an amateur radio operator, he’s friendly, super responsive, and committed to helping others learn Morse code.
In a broader context, for more information on Morse code and amateur radio, check out the Straight Key Century Club (SKCC) at skccgroup.com. The SKCC is the worldwide group of mechanical-key CW operators. Membership is free for the asking.
Another organization worth investigating is the Americas Chapter of FISTS: The International Morse Preservation Society at fistsna.org. FISTS has a slightly different twist on Morse code in that it was started to promote the use of CW in any form, including electronic paddles. Membership is currently free. Their quarterly newsletter, Keynote (which I edit), is also freely available through the FISTS website. NV