Are you ready for some serious Rock, Paper, Scissors competition? This game is not just for kids! In fact, the World RPS Association in Canada holds big tournaments every year. Now you can build your own Rock, Paper, Scissors Electrified game that keeps score as you bang away on the huge arcade buttons.
As you know, normally the game is played by using your hand to signal either Rock, Paper, or Scissors. A closed fist signifies Rock; a flat hand is Paper; and a V shape with two fingers stands for Scissors. The rules are simple: Rock breaks Scissors; Paper covers Rock; and Scissors cut Paper.
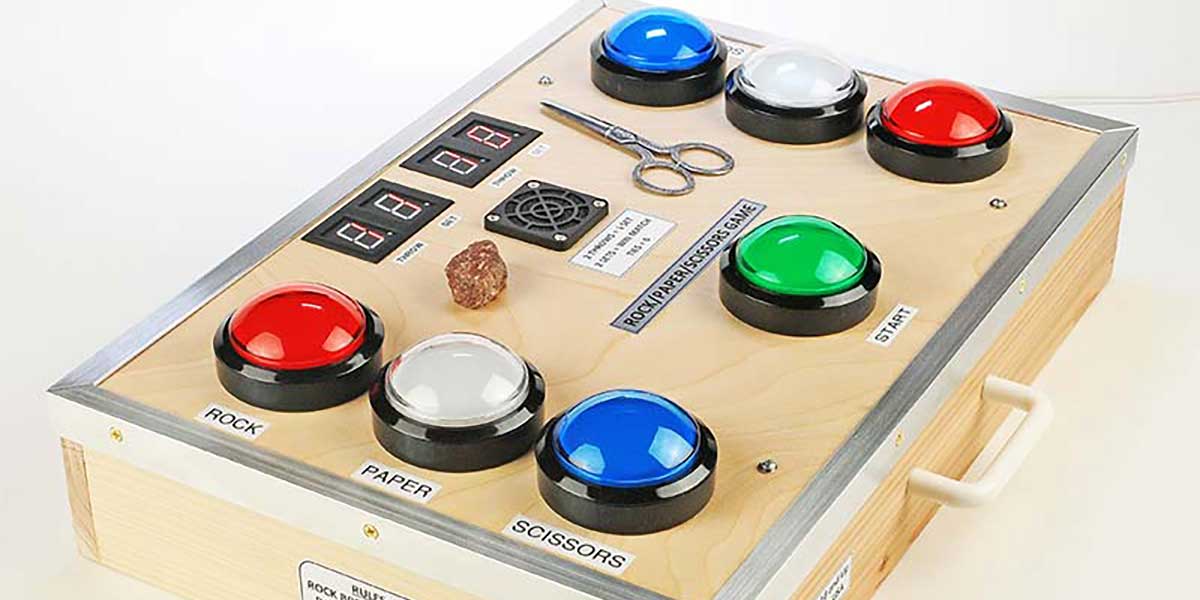
I figured that it might be just as much fun to bang on a bunch of big lighted buttons instead of using hand signals, and to use a small microcontroller to keep track of the score, flash some lights, and trigger a soundtrack to narrate the play. Figure 1 shows the end result.
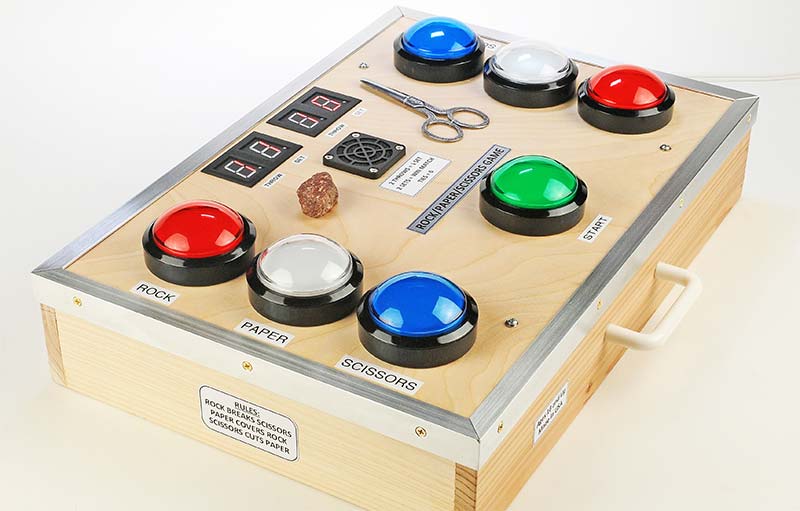
FIGURE 1. The Rock, Paper, Scissors Electrified game uses giant arcade style buttons instead of the usual hand gestures. Rock breaks Scissors, Paper covers Rock, and Scissors cut Paper.
THE PLAY AND SCORING
The game is mounted in a wooden box to provide room for the buttons and to separate the players a bit. Rock is the red button, Paper is white, and Scissors is Blue. The Green button resets the score and starts the game.
The scoring is as follows: Whoever wins a Throw gets a point. Two winning Throws equals a Set. Two Sets win the Match. Bottom line: If you win four Throws, you win the Match and are crowned the grand champion of the day.
A short video showing the operation of the game is available at https://youtu.be/a0T3bJ8ju68.
In some tournaments, a Throw is called a Game. I’m using Throw because I think it’s more descriptive of the action. So, my game is “Throw, Set, and Match.” However, you could also think of it as “Game, Set, and Match” like in tennis. Same difference.
During play, if both players Throw the same thing, like Rock vs. Rock or Paper vs. Paper, it’s called a tie and doesn’t count. The soundtrack says, “It’s a tie, no score, go again.” (BTW, according to tournament statistics, Rock is the favorite Throw.)
The command to start a Throw is initiated by tapping the blinking White button. The specific White button is alternated with each Throw to give both players an equal opportunity to start the Throws.
Question: What’s to prevent a player from watching the other person’s hand and changing their Throw? The rules say that the player’s Throws MUST be “in sync” with each other. So supposedly, there would not be enough time to change a Throw.
Solution: To insure this, the Arduino records the time (in milliseconds) that each player hits their button. If the time between them is greater than 1/3 of a second (333 ms), the soundtrack calls “Players were not in sync, go again.”
The playing gets really intense when both players have each won three Throws because the very next Throw could determine the big winner. Of course, if a “tie” is thrown, they must keep going. Sometimes three or four ties are thrown in a row and the excitement reaches mind-blowing levels. Great fun!
Figure 2 illustrates a typical score.
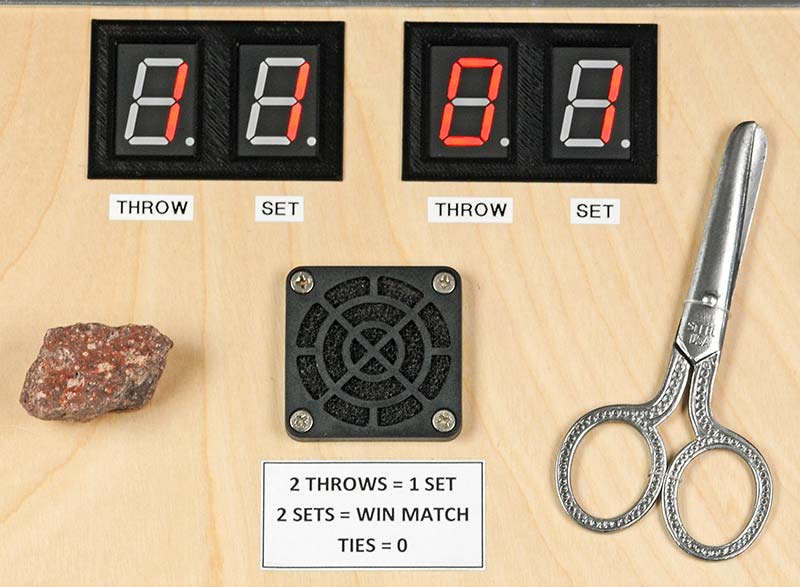
FIGURE 2. Seven-segment displays show the scores as the soundtrack narrates the game, “Hold on to your hat, the next Throw could win the Match.”
In this case, the person on the left only needs to win one more Throw to win the Match. The soundtrack would be saying, “Hold on to your hat, the next Throw could win the Match.” Winning a Match triggers a “rousing cheer from the crowd.”
ALTERNATE SCORING
Some Rock, Paper, Scissors (RPS) tournaments are scored a little differently.
Method 1: A winning Throw gets a point on the scoreboard.
Method 2: A winning Throw gets a point on the scoreboard AND subtracts a Throw from the opponent’s score if the opponent has a Throw score.
To accommodate this alternate scoring, a “scoring method” toggle switch was added underneath. The software performs the subtraction automatically, although subtracting a Throw is a little more cutthroat. Your choice. I prefer NOT doing the subtraction so the game moves along a little faster and the scoring is simpler.
If you search “Rock Paper Scissors Competitions” on YouTube, there are several videos of past “professional” matches in Las Vegas; they use the subtraction method.
ARDUINO SELECTION
The underside of the game is shown in Figure 3.
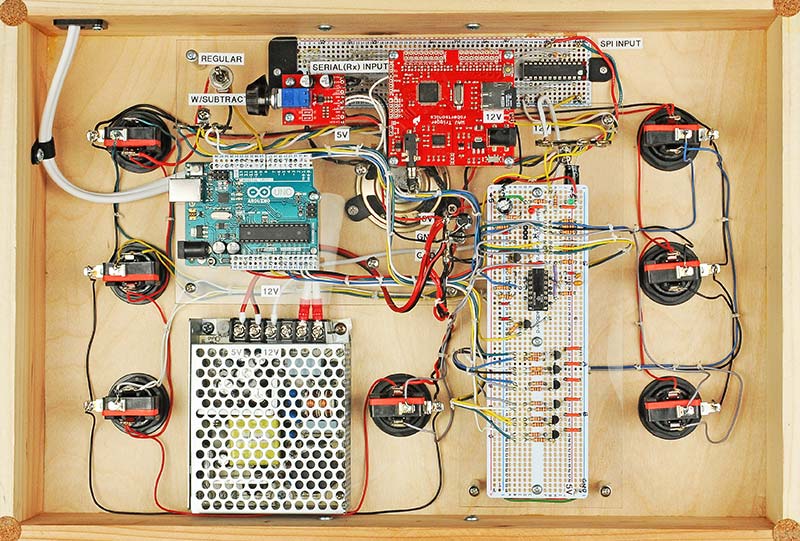
FIGURE 3. The box houses a green Arduino Uno, red sound card, white Proto board for discrete components, and dual power supply (5 and 12 volts).
The schematic for it is Figure 4.
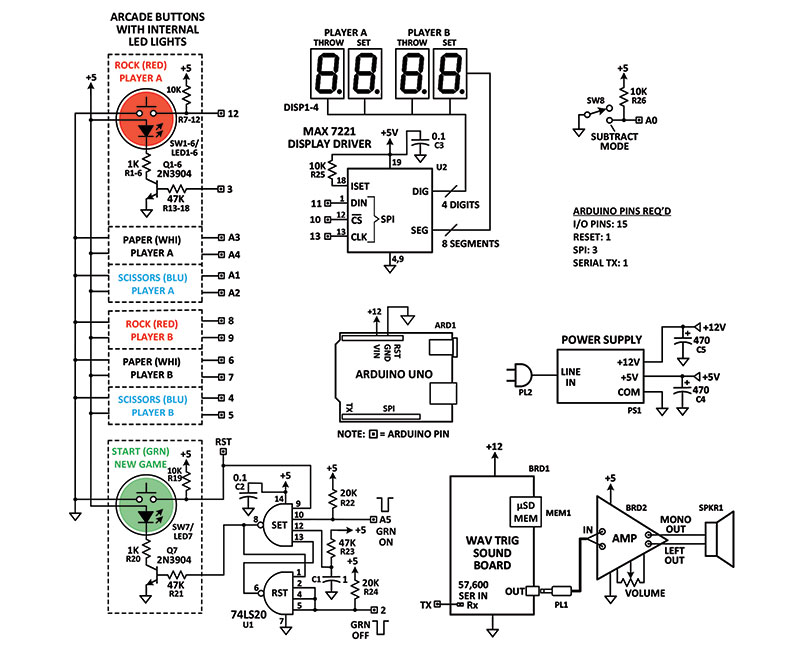
FIGURE 4. The MAX 7221 display driver IC uses three SPI pins to configure and display the scores during a match. It handles the seven-segment decoding and scanning of the digits.
You’ll notice that I put in an Arduino Uno, which barely had enough pins. I could have used a smaller Arduino like a Nano Every, but I had an Uno in my junkbox, so I used it.
Of course, the larger Mega 2560 would also do the job — especially if you needed a few more pins to add some options like variable 1,2,3 cadences or more flashing lights.
Just for my edification, I checked on the cost of the three Arduinos shown in Figure 5 to see what the difference was.
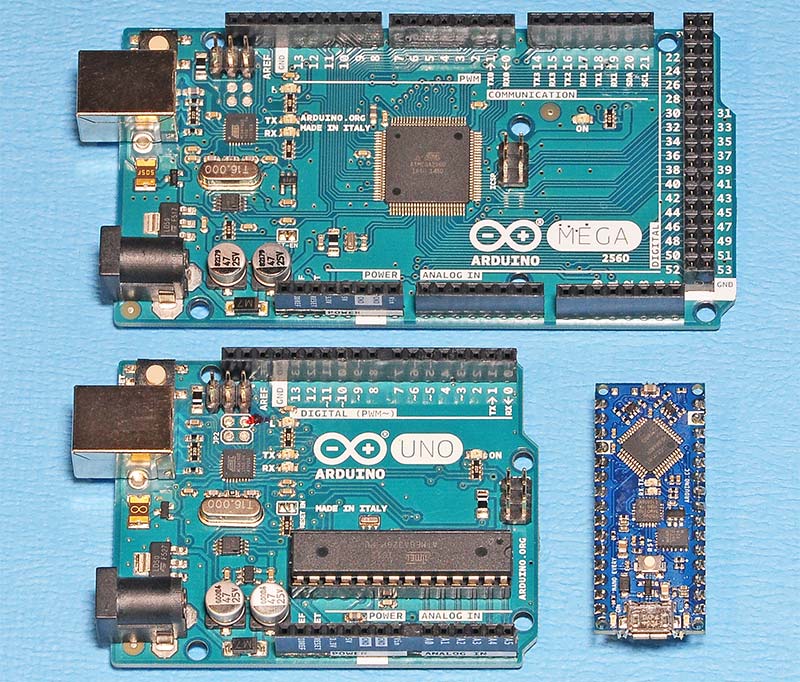
FIGURE 5. A number of Arduinos could be used such as the Mega, Uno, and Nano Every, but some pins would need to be reassigned.
I found that a knockoff Mega on Amazon was only $21, although a genuine Mega was $40. An Uno cost $23; a Nano Every was $19. Not much of a spread.
Please note that switching to other Arduinos would require some minor changes to the I/O pin numbers in the sketch.
SOUNDTRACK
The installed sound card is a bit overqualified. A smaller one would do the job, but I happened to have several spare Robertsonics WAV Trigger boards from other projects. SparkFun carries less expensive WAV and MP3 trigger boards like their Papa Soundie in Figure 6.
List of Sound Effects
001. “Starting new game.”
002. “Tap white to start Throw.”
003. “Ready, set, 1, 2, 3, BAM!” — (fast cadence; default)
004. “Rock wins Throw.”
005. “Rock wins another Throw and Set.”
006. “Paper wins Throw.”
007. “Paper wins Throw and Set.”
008. “Scissors wins Throw.”
009. “Scissors wins Throw and Set.”
010. “It’s a tie; no score, go again.”
011. “Rock wins final Throw, Set, and Match, congratulations.”
012. “Paper wins final Throw, Set, and Match, congratulations.”
013. “Scissors wins final Throw, Set, and Match, congratulations.”
014. “Tap green to start new game.”
015. “Tap white to Throw again.”
016. “It’s a tie.” — (see effect #10)
017. “Error” (not used).
018. Cheering crowd.
019. “Hold on to your hat, the next Throw could win the Match.”
020. “Sound Effects 20” (spare)
021. “Players were not in sync.”
022. Booing (not used).
023. Trumpets .
024. “Ready, set, 1, 2, 3, BAM!” — (slow cadence; not used)
025. “Ready, set, 1, 2, 3, BAM!” — (medium cadence; not used)
FIGURE 6. Other smaller sound cards like the Papa Soundie are available from SparkFun and Adafruit, but some redesign would be required.
Some sound cards even come with a built-in amplifier capable of driving a small speaker. This feature could eliminate the Noisy Cricket audio amplifier.
The Robertsonics WAV board is triggered through its serial port which can handle hundreds of tracks. I used Audacity to record the 25 tracks. BTW, they must be recorded in stereo or the board won’t play them. One other thing I noticed was that you need to leave at least a half second at the end of each effect or the playback will cut it off short.
HARDWARE
A set of five assorted color 60 mm arcade buttons are available on Amazon for just $15. You’ll need two sets; refer to Figure 7.
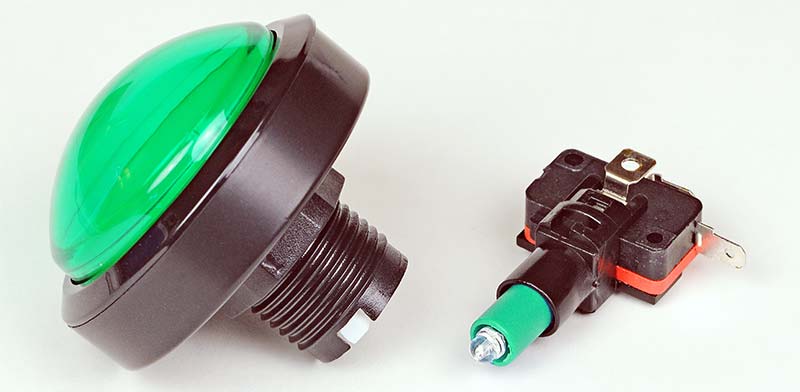
FIGURE 7.The 60 mm (2.5”) LED arcade buttons are available from Amazon and Adafruit (#1190).
They even come with spare switches and LEDs. I found the same 60 mm buttons at Adafruit for $5.95 each. The buttons have a good feel when you punch them, but I wonder if they’re sturdy enough for rough use. I haven’t had any problems so far. A small CCW turn on the rear housing releases the microswitch and LED for mounting and servicing.
The seven-segment displays are driven by a MAX7221. This driver has a host of features that allow you to configure it to just about any application. You can set brightness, number of digits, type of decoding, and many other parameters. Of course, it has a memory that continues to scan and display the most recent entries. Communication is through three SPI pins. Note that the different Arduinos have different dedicated SPI pins.
As I have mentioned before, I finally bought a 3D printer a short time ago and I can’t believe how handy it is. I have a lathe and a milling machine, but they can’t produce such beautiful plastic parts in such a short time. So, when I needed a bezel for the seven-segment displays, it only took less than an hour to print out two pieces. Figure 8 shows the results. Sweet! I used FreeCAD as the design software.
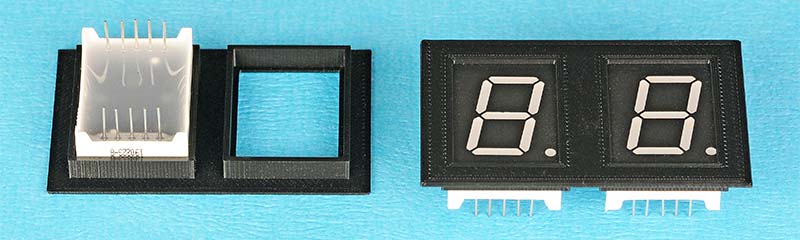
FIGURE 8. The nifty black bezels were printed by a Prusa i3 3D printer using FreeCAD design software.
Referring back to Figure 3, the shiny dual power supply is from Mean Well and is mounted underneath because I didn’t want to deal with a dangling wall wart and 5V regulator. However, a 12 volt wall wart coupled with a five volt regulator mounted underneath would also do the trick.
The discrete electronics are soldered onto a full-sized Adafruit Perma-Proto board. Normally, I’d use a solderless plugboard but since the board would be mounted upside down and people would be banging on the buttons above, a soldered board was called for. The Adafruit Perma-Proto board comes in smaller sizes too. They’re very nicely made with gold plated through holes. It’s a snap to move your design from a solderless board to a Perma board because the holes are almost identical, as you can see in Figure 9.
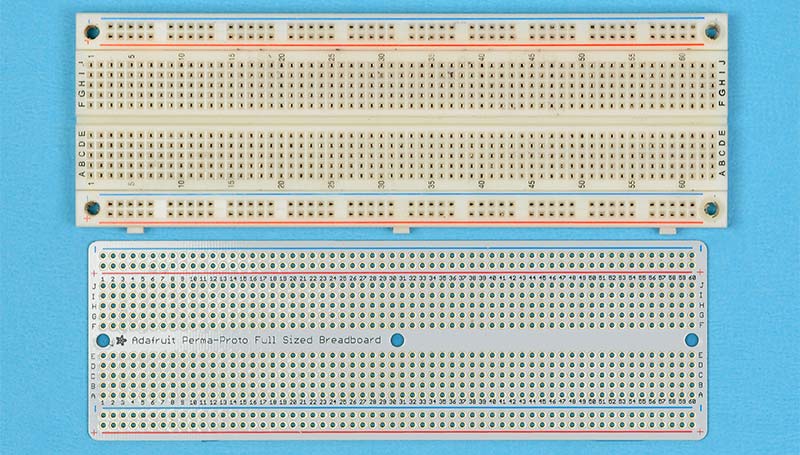
FIGURE 9. I used a solderless plugboard to develop the game, then transferred it to an Adafruit soldered board in order to firmly mount the parts.
The 74LS20(U1) dual four-input NAND is used to light up the green button during an Arduino reboot. I found that players kept hitting the green button if the green LED didn’t come on right away when the unit was first plugged in. The 74LS20 SR flip-flop turns it on as soon as the power supply comes up via the pull-down capacitor on pin 12. Problem solved.
SOFTWARE
The sketch is fairly simple but has a lot of moving parts. I’m not a professional programmer, so please bear with me on the formatting. Here’s a brief outline of what it does:
- It designates the players as A & B.
- Keeps a running tally of 1, 2, 3, or 4 wins for each player.
- Uses the tally to calculate and display the scores on the scoreboard.
- When two Throws are won, the scoreboard displays “2 Throws,” then changes it to “1 Set.”
- The final winning score is 2 Throws and 1 Set, which gets changed to 0 Throws and 2 Sets.
- The sketch does the flashing of the lights when appropriate.
- It triggers the WAV soundtracks (sfx) at the appropriate times using the SPI pins.
- The (millis) function is used to record the exact times that the 1, 2, 3, BAM buttons are pushed.
- If the difference between them exceeds 333 ms, the “players are out of sync, go again.”
- The buttons are NOT interrupt-driven because it looked simpler to write a fast polling loop. The loop polls the buttons at a high rate, while also flashing the button LEDs at a much slower rate during the “1, 2, 3, BAM!”
AND FINALLY …
This game is great for family get-togethers, although I’ve learned that some people can get really competitive as they bang away on the buttons. It’s a very physical game. Have fun!
Please feel free to contact me at [email protected] with comments or corrections. Or, you can make a comment at the end of the online article to share your thoughts with the other readers. NV
Parts List
| Designation |
Qty |
Component |
Digi-Key, unless noted |
| R1-R6,R20 |
7 |
Resistor, 1K |
1.0KQBK |
| R7-R12,R19,R25,R26 |
9 |
Resistor, 10K |
10KQBK |
| R22,R24 |
2 |
Resistor, 20K |
20KQBK |
| R13-R18,R21,R23 |
8 |
Resistor, 47K |
47KQBK |
| C1 |
1 |
Capacitor, 1 mfd 50V |
Jameco 94161 |
| C2,C3 |
2 |
Capacitor, 0.1 mfd 50V |
Jameco 2261351 |
| C4,C5 |
2 |
Capacitor, 470 mfd 35V |
Jameco 93817 |
| SW1-SW7 |
7 |
Pushbutton, Arcade Style, 60 mm |
Amazon & Adafruit 1190 |
| SW8 |
1 |
Toggle Switch, SPDT |
Jameco 26315 |
| LED1-LED7 |
7 |
LED, Part of SW1-SW7 |
Amazon & Adafruit 1190 |
| DISP1-DISP4 |
4 |
Seven-segment Display, Red, CC, 0.8” |
eBay, $13/10pcs |
| DISP BEZEL |
2 |
Dual Display Bezel |
In-house PLA Printed |
| PS1 |
1 |
Power Supply, 5V, 12V, 4A, 1A |
Mean Well RD-35A |
| Q1-Q7 |
7 |
Transistor, 2N3904 |
2368-2N3904-ND |
| U1 |
1 |
IC, 74LS20, Dual 4 inch NAND |
296-3670-5-ND |
| U2 |
1 |
MAX 7221 Display Driver |
MAX7221CNG+-ND |
| MEM1 |
1 |
µSD Memory Card, 8 GB |
Amazon, Others |
| SPKR1 |
1 |
Speaker, eight ohms |
Jameco 135589 |
| ARD1 |
1 |
Arduino Uno |
Amazon, Others |
| BRD1 |
1 |
WAV Sound Trigger Board |
SparkFun WIG-13660 |
| BRD2 |
1 |
Amplifier, 1.5W, Noisy Cricket |
SparkFun DEV-14475 |
| BRD3 |
2 |
Protoboard, Full Sized |
Adafruit 1606, $7 e |
| PL1 |
1 |
Plug, 3.5 mm, Stereo |
Jameco 231176 |
| PL2 |
1 |
Line Cord, Replacement |
Home Depot |
| BOX |
1 |
Poplar Wood and Aluminum |
Home Depot |
Downloads
What’s In The Zip?
Arduino Sketch Software
WAV Sound Files