If you’ve been following my series of refurbishing tube-type receivers, you may have noticed that I don’t rely on digital oscilloscopes, spectrum analyzers, and other modern equipment when it comes to diagnosing and tuning the receivers. The only exception is the signal source.
I use a modern digitally synthesized waveform generator to create IF and signal frequencies for tuning the signal chain. That’s only out of necessity because I haven’t found a suitable analog source to refurbish and add to my classic tool arsenal.
For my receiver refurbishing projects, the majority of diagnostic and alignment tools consists of a few vintage instruments:
- Simpson 260 Analog Volt Ohmmeter (VOM), circa 1950
- Hickok 600A Tube Checker, circa 1960
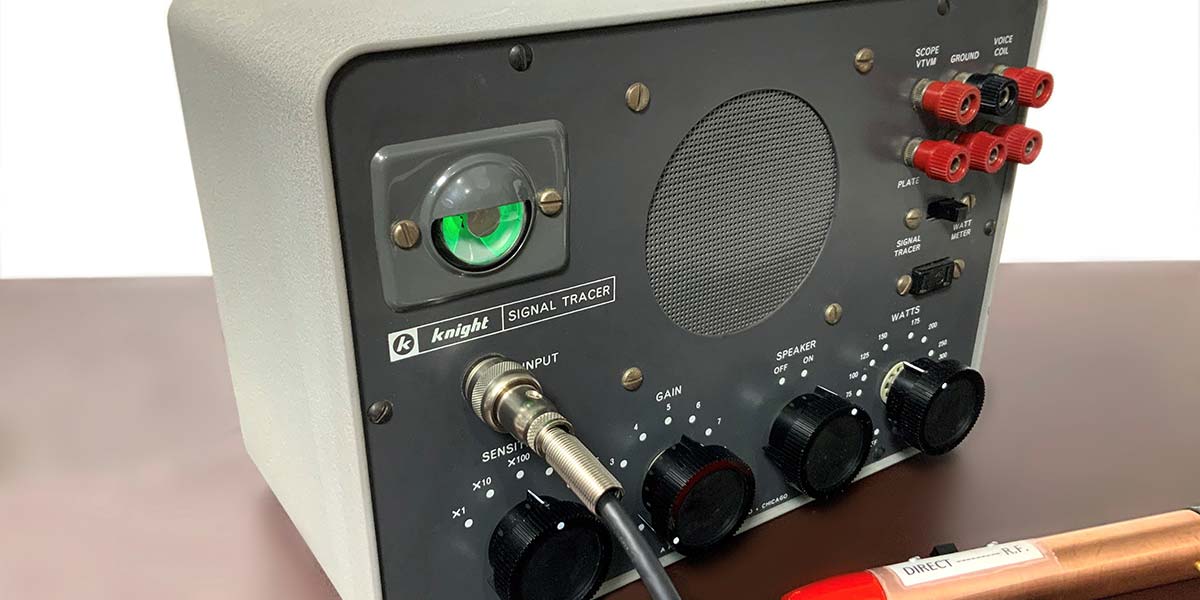
- Knight Signal Tracer, circa 1955
- Heathkit IT-11 or Sprague T0-6 Capacitor Checker and Reformer, circa 1962 and 1964, respectively
Why not pull out a modern scope or digital multimeter and save time checking the signal path? One reason is that time isn’t the issue. I’m not running a repair shop where time on the bench is lost income.
For me, refurbishing a vintage radio is about the process, not the end result. As such, I’m not in any rush to get things up and running. Without the pressure of profit or unit turnover, I enjoy the hunt for spare tubes, the hours of sanding and then applying lacquer to the cabinet, and using the tools specified in the user manual for maintaining and repairing the electronics.
I’m not looking for the quick fix. I’d rather spend a day pouring over an old schematic, becoming intimately acquainted with the underlying design philosophy. Why triple conversion and not dual conversion? Why isolate one part of the chassis from another? Why use a selenium rectifier over a tube?
Sometimes, it simply makes sense to use a particular piece of vintage gear because it’s the best or only option. For example, consider my Knight signal tracer (shown in the photo) which was designed to support the repair of tube-type receivers.
The assembled kit, which I purchased on eBay and refurbished — the focus of an upcoming article — is essentially a receiver without the tuned circuits. The five-tube 13 lb device provides the following:
- AF and RF Amplifier
- Noise Locator
- Wattmeter
- Audio Amp
- Output Transformer
- Output Speaker
- Output Indicator
- B+ Source
- Demodulator/Preamp for Scope and Vacuum Tube Voltmeter (VTVM) Monitoring
Most of these functions are linked to the green fluorescent magic eye display in the upper left of the device.
The Knight signal tracer seamlessly supports the diagnosis and maintenance of a tube-type receiver. Think there’s a problem with the audio circuit in your receiver? Simply touch the probe of the signal tracer to the demodulator out. A nice, clear audio tells you that, in fact, there’s something wrong in the audio amp circuit — probably a defective tube or capacitor.
Need a speaker for the radio audio output but it’s connected to the cabinet which is stored elsewhere? Simply use the speaker terminals on the signal tracer. Think there’s a problem with the HV power supply? Disconnect the internal HV power in the receiver and use the HV (B+) source in the signal tracer.
The common denominator in all my vintage gear — whether an instrument or an end-use appliance — is the use of high voltage tube circuitry. It’s assumed that you’ll be working with and around high voltage. You can forget about using ESD straps and floor mats, miniature lead sets designed for 3.5 VDC solid state circuits, and scantily clad wire wrap connections.
The dance with vintage electronics is one of respect, with no or very little direct contact. Assume every circuit is alive and lethal, stay on your toes, and enjoy the ride. NV