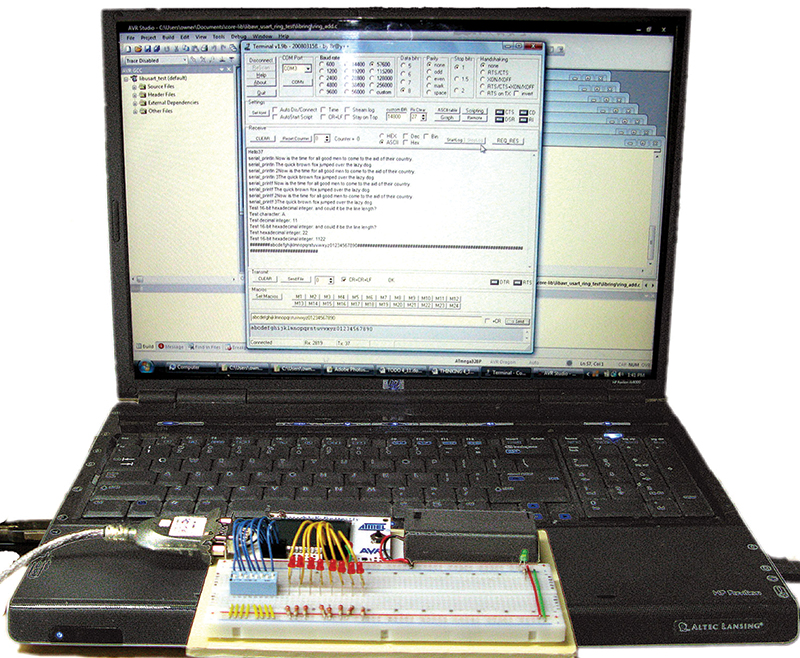
FIGURE 1. Serial communication with the AVR Butterfly.
Recap
Let’s get back on track with avrtoolbox [http://code.google.com/p/avrtoolbox] after our slight detour to learn about the FT232R USB to serial converter and the revision to my book, Virtual Serial Port Cookbook. If you want to get with the avrtoolbox flow, you can find the first three articles in the January, February, and March ‘11 issues of Nuts & Volts. (Or, click parts 30, 31, and 32 in the right sidebar.) In these articles, we see how to create an open source project, manage software versions with SVN, document with doxygen, adopt a C coding standard, put functions in libraries, and keep things organized.
Introduction
This time, we'll learn two more principles for good software project development: the concept of the Functional Requirements Specification (FRS) and the Applications Programmer Interface (API) — both of which are documents that you should create before writing the code. We will learn about these in the context of creating a serial library that will simplify communications between our AVR and a terminal program on a PC.
This library will provide us with the sorts of easy to use functions we might expect from the Arduino or PBASIC, but with no barrier to moving to real C if we so choose. Our serial library, will sort of mimic the better features of the Arduino serial library while providing much more capable serial output — all the while using regular C for use with the standard Atmel tools AVRStudio/WinAVR/avrdude (not the Arduino IDE).
In case you are snorting at my claim of ‘much more capable’, let’s just say that what I’m doing is encapsulating the venerable C standard library function printf() in a package that makes it easy to use with the AVR without having to read the dozens of relevant pages in the avrlibc manual or the USART section of your AVR datasheet. So, I won’t even bother with IMHO for my ‘much more capable’ assertion.
To help prevent confusion, let me repeat: This article covers three separate topics; two are general software development principles — the FRS and the API — while the third is an application of all the avrtoolbox principles discussed so far, to create a very useful library of serial functions.
Draw the Blueprints Before Sawing the Wood
So, if you were going to build a house would the first thing you do be to go out and buy a bunch of 2x4s and start cutting them up? You’d be surprised at the number of folks who think you can approach writing a program by grabbing a case of Twinkies and Red Bull, and just jumping in and starting writing code. Some people are even proud of this approach. If I’m honest, I have to admit that was the way I programmed when I first started out. I knew exactly what I wanted and so I just jumped right in and did it. However, over time reality taught me that this was not just a bad idea; it was a very bad idea.
I found that I’d get well into something only to discover that I’d neglected to plan for one little thing that generally exploded into one big thing. I’d beat that down and hack away until the next little thing I’d neglected to plan for started intruding. It was a vicious cycle of my arrogance getting pounded into submission by the real world. I eventually learned that I should spend time — a lot of time — thinking about a project before allowing myself to write a line of code.
I discovered the hard way that the standard software engineering concept of writing a ‘functional requirements specification’ before writing any code was not a dumb-bureaucratic-stick-in-the-mud-buzz-kill, but a tool that could help prevent me from committing massive stupidity on a keyboard. It helps reduce the ‘massive’ part even though the ‘stupidity’ part is inherent in programming. As a general rule, I can say that the larger the project, the greater the value of time spent planning. An FRS states what the functions will do, without stating how the functions will do it. Separating the requirement from the implementation keeps the process focused on what needs to be done. Conceptually, this separates the people who want to use the code from the folks who write it. The users group may or may not know anything about creating software, but they know what they want an application they will be using to do, while the programmer may have no use whatsoever for the program but knows how to make it do what the user wants.
I’ll share a personal anecdote about a time I helped nearly bankrupt a company that refused to do an FRS up front. I was presented with a program that the client said almost worked and was asked to finish it. The underlying code was a 600 page nightmare that I used as the initial requirements specification, pulling out what the code was supposed to do and tossing the original code in favor of using a bit more modern language that let me re-write it in 60 pages. The boss said, “Great, now I want you to add this one little thing.” I choked a bit thinking that if I’d known about that ‘one little thing’ when I got started, I would have designed the code differently, but I guessed I could shoe-horn it in without breaking anything — which I did.
The boss said, “Great, now I want you to add this one little thing.” At which point, I delivered him a strident lecture about software engineering principles and insisted that we get it all decided now. He just grinned and said, “Now how difficult can it be to add blah blah?” So, I bent the design further out of shape and added his new requirement and got it all working. The boss said, “Great, now I want you to add this one little thing.” Okay, you are probably getting the picture here. We kept going around this circle, the code getting more and more fragile as I kept bending and patching the base trying to fit in each new requirement. So back on topic: Don’t write a line of code until you have the final requirements specified. Now that I’ve got that out of my system, let’s write that FRS for the serial library.
Serial Library Functional Requirements Specification
The serial library is part of the avrtoolbox elementary libraries and is intended for use by novices. The source code will be written in the C programming language using AVRStudio, WinAVR, and avrlibc. The novice will use this library based on the API document. More advanced users may want to consult the source code.
Some of the requirements for these functions (especially the serial_out() function) are somewhat dense without reference to coded examples, so I recommend that the casual reader may want to refer to the API and the examples to understand what is being specified.
Serial initialization function: serial_begin() will let the user initialize the underlying hardware and software needed to open serial communications with an external UART. This function will allow the user to set the baudrate, but all other UART parameters will be set to the common defaults.
Serial termination function: serial_end() will let the user set the underlying hardware parameters back to the system default values.
Serial input available function: serial_available() will let the user determine if any data is available in the serial input buffer.
Serial buffer clear function: serial_flush() will let the user clear all data from the serial buffers.
Serial input function: serial_in() will let the user read data from the serial input buffer one byte at a time.
Serial output function: serial_out() will let the user output formatted serial.
This function will:
1. Return the number of characters sent to the USART or a negative number if an error occurred.
2. Accept as that first parameter a string with N data format symbols: This will be a string of characters contained within double quotes, containing text to output and conversion symbols for outputting specially formatted data that is contained in the subsequent parameters.
3. Accept as subsequent parameters, data1, data2, … dataN: a list of raw data types that will be converted to printable characters indicated by the conversion symbols in the first parameter string.
4. Will use the following conversion symbols in the first parameter string:
a. %c – print an ASCII character.
b. %s – print a character string.
c. %d or %i – print a decimal integer.
d. %x or %X – print a hexadecimal integer. Note that we usually precede this with the characters 0x%X to output, for instance, if the hexadecimal number is 5A, the output will be 0x5A. Using 0x%x will output 0x2a.
5. Will use the following control characters:
a. \n – print a new line.
b. \” – print a quotation mark.
c. \\ – print a forward slash.
Serial Library API (Application Programmers Interface)
The API tells the user how to use the functions in an application. For avrtoolbox, we will create the API by using doxygen (discussed in the January ‘11 Smiley’s Workshop) to provide comments in the header file. These comments will be extracted into html and chm help files. The user should only need to read these help files to use the library functions. This means that the user should never have to look at either the contents of the header or the C source files. This is, of course, the great value of an API: It allows you to use the functions without ever seeing the code for the function.
The API provides a sort of contract between the function writer and the user. The writer promises that the function will behave as shown in the API and the user trusts that any changes or bug fixes to the function won’t affect how the function is used. The API generally specifies what parameters a function will take and what data it will return. The following is the serial library initial API. However, the user should consult the API document in avrtoolbox for the latest serial library API information before using these functions.
serial_begin()
Description: Sets up the serial communication with the transmission data rate (baudrate).
Syntax: serial_begin(baudrate).
Parameters: Baudrate: 32-bit integer (uint32_t). Recommended that you only use one of the standard rates of: 300, 1200, 2400, 4800, 9600, 14400, 19200, 28800, 38400, 57600, or 115200.
Returns: Nothing.
Example:
void setup()<br />
{<br />
    // Set up serial port for 57600 baud<br />
    serial_begin(57600);<br />
}
serial_end()
Description: Returns the serial communications elements to their default values.
Syntax: serial_end().
Parameters: None.
Returns: Nothing.
Example:
void shut_down()<br />
{<br />
    serial_end();<br />
    sleep();<br />
}
serial_available()
Description: Gets the number of bytes that have arrived from the serial port and are available for reading from the 128 byte buffer.
Syntax: serial_available().
Parameters: Nothing.
Returns: uint8_t bytes available in the serial receive buffer — up to 128.
Example:
void loop()<br />
{<br />
    if(serial_available() > 16)<br />
{<br />
    process_serial_input();<br />
}<br />
}
serial_flush()
Description: Clear out any data in the serial buffer. Subsequent calls to serial_in() or serial_available() will only return data that has arrived since the call to serial_flush().
Syntax: serial_flush().
Parameters: Nothing.
Returns: Nothing.
Example:
// Received unknown command, restart the conversation<br />
serial_out(“Unknown command: %d, flushing buffer.”, last_command);<br />
// Throw out everything<br />
serial_flush();
serial_in()
Description: Inputs incoming serial data one byte at a time, returns –1 if no data is available.
Syntax: serial_in().
Parameters: Nothing.
Returns: 16-bit signed integer (int16_t) - the first byte of incoming data or returns –1 if no data is available.
Example:
// Define and receive a serial byte<br />
int16_t myByte = serial_in();
// Is it ‘!’<br />
if(myByte == ‘!’)<br />
{<br />
    process_exclamation();<br />
}
serial_out()
Description: Outputs formatted data based on conversion symbols and escape character sequences contained in a string of text.
Syntax: serial_out(string_with_N_data_format_symbols, data1, data2, … dataN).
Parameters:
First parameter: String with data to format.
Following parameters: The data to be formatted for printing in the first parameter string.
Returns: The number of characters printed or a negative number if an error occurred.
Note:
Conversion symbols:
%c – print an ASCII character.
%s – print a character string.
%d or %i – print a decimal integer.
%x – print a hexadecimal integer. Note that we usually precede this with the characters 0x to output, for instance if the hexadecimal number is 5A, the output will be 0x5A.
Control characters:
\n – Print a new line.
\” – Print a quotation mark.
\\ – Print a forward slash.
Example 1:
uint8_t my_char = ‘!’;<br />
uint8_t my_string[] = { ‘H’, ‘e’, ‘l’, ‘l’, ‘o’, 0};<br />
my_byte = 42;
serial_out(“Print a character: %c, a string: %c, a decimal integer: %d, a hexadecimal integer: 0x%X, a forward slash: \\, a quote: \”, a new line: \n next line.”, my_char, my_string, my_byte, my_byte);
which shows in the terminal as:
Print a character: !, a string: Hello, a decimal integer: 42, a hexadecimal integer: 0x2A, a forward slash \, a quote “, and a new line:<br />
next line.
Example 2:
uint8_t  my_day = 21;<br />
uint8_t my_month[] = {‘J’,’u’,’l’,’y’,0};<br />
uint16_t my_year = 1980;
serial_out( “Your date of birth is:\n Day %d \nMonth: %s \nYear %d.”, my_day, my_month, my_year);
which shows in the terminal as:
Your date of birth is:
Day 21
Month July
Year 1980
NOTE: More advanced users may note that this is a macro wrapper for the standard library printf() function with the string stored in Flash and the output directed to the USART, but the documentation here is kept simple for use by novices. If you want to use floating point conversions — DON’T. That facility is not included since it causes the code size to increase more than is warranted by the convenience. If you really need floating point, consider using the special printf() functions as documented in avrlibc.
Running Over the Buffer
After I built the serial library, I wrote a program that I thought provided reasonable testing of all the functions. Everything worked fine and then as I was about to wrap things up, I decided to push things a bit and see if I could choke the buffers, and what would happen if I did. Thankfully, nothing crashed, and based on the underlying code, I didn’t expect it to, but you never know until you test. I found that if I sent a string greater than the buffer size (64 bytes in the test case) or if I called the function twice in succession with the total bytes being too high, I’d get some random output until the background interrupt had a chance to catch up. Look at the string in:
serial_out(“serial_printf Now is the time for all good men to come to the aid of their country.\n”,0);
You might think this is a reasonable test and if you took typing lessons you might even feel a bit nostalgic, but this string is over 80 bytes and will choke the buffer. Since this library is intended for novices who might think that this is a reasonable sentence, I decided to add a feature that would allow long strings to be printed without choking the buffer. The mechanism I chose has a drawback in that if you try to transmit more than 2/3 of the buffer size, then the function will insert a brief delay after each character until the system catches up [10 ms for the Atmega328, which is running at 16 MHz and 20 ms for the Butterfly, which is poking along at 2 MHz].
The 2/3 buffer size was selected empirically because 2/3 works but 3/4 doesn’t. This delay isn’t particularly noticeable, but as a word of advice to folks who actually RTFM, don’t send strings larger than 2/3 of your maximum buffer size if you have any kind of time constraints in your program.
Library Test Application: serial_tester
The avrtoolbox libraries will each have an application that tests the functions (and as a byproduct, demonstrates how to use the functions). The test application will assure that the functions do what is stated in the FRS, according to the API. In a large project with lots of human resources available, software testing is often the job of several people who design rigorous test cases and thoroughly examine every problem they can foresee. This is, of course, very expensive and not really needed for a small project like ours. Proper testing is a subjective task and we will let the common sense of the developer prevail. Since this is an open source project, if a problem shows up that wasn’t covered in the tests (they will), then the user can file a report in the ‘issues’ section of the project and someone working on the project may eventually get around to looking at it.
Since libraries can sometimes be device-dependent, we will create separate libraries tested for each of our avrtoolbox common devices and development platforms: Atmega169 (Butterfly); Atmega328 (on an Arduino board); and the Atmega644 (on the BeAVR). We will call the libraries libserial_butterfly001.a; libserial_atmega328; and libserial_atmega644.a.
You can find the serial_tester AVRStudio project and the serial library archives and source code in the avrtoolbox project source code trunk or at: http://tinyurl.com/3cc7qz, and the serial_tester code at http://tinyurl.com/3jxf5z6. Load the serial_tester project in AVRStudio then load the library archive as follows.
Using the Libraries with AVRStudio
Let’s use the libserial_butterfly_001.a as an example. [If you have an Arduino, you can use the libserial_mega328_001.a.] Make sure that the library is in the same sub-directory as your AVRStudio project .aps file. Then, open the AVRStudio Project menu and select the Project Options. Click on the libraries icon to open the window shown in Figure 2. In the upper part of this window, click on the little folder icon (left of the red X) and navigate to your project folder.
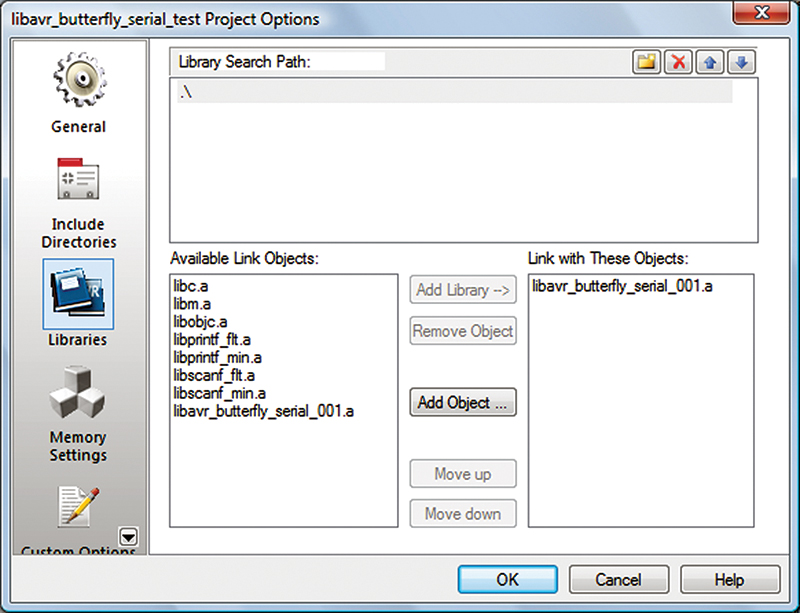
FIGURE 2. Project Options.
It will show “.\” in the upper text box and it will also locate the libserial_butterly001.a file and show it in the ‘Available link Objects:’ list below. Highlight the library, then click the ‘Add Object’ button to add it to the ‘Link with these objects’ list. Click okay and compile the project to generate the .hex file for uploading to the Butterfly.
Uploading the .hex File
You can use avrdude as shown in Smiley’s Workshop in the May ‘09 Nuts & Volts.
However, if you want to try something a bit different you can use the uploaders I am working on that put a C# IDE over avrdude, making it a bit easier to use. You can get them in the avrtoolbox pc_applications section. You navigate to this directory by opening http://code.google.com/p/avrtoolbox/source/browse/, then click on trunk and then pc_applications. These are beta releases, so take that under advisement.
ButterUp
ButterUp comes with a user manual and rather than waste trees here, I suggest you just click on the button ‘New to ButterUp? Click here.’ shown at the top of Figure 3. If you make a mistake, the manual .pdf file will automatically be opened which is sort of like yelling RTFM and then pushing it into your face. (Annoying yes, but then again, if you weren’t making mistakes you wouldn’t need the manual, would you?)
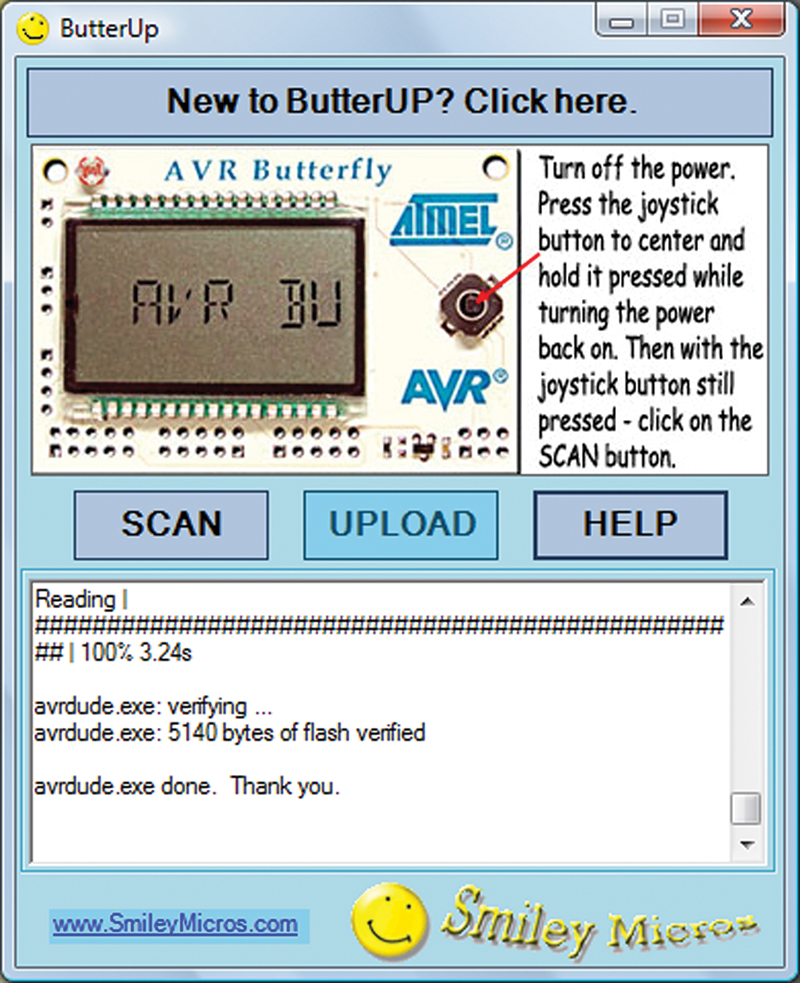
FIGURE 3. ButterUp .hex file uploader.
ArdUp
Like for ButterUp, I suggest you just click on the button shown at the top of Figure 4 to find out how to use it. This program is similar to ButterUp but uses the DTR modem line to reset the Arduino, so that it goes directly to the bootloader for use by avrdude. Try and keep in mind that we are using the Arduino board as a generic Atmega328 development platform and not using it as an ‘Arduino.’ If you find this concept confusing, please consult the ‘Moving Beyond the Arduino’ stuff in the May ‘09 issue.
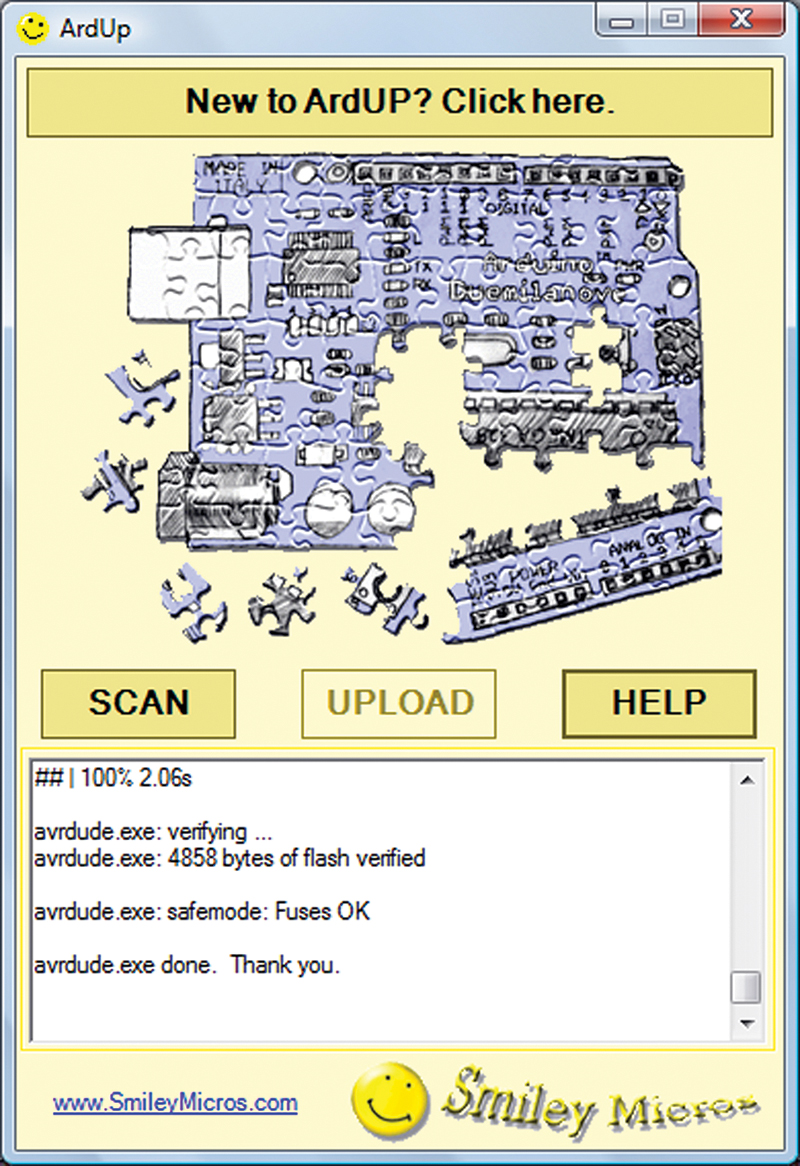
FIGURE 4. ArdUp .hex file uploader.
If you do use either of these, I’d like to hear if you have any problems. You can start a thread on AVRFreaks with either ButterUp or ArdUp in the title, or you can open an issue in the avrtoolbox project.
Running the Test In Bray’s Terminal
Open Bray’s terminal as shown in Figure 5. If you are using a Butterfly, make sure the baud is set to 19200 and click the joystick up to get the application to run. If you are using the Arduino board, make sure the baud is 57600; you may need to click the DTR button on Bray’s on and off (or just press the reset button on the board). Once the test output prints, then you can send some characters via the send window. In the case in Figure 5, I sent “abcdefghijklmnopqrstuvwxyz01234567890” and — as you can see — everything Rx’d and Tx’d just fine.
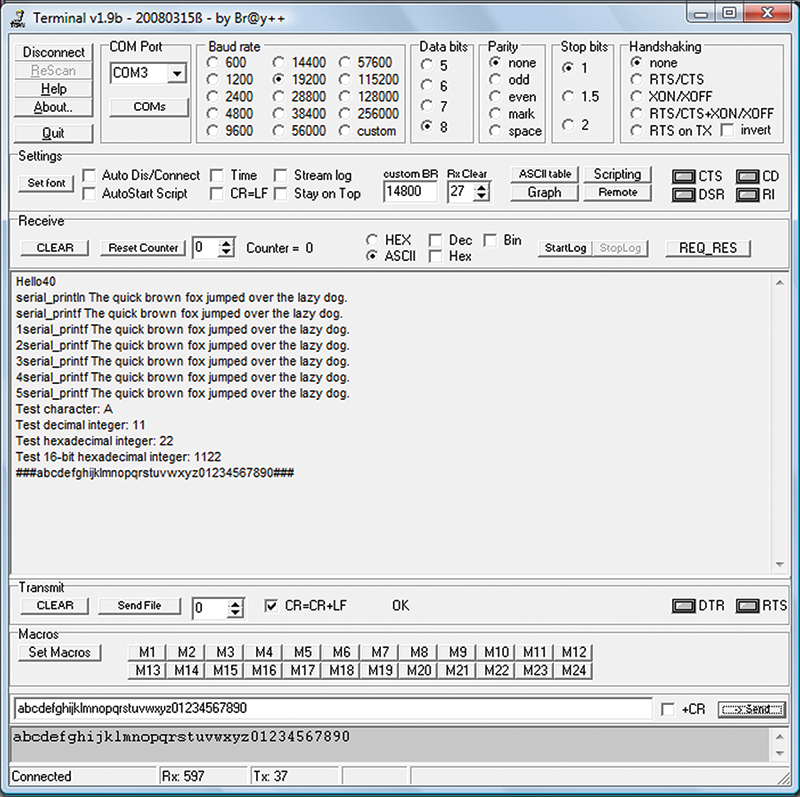
FIGURE 5. serial_tester results in Bray's Terminal.
Please note for the AVR Butterfly: This marvelous little board uses a 32.768 kHz watch crystal to keep track of real time and to calibrate the internal RC oscillator to 2 MHz. Since the RC oscillator isn’t particularly accurate, you can’t use just any old baudrate and expect it to work consistently.
For this reason, the serial library for the Butterfly is hardwired for 19200 baud and even if you enter another value in the serial_begin(baud) function, if you are using the libserial_butterfly001.a, it will ignore the baud value and use 19200. Also, the Butterfly tries to run the application twice when you toggle the joystick up: once when it goes up and once when it comes down, so you may get a partial start before the real start in Bray’s terminal.
If after all this good stuff you just can’t wait and want to get a good leg up on real C programming and the AVR (while helping support your favorite magazine and technical writer), then buy my C Programming book and Butterfly projects kit from the Nuts & Volts website.
Next time, if all goes well, we will continue with avrtoolbox by learning about how to buffer data and writing a ring (a.k.a. circular or FIFO) buffer. NV