The goal of this article is to give you an idea of what options you have and point you to resources where you can learn the details of doing things right. Along the way, I’ll introduce some terms and techniques to get you started.
A Higher Calling
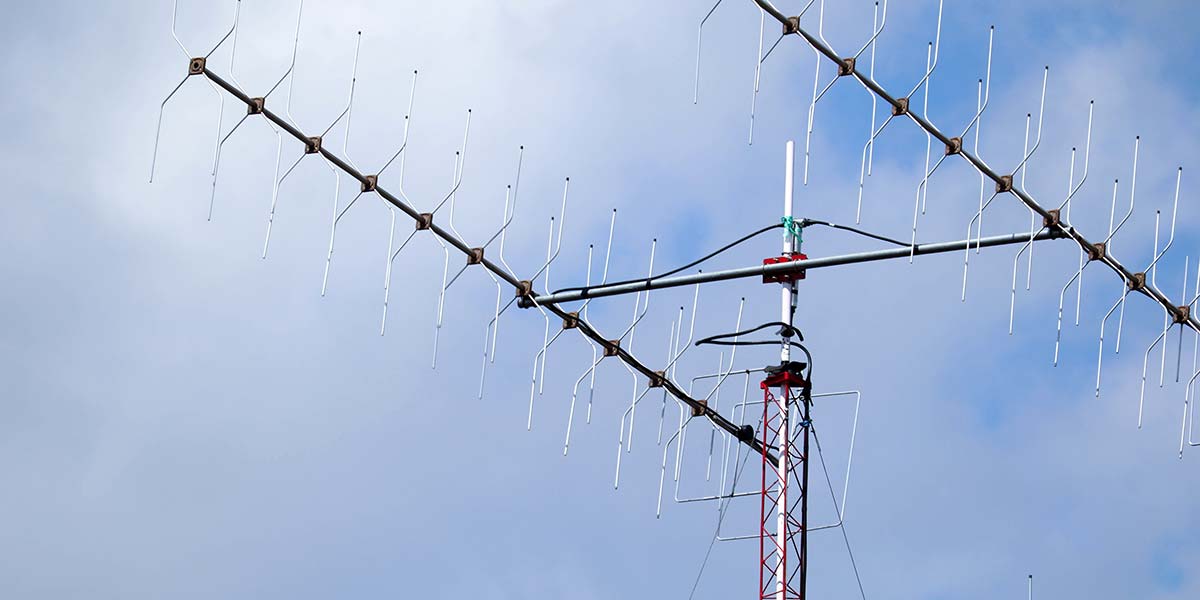
Most places are not very good “radio locations,” particularly on the VHF, UHF, and microwave bands. Nearby buildings and trees block most paths. The closer you are to buildings, the stronger the RF noise from all the electronics inside them becomes, too. A time-tested solution is elevation. Getting away from the ground pays many benefits for wireless data and point-to-point voice or data communications.
Let’s start with the most obvious benefit: increased range. VHF+ wireless is pretty much a line-of-sight proposition, so the higher the antenna, the farther it can “see.” It’s that simple. You can calculate the distance to the radio horizon with the equation:
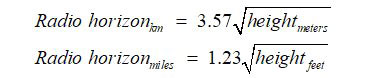
Or, use an online calculator like the one at www.rfwireless-world.com/calculators/radio-horizon-calculator.html.
Unless you live on a wide-open plain, you also have to take into account any hills or valleys along the desired path. There are good tools online such as Radio Mobile (radiomobileonline.pe1mew.nl) to help you find out whether you have a clear shot or not. Higher antennas give you more options.
Obstructions (whether caused by the local topography or buildings) can bend, block, or reflect your signals. You might find that your signal can get from Point A to Point B in a number of ways by reflecting from buildings and hills; this is called multipath.
The reflections can cause signals to cancel or add at a receive antenna. (Reflections alternately canceling and reinforcing is the cause of mobile flutter you hear in fringe-coverage areas while driving around.) By placing your antenna higher, you can pick from more directions to either use a direct path or find the best reflecting path.
Finally, noise sources are usually strongest closer to the ground. All that network and computer gear plus switching power supplies, motors, and lighting ballasts can raise the noise floor by many decibels. By raising the antenna away from the sources, the combined strength will be greatly reduced. That improves signal strength and most importantly, the signal-to-noise ratio or SNR. Higher SNR means less noise and lower BER (bit error rate).
So, you’ve made the decision to move on up. What options do you have? There are a wide range of antenna supports for temporary to permanent installations. Let’s start with the little ones and move on to the big ones.
Lightweight and Portable Supports
Push-up masts have been used for TV antennas and small vertical antennas for decades. The primary manufacturer these days is Rohn Products, LLC (www.rohnnet.com/rohn-telescoping-masts). Masts are available from 20-50 feet in height. The base of the mast can be on the ground or on a building; they aren’t particularly heavy. You raise them by extending each telescoping section one at a time.
“Push-ups” are not self-supporting! They require two or three sets of guy wires so you have to place them where symmetrical guy points are accessible. You won’t be able to climb the mast, so you have to be satisfied with limited aiming capabilities for the antenna, twisting the mast back and forth a bit. High-gain antennas with very narrow beam patterns can be difficult (and frustrating) to aim and keep aimed properly on push-ups.
If you have space on a building roof, a tripod mount may be a better choice. These self-supporting structures are anchored to the building. The “tripod” can have three or four legs. Masts up to 10 feet above the tripod can be installed. Light-duty tripods are great for everything from small vertical antennas and beams to small dishes.
Some tripods are designed for temporary installations with the base held down by heavy weights. They’re available from a number of sources; just search for “tripod antenna mount” and you’ll find quite a few.
A step up from the lightweight tripods are the roof-mount towers that can handle taller masts and larger antennas. There are several manufacturers, such as those listed at www.antennapartsoutlet.com and the larger ham radio distributors. Self-supporting, these are also attached to the structure. The larger the antenna, the more careful you need to be with your design engineering! You can also buy special bases for guyed lattice towers discussed in the next section.
You’ve probably seen crank-up portable towers on the vans or trailers used by emergency communication groups and broadcasters. These are great for portable use (not while in motion!) if you have the budget and a suitable trailer or vehicle. The telescoping tubular or lattice-work sections are lifted with a cable or compressed air.
These are much heavier than push-up masts and can support even large dishes and medium-size Yagi beams. Heights of up to 70 feet are available and the tower must be mounted on a substantial base. A rotator can be mounted on the tower for aiming the antenna.
Lattice Towers
For fixed permanent installations — whether ground mount or rooftop — the standard is a steel or aluminum lattice tower. These have three tubular or angle legs with Z- or cross-braces. The standard section is 10 feet long and sections are bolted together. The primary US manufacturers (along with Rohn; see previous reference) are Universal Towers (www.universaltowers.com) and Aluma Towers (www.alumatower.com).
Guyed towers are the most common for hams and commercial use. Rohn 25 (steel construction, 11-1/4” on a side) is a very popular tower type for small and medium antennas. Guyed towers can also be attached to the side of buildings with a bracket. Self-supporting towers taper with increasing height and rely on a heavy base to keep them upright. Lattice towers can be climbed and provide the most flexible mounting and aiming options.
Crank-up lattice towers are a top-of-the-line solution for antenna supports, reaching heights of 90 feet or more. They can be used for portable installations, again requiring a sturdy trailer or vehicle. They are also expensive. Crank-ups are not intended to be guyed, relying on the base to keep them upright. The larger models have motorized lifting winches.
Accessories for guyed lattice towers can typically be used on the crank-up versions. Tubular steel crank-up towers are available for permanent installation, as well.
Bases and Guys
Even a simple mast needs a proper base to keep from sinking into the ground or damaging a roof. (Creating leaks or other damage to a roof is not a way to make friends with a building manager or spouse!) The maker of the mast or tower will offer accessories and fixtures for doing the job correctly. They are not as expensive as having to make repairs!
For a trailer- or vehicle-mount support, be sure the frame is adequately rated for the weight. You may also need outriggers or stabilizers to keep the assembly from tipping over. Be sure to check the height restrictions for street and highway travel as well. You won’t be driving with the tower extended but if you are close to the limit, be sure your antennas and accessories aren’t too high. Overhanging branches and low wires are something you’ll quickly learn to watch out for and avoid.
For fixed ground-mounted towers, most bases will be concrete. Tower manufacturers will provide complete engineering drawings for them in their literature. Bases for guyed towers are generally pretty modest, only being required to support the weight of the tower and hold the bottom section steady. Check with a builder or architect before putting a tower on top of a structure to determine where and how to locate the tower.
Self-supporting towers depend on the weight of the extensive base to keep the center of gravity low. The sides of the base pressing on the soil also resist overturning forces from the wind. If you can’t dig a hole precisely as required, an engineer can redesign the base for you. Pay attention to the wind-load rating of the tower, that presented by the antennas, and stay within spec.
You should also learn a bit about concrete. Each mix has a strength rating given in pounds per square inch or PSI. Your base will need to have a minimum PSI rating that you can order from the local ready-mix plant or mix yourself using bags of concrete — if you follow instructions. Concrete also needs to set for a minimum of a few days before you can start installing the tower on top of it. Patience!
For guying your tower, the usual material is 1/4 inch or 3/16 inch EHS (extra high strength) cable. (Push-up masts can use lighter material; check the instruction manual.) Don’t use non-metallic rope that will stretch. If you require insulated guys, Phillystran (www.phillystran.com) is somewhat expensive but well-tested and fairly easy to work with.
To attach the guys to the tower and the guy point, use the proper clamps, thimbles, turnbuckles, shackles, and properly-rated bolts. Know how to secure the guy wire properly. EHS cable is much easier to terminate using Big Grip Dead-end preforms (preformed.com/energy/transmission/guying-products/big-grip-dead-end) instead of individual Crosby clips (www.thecrosbygroup.com). Finally, if you use turnbuckles, include safety wires to prevent loosening from vibration.
Climbing Safety
Today’s tower climber uses a nylon fall-arrest harness instead of the obsolete (and dangerous) leather lineman’s belt (Figure 1).
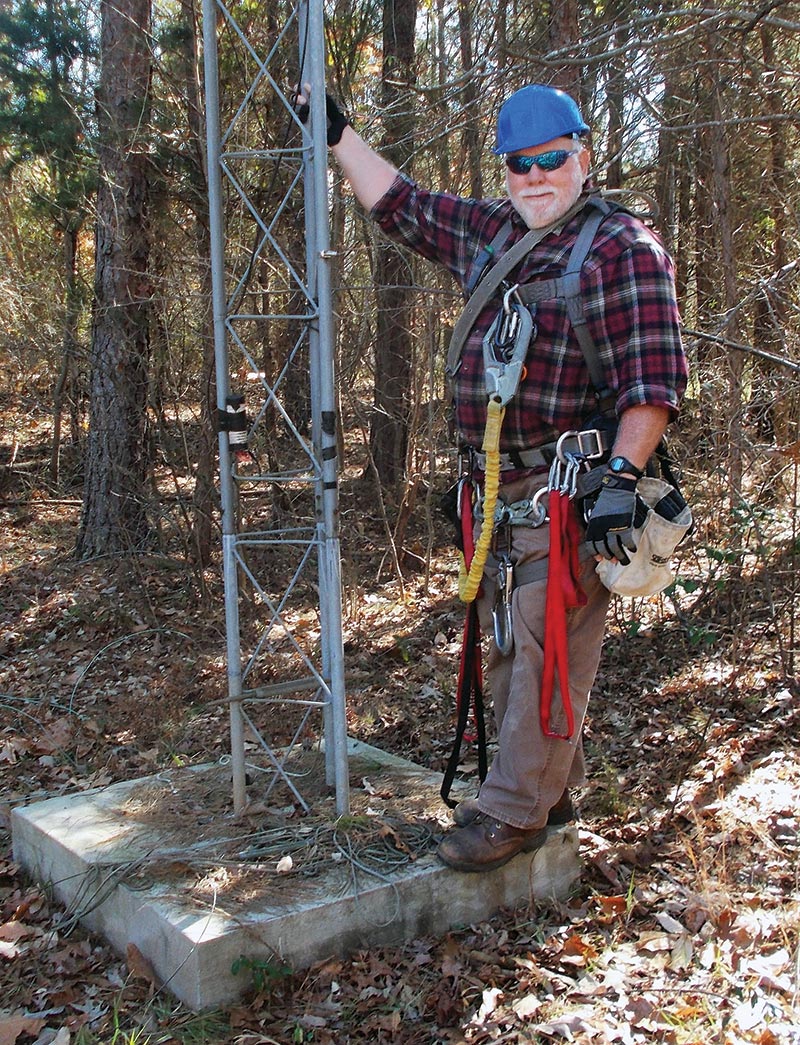
FIGURE 1. A properly prepared climber with a fall-arrest harness, gloves, safety glasses, and hardhat. Note the waist D-rings for attaching a positioning lanyard. The harness includes a seat strap and leg loops along with suspenders and the chest D-ring for a shock-absorbing lanyard. (Photo courtesy of Don Daso K4ZA and the American Radio Relay League.)
These are designed for comfort and security when working on a tower. If you do fall when wearing them, you’ll be kept upright and in a position where you can breathe.
There are two types of lanyards for climbing: shock-absorbing and positioning. The first type decelerates you instead of an abrupt and damaging stop. The second holds you in position on the tower to work comfortably. Don’t rely on ropes to keep you secure.
Slings are loops of nylon webbing that you use to lift and hold equipment. Acquire an assortment of slings in various lengths and widths. Learn how to use them for lifts and tying off equipment and tools. You’ll be amazed at how handy they are.
If you plan on doing tower work on a regular basis, spend a little money on high-quality climbing rope. Braided rope is more flexible than garden-variety twisted strands. Kernmantle rope has an abrasion-resistant sheath over the core of strong fibers.
Be sure to take care of your rope (www.ehsdb.com/rigging---fiber-ropes--knots-and-hitches.php). Knowing what the right knots are and how to tie them is important too (www.arbormaster.com/Rigging%20Knots.pdf).
Be sure to use high-quality pulleys and blocks that are rated for loads you intend to lift. A snatch block opens up so that you can attach it anywhere along a rope. Marine pulleys are intended for prolonged use in the weather and won’t rust and freeze up. Learn to use a gin pole (Figure 2) to lift and position heavy loads so you can work safely.
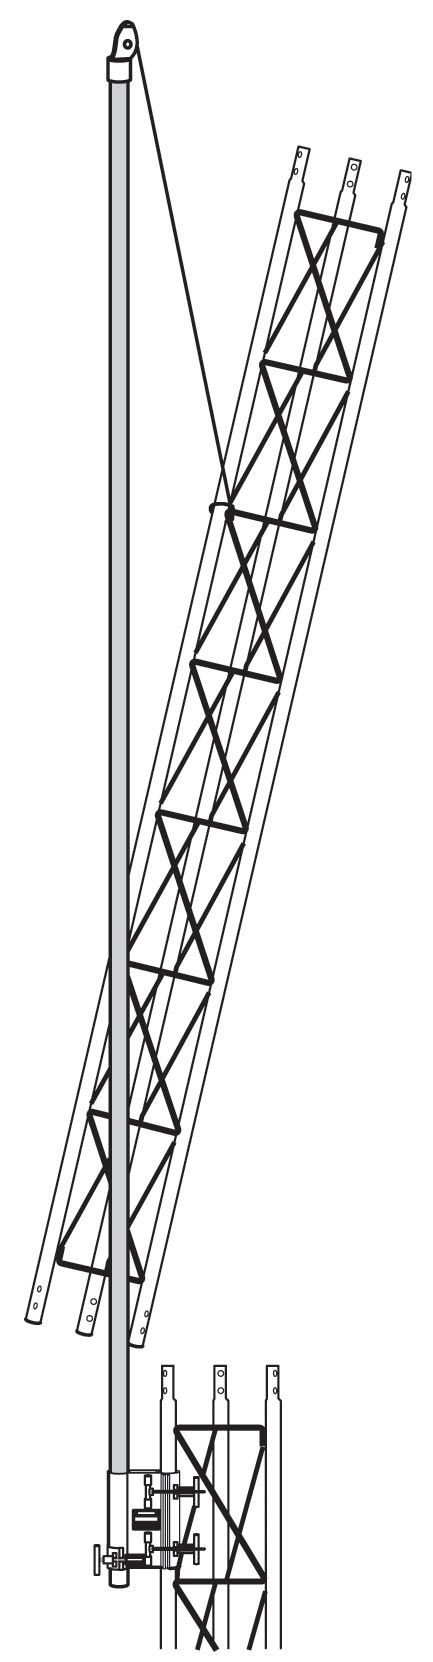
FIGURE 2. A gin pole is a tube with a fixture on one end that attaches to the tower leg. The other end holds a sturdy pulley. The lift rope runs through the tube and over the pulley. Gin poles hold heavy objects in position while you work on them. (Graphic courtesy of the American Radio Relay League.)
Lanyards, ropes, and slings are attached with carabiners: spring-loaded clips that are able to handle loads of thousands of pounds (Figures 3 and 4).
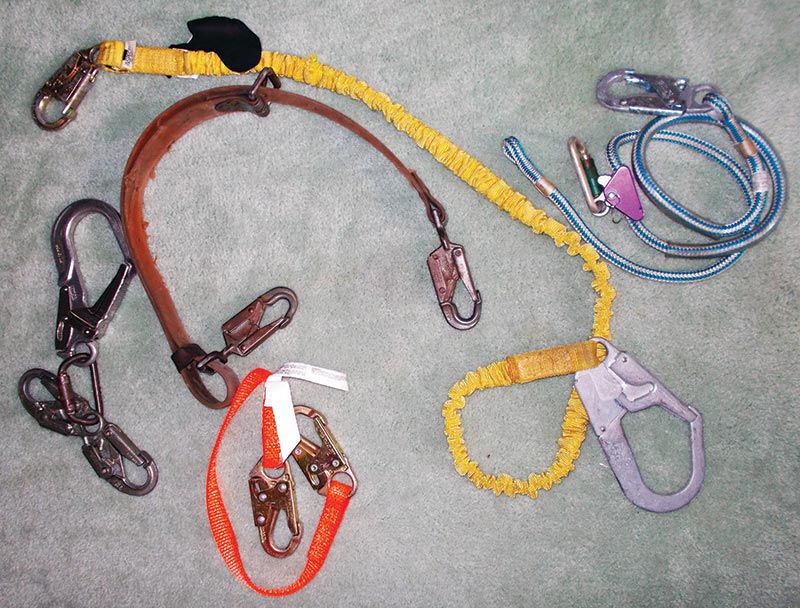
FIGURE 3. Here are some examples of (left to right) locking clips, a belt-type positioning lanyard, a shock-absorbing lanyard, and an adjustable lanyard. (Photo courtesy of Don Daso K4ZA and the American Radio Relay League.)

FIGURE 4. Carabiners are available from mountain climbing stores and rigging suppliers. At left is an open oval carabiner with a closed carabiner to its right. A steel snaplink is at right with a locking carabiner to its left. (Photo courtesy of Steve Morris K7LXC and the American Radio Relay League.)
Locking carabiners require a two-step procedure to release the clip. Be sure you use load-rated carabiners from a reputable manufacturer. You’ll want to have plenty of these around when doing tower work!
Finally, be sure to inspect your gear before each use — particularly ropes and webbing. Because of how it’s used, cuts, nicks, and abrasions are common. (Rodent damage is another common problem.) If you see web stitching that is coming undone or partial cuts, retire that gear so it doesn’t fail under load. Carabiners with weak springs and pulleys with wobbly or binding sheaves should be retired too. Avoid buying used gear if you aren’t experienced.
In the Clear
I’ve just scratched the surface of getting your antenna to where it can work the way you want. There are lots of decisions to make and things to learn. When I was young, I did some dumb things: free-climbing; not using the right climbing gear; overloading masts; working alone; you name it. Pro tip: Don’t! You might get away with it and you might not.
Take the time to learn how to climb and work aloft. Don’t be afraid to say, “I don’t know” and ask for help or hire a professional. It’s not a race. Plus, you don’t get extra points for taking unnecessary risks. NV
The Prime Directive
As techies, we like to improvise and tend to not read the directions. This can lead to problems when putting things in the air. My friend and professional tower worker, K7LXC often cites his “prime directive:” First, do what the manufacturer tells you to do. Second, don’t do what the manufacturer doesn’t tell you to do or tells you not to do. Simple, no?
Professional Installers
Having put up a fair number of antennas myself, I can attest that there are many details of which an inexperienced person is unaware. This can result in expensive mistakes or injuries. If you aren’t familiar with the materials or the techniques, get help from a mentor. If a mentor isn’t available, use a professional and watch how they work.
Permits and Inspections
In urban and suburban settings, you’re probably required to have a permit to put up anything bigger than a small satellite dish or TV antenna. Most permitting processes are fairly straightforward. Complying with building codes can also avoid problems you aren’t aware of. You may be required to get your installation inspected as well. While this can be an annoyance, it’s still the law. Your personal and homeowner’s insurance may require that permits be in order too.
Power Lines — Stay Clear!
Those warning stickers on masts and towers aren’t kidding. Electrocutions while putting up antennas are distressingly common. The usual accident occurs when a mast is being “walked up” and is either raised directly into power lines or the workers lose control and it falls into them.
When siting or raising an antenna, it’s a good idea to keep your working area away from power lines by at least half of the mast-plus-antenna’s height. Look carefully for power lines, particularly around trees where you might not be able to see them clearly.
Tower and Rigging References
Where can you find out the right way to do things? Start with information provided by the manufacturer of your mast or tower. They want you to have a good experience! The Rohn User’s Guide is a wealth of information about towers. Online, survey the articles in the ARRL’s “Antennas” web page at www.arrl.org/antennas or pick up a copy of the ARRL Antenna Book (www.arrl.org/arrl-antenna-book-reference).
Finally, there are two complementary books specifically written for hobby-level antenna and tower installers that you’ll find very helpful. Antenna Towers for Radio Amateurs by Don Daso K4ZA covers all aspects of erecting the typical amateur tower and applies it to many commercial installations too. Up the Tower by Steve Morris K7LXC is a tutorial on working aloft, rigging gear to lift and position antennas, and the tools and accessories involved. Both are widely available online, including from the ARRL (www.arrl.org/shop).