Do you remember the logic puzzle about the Farmer who wanted to transport his animals and produce across a river without them eating each other? The puzzle was deceptively simple. How could he stop the Fox from eating the Chicken or the Chicken from eating the Corn while he was busy crossing the river?
Of course, there were a few rules to complicate his task, like he could only take one thing at a time during each crossing, and he also had to go along on each trip. Sounds simple? Not! I dare you to try and solve it as a mind exercise as described in Figure 1.
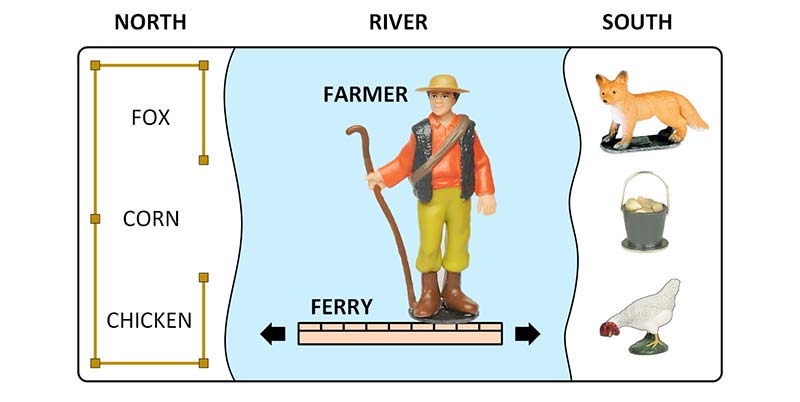
FIGURE 1. Mind Game: How can the farmer safely move the three pieces in the South across the river to the North without anything getting eaten?
The Rules:
1. Farmer must always be on the Ferry when it crosses river.
2. Farmer can only take one piece at a time on the Ferry.
3. If Chicken is left alone with Corn, Chicken will eat Corn.
4. If Fox is left alone with Chicken, Fox will eat Chicken.
5. Fox will not eat Corn.
(Solution given at end of article.)
Just remember, you can’t leave the Fox alone with the Chicken or the Chicken alone with the Corn even for a minute! Good luck!
THE FINISHED WORKING PUZZLE
YouTube has numerous videos of this puzzle that describe exactly how to solve it, although the ‘actors’ are sometimes different. The Fox is sometimes a Wolf, the Corn is a bag of Grain, and the Chicken can be a Duck. It doesn’t really matter of course. You get the idea.
Typically, the puzzle has the Farmer rowing a boat across the river, but I decided to build a motorized version to make it more interesting for kids (and adults) to play. So, I magically transformed the boat into a Ferry and added an Operator who controls it with a big lever. Back and forth. Back and forth. Such fun!
Figures 2 and 3 show the finished result.
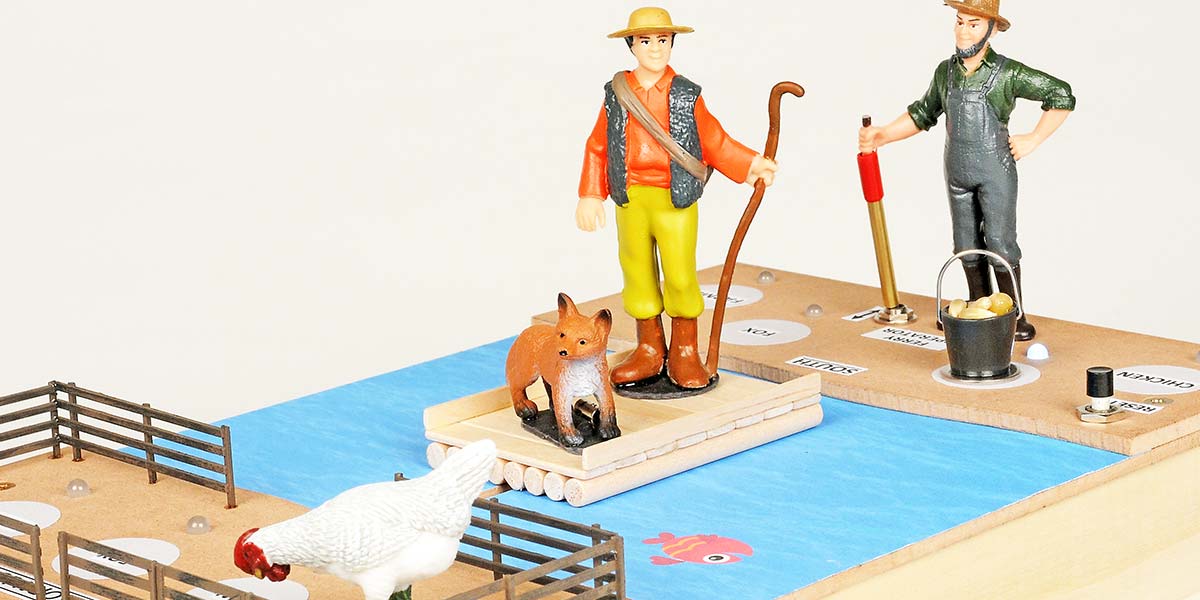
FIGURE 2. The Ferry travels across the raging river carrying the Farmer and his possessions one at a time.
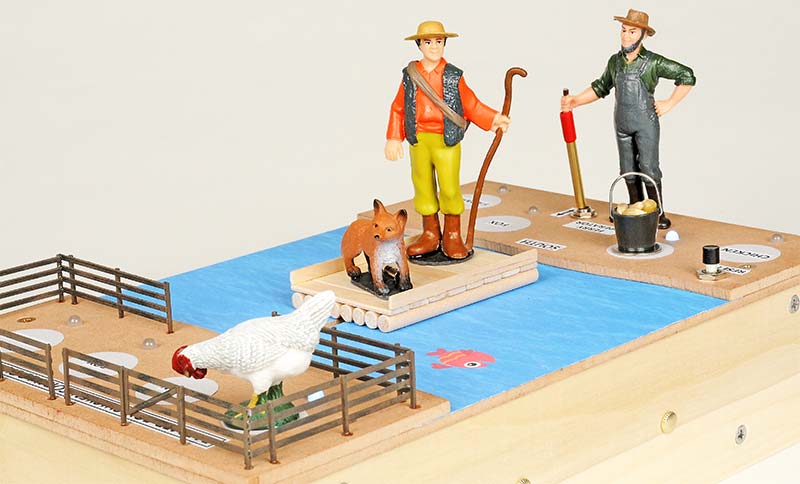
FIGURE 3. The Ferry Operator controls the Ferry while the Farmer loads and unloads his possessions.
Notice that a speaker is mounted on the front. I couldn’t stop myself from adding a soundtrack, and frankly it needed one to tell the players when they had won or to caution them when they made a move that could lead to disaster. The Ferry Operator controls the Ferry while the Farmer loads and unloads his possessions on both sides. I posted a video on YouTube that shows how a typical game is played on the working model from start to finish. The link is https://www.youtube.com/watch?v=OXL2XotUkQU or search YouTube for “Farmer Fox Chicken Corn Puzzle Working Model.”
Take a look at Figure 4.
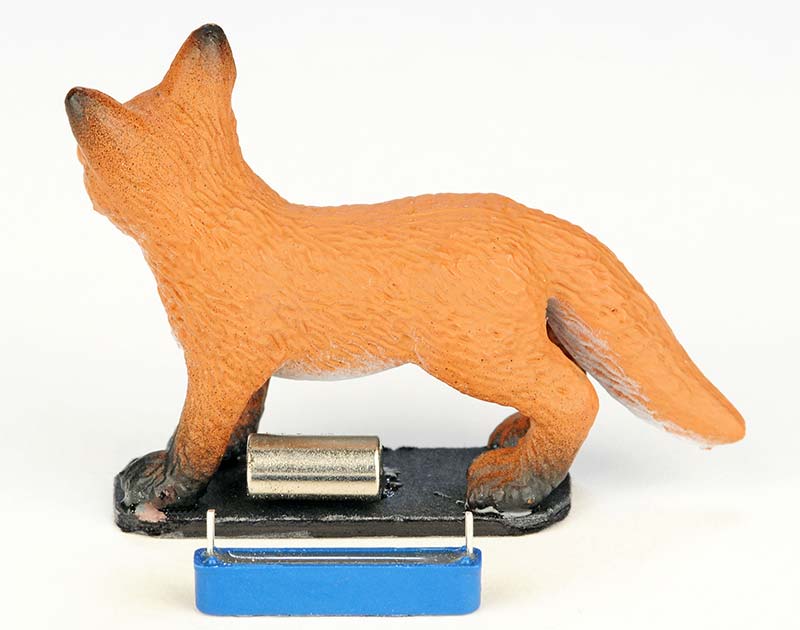
FIGURE 4. Each puzzle piece contains a small cylindrical magnet which actuates a blue reed switch mounted underneath the wood.
In order to track the locations of the figures, small magnets are attached to the bases of the figures and little blue magnetic-sensing reed switches are mounted underneath the wood. The reed switches are connected to an Arduino microcontroller which acts as the brains of the system.
Figure 5 shows the underside of the unit with its motor, pulleys, and 0-ring belt to move the Ferry, not to mention the ever-present little blue Arduino µC.
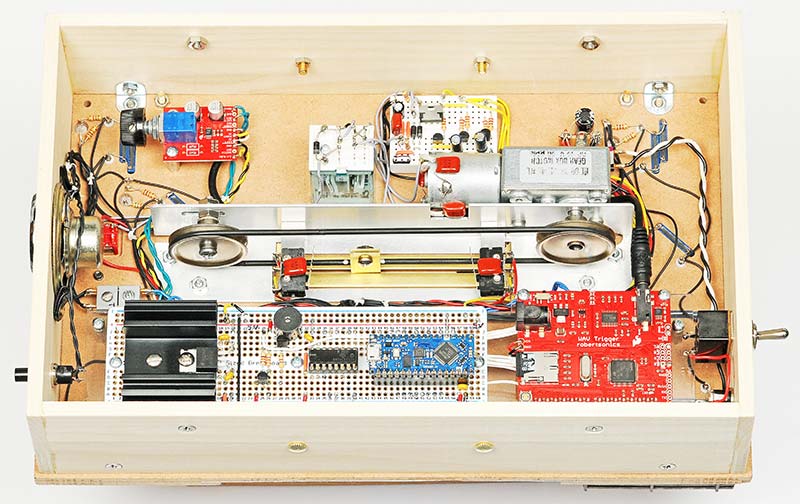
FIGURE 5. A DC motor, two pulleys, and a rubber belt move the Ferry. The blue Arduino Nano triggers the red sound board.
The larger red board in the lower right is a SparkFun sound card and the little red board in the upper left is an audio amplifier to drive the speaker. The white-colored direction relay for the Ferry circuit is in the upper center, mounted upside down with foam tape.
Figure 6 is a block diagram of the system showing the major components.
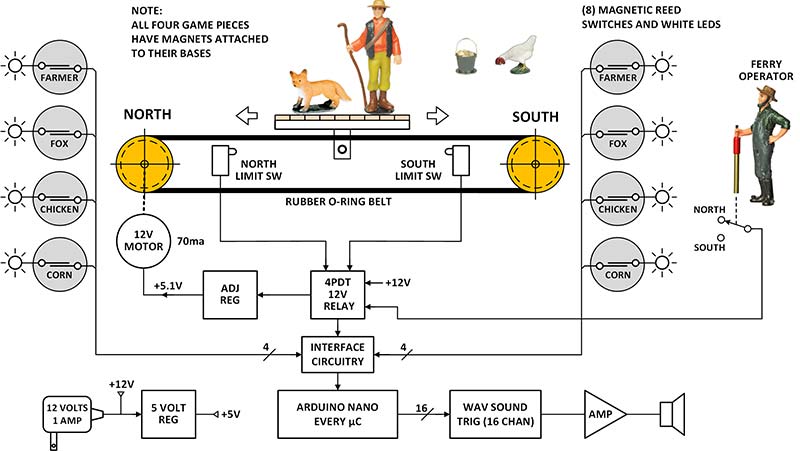
FIGURE 6. The white LEDs next to each of the eight round pads light up when the figures are placed over the magnetic switches below.
Please notice that there are four labeled circles for the puzzle pieces on each side. Right next to each circle is a white LED which lights up when the figure’s magnet activates the reed switch directly below. This is an important feedback mechanism to make sure the player correctly positions the figures when they are moved.
SOUNDTRACK
In operation, the Arduino continually polls the status of the figures and Ferry and triggers the appropriate soundtrack.
Figure 7 lists the sound effects.
| TRIG# |
SOUND TRACK |
| 001 |
“Winner, winner! You have correctly solved the puzzle.” |
| 002 |
“To begin, move all pieces and Ferry to South side of river.” |
| 003 |
“Ready to play.” |
| 004 |
Ding, ding. (Ferry bell.) |
| 005 |
Water sloshing. |
| 006 |
Chicken clucking. |
| 007 |
Spare |
| 008 |
Spare |
| 009 |
“Go back, Chicken with Corn.” |
| 010 |
“You lose, things got eaten.” |
| 011 |
“You lose, Fox ate Chicken.” |
| 012 |
“You lose, Chicken ate Corn.” |
| 013 |
“Go back, there’s trouble.” |
| 014 |
“Go back, Fox with Chicken.” |
| 015 |
“Go back, Farmer must go along.” |
| 016 |
“The challenge of this puzzle ... ” |
FIGURE 7. The soundtracks help the player recover from bad moves but do not divulge the best moves.
The majority of effects are triggered by the Arduino each time the Ferry either leaves or arrives at either side of the river. This was simple to implement because of the limit switches. Each time a limit switch changes state, the Arduino checks which limit switch has changed plus the status of the eight reed switches, and triggers the appropriate response. Simple!
Just for fun, I added the sound of water sloshing every time the Ferry is in motion. If the Chicken is along, a clucking sound is also heard. This mixing of sounds was possible because the SparkFun card is polyphonic.
THE MOTORIZED FERRY
What could be more fun than driving a Ferry back and forth across a raging river?
I found a dandy 12V motor on Amazon that had a gear ratio that allowed about four seconds for a crossing; refer to Figure 8.
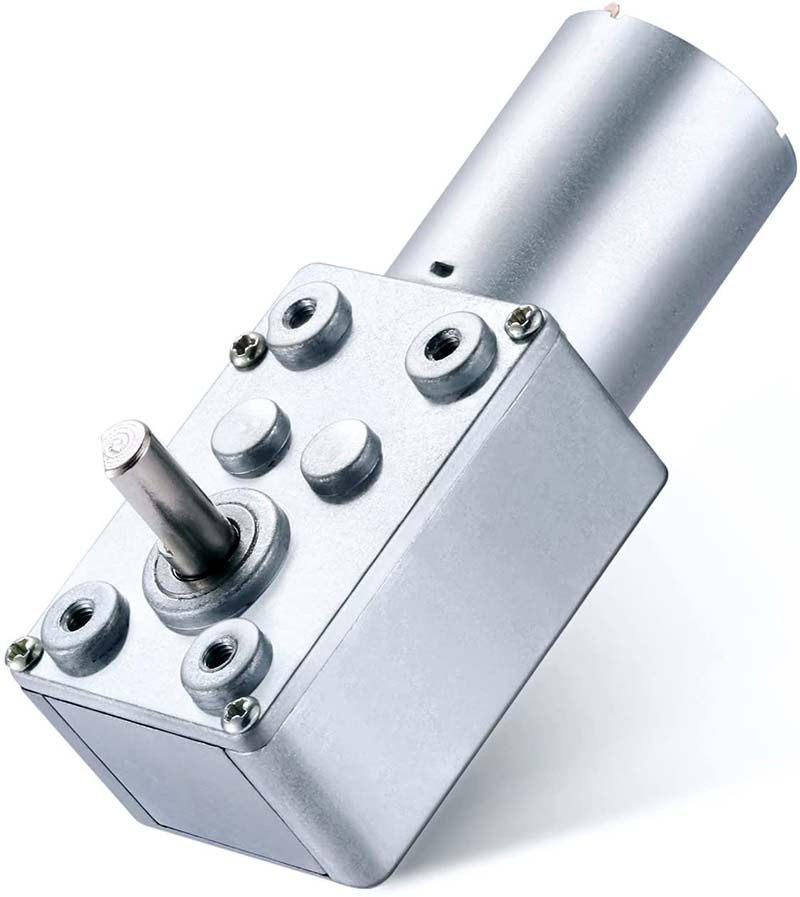
FIGURE 8. An inexpensive 12 volt, 20 RPM motor was available on Amazon to drive the Ferry.
It had to be slow enough so a bad move could be reversed, but not too slow to keep you waiting. So, 20 RPM seemed about right. When I added an adjustable regulator to drop the voltage to around five volts, it was perfect. Probably a 10 RPM motor would have been a closer match.
The next thing to design was the drive mechanism itself. I had several pulleys from an old Erector Set that looked about right. BTW, the 1-1/8” pulleys are still readily available on eBay. A standard 0.103” diameter O-ring belt fits their groove perfectly.
The motor shaft was about 0.218”, so the pulley hub needed to be drilled out. Some Erector Set pulleys only have a 5/16” hub which doesn’t leave much material after drilling. Try to find a 1-1/8” pulley with a 3/8” hub on eBay. This will allow a screw to be used to tighten the pulley on the shaft.
SPLICING THE BELT
The O-ring belt needed to be about 16” long. Garf! Regular O-rings don’t usually come this long, but you can make your own. McMaster-Carr has long pieces of 0.103” O-ring material for just $0.27/ft. So, I ordered 10 feet. But how do you join the ends? No problem!
Figure 9 shows the simple jig I made to super glue the 45 degree cut ends together.
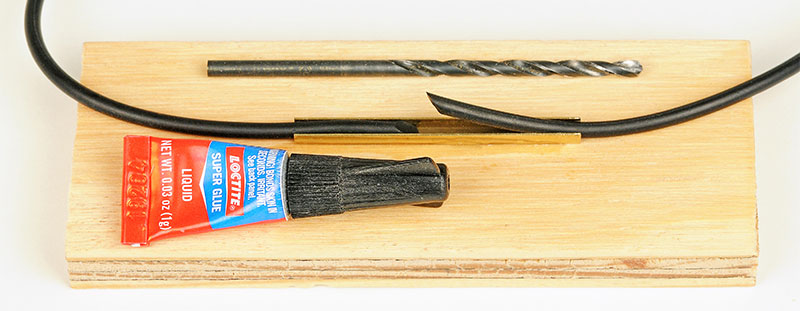
FIGURE 9. The angled ends of the O-ring stock can be bonded together with super glue to form a surprisingly strong belt.
The 1/8” brass channel is used to hold the ends in alignment as the glue sets up. The inside dimension of the channel was 0.097” which was a little tight for the O-ring. My solution was to briefly press a 0.113”(#33) drill bit into the channel in order to flare it out a bit.
You’ll be amazed at how strong the super glue bond is. The belt should NOT pull apart when you stretch it. If it does, trim it and glue again. I’ve done dozens of successful splices like this in the past.
THE SCHEMATIC
Figure 10 shows the schematic the of unit.
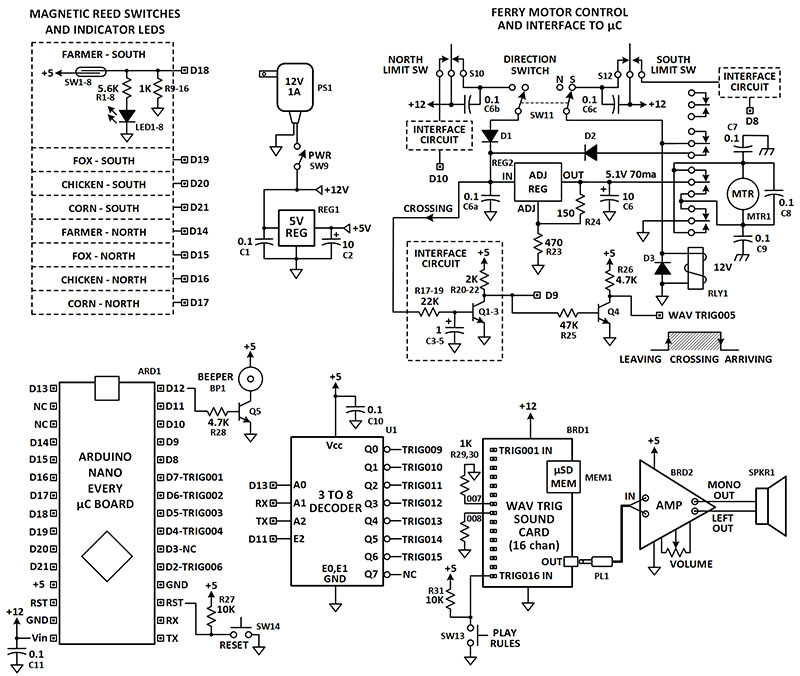
FIGURE 10. The Arduino Nano Every µC continuously notes the locations of the pieces and Ferry, then triggers the appropriate soundtrack.
An Arduino Nano Every was perfect to sense the states of the reed switches, limit switches, and motor voltage, and then to trigger the appropriate soundtrack. I actually considered using discrete logic instead of the Arduino, but I caved in because it was just too easy to do debouncing, pulsing, and long delays with the µC.
The sound card had several ways to trigger it, including a serial input. I chose to use the 16 separate trigger inputs because it seemed simpler since I only anticipated 5-6 sound effects. However, I went crazy and added a bunch more which forced me to add a 3-8 decoder to increase the number of outputs from the Arduino. Next time, I’ll just go full serial.
The tiny µSD memory card that is plugged into the sound card contains 16 wav files, along with an INIT file. The manufacturer of the card (Robertsonics) provides an intuitive GUI window to generate a new INIT file if any changes are desired.
SOFTWARE
The general operation of the Arduino sketch has been described in previous sections of this article, so I’m not going to cover it in any detail. Please refer to the comments in the sketch. The sketch and wav files are available in the downloads for this article.
PROBLEMS
Problem: At first, I tried running the motor without any noise-suppression capacitors installed on it.
Result: Each time the Ferry was started or stopped, the Arduino went nuts.
Solution: Added 0.1 mfd caps across the terminals and to the metal case. Problem went away.
Problem: Sometimes the magnets in the bases of the figurines would also trigger the reed switches on either side.
Solution: Spread out the pieces so they don’t interact. Or, I could have installed weaker magnets in the bases. I also added 1” diameter labeled pads to define the exact areas where the specific pieces should be placed, so the Arduino would know who was where.
Bright Idea: Install some neat HO gauge miniature fencing on the North side to add an interesting feature to that area.
Problem: The fencing was so delicate that the mounting pins broke off at the slightest touch.
Solution: Treat it with care. Next time, use a sturdier fencing material.
Problem: I could not find a Chicken with the proper scale even after buying three sets of animals.
Solution: Live with it. Or, think of it as the “Chicken that ate Chicago.”
SIGNING OFF
All in all, this was a fun project. It brought an age-old puzzle to life with actual puzzle pieces, a motorized Ferry, and a soundtrack to boot. My friends and relatives have had fun solving it, although the one tricky move with the Chicken stumped a few of them for a while. I hope you enjoy solving it too. NV
Parts List
| Designation |
Qty |
Component |
Digi-Key, unless noted |
| R1-R8 |
8 |
Resistor, 5.6K |
5.6KQBK |
| R9-R16,R29,R30 |
10 |
Resistor, 1K |
1.0KQBK |
| R17-R19 |
3 |
Resistor, 22K |
22KQBK |
| R20-R22 |
3 |
Resistor, 2K |
2.0KQBK |
| R23 |
1 |
Resistor, 470 |
470QBK |
| R24 |
1 |
Resistor, 150 |
150QBK |
| R25 |
1 |
Resistor, 47K |
47KQBK |
| R26,R28 |
2 |
Resistor, 4.7K |
4.7KQBK |
| R27,R31 |
2 |
Resistor, 10K |
10KQBK |
| C1,C6abc-C11 |
9 |
Capacitor, 0.1 mfd 50V |
Jameco 2261351 |
| C2,C6 |
2 |
Capacitor, 10 mfd 35V |
Jameco 94221 |
| C3-C5 |
3 |
Capacitor, 1 mfd 50V |
Jameco 94161 |
| D1-D3 |
3 |
Diode, 1N4002 |
Jameco 76961 |
| SW1 |
1 |
Toggle Switch, SPST |
Jameco 76241 |
| SW2-SW9 |
8 |
Reed Switch, Magnetic |
MK06-7-B |
| SW10,SW12 |
2 |
Lever Switch, SPDT |
Jameco 187709 |
| SW11 |
1 |
Toggle Switch, DPDT |
ANT21SEBQE |
| SW13,SW14 |
2 |
Pushbutton, N.O. |
Jameco 2266839 |
| MAGNETS |
8 |
Magnet, Small, as required |
Multiple |
| RLY1 |
1 |
Relay, 4PDT, 12V |
Jameco 291507 |
| LED1-8 |
8 |
LED, White, Diffused |
QBL8IW60D-CW |
| REG1 |
1 |
Regulator, LM7805, 5V |
Jameco 51262 |
| REG2 |
1 |
Adj Regulator, LM317 |
Jameco 23579 |
| PS1 |
1 |
Power Supply, 12V 1A |
Jameco 2232825 |
| Q1-Q5 |
5 |
Transistor, 2N3904 |
Jameco 38359 |
| U1 |
1 |
IC, 74LS138, 3-8 Decoder |
Jameco 46607 |
| BEEP1 |
1 |
Beeper, 3-20V |
Jameco 2120452 |
| MEM1 |
1 |
µSD Memory Card, 8 GB |
Amazon |
| SPKR1 |
1 |
Speaker, 8 ohms |
Jameco 135589 |
| MOUNT |
1 |
Alum Angle, 1.25” x 1.25” |
Home Depot |
| FENCE |
1 |
Fence, Plastic, HO scale |
Walthers 272-272402 |
| FIGURES |
5 |
Farmer, Fox, Chicken, Corn, Man |
Amazon, Walmart |
| ARD1 |
1 |
Arduino Nano Every µC |
ABX00033 |
| BRD1 |
1 |
Wav Sound Trigger, 16 chan |
SparkFun WIG-13660 |
| BRD2 |
1 |
Amplifier, Noisy Cricket |
SparkFun DEV-14475 |
| BELT |
10' |
O-ring Stock, 0.103”, $0.27/ft |
McMaster 9407K11 |
| MTR |
1 |
Motor, 12V, Geared, 20 RPM |
Amazon, approx $18 |
| PULLEY |
2 |
Erector Set 1-1/8” Pulley, 3/8”hub |
eBay (note hub size) |
| BOX |
1 |
Poplar Wood and Masonite |
Home Depot |
FIGURE 11. All the parts were readily available from the usual sources. Check eBay for the pulleys first.
Please feel free to contact me at [email protected] with comments or corrections. Or, make a comment at the end of the online article if you would like to share your thoughts with the other readers.
Seven Step Solution to Farmer, Fox, Chicken, Corn Puzzle
1. Farmer and Chicken to North. 2. Farmer returns to South. 3. Farmer and Corn to North (alt. Farmer and Fox to North). 4. Farmer and Chicken return to South. 5. Farmer and Fox to North (alt. Farmer and Corn to North). 6. Farmer returns to South. 7. Farmer and Chicken return to North. Success!
Downloads
What’s In The Zip?
Sketch Files
WAV Files