The Lunch Box Jukebox is a compilation of various projects to make a compact portable music, video, and game entertainment device. The Raspberry Pi Zero is the heart of the Jukebox Internet radio. It’s combined with a DAC hat in the current version of Pimoroni pHAT BEAT with a VU meter, although the newer Pimoroni Pirate Audio could be substituted with a few changes.
For more versatility, an inexpensive Blaupunkt Toronto car radio gives the option of listening to broadcast AM/FM radio, or you can use it for playing music with a USB thumb drive. The Blaupunkt also allows playing from your phone via the Bluetooth option.
The unit plays videos under LIbreEL, OSMC, or an ARM based operating system like the Raspberry OS or Diet-Pi, via the VLC media player or Kodi. The back of the Lunch Box Jukebox has a built-in seven inch capacitive touch screen display by UCTRONICS. This display was chosen because in addition to its excellent screen quality, it also has a HDMI audio take-off jack which can be used for certain software configurations.
The enclosure for the Lunch Box Jukebox is a wooden pine box from a local crafts store. The sound from a wooden box is more sonically pleasing, plus it presents a very appealing look when stained and lacquered. The inside dimensions — which allow the placement of all the components easily — measures 13 cm high and 20 cm in length with a depth of 7.5 cm. The outside dimensions are a little bigger which includes the thickness of the pine wood box but also a slight rim. The rim acts as a protection for the side speaker grills and switches, as well as a convenient stand.
To make cutting the openings and drilling the mounting holes for the components easier, I found taping a sheet of graph paper to each face of the wooden box and marking with a pencil the desired drill sites will assure proper placement and adequate spacing. The openings for the speakers and switches and other mounting sites are done using common woodworking tools and techniques.
Using Forstner drill bits for the larger holes give smoother edges. The slits for the pHAT BEAT VU meter were made by drilling a series of holes the appropriate length, then using an Xacto™ chisel fashioning the final double slits. Once all the drilling is done, then comes sanding, staining, and several layers of lacquer, or whatever your personal preference is for a wood finish.
As mentioned before, the Pi Zero is the basis of the Internet radio. To mount it to the Pimoroni pHAT BEAT, you’ll need to order a long lead 2x20 pin female header. The long leads will be soldered on the component side of the Pi Zero. The pHAT BEAT will mount onto these leads (refer to Photo 1 and the Parts List).
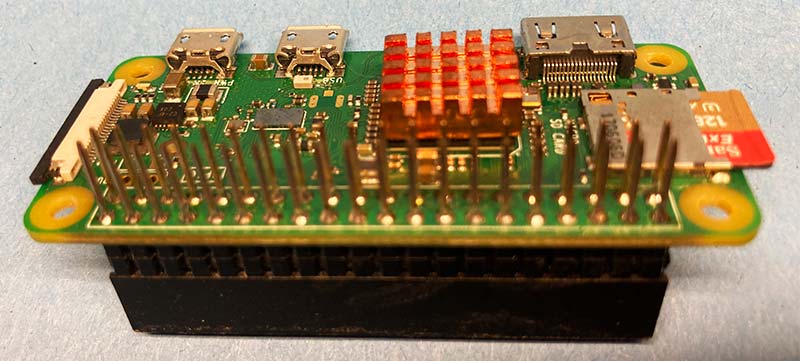
PHOTO 1.
Nylon standoffs in the PCB (printed circuit board) mounting holes make a secure package. The stacked pHAT BEAT with the Pi Zero unit is mounted to the front of the wooden enclosure using nylon spacers and screws. Placing a piece of frosted plastic between this unit and the front makes for a softer LED display. Painting the nylon screw heads a gold color also gives a nicer look (Photo 2).

PHOTO 2.
Constructing the front button control panel requires an 8 cm x 2 cm perfboard and momentary button switches with covers. The switches are mounted, soldered, and wired in place. This is mounted on the front panel below the pHAT BEAT/Zero unit and directly above the opening for the Blaupunkt radio using nylon hardware. The wire ends from the switch panel are stripped and pushed into the designated positions on the female GPIO header of the pHAT BEAT/Zero unit as shown in Figure 1 and Photo 3.
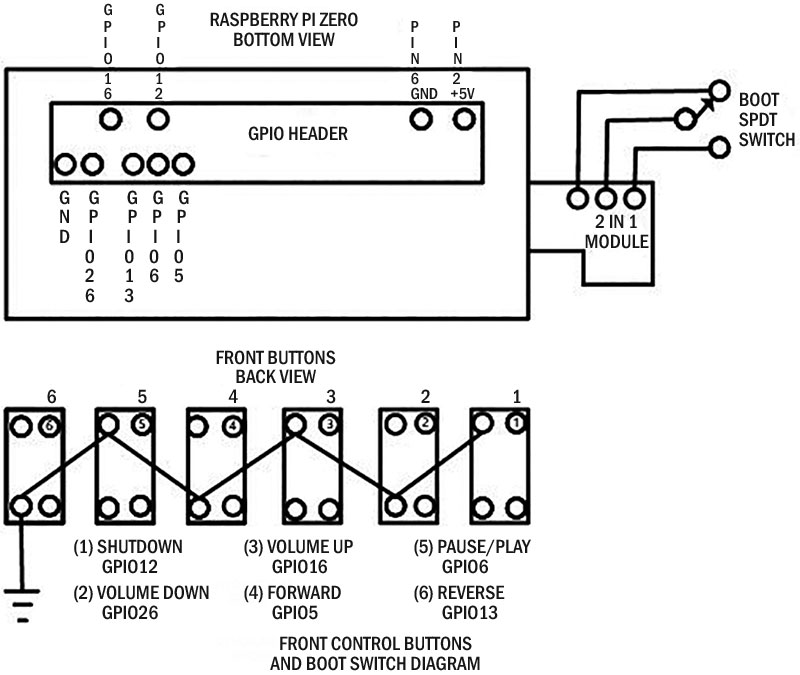
FIGURE 1.

PHOTO 3.
Shaft extensions for the momentary switches were constructed using two nylon spacers. The longer one is glued to the switch and the other in the button cap. The button cap can then be screwed into the protruding longer one.
Two four ohm/three watt Uxcell speakers are installed on the side panels, while the passive speakers are mounted in the front. The front passive speakers give the music a better tonality with improved bass. The speaker grills in the photos are two inch painted push type drain covers made by Danco from a local hardware store.
When placed into the precut holes, the push tabs are bent to hold the grills in place. The speakers are switched between the audio sources; that is, the pHAT BEAT/Zero unit, the Blaupunkt radio, and the stereo amplifier module. Make sure the pHAT BEAT output switch is set to stereo.
The stereo amplifier module is installed above the pHAT BEAT/Zero package. The line level input for the stereo module is taken from the HDMI audio extraction output jack on the UCTRONICS UC-595 LCD touchscreen display. A four-pole/three-position rotary switch accomplishes this audio source selection task. The wiring diagram shows the setup; refer to Figure 2 and Photo 4.
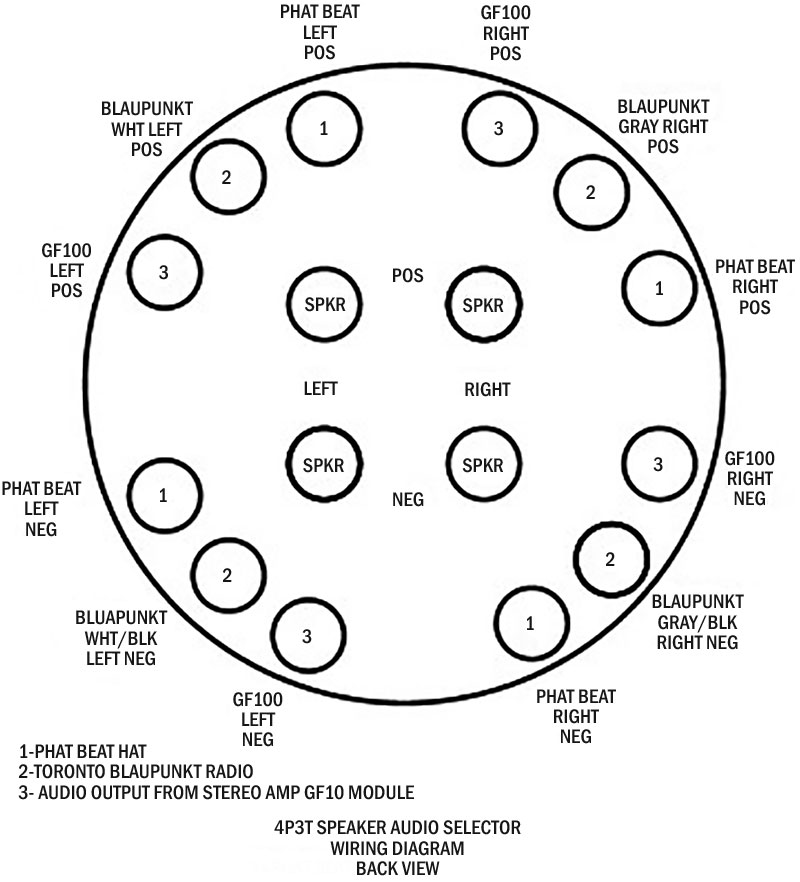
FIGURE 2.
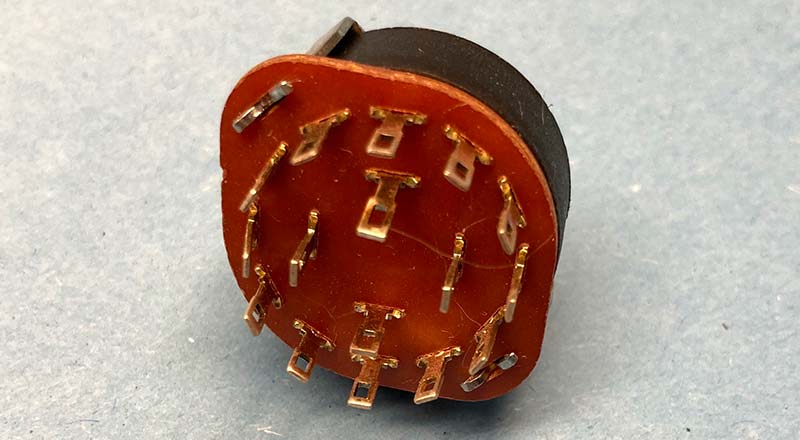
PHOTO 4.
This audio source selector is placed on the lower side panel above the Blaupunkt as determined when initially planning component placement. It’s convenient to have the pHAT BEAT/Zero unit or Internet radio section connected to the speakers when in the forward setting, the Blaupunkt radio when in the up or middle position, and the video screen when turned to the back. This will also act as an additional safety feature to prevent accidentally sending audio from the Blaupunkt to the separate stereo amplifier module which can harm that unit, since the rotary switch is not a true break before make type. A power-on switch wiring arrangement that only powers either the pHAT BEAT/Zero or the Blaupinkt is additional insurance this will not happen (Figure 3).
FIGURE 3.
Mounting the Blaupunkt in the front cutout of the wooden box is straightforward. Just follow the instructions that came with the radio. Operation of the radio is similar to others of comparable design and function. Remember the Blaupunkt can only be turned on when the power toggle switch is in the off position.
Pushing the volume control will turn the Blaupunkt on and you’ll be greeted with a HELLO moniker on the fluorescent display if everything is wired correctly. Make sure the power button on the TalentCell battery brick is also turned on if you fail to see the HELLO message before troubleshooting the wiring.
Remember to switch the speaker switch for the Blaupunkt. One omission in the instructions for the radio is setting the time. Do this by pressing and holding the DISP button on the remote until the time comes up and the hours are flashing. Use the rotary volume control to set the hours and AM/PM section, then press DISP once again to set the minutes. You are now good to go.
The Lunch Box Jukebox uses a dual boot board inserted in the microSD slot. The ICStation 2-in-1 microSD board shield dual system switching module is available at Amazon or eBay (Photo 5). Using it increases the versatility of the Lunch Box Jukebox.
PHOTO 5.
For use with the Jukebox, you must unsolder — very carefully — the on-board SPDT micro switch. Once this is successfully completed, three wires are soldered in the resulting holes.
Maintain the correct identity of each wire. The free end of each wire is then soldered to an SPDT slide switch, with the common lead in the center connector. This slide switch is attached to the side opposite the audio selector and above the Blaupunkt radio.
Using a piece of plastic around this switch will lessen accidentally hitting it while in operation. It should only be used when the pHAT BEAT/Zero is powered down. A DPDT toggle power switch is installed on the front panel below the passive speakers and is symmetrical to the LED power indicator. This switch is wired directly to the 12 volt output of the TalentCell dual battery pack and then to the Blaupunkt, but only when the power switch is in the off position for the pHAT BEAT/Zero and the five volt LED power indicator is off.
The LED is held in place using a shaft housing from another toggle switch. I found the LED too bright for nighttime use and corrected the problem by using LightDims. Lastly, the charging port is positioned between the speaker and the ICstation 2 in one switch on the side panel. The Lunch Box Jukebox can be operated while the TalentCell is charging.
A seven inch capacitive touch UCTRONICS LCD screen is mounted in a cutout in the back cover. Cables attach the power line to the five volt bus, touch control to the data lines of the USB line via the USB extender, and finally the HDMI input to the micro HDMI on the Pi Zero. Using the USB connection UCTRONICS screen to power the display saves the use of another cable.
A keyboard dongle is inserted into another of the USB extender’s open ports which is then paired with a combined keyboard, touchpad, and game controller. Although you can navigate the screen via the touchscreen, I found it easier with the touchpad. The USB extender is attached to the micro USB port on the Pi and it sits on the back of the Blaupunkt radio under the TalentCell battery.
Final assembly consists of adding the car antenna, connecting it to the Blaupunkt antenna input, then installing a handle on top of the wooden box with an embedded neodymium magnet nearby to hold the Blaupunkt’s remote control. The remote control itself will have a metal plate (frequently used with cell phones) to adhere to its back to securely hold it magnetically in place on top of the Jukebox.
The external female USB port mounts between the antenna and stereo module. It connects to the USB extender port. Magnetic closure of the two halves of the wooden box is accomplished by gluing 1/4 inch neodymium magnets after drilling with a 1/4 inch Forstner bit in 1/2 inch wood squares, which are then glued to the front and back pieces. When the internal components are arranged as shown in Photos 6 and 7, everything fits nicely and the magnetic latches provide a secure closure between the two sections.
PHOTO 6.
PHOTO 7.
After the hardware has been assembled, software needs to be decided on and then installed. The first build of the Lunch Box Jukebox ran the Pimoroni software package “Pirate Radio” under the Raspberry Pi Stretch operating system using Pimoroni’s one line installer, curl https://get.pimoroni.com/vlcradio | bash. It worked perfectly and allowed remote control of the Internet radio via a cell phone using a built-in VLC player program; a nice feature.
The default name of the Lunch Box Jukebox on the Wi-Fi network is raspberrypi. All you need to do is type raspberrypi.local:8080 or http://(the IP address of the Pi zero) in a web browser when the cell phone is connected to the same network as the Jukebox. When asked for a username, leave that field empty and type raspberry for the password.
The Stretch operating system can still be downloaded from the Raspberry Pi operating system archives at http://downloads.raspberrypi.org/raspbian/images. When the Raspberry Pi Buster operating system came out, there was a delay in updating the Pimoroni one line installer that caused errors, but that now seems to be corrected.
Programming the Internet streaming radio stations for the ones that you wish to play is a two-step process. First, choose your station. Go to https://www.internet-radio.com to choose the music you’re interested in. Right click on .m3u under the play button and copy the http:// address in the highlighted area. To add that station, you need to edit the playlist file (default.m3u).
Type in a terminal window when running the RaspPi OS sudo nano /etc/vlcd/default.m3u, then add the URLs one line at a time. When finished, just press control and x, then y, then ENTER to save and exit. Reboot by typing sudo reboot.
If you’re intending to connect to multiple Wi-Fi networks, it’s easier to configure the wpa_supplicant.conf file manually. In terminal mode, type sudo nano / etc/wpa_supplicant/wpa_supplicant.conf. Use the arrow keys to move to the bottom of the file and add the following for each Wi-Fi network you wish to connect to, replacing the parts that say “YOURSSID” and “YOURPASSWORD” with the SSID and password of the Wi-Fi networks to which you are going to connect. (Make sure you keep the quotes; they’re important.) Again, to save the changes, press control and x, then y, and finally ENTER to save and close.
The other option for the Internet radio software is the excellent program by Bob Rathbone listed in the Resources. It’s a very extensive and versatile program. The program is written for both the Pimoroni pHAT BEAT used in this project, and the newer Pimoroni Pirate audio (https://shop.pimoroni.com/collections/pirate-audio). When using Bob’s program, you should use the one line pHAT BEAT installer as mentioned on page 92 of Bob”s manual: curl https://get.pimoroni.com/phatbeat | bash.
The Lunch Box Jukebox has the capacity to boot two different operating systems using the slide switch controlling the ICstation 2-in-1 board. This system worked much more reliably that my original effort with the multi-booting program BerryBoot, which frequently gave kernel panic/not syncing errors. Currently on my unit is the second operating system, LibreELEC for the Pi Zero.
My video files from my DVD collection were encoded using the free online HandBrake program. Those mp4 files can be played from a thumb drive and viewed on the built-in LCD screen. The sound is tapped from the HDMI audio extraction port on the display and routed through the stereo amplifier module (see Figure 3).
Other operating systems that have been tried so far are the Buster RaspPi OS, RetroPi for the Pi Zero, DietPi, and OSMC. I’am planning to try others in the future, so this project will keep me busy and entertained for a while. I hope this for you too. The versatility of the design will afford a myriad of software configurations for you to try. NV
Parts List
- Raspberry Pi Zero W
- Pimoroni pHAT BEAT Hat
- ICstation 2-in-1 Module for the Raspberry Pi
- Blaupunkt Toronto (TRT1049) AM/FM Media Radio with Bluetooth
- GF1002 Stereo Amplifier Module
- UCTRONICS UC-595 Seven Inch Touch Screen Display
- Two Uxcell Four Ohm/Three Watt/Two Inch Square Speakers
- Makerspot USB Extender
- TalentCell Lithium-ion Battery Model YB1206000-USB
- Four-pole/Three-position Rotary Switch
- DPDT Mini Toggle Switch
- SPDT Mini Slide Switch
- Aluminum Carbon Fiber Short Car Antenna
- Connecting Cables and 22 Gauge Wire, Various Colors
- USB Male-to-Female Cable
- Passive Speakers
- Nylon Spacers and Mounting Hardware
- Bolts and Nuts
- Wooden Box, at Least 20 cm L x 13 cm H x 7.5 cm D Inside Dimensions (Nicole WOD 0645)
- Perfboard
- Six Momentary Switches with Button Covers (Adafruit)
- Four Speaker Grills (DANCO Two Inch Snap-in Tub Strainer)
- Nine 1/4 Inch Diameter Neodymium Magnets
- LED Power Indicator and 330Ω Resistor
- LightDims (to Decrease LED Brightness at Night or in Dark Room)
- Metal Plate for Cell Phones (Used on Blaupunkt Audio Remote)
- Metal Handle for Enclosure
- LightDims (Amazon)
Resource Sites
https://www.instructables.com/Mod-My-Pirate-Radio
https://shop.pimoroni.com/products/pirate-radio-pi-zero-w-project-kit
https://www.internet-radio.com
http://downloads.raspberrypi.org/raspbian/images
http://downloads.raspberrypi.org/raspbian_lite/images
https://bobrathbone.com/raspberrypi/documents/Raspberry%20PI%20Radio.pdf
https://github.com/pimoroni/phat-beat/blob/20957ff650bac7e029d0c9321c5d40f4f1f38081/projects/vlc-radio/setup.sh
https://github.com/pirateradiohack/PiRadio
https://github.com/pimoroni/phat-beat#full-install-recommended
DIY Multi-Function Bluetooth Speaker/FM Radio/MP3 Player
https://www.youtube.com/watch?v=aSzFcCSp31s
https://github.com/pirateradiohack/PiRadio/releases/tag/2019-06-15-PiRadio
Downloads
What’s in the zip?
Videos
