This time, we’ll explore a technology used on a daily basis by super-sleuths: gel electrophoresis. In addition to examining the step-by-step process of how to obtain pure samples of charged molecules with little more than seaweed gelatin, a plastic chamber, and a DC power supply, we’ll review some DNA basics and see why gel electrophoresis is a cornerstone to many DIY Biotech projects.
INTRODUCTION
You’ve seen it in the movies. A single hair follicle from a suspect is found at the scene of a crime and it’s all that’s needed to close the case. Or, maybe you’ve subscribed to one of the DNA testing labs that use a sample of your saliva to determine if you’re, say, half Irish and half Japanese. Or, maybe you know someone involved in a paternity suit, asking for support from a supposed parent. All these cases can be solved through the use of gel electrophoresis.
Electrophoresis is simply the use of an electric current to move — and therefore separate — charged molecules. In gel electrophoresis, the movement of molecules is through a sponge-like matrix of gelatin. Add some means of visually tracking or identifying these molecules, and you’re done.
How is this useful? Well, consider that DNA is a huge molecule, consisting of hundreds of thousands of base pairs; recall, these pairs are Adenine-Thymine and Cytosine-Guanine. As such, it’s not practical to compare DNA molecules directly, but instead work with fragments of DNA produced by treating the DNA molecule with restriction enzymes (think molecular scissors).
These enzymes cut the DNA at specific locations, such as whenever it finds the base sequence, “ACCCAACACAC.” Because DNA from the same person will be cut by the restriction enzyme at the same places, the fragments will be exactly the same size. Not so for the DNA from someone else — especially if they’re not genetically related.
So, now the job becomes identifying fragment patterns — a much higher level and easier task than working at the level of base pairs.
DNA is, however, fragile and can be difficult to work with. Sterile techniques — a hassle — are required. In addition, visualizing the results of DNA gel electrophoresis requires a UV light box. A better learning vehicle for readers new to DIY Biotech is to use visible charged dyes that can be easily tracked.
THE SCIENCE
Key STEM Concepts
Although we’ll be using a substitute for DNA in the experiment presented here, the key STEM concepts remain relevant to DNA:
- In DNA gel electrophoresis, DNA is split into fragments with restriction enzymes, and these fragments (like the intact DNA molecule) are negatively charged.
- A buffer such as Tris Borate ethylenediaminetetraacetic acid (EDTA) — known as TBE — provides ions, enabling current to flow through a gel and carry DNA fragments (or dye) with it.
- Voltage applied across gel soaked in a conductive buffer moves DNA toward the anode.
- Smaller DNA fragments travel faster through the gel than larger fragments do.
Agarose Gel
The gel (or gelatin) I’ve been referring to is agarose: a pure seaweed-based gelatin. It’s akin to the animal-based gelatin dessert that’s served in hospital and school cafeterias worldwide, but without the color and sweetener. Agarose is usually prepared so that it has a firmer texture than common dessert gelatin, making it easy to work with. We’ll be working with 2% agarose gel.
This plant-based gelatin presents a regular sponge-like matrix that allows the passage of medium-sized molecules such as DNA processed with restriction enzymes. Agarose is an insulator, however, and for current to flow through the agarose, it must be saturated with an ion source or buffer. For short lengths of DNA, other substrates are available.
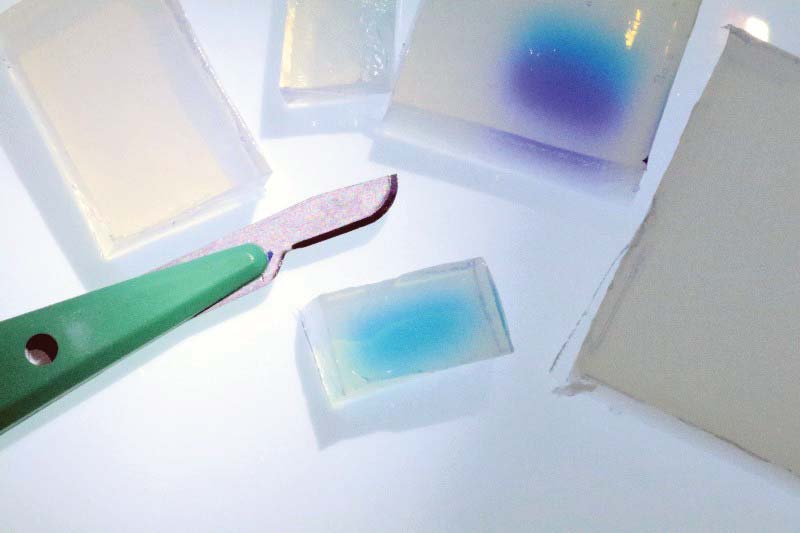
FIGURE 1. The end-product of our gel electrophoresis experiment: an isolated band of turquoise colored gel.
Buffer
You’re probably wondering whether ordinary table salt can be used to provide the conducting ions for DNA gel electrophoresis. It can’t. Successful DNA gel electrophoresis requires more than a slab of gelatin filled with the free ions that a salt could provide.
There must also be a way to keep the pH of the electrophoresis environment relatively constant because DNA is sensitive to excessive acidity/alkalinity. If the gel is too alkaline or acidic, the deoxyribonucleic acid will decompose.
What we need is a buffer. If you recall from high school chemistry, a buffer contains a weak acid or base and its salt. The acid or base neutralizes any additional acid or base, and the salt provides the electrical conductivity. The buffer TBE both protects DNA from degradation and provides the free ions needed for conductivity. We’ll be using TBE in our experiment here.
Gel Electrophoresis
The basics of gel electrophoresis are depicted in Figures 2 and 3. Samples containing molecules with predominantly positive or negative charges are placed in wells in a buffer-saturated agarose gel. A DC current is passed through the gel, and molecules of the samples with a positive charge move through the gel toward the cathode.
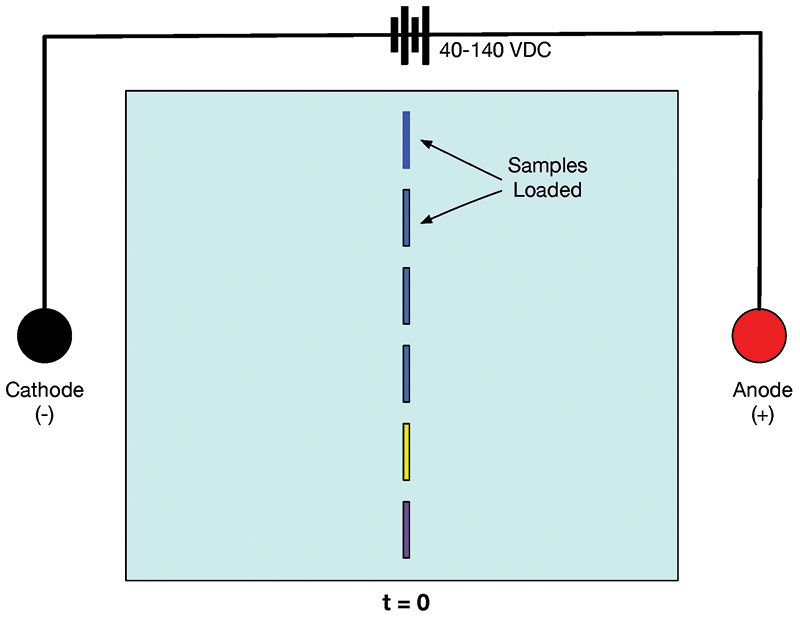
FIGURE 2. Gel at t = 0. Sample molecules are in the wells.

FIGURE 3. Gel at t = 20 minutes. Sample molecules have migrated toward the anode and cathode.
Conversely, samples of molecules with a negative charge move through the gel toward the anode. The greater the voltage, the greater the current, and the faster the movement of molecules through the gel. In addition, smaller molecules travel through the obstacles posed by the gel faster than larger molecules.
The maximum voltage and current are limited by the properties of the electrophoresis chamber and the heat dissipation characteristics of the gel. With excessive voltage or current, both the sample molecules and the gel will decompose.
In Figure 2, you can see that the samples are neatly tucked away in wells at the start of the experiment. In contrast, Figure 3 shows the status of the gel at 20 minutes after 40-140 VDC has been applied. The sample wells are empty, and the molecules of samples with a negative charge have moved toward the anode. Samples with a positive charge have moved toward the cathode. The closer to the anode or cathode, the smaller the molecule, meaning the trip through the gel matrix is more efficient.
For example, the gold samples on the far right of Figure 3 necessarily contain shorter (and therefore lighter) molecules than the blue samples closer to the midline.
Note that in DNA gel electrophoresis, the DNA molecules have a net negative charge because of phosphorous on the DNA spine. As such, all samples will move toward the anode. DNA samples are placed to the far left in Figure 2, near the cathode. When power is applied, the negatively charged DNA molecules migrate toward the anode. The greater the distance between the cathode and anode, the greater the possible separation of the DNA components.
EXPERIMENTAL DESIGN
If we were working with DNA from a crime scene — say, DNA found on a knife and a sample of saliva taken from a suspect — then we’d have to establish criteria for a match. For example, we might expect at least 90% of the DNA fragments from gel electrophoresis of DNA from the suspect to match the positions from gel electrophoresis of DNA taken from the knife.
However, in this experiment, we’re working with visible dyes: four known and two unknown combinations of the other four dyes. A reasonable hypothesis is that the two unknown dyes will separate out into one or more components that match the known dyes. We could specify an accuracy (such as ±1 mm), but for now let’s just eyeball the results.
The vivid colors of the dyes will make the composition of the unknowns obvious, even if the positions are a little off. If we were working with actual DNA strands, then we’d have to use special UV dyes to visualize the distribution of strands in the agarose gel.
EQUIPMENT REQUIRED
- Gel Electrophoresis Chamber
- Power Supply (40-140 VDC)
- Microwave Oven
The gel electrophoresis chamber — the centerpiece of this experiment — can be built with new or used Plexiglas and aluminum foil. I’ve built several, but my favorite is one I purchased from Amazon: the Thermo Fisher Owl B1A-BP, shown in Figure 4 ($200). It produces a gel 8 cm x 7 cm x 1-2 cm thick. The chamber is rated at up to 150 VDC/100 mA.
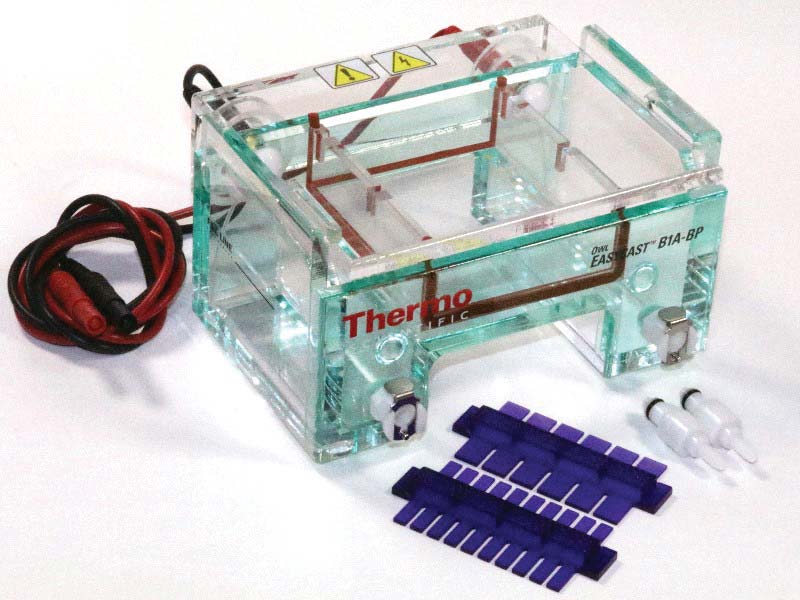
FIGURE 4. Thermo Fisher gel electrophoresis chamber with finger combs in purple.
This model is safe, easy to use, and provides consistent results. That said, $200 is a lot to pay for a plastic container with a bit of foil and a few inches of wire. Expect to pay $50-$100 for a comparable used model on eBay.
Viable options for a suitable supply run from fully DIY units and used supplies on eBay, to commercial supplies that can cost $500 or more. The power supply I used for this experiment is the Thermo Fisher Owl, shown in Figure 5.
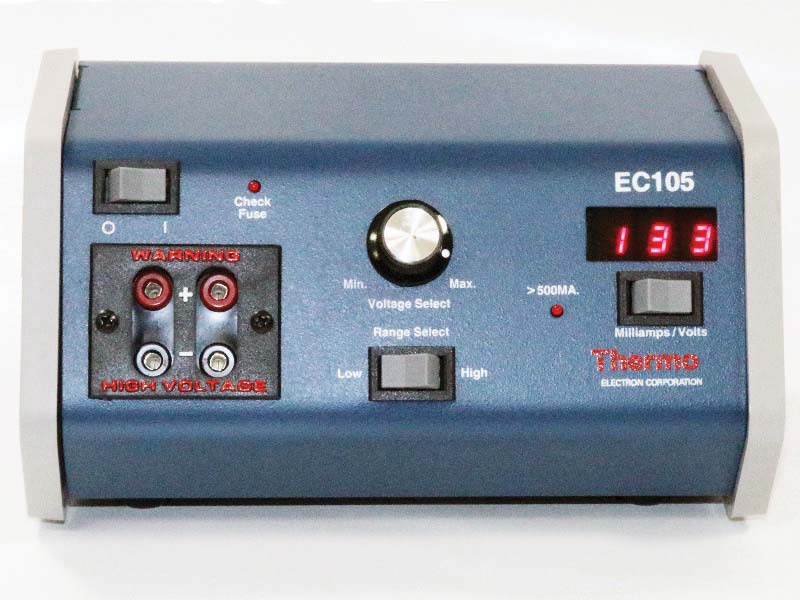
FIGURE 5. Thermo Fisher Owl power supply.
This is a safe but expensive option ($184, Amazon) if you have limited electronics ability or time. You simply select a voltage with the multi-position rotary switch and monitor the current on the LED display.
Inside, there isn’t much to see. It’s simply switching between taps on a multi-tap transformer, which leads to a bridge rectifier. There’s very little in the way of output filtering.
The one advantage a commercial unit has over a DIY power supply is probably safety. If you’re a teacher supervising a group of students, then a bulletproof, fully sealed supply makes sense.
The third major hardware item required is an ordinary microwave oven. You’ll need about five minutes with the oven to melt the prepared agarose gel so that it can be poured into the gel casting tray of the electrophoresis chamber.
CONSUMABLES
- Agarose Gel Separation of Dyes Kit
- Distilled Water
- Nitrile Gloves
The main consumable is a readily available electrophoresis kit by Innovation Science based on visible dyes, shown in Figure 6 (Amazon, $57). The kit consists of six 1 ml vials of dye, 500 ml of TBE buffer concentrate (5x), and 200 ml of prepared agarose with buffer 2%.
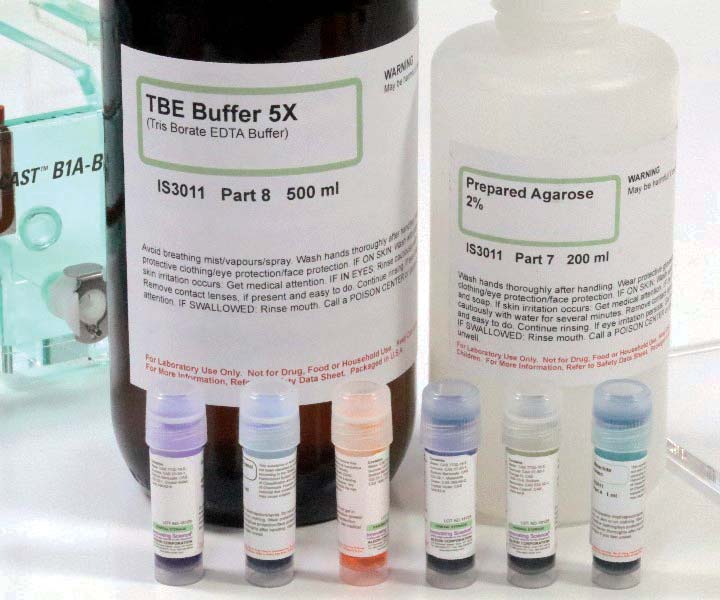
FIGURE 6. TBE buffer concentrate, prepared agarose gel/buffer, and vials of dye/buffer.
Oddly, that’s only enough agarose for 2-3 experiments, but enough buffer and dye for 9-10 experiments. The agarose gel is premixed with buffer and only needs to be heated to about 85°C so that it can be poured into an electrophoresis gel casting tray.
Note that the buffer — and therefore each component in the kit — is poisonous. Read the warning on the labels and wear nitrile gloves when performing the experiment. To make full use of the kit, you’ll need more agarose. I’ve had good luck with High Pure Quick Dissolve Agarose Powder by Green BioResearch (Amazon, $30/50g). Since it takes 0.8g of the agarose powder to create 100 ml of gel, 50g of powder (when used with TBE buffer) will create 6.25L of prepared agarose. That’s a lot of experimentation!
Similarly, if you run out of TBE buffer, you can order 500 ml of Frey Scientific buffer (Amazon, $12/500 ml).
THE EXPERIMENT
The experiment described here closely follows the instruction booklet that accompanies the Separation of Dyes kit. Note that there’s a teacher’s manual, as well as handouts for students.
1. Create the slab of agarose and wells.
This kit gives you a head start by providing the agarose pre-prepared with buffer and in gel form. Simply heat the gel in a microwave to about 85°C (a minute or less at a time) and then pour the warm agarose into the rectangular gel casting tray. Next, insert the six-fingered comb into the agarose to form the rectangular wells as in Figure 7.
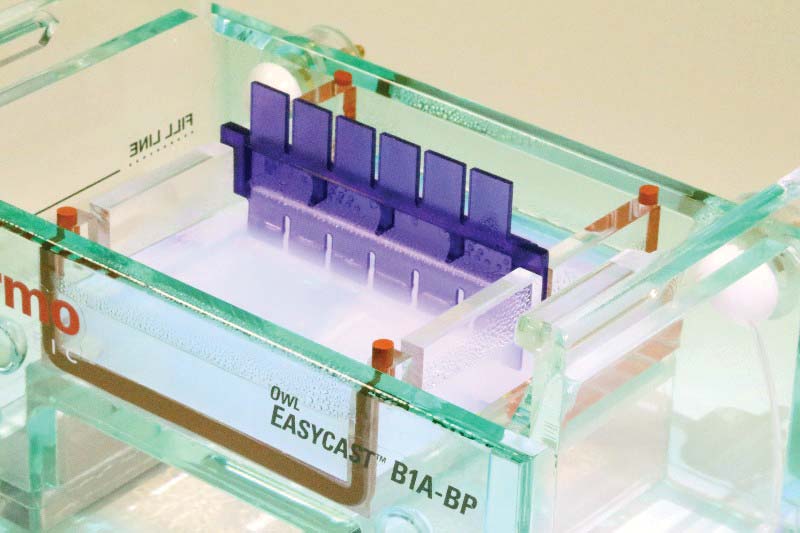
FIGURE 7. Six-finger comb in newly poured agarose.
After 30 minutes or so, carefully remove the comb from the solidified gel. You should see six empty wells for specimens as in Figure 8.
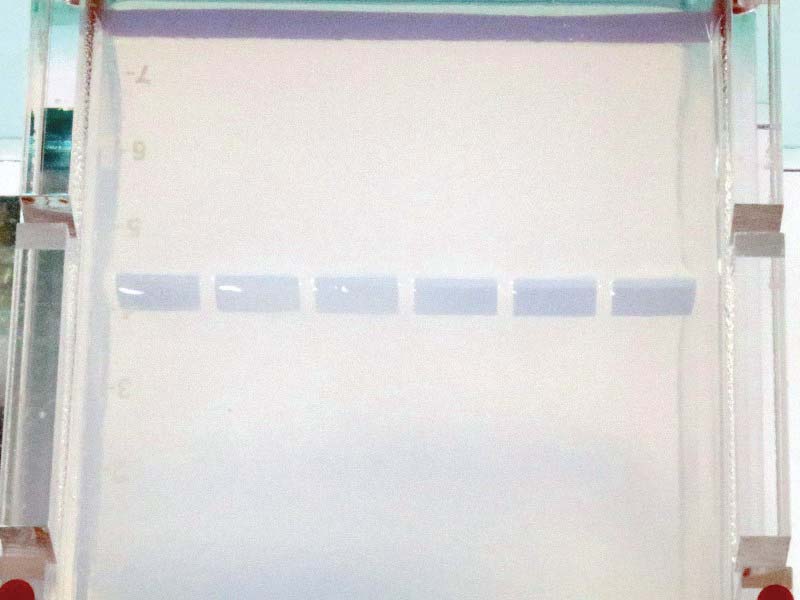
FIGURE 8. Empty wells formed in agarose.
2. Load the chamber with gel and buffer.
Next, rotate the gel casting tray with the solidified gel so that the ends are exposed to the troughs at either end of the chamber. Add 400 ml of distilled water to 100 ml of the 5x buffer concentrate, resulting in 500 ml of normal concentration buffer. Fill the chamber with TBE buffer, making sure to cover the slab of agarose (see Figure 9).
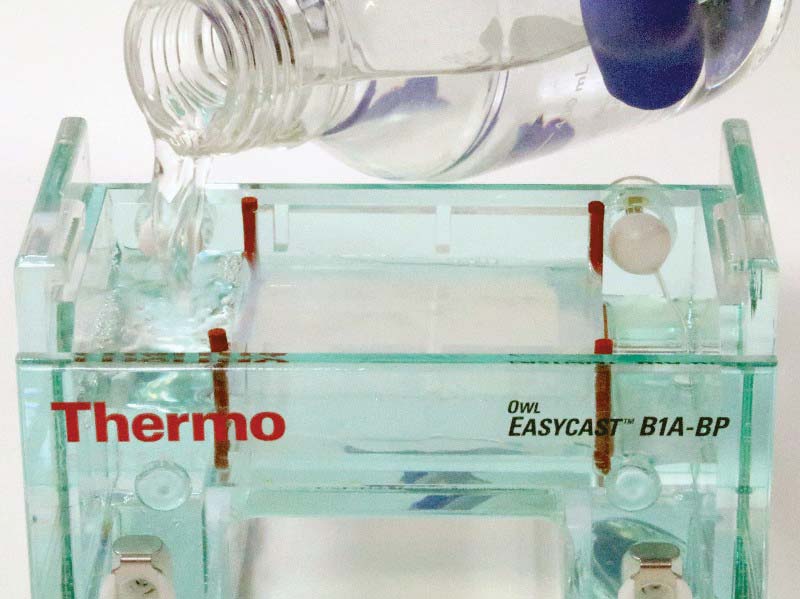
FIGURE 9. Filling chamber with buffer.
Note that the slab of agarose is between the two electrical terminals. As such, virtually all current between the electrodes must pass through the buffer-soaked agarose. Don’t forget to wear your nitrile gloves when handling the buffer solution!
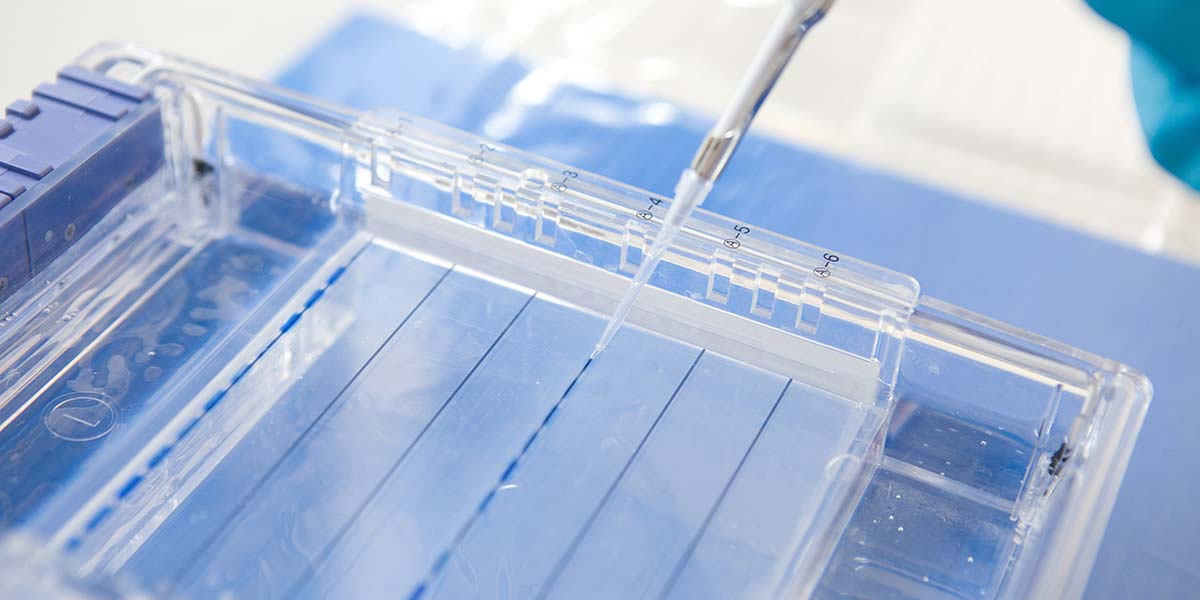
3. Load the wells with dye.
Next, using a micropipette, transfer 10 uL from each of the six vials to one of the empty wells. Use a new (or at least clean) tip with each transfer to avoid contamination of the samples. See Figures 10-12.
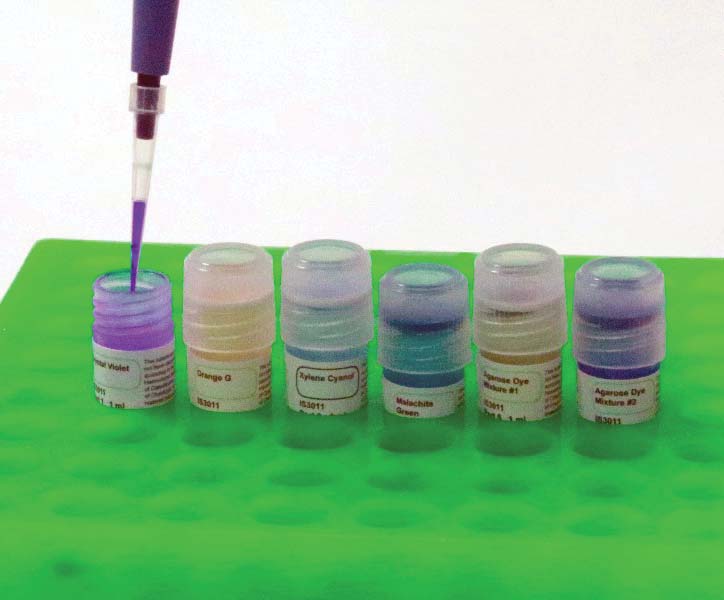
FIGURE 10. Using a pipette to move dye.
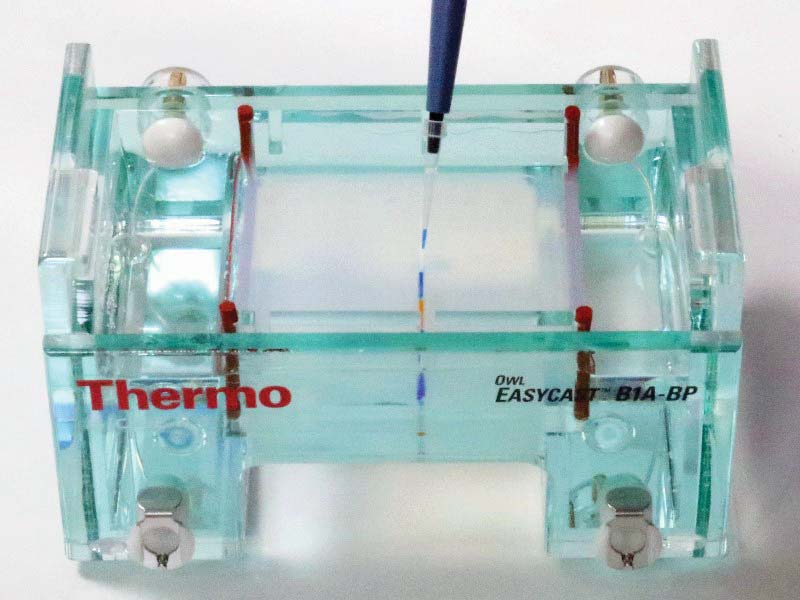
FIGURE 11. Loading a well with dye.
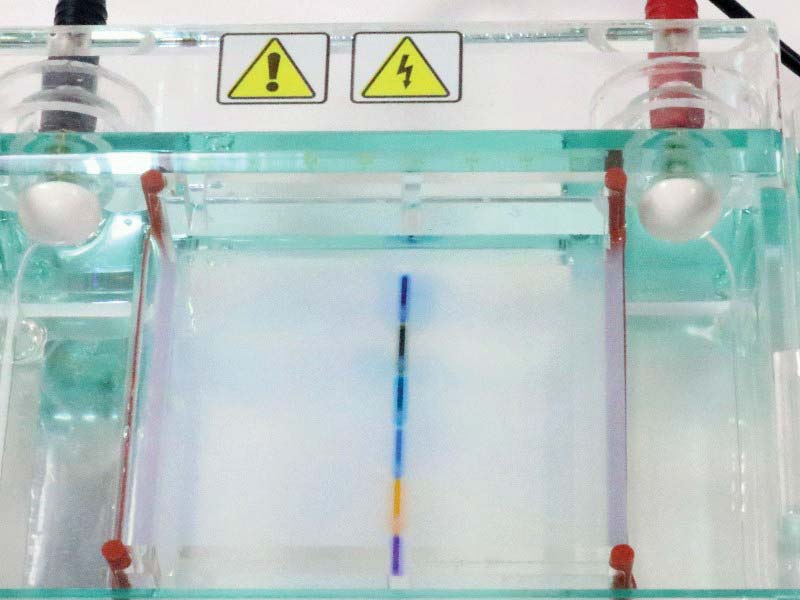
FIGURE 12. All six wells loaded with dye.
As you move the dye from each of the six vials to a well in the agarose, make certain that the tip of your micropipette slips into each agarose pocket and that you release the dye into the lower third of the pocket. Any higher and the dye will leave via the mouth of the pocket. Go lower and you risk puncturing the floor of a pocket. The dye will leak out and disperse.
4. Apply voltage to the chamber.
Using a dedicated power supply, your bench supply, or a stack of 9V batteries, apply 40-140 VDC to the chamber terminals. In my experiment, I used 133V, which resulted in 60 mA current flow. The dyes will start to migrate to the negative and positive poles as shown in Figures 13-15.
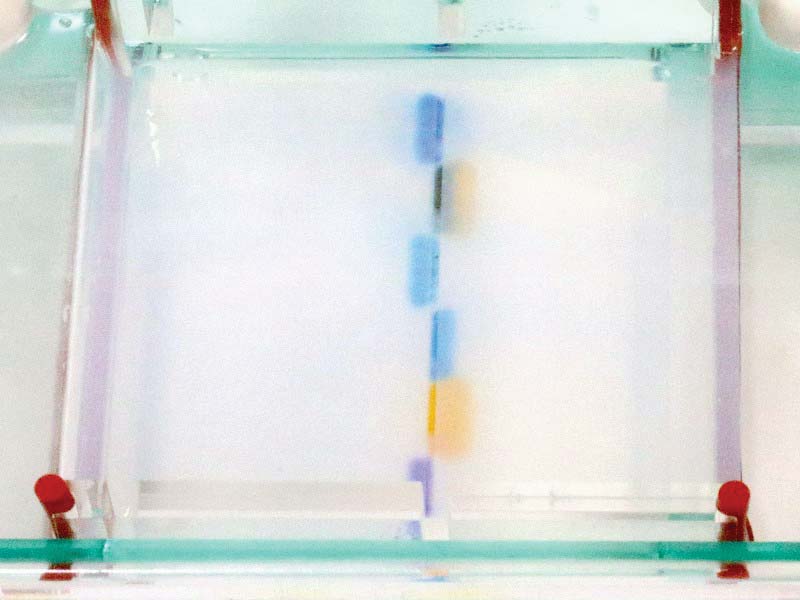
FIGURE 13. Gel five minutes after start.
Figure 13 shows the position of the dyes at five minutes into the process. Figure 14 shows the position of the dyes at 10 minutes, from a side perspective. The original blue/purple well is just visible to the right of the dye cloud.

FIGURE 14. Gel 10 minutes after start (side view).
Figure 15 shows the end of my experiment at 20 minutes. Your times may vary, depending on the power supply setting. A 40 VDC supply might require an hour for the same results, for example.
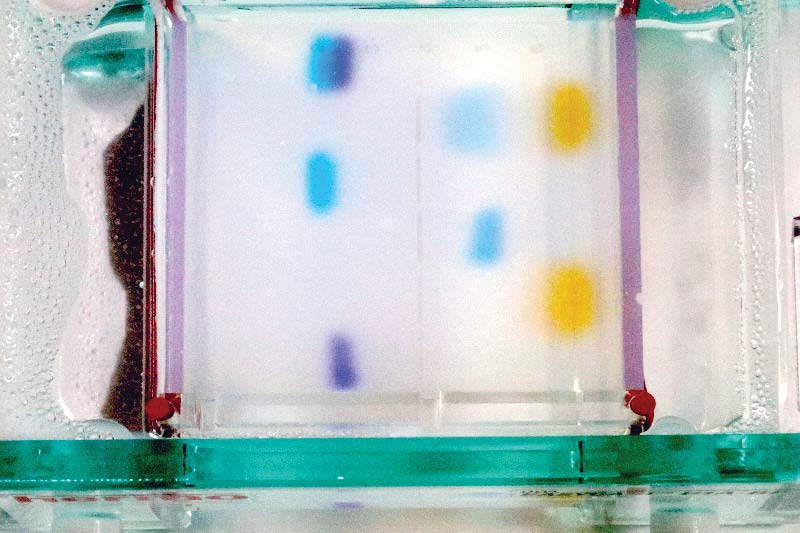
FIGURE 15. Gel 20 minutes after start.
5. Remove the gel from the chamber.
Next, remove the power supply leads from the chamber and unplug the power supply. Wearing surgical gloves, remove the gel slab and allow it to drip dry for a minute before moving it to a light table (see Figure 16). Note that if this was a real DNA gel electrophoresis, you’d have to maintain sterile conditions at all times. For now, the gloves are to protect you from the buffer.
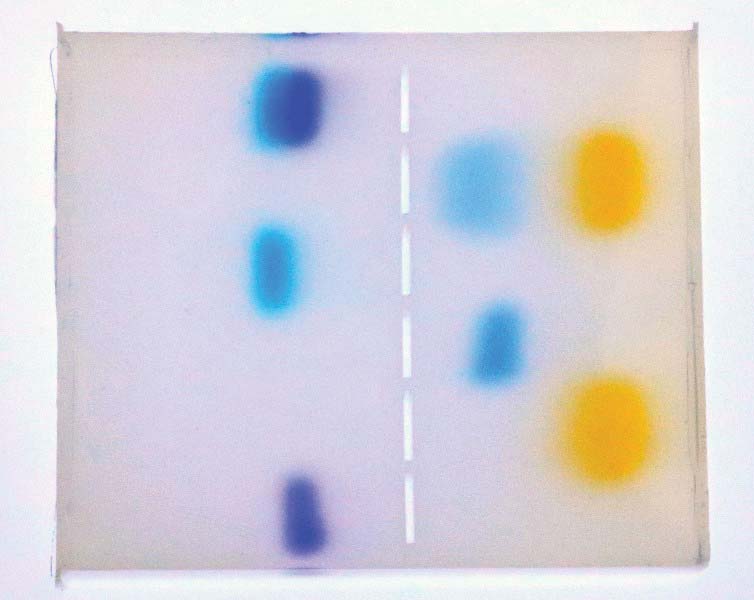
FIGURE 16. Finished gel removed from chamber, on a light table.
6. Document the band positions.
Using the pure dyes as a reference, document the band positions of the unknown samples. As you can see, the first unknown (shown at the top left position of Figure 16) is composed of the pure dyes used in wells three and six (from the top).
Similarly, on the right-hand side of the figure, you can see that the second unknown at position two from the top is composed of pure dyes used in positions four and five (from the top). Remember, we’re dealing with visible dye here, but in a DNA electrophoresis experiment, we would be identifying monochromatic bands under UV light.
7. Excise the desired band of dye.
With the slab of gel on a light bench, excise one of the bands of dye. It doesn’t matter which band you choose, but practice getting as close as possible to the cloud of dye in the gel. (Refer to Figures 1 and 17.)
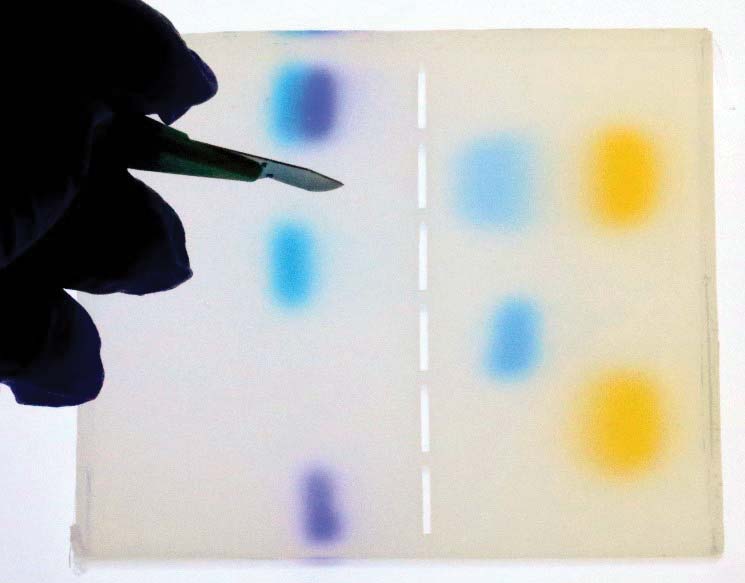
FIGURE 17. Excising a colored area with a scalpel.
If this were a DNA experiment, then that excised piece of gel would serve as the source material for a PCR machine, which would amplify the perhaps hundreds of strands of DNA to billions of strands. As a result, there would be plenty of DNA for testing and further analysis.
OUTCOMES
It’s hard to go wrong with this kit. Clearly, the dyes moved from the centrally located wells toward the anode or cathode, depending on their charge. It’s also clear that the unknown dyes in the first and second positions were composed of the two pure dyes with a positive charge and the two pure dyes with a negative charge.
ANALYSIS & DISCUSSION
With vividly colored dyes and obvious separations, this is a somewhat exaggerated example of how DNA gel electrophoresis is performed. In the DIY Biotech lab, you’ll need a UV light box to identify bands of DNA fragments that you’ll excise with a scalpel.
There are also tools to make life easier when working with real DNA. One is ladder DNA. This ladder DNA is placed into a well alongside wells filled with DNA samples. During electrophoresis, it migrates and separates in a precise manner.
For example, “5K Ladder” might have five bands, evenly placed at 1,000, 2,000, 3,000, 4,000, and 5,000 base pairs (bp). In this way, you can identify DNA strands of a specific length in other wells.
For example, if the desired strand is 2,500 bp, then it would be located in the gel between ladder bands 2,000 and 3,000.
If your DIY Biotech work involves the use of DNA, then you’ll probably rely heavily on DNA gel electrophoresis. It’s a simple, affordable, and powerful tool that enables you to identify and separate large molecules — a feat that was impossible only a few short years ago.
Gel electrophoresis is also a perfect project for the DIY/maker community. The power supplies — while potentially hazardous because of the high voltage — are simple to construct.
Chambers in various stages of disrepair can be purchased on eBay or you can build one from scratch with inexpensive plastic and silicone sealant. Just exercise caution when handling the buffer. NV