Recap
In our last episode, we finished up with C pointers (whew!) and we built a chaser light marquee frame using the Simple Chaser Lights kit available from Nuts & Volts. Now it's time to study a C topic related to pointers: arrays. As a reward for our patience with the theory, we will build another project using the chaser lights kit: a POV (Persistence Of Vision) wand.
As before, this Workshop is split between some C theory and a tangentially related (but more fun) lab exercise that uses LEDs. We are nearing the end of the C theory, and soon will just use it and refer back to these articles when we show the C code. So, save your back issues! They might come in handy some day when you need a refresher on some arcane C concept.
Figure 1 shows the chaser lights board tied down on a stick and swung madly about in a dark room where you can just see NUTS & VOLTS spelled out in the air.

FIGURE 1. Slinging the simple chaser lights board.
In this episode's lab section, we will look at some of the principles behind the phenomenon of POV and will build the actual thing in the next.
Theory: Arrays
Last time, you probably got good and sick of hearing about pointers. I hope that you also got how they work, because they are critical to serious use of the C programming language. After all that, we are now going to look at arrays that do many of the same things you’d do with pointers, but are a lot easier to understand. You might wonder why we didn’t look at arrays first if they are easier. The reason is that you’d tend to skim over pointers if you learned arrays first. You’d think, ‘Oh I can do that with arrays, no need to learn pointers!’ Well, not exactly. Pointers and arrays are very closely related but not identical, and you will run into pointers a lot in C, so best learn them now rather than when your boss is standing over you with a whip.
Arrays
An array is a C data type that represents a sequence of memory locations. Think about that for a moment. Memory is where data is located and each of these locations has an address beginning at 0 and increasing all the way to the end of memory (okay, there are exceptions but they are not relevant here). When you create an array of size x, C will assign x contiguous locations in memory to that array. Say, for instance, you create ‘char myArray[10]’ — the C compilation process will find 10 contiguous locations in memory that are not in use. It will then assign the address of the first location to the 0 element of the array.
If the first memory location is the 12,718th byte in the AVR data memory, then the address of the first element (element 0) in myArray[0] is 12,717 and the address element 9 of myArray[9] is 12,727. Some folks get confused on counting since both memory and arrays start counting at 0 not 1. So, for a 10 member array the lowest location is 0 and the highest location is 9. Fortunately, you never have to know the address of myArray[0] since C uses the ‘myArray[0]’ as the alias for that address (you see myArray[0]; C sees 12717). It is also legal to just use the array name (“myArray”) without the brackets as the address of (pointer to) the first element of the array. If we do the following:
myArray[4] = ‘1’;
we are storing the ASCII code value for ‘1’ which is the decimal number 49 at the memory location for myArray[4]. Remember that [4] refers to the fifth memory location since we start counting at 0, so that in our example 12,717 + 5 = 12,722. This means that when you write myArray[4], the C compiler generates the memory address 12,722. To repeat: myArray[4] is the data located at memory location 12,722 which is ‘l’ which is decimal 49. So, the operation shown above (myArray[4] = ‘1’) stores an eight-bit byte with a value of 49 at the memory location 12722.
One of the most useful aspects of arrays is that the address of the first element of the array can be used as a parameter to a function to tell that function where the array is located. This gives you the ability to pass the full array of 10 values to a function by sending only the address of the first location in the array as a parameter. You can see the value of this since to pass the entire array as parameters means that 10 bytes would have to be pushed on the stack using valuable RAM. Using the address of the first byte, however, you only have to pass the address which — in our case — is an integer and two bytes long. Thus, we use two bytes for the address pointer versus 10 bytes for the data. If the array was 100 bytes long or a thousand bytes long, the address for the first element in the array would still be the same two-byte size.
Let’s look at a simple program to illustrate this. The following code is for an AVR, but now would be a good time for you to test your knowledge and port this to Pelles C like we used last time. You’d eliminate the usart.h include and calls to the usart. The code should then output the data shown to the Console Program Output rather than Bray’s Terminal:
#include <stdio.h><br />
#include “c:\avrtoolbox\libavr\source\driver\usart\<br />
usart.h”
void load_array(char *);
// We do this so that it is easy for us<br />
// to change the array size in one place<br />
#define MAX_SIZE 10
int main()<br />
{<br />
  // Initialize usart for printf<br />
  usart0_init_baud(57600);<br />
 <br />
  int i = 0;
  // Create an empty array<br />
  char myArray[MAX_SIZE];
  // Initialize myArray to all 0<br />
  for(i = 0; i < MAX_SIZE ; i++)<br />
  {<br />
    myArray[i] = 0;<br />
  }
  // Show the data on the console before<br />
  // loading it<br />
  printf(“Before loading:\n”);<br />
  for(i = 0; i < MAX_SIZE ; i++)<br />
  {<br />
    printf(“myArray[%d] = %d\n”,i,myArray[i]);<br />
  }
  // Send it to a function to load it with data<br />
  load_array(myArray);
  // Show the data on the console after<br />
  // loading it<br />
  printf(“After loading:”);<br />
  for(i = 0; i < MAX_SIZE ; i++)<br />
  {<br />
    printf(“myArray[%d] = %d\n”,i,myArray[i]);<br />
  }<br />
}
void load_array(char *thisArray)<br />
{<br />
  int i = 0;
  for(i=0;i<MAX_SIZE;i++)<br />
  {    <br />
    // load it with ASCII codes for ‘0’ to ‘9’<br />
    thisArray[i] = i + 48;<br />
  }<br />
}
Results in Bray’s Terminal:<br />
Before loading:<br />
myArray[0] = 0<br />
myArray[1] = 0<br />
myArray[2] = 0<br />
myArray[3] = 0<br />
myArray[4] = 0<br />
myArray[5] = 0<br />
myArray[6] = 0<br />
myArray[7] = 0<br />
myArray[8] = 0<br />
myArray[9] = 0<br />
After loading:myArray[0] = 48<br />
myArray[1] = 49<br />
myArray[2] = 50<br />
myArray[3] = 51<br />
myArray[4] = 52<br />
myArray[5] = 53<br />
myArray[6] = 54<br />
myArray[7] = 55<br />
myArray[8] = 56<br />
myArray[9] = 57
Multi-dimensional Arrays as Function Parameters
You can have arrays of arrays, known as multi-dimensional arrays. For instance, you might have a two dimensional array where one dimension is the alphabet and the other is the graphic data to show a given character. So, for instance, alpha[3][5] might represent the third character ‘d’ and have five bytes associated with it to show it on a 5 x 7 LED matrix. In avrtoolbox, you’ll find font_5x7 which uses a two dimensional array to store the characters for the ASCII codes from 0x20 (space) to 0x73 (~). Since only 95 characters need to be used at 5 x 7 say, five bytes per ... that’s 475 bytes. Not a lot. That can be stored in program memory as shown:
Const char font[][5] PROGMEM = {<br />
    {0x00,0x00,0x00,0x00,0x00},<br />
       //   0x20 32<br />
    {0x00,0x00,0x6f,0x00,0x00},<br />
       // ! 0x21 33<br />
    {0x00,0x07,0x00,0x07,0x00},<br />
       // “ 0x22 34
[a bunch of data left out to save space]
    {0x41,0x41,0x36,0x08,0x00},<br />
       // } 0x7d 125<br />
    {0x04,0x02,0x04,0x08,0x04},<br />
       // ~ 0x7e 126<br />
    };
[NOTE: PROGMEM was discussed in Smiley’s Workshop 25 in the Aug ‘10 Nuts & Volts.]
We use this data to map out the lighted LEDs that give a specific character. For example, the character ‘X’ is:
0x63,0x14,0x08,0x14,0x63}, // X 0x58 88
When we look at this in binary and character graphics, we see:
0x63 0<span style="color:#FF0000;">11</span>000<span style="color:#FF0000;">11</span> _<span style="color:#FF0000;">**</span>___<span style="color:#FF0000;">**</span><br />
0x14 000<span style="color:#FF0000;">1</span>0<span style="color:#FF0000;">1</span>00 ___<span style="color:#FF0000;">*</span>_<span style="color:#FF0000;">*</span>__<br />
0x08 0000<span style="color:#FF0000;">1</span>000 ____<span style="color:#FF0000;">*</span>___<br />
0x14 000<span style="color:#FF0000;">1</span>0<span style="color:#FF0000;">1</span>00 ___<span style="color:#FF0000;">*</span>_<span style="color:#FF0000;">*</span>__<br />
0x63 0<span style="color:#FF0000;">11</span>000<span style="color:#FF0000;">11</span> _<span style="color:#FF0000;">**</span>___<span style="color:#FF0000;">**</span>
The first set of brackets in the font array are left blank because we initialize the array with data, and C will count up the number of elements we are creating and then allocate memory for it. Beside each character in the array, you see the comment line. For instance, // ! 0x21 33 — this shows the character, the hexadecimal, and the decimal ASCII value for that character. Note that the first element in the font array is ASCII character number 32, and that the rest of the characters are sequential. This allows us to address the character element by subtracting that ASCII value from the ASCII value for the first character in the array. Say what? The first character in the array is the space character ‘ ‘ with an ASCII value of 32. If we want to get the array element for the ‘}’ character, then we can subtract ‘ ‘ from ‘}.’ C knows that ‘ ‘ is 32 and that ‘}’ is 125, so when you use the following: font[‘}’ – ‘ ‘][0], C sees this as font[125-32][0] which is font[93][0], and that is equal to 0x41. From the font array, we see:
{0x41,0x41,0x36,0x08,0x00}, // } 0x7d 125
So:
font[93][0] == 0x41<br />
font[93][1] == 0x41<br />
font[93][2] == 0x36<br />
font[93][3] == 0x08<br />
font[93][4] == 0x41
If you want to test this with Pelles C, you can copy the font array from the font_5x7 file in avrtool box and append it to the following code, which will generate the pattern shown in Figure 2.
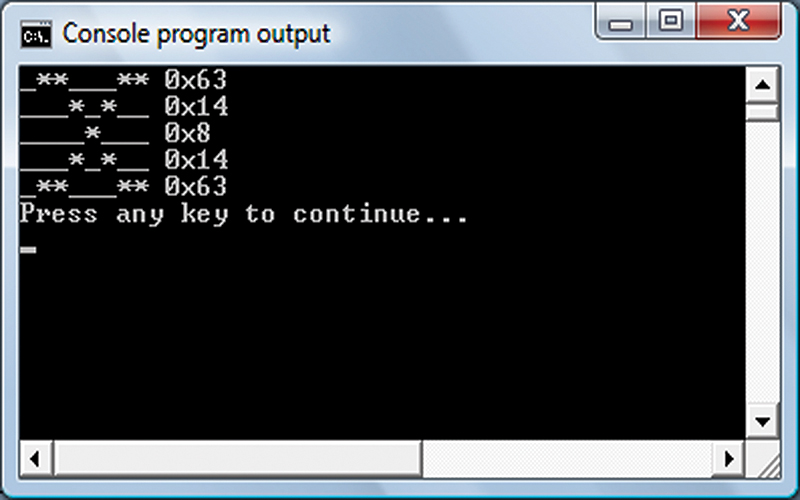
FIGURE 2. X in console.
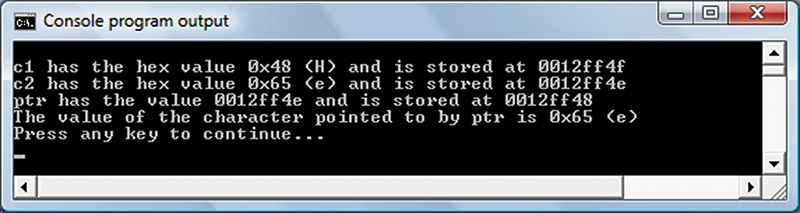
FIGURE 3. Console pointer demo.
void print_binary(uint8_t num);<br />
void print_5x7(uint8_t *font);
int main(int argc, char *argv[])<br />
{<br />
    print_5x7(&font[‘X’-’ ‘][0]);<br />
}
void print_5x7(uint8_t *font)<br />
{<br />
    for(int i = 0; i < 5; i++)<br />
    {<br />
        print_binary(font[i]);<br />
    }<br />
}
void print_binary(uint8_t num)<br />
{<br />
    uint8_t temp = 1;<br />
    for(int i = 7; i >= 0; i—)<br />
    {<br />
        if(num&(temp<<i))printf(“*”);<br />
        else printf(“_”);<br />
    }<br />
    printf(“ 0x%x\n”,num);<br />
}
Lab
Well, I went way too long on the C theory, so I’ll have to short-change things a bit in the lab. We’ll just look at the POV concept and delay the details on how to convert the simple chaser lights board until next time.
Persistence of Vision
Persistence of vision is the retention of an image in the eye for about 1/25th of a second after the visual stimulus has been removed. POV accounts for us seeing movies as showing real motion when they actually only show still images at a rate of 24 frames per second. [Modern movies and televisions are a little more complex than this, but no need for the details here.]
The Thaumatrope Magic Disk
The thaumatrope is a spinning disk toy that was popular in the 19th century. If you saw the movie Sleepy Hollow, you may remember the scene in Figure 4 where Ichabod dreams about his mother showing him a cardinal in a cage using a thaumatrope.

FIGURE 4. Thaumatrope from the movie Sleepy Hollow.
Ichabod shows Katrina the disk and they have the following dialog:
KATRINA — You can do magic! Teach me!
ICHABOD — It is no magic. It is optics.
Oh, what a stick in the mud! Of course it is magic. You can build your own by copying Figure 5 and gluing it to a disk and attaching some string as shown in Figure 4. Just twirl away and impress three year olds everywhere.

FIGURE 5. Thaumatrope template.
NOTE: if you build the thaumatrope, be sure and have the bird and cage upside down relative to each other when you glue them front to back so that when the disc is spun, you will see the bird upright in the cage. This little project is kind of fun to do with kids, especially when you tell them about POV and how this was seen as a sort of magic long ago.

FIGURE 6. Thaumatrope spinning.
NUTS & VOLTS Out of Thin Air!
The simple chaser lights board shown in Figure 7 has several POV messages programmed into it that can be selected using the leftmost five switch positions as follows:
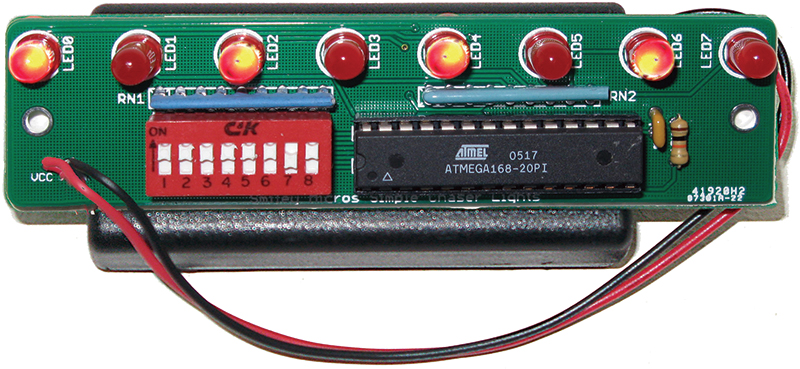
FIGURE 7. Simple chaser lights board.
Dipswitch Setting for POV Patterns:
10111xxx (23): pov_smiley_micros
11000xxx (24): pov_nutsvolts
11001xxx (25): pov_help
11010xxx (26): pov_stop
11011xxx (27): pov_ I_love_you
11100xxx (28): pov_ taxi
11101xxx (29): pov_right_arrows
11110xxx (30): pov_left_arrows
When I attacked the problem of making an LED POV wand, it attacked back. At first, I built one of those hand waving wands that you sweep back and forth to display a message, and I quickly found that this concept doesn’t work as well as I thought. First off, if you are displaying the message to others, then you are standing behind the wand and have no way of knowing how the message looks other than to stand in front of a mirror. Doing so lets you get an idea about how fast you need to wave the wand and lets you change the waving so that the message starts at the beginning of a sweep and finishes at the end of the sweep. Having a mirror available is a bit of a stupid requirement. So, I decided that instead of all the hand waving, I’d just attach the chaser lights to a board with a handle on it and swing it in a circle. The results shown in Figure 1 are with me slinging with my right hand and trying to take a picture with my left. (It took a lot of pictures to get one that had all the text in the frame.) The slinging technique requires less finesse in your timing, though you will want to practice in front of a mirror to get an idea of how fast to swing it.
Then, there is that problem that you might get the timing right, but the message will be showing at the bottom of the swing and appearing upside down. I built the device shown in Figure 1 by cutting out a two foot length of Styrofoam, fastened the chaser lights board and battery box to it with a rubber band, and then jammed a pencil in one end for a handle to swing it with. No need to show it since it looks as bad as it sounds.
Okay, I get it now — the reason POV wands aren’t more popular is that they require you to be in the dark, standing in front of a mirror to make them work right. (Some lessons can only be learned by building something and after seeing it in action, realize that it was a stupid idea.) Yeah, sounded great on paper, but the reality is somewhat less than great. Technically, you could mount the chaser lights board on a motor and set the timing like one of those propeller clocks, and it would work just fine. You could also use an accelerometer and have software that senses direction change and speed. Who knows, I might decide one day that is a good project. So, let’s declare that this whole POV wand was a great experiment and we learned a lot. Let’s just move on to the next thing and hope not to embarrass ourselves again. NV
Theory is all well and good, but to really learn this stuff you have to get your hands on some tangible items that blink, whirr, and sometimes detonate. As a service for the readers of the Smiley’s Workshop articles, we have simple and inexpensive projects kits available that can help you make it real. You can find these kits (and some darn good books) at the Nuts & Volts Webstore.
Nuts & Volts now carries the entire line of Smiley Micros books and kits. Some are shown in the magazine and others in the web shop. If you just can't wait and want to get a leg up on real C programming for the AVR, then get the C Programming book and Butterfly projects kit, or if you are a complete novice try The Arduino Workshop and projects kit.
Downloads
Workshops 44. 45. 46, and 47
March 2012, April 2012, May 2012, and June 2012 Source Codes