Unless you’ve been sleeping under a rock, you’ve noticed that more and more products use microcontrollers in one way or another. From your car to your oven and toaster, microcontrollers are everywhere.
Why?
A major reason is because the software that drives these microcontrollers can be used to control other elements of the product or its environment. People talk into their watch and a thermostat a thousand miles away gets adjusted. A package service rings a doorbell and the homeowner “answers” the door, even though they’re on vacation. Not only does the software make products more flexible, the microcontrollers are incredibly cheap. A microcontroller with more computing power than a mainframe of 40 years ago costs less than a morning latte.
However, we’re not here to program a microcontroller to do open heart surgery. We want to know how to make these devices do what we want them to do. Perhaps we want to make a solar collector that tracks the sun for maximum power gain throughout the day. Perhaps we just want to make a simple robot that does nothing more than follow a line on the floor. Perhaps it’s a device that augments our favorite hobby, like something that converts our keystrokes at a keyboard into Morse code. Can’t think of a project for yourself? Really? Well, do an Internet search using “Arduino projects” and see what happens. I just did that and got 65.5 million hits! I’ll bet one of those hits would be something that you would enjoy building.
The common thread in all this impetus towards more and more use of microcontrollers is the flexibility that software brings to the table. Take a single microcontroller and find 65 million adaptations of it. Amazing how creative the human mind is. And, as you know, each adaptation means somebody had to do the programming for those microcontrollers. And that’s where you come in. As I open the door and you stroll past me, you look at me and say: “But I don’t know how to program.”
Don’t care.
That’s an excuse — not a reason — for not trying some software-based projects. When you got your first bike, did you just jump on it and do a 50K ride? How much preparation did you go through to get your first driver’s license?
Most of us have invested some time in learning those things we want or need to do. Learning how to program is no different, and it can be an extremely satisfying endeavor. Seeing a device respond to code you wrote is, well, intoxicating in a good way. My goal is to create an interest in exploring microcontrollers and encourage you into investing $5 and some of your time into that exploration. I honestly think you’ll enjoy the journey.
Where to Start?
For me, it would be great if you knew absolutely nothing about programming. The reason is because no experience would mean you haven’t acquired any bad programming habits. It would also mean you don’t have any preconceived notions about how things should be done.
I have a somewhat different way of teaching programming concepts that I’ve developed over the past four decades and they work pretty well. Also, I sincerely believe you will find it to be an enjoyable journey if given half a chance. So, let’s get to it.
First, Gather the Tools
We begin our journey using the Arduino family of processors (Uno, Nano, and Mega 2560), mainly because they can be purchased in a variety of stores and there’s about a bazillion lines of free program code you can use for your projects. This huge body of code comes to us through the open source movement, where thousands of programmers have given freely of their talents. There are tens of thousands of programs available to you, where you can stand on their shoulders to create your own programs.
The tools needed to program the Arduino family (and others) are also free and the microcontrollers are inexpensive (i.e., less than $5 for a Nano). Later on, we’ll add the STM32F1 (e.g., “Blue Pill”), ESP32, and Teensy 4.0 microcontrollers.
Why these additional microcontrollers? There are several reasons: They are also cheap ($2 to $20); their programming tools are also free; and they can all be programmed using those same tools.
Finally, these other microcontrollers have a much deeper resource pool: more program (i.e., Flash) memory; more data space (i.e., SRAM); and more Input/Output (I/O) pins — all of which boot-scoot your data around the circuit at up to 37 times faster than a Nano!
All the programming activity you’re going to do takes place in something called the Integrated Development Environment, or IDE. To create an executable microcontroller program, you need a text editor to write the program (i.e., the program source code); a compiler to convert your English-like C language program statements into instructions the computer can understand; a linker to combine what you wrote with other code from the open source libraries designed for your specific type of microcontroller; and a serial monitor so you can see the output produced by your program (if you want to). All these tools — from the text editor to the serial monitor — are embedded in the Arduino IDE.
The process of downloading and installing the Arduino IDE is well documented elsewhere. However, we have posted a set of instructions in the article downloads to help you through the download and install process for the IDE if you haven’t already done so. That document also encourages you to buy at least one Arduino Nano for experimenting.
Second, Think
My guess is that after you finished installing the Arduino IDE, you connected your Nano to your PC, loaded the Blink program (using the File → Examples → 01.Basics → Blink menu sequence), compiled, and uploaded it. Now you’re sitting there staring at your Nano which is dutifully blinking its onboard LED at you once every second. If you leave and come back tomorrow, it will still be there blinking at you. Clearly, that’s not the ultimate reason you bought your Nano.
No, you bought it because either you are inquisitive by nature or you have something else in mind for your Nano “down the road.” So, how do you move from point A (where you are now) to point M which is the project you have in mind? Well, it’s the old Elephant Problem: How do you eat an elephant? Answer: One bite (byte?) at a time.
There’s a beautiful simplicity about programming: Any program — no matter how complex — reduces to what I’ve named the Five Program Steps. Therefore, the first thing you should do when confronted with a programming task is think through the Five Program Steps.
Step 1. Initialization
Simply stated, the Initialization Step establishes the environment in which the program is to execute. Establishing the run-time environment for your program involves doing things behind the user’s back, before they see anything on the output device (e.g., display, LEDs, web page, etc.).
For example, you have all probably used a word processor or spreadsheet that has a menu option for “Recent Documents” which allows you to quickly reload the last document you used. If you look at the Arduino IDE and click on the File menu option, you’ll see an Open Recent option that presents a list of the source code files you have recently accessed. Where did that file list come from?
Somewhere on your system, the IDE, word processor, or spreadsheet program has stored a list of the files you have used recently. As part of the Initialization Step, the program first went to that place, loaded that file list, and made it part of the Open Recent menu option.
Other common activities that are part of establishing the operating environment might include opening a printer port, creating a database connection, opening a Wi-Fi link, initializing a temperature or humidity sensor, or any one of a thousand other things your program may need to do before it can function properly.
Step 2. Data Input
Expressed in its simplest terms, all a computer program does is take data into the program in one form, process that information, and then output that data, but in a new form. If you’re writing an email program, the data most likely is coming into the program from a keyboard. However, data could be coming in via a database connection, from a disk file, from a fire sensor, a retinal scanner, from thousands of different sources.
The point is a useful program is going to require some form of input data.
Alas, incoming data can be corrupt. Database connections can be broken, Wi-Fi links can disappear, sensors can fail, and humans do make typing mistakes. The point is, it is almost always a good idea to verify the data if at all possible. If someone is applying for a driver’s license and later on in the application, they tick the Blind checkbox, you might want to ask some further data verification questions.
The old saying: Garbage In, Garbage Out means that the results of a program are no better than the data that drives the program. Therefore, the Data Input Step assumes that every attempt possible has been made to verify the data.
Step 3. Processing
Once the verified data is part of the program, something is done to that data to transform it from its current state to the desired state. That data transformation is guided by an algorithm. An algorithm is nothing more than a methodology that is applied to the input data to generate the new output data.
For example, an algorithm to generate the square of a number, n, is to take n and multiple it by itself. If n is 3, the square of n is n multiplied by n yields the square of n (s = n * n, or 9 = 3 * 3 where an asterisk in this case indicates multiplication). However, there is almost always more than one way to skin a cat.
Some years ago, I discovered quite by accident a different algorithm for squaring a number:
The square of a number n is equal to the sum of its first n odd integers
Using this algorithm to square a number, we find:
Square of 3 = 1 + 3 + 5
9 = 1 + 3 + 5
Square of 5 = 1 + 3 + 5 + 7 + 9
25 = 1 + 3 + 5 + 7 + 9
While this is a very inefficient way to square a number, the point is valid: There are many possible algorithms for a solution to the same problem. A programmer I know was hired by a very large company and his first assignment was to address a sales report problem. Sales data came in each night before 1 AM from all over the world. The task was to take that sales data and prepare income statement and inventory reports before 8 AM the following morning. The reports were always late.
After a closer examination of the processing of that data, the programmer formulated a new algorithm. The new report generation code implemented the new algorithm that processed the data and constructed the same reports in 47 minutes.
One time I was looking for a good way to search through a disk data file looking for a certain pattern of words. I read an article on the Boyer-Moore string matching algorithm. The authors used a brute force searching method as the baseline point for judging the Boyer-Moore effectiveness. The article’s brute force algorithm took 42 seconds to search a given data file. Because I didn’t have their brute force algorithm code, I wrote my own. Oddly, my brute force algorithm processed the same file in about six seconds. Why the difference?
Actually, in this case, the algorithms were almost the same, but I used several C library routines and tricks that they could not do in their language of choice (i.e., Pascal).
First, the C library routines I used are “standard” library routines which are often written in hand-tweaked assembly language by guys with propeller caps and are much brighter than I am. Second, my algorithm used what’s called a sentinel to do away with a few extraneous program statements.
What I’m trying to show here is that as you gain programming experience, the way you write your own code just gets better and better.
Yep, algorithms matter.
Step 4. Output
It wouldn’t make much sense to expend the effort doing the first three steps if you didn’t have plans for the new data when the processing was finished. Perhaps the most common way to see the output from a program in the Arduino environment is via the serial monitor.
The serial monitor is an object in the IDE that lets you use simple statements to display things via the USB cable from your microcontroller to your PC’s monitor.
However, there are also thousands of other possibilities for output. Indeed, most of the programs I write often direct the output to a TFT color display controlled by the microcontroller. In other cases, the program output might be nothing more than to load a new program based on the values determined in the first program.
Other programs might be responsible for updating a person’s record in a database, or dialing a phone number, or sounding an alarm and dialing 911, or opening a valve that allows two vats to be mixed. The number of possibilities is limitless. The good news: It’s your program. Send the output where you want to!
Step 5. Termination
The purpose of the Termination Step is to gracefully end the execution of the program. The key here is the word “gracefully.” Too often, programmers simply terminate the program without any real thought to what they are doing. Not good.
If your program reads a list of recently opened data files during the Initialization Step, the Termination Step should update and store that modified list. If your code opened a database connection, your code should close that connection. Same for disk file handles, printer ports, Wi-Fi, and other connections.
In general, any resources you borrowed from the system or its environs during your program execution should be returned to that system. Leaving open disk files or dangling port (or other) connections is just impolite and wrong. In the words of my mom: “Clean up your mess!”
So, the Termination Step seems to follow the adage that all good things must come to an end. Well, not really. Microcontroller programs are often written to run forever. How effective is the Empire State Building fire alarm system if you shut it down at 5 PM and don’t restart it until tomorrow at 8 AM? How about traffic light controllers? Refrigerators? Air traffic control radar? It kinda seems like a good idea to keep artificial hearts going most of the time, too!
The point is that many microcontroller programs are assumed to never shut down. Such “perpetual” programs have three causes for their shutdown: 1) power removal; 2) component failure; or 3) a program reset (i.e., a do-over!). We shall see examples of such “perpetual” programs later in this series.
Your Assignment
Okay, you are now equipped to look at any program and think of it in terms of the Five Program Steps, and that’s exactly what I want you to do. Take a look at the Blink program you probably ran earlier and identify the Five Program Steps.
Think about a program you’d like to write. Take a sheet of paper and write down the Five Program Steps, leaving a couple of inches between each heading. Now, fill in each step with those things you think you need to do to get from point A to point M.
The rest of this series is designed to help you make that move from point A to point M. NV
Two flavors of the Arduino Nano are the Nano and the Nano Pro Mini. As you can see, the Nano has a mini B USB connector on the board, which makes connecting it to your PC via a USB cable very convenient. The Nano Pro Mini does not include the USB connector. So, while the Pro Mini may cost a little less, you have to construct the equivalent of a USB cable between your PC and the Nano. If you value your time at more than a penny an hour, buy the Nano.
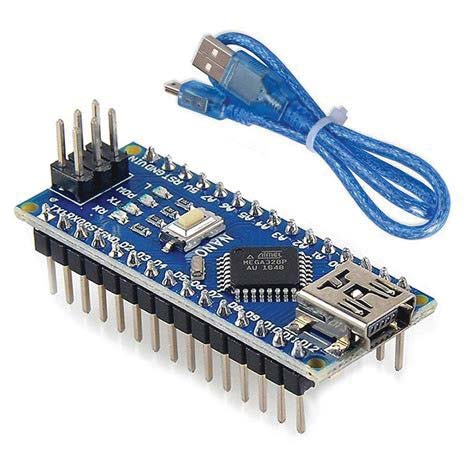
Nano.
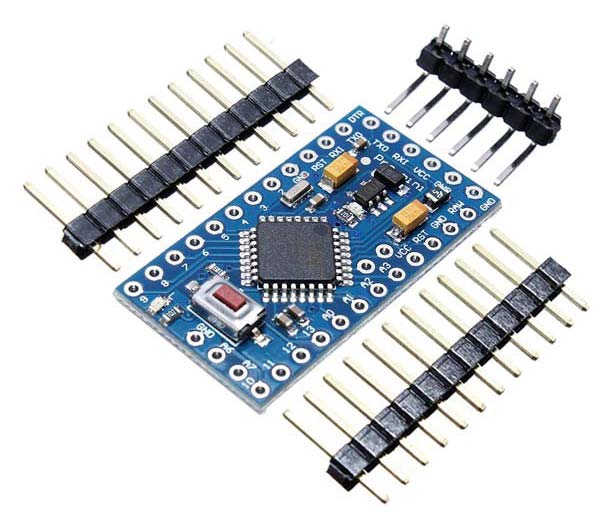
Nano Pro Mini.
Downloads
What’s in the zip?
Arduino IDE Download and Install Instructions