This idea got its start after reading the article by Matt Newman VA3MGN in the January 2023 issue of QST, “Switch Selection of Powerpole Ports.” Combining his concept with the use of a Nextion touch display seemed like a nice upgrade.
This project takes off where Matt’s project concluded (a pdf of his article is available in the downloads). It still uses the Anderson Powerpole connectors for incoming and distributed power. The only difference is the addition of a touchscreen display and a current sensor for each output, so the current consumption on that output can be displayed.

Display mount.

Display wiring.
The Circuit
The incoming power is from your available power supply. Powerpole connectors can be found to handle from 15A-45A. The current sensors specified here will have a maximum of 30A each, so select your powerpoles accordingly. The current sensing is accomplished with an ACS712 module, which provides a proportional voltage output and is fed into the Arduino Nano analog ports.
 matic.
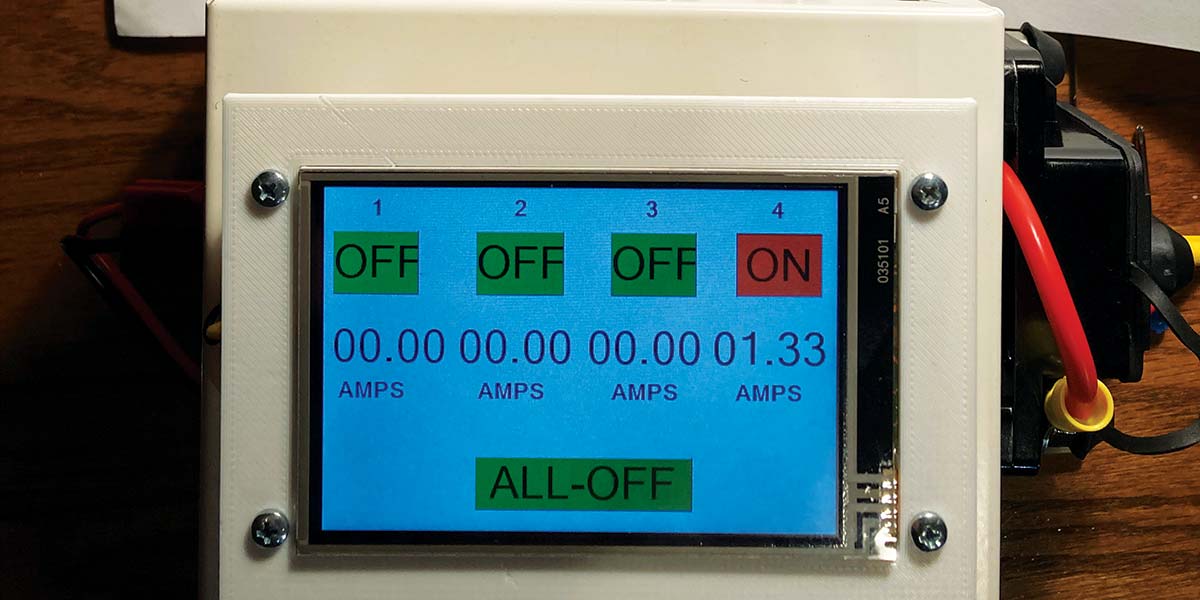
When a button image on the display is touched, the Nano will read that via the serial port. It will then process it to yield an output signal that controls the associated relay. Below each button image is a text box that indicates the current draw from that set of relay contacts to its designated powerpole connector. There is one additional button image which turns all outputs off. The four port button images are dual-state, meaning touch-on/touch-off.
The Software
There are two files that contain the code for this project. First is the .HMI file, which is Flashed into the Nextion display. This contains the screen images and the interface back to the Arduino Nano via a serial port. There’s a wonderful write-up on getting started with the Nextion display at https://randomnerdtutorials.com/nextion-display-with-arduino-getting-started/. Please see the section titled “Compiling and Uploading Code to the Nextion Display.” The article shows how to take an .HMI file and install it in the display.
One thing that isn’t very obvious is that you need to be sure the serial port from the Nano is disconnected from the Nextion display when trying to program the Nano. If you get an error while the Nano is being programmed, this will most likely be the culprit. Second is the .ino file used to program the Arduino Nano board. This requires the Arduino IDE (integrated development environment), which is available from the Arduino website. It’s beyond the scope of this article to step through the use of the IDE, however, there are many tutorials available on the web.
Construction
This project has been bench tested and put in a small enclosure I already had, measuring 5” W x 4” T x 3” D.

Front rear.
I also added a bezel to the Nextion display that was printed on my 3D printer. To limit the number of holes drilled in the enclosure, I used some double-sided 3M VHB (Very High Bond) tape to hold the three modules to the interior walls. Using some protoboards from an Austor 100 piece kit (Amazon), the Nano, ACS712s, and connectors were fit on a single board. A builder might consider putting this into a larger enclosure and perhaps committing all circuitry to a custom PCB (printed circuit board).

Working unit.
About the Display
The model chosen for this project is the NX4832F035, which is a 3.5” resistive LCD-TFT unit from their Nextion’s Discovery Series. As of this writing, these units are available on Amazon for $43. If you want to experiment beyond this article, you’ll need to obtain the editing software from the display manufacturer at https://nextion.tech.
With this project as a starting point, you can make the final unit as big as you need.
I need to extend kudos to Theron Wierenga who, with his numerous articles in Nuts & Volts, helped educate me in the use of the Nextion products, and also Mark Lyle and his website (https://cheapcontrols.com) for his great YouTube tutorials on how to use a Nextion without the libraries. NV
Parts List
1 - Arduino Nano
1 - Nextion 3.5” Display (NX4832F035 )
4 - ACS712 Current Sensor Modules (DAOKI 30A module, Amazon)
1 - Four-channel Relay Module (SunFounder 5V Relay Shield, Amazon)
1 - LM7805 Regulator
5 - Anderson Powerpole Connector Pairs (PowerWerx)
5 - Anderson Powerpole Clamp Pairs (PowerWerx)
1 - Lenkrad 30A Circuit Breaker (Amazon)
1 – Enclosure
Misc. wire, hardware, etc.
Downloads
What’s In The Zip?
Code Files
Matt Newman Article PDF