Smiley's Workshop — Serial Communications - Part 2
Selecting A Serial Port And Getting User Input
Recap
In the last episode, we introduced you to serial communications between a PC and an Arduino using C# or Visual Basic Express .NET (both free from www.microsoft.com/express. (The article shows the C# examples and the Visual Basic examples that are in the Workshop19.zip). This time, we'll look at selecting a serial port, getting user input, and then we will expand on all this to build a simple terminal.
Getting User Input
 |
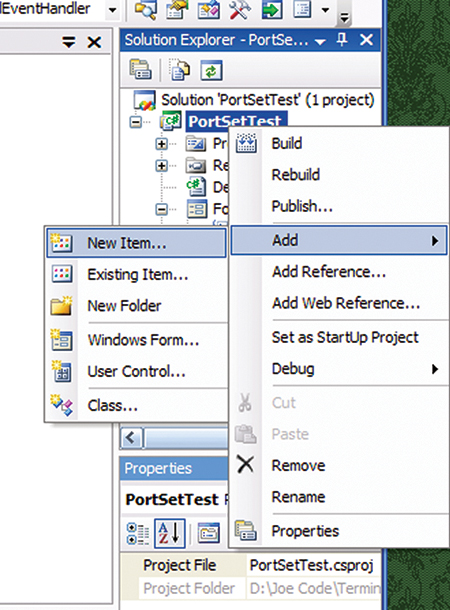
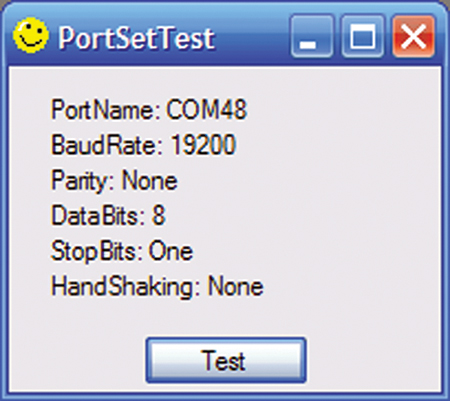
FIGURE 1. PortSet Test.
|
 |
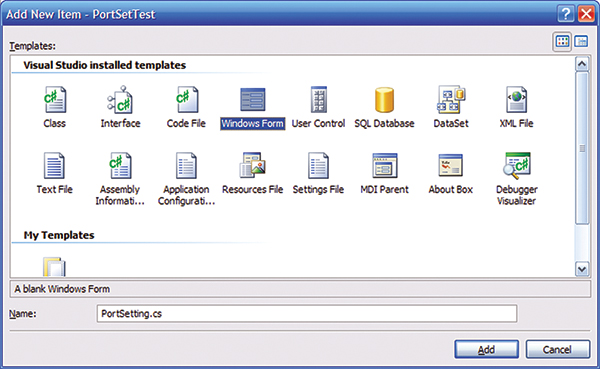
| FIGURE 2. Add New Item. |
In this section, we will create a dialog form to allow the user to select an available serial port and set the UART parameters needed for the communication link (Baudrate, Data Bits, Parity, Stop Bits, and Handshaking). To create and test the Settings dialog, we will use a test form — PortSetTest — to call it. Later, we will access this form by clicking the settings menu item from the Simple Terminal (next month, we will use it for a Arduino voltmeter program).
- Open either C# Express and create a new project named PortSetTest.
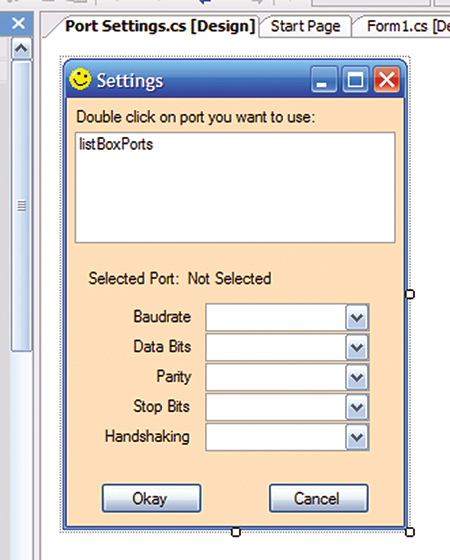
- Create a form to look like Figure 1.
- The text list is made from six labels using the text shown.
- In the Solutions Explorer, right-click ‘PortSetTest’ and from the drop-down menus, select Add/New Item as shown in Figure 2.
- In the Add New Item form shown in Figure 3, highlight ‘Windows Form,’ change the name to ‘PortSettings.cs’ if C#, and click Add.
- The blank form will open.
- In the Properties Window, select ‘FormBorderStyle’ and select ‘FixedDialog.’ This type of form can post a DialogResult message that the calling form — in this case, the Simple Terminal form — can process (don’t panic, this is all done for you and is simpler than it sounds). We will use the DialogResult to learn if the user clicked the Settings form Okay or Cancel button.
- Now you should be able to do some stuff without a lot of hand-holding:
— Change the form name to ‘Setting.’
— Add the Smiley.ico icon.
— Change the form color to Bisque.
- Add the controls shown below:
— The upper white box with listBoxPorts is a listBox which you will name listBoxPorts.
— The control with the label ‘Baudrate’ is a ComboBox; change its name to comboBoxBaud.
 |
 |
| FIGURE 3. Add New Item Form. |
FIGURE 4. Settings Form. |
- Your Settings form should look like Figure 4.
- Add the DevInfo file to the project.
- Copy the DevInfo.cs (if C#) to the directory containing the PortSettings project files. You will find the DevInfo file in the Workshop19.zip.
- Refer to the Add/New Item image as shown in Figure 2.
- Open the same menus in the Solution Explorer, but instead of selecting Add/New Item, select Add/Existing Item and select DevInfo.cs.
- Note that we are intentionally not using the SerialPort GetPortNames function since it doesn’t work correctly. (Microsoft released a buggy function — hard to believe, isn’t it?) We will not look at this file in detail since it contains some advanced concepts, but we will use it to get the names of the available ports. The source code is in Workshop19.zip. If you want to learn the gory details, they are contained in The Virtual Serial Port Cookbook available from Nuts & Volts and Smiley Micros.
- In C#, add to the ‘using’ list at the top of the program:
using DevInfo;
- In C#, add to the constructor:
public PortSettings()<br />
{<br />
    InitializeComponent();
    // Get a list of the Serial port names<br />
    string[] ports = GetPorts();
    int i = 0;<br />
    foreach (string s in ports)<br />
    {<br />
        if (s != “”)<br />
        {<br />
            listBoxPorts.Items.Insert(i++, s);<br />
        }<br />
    }
    // Set first Serial port as default<br />
    GetCOM(0);
    // Initialize baudrates in combobox;<br />
    comboBoxBaud.Items.AddRange(new object[]<strong>wrap</strong><br />
    {“75”,”110”,”134”,”150”,”300”,”600”,<strong>wrap</strong><br />
     “1200”,”1800”,”2400”,”4800”,<br />
     ”7200”,”9600”,<strong>wrap</strong><br />
     “14400”,”19200”,”38400”,<br />
     ”57600”,”115200”,”128000”});<br />
    <br />
    // Set Handshaking selection<br />
    // We will only use these handshaking types<br />
    comboBoxHandshaking.Items.Add(“None”);<br />
    comboBoxHandshaking.Items.Add(“RTS/CTS”);<br />
    comboBoxHandshaking.Items.Add(“Xon/Xoff”);
    // Set Parity types<br />
    foreach (string s in<br />
    Enum.GetNames(typeof(Parity)))<br />
    {<br />
        comboBoxParity.Items.Add(s);<br />
    }
    // Set Databits<br />
    // FT232R UART interface supports only 7<br />
    // or 8 data bits           <br />
    // comboBoxDataBits.Items.Add(“5”);<br />
    // not supported<br />
    // comboBoxDataBits.Items.Add(“6”);<br />
    // not supported<br />
    comboBoxDataBits.Items.Add(“7”);<br />
    comboBoxDataBits.Items.Add(“8”);
    // Set Stopbits<br />
    // FT232R UART interface supports only 1<br />
    // or 2 stop bits<br />
    // comboBoxStopBits.Items.Add(“None”);<br />
    // not supported<br />
    comboBoxStopBits.Items.Add(“1”);
    //comboBoxStopBits.Items.Add(“1.5”);<br />
    // not supported<br />
    comboBoxStopBits.Items.Add(“2”);
    comboBoxBaud.Text = “19200”;<br />
    comboBoxParity.Text = “None”;<br />
    comboBoxDataBits.Text = “8”;<br />
    comboBoxStopBits.Text = “1”;<br />
    comboBoxHandshaking.Text = “None”;<br />
}
- Note the word ‘wrap.’ This means that the prior line of code was too long to display so it was wrapped to the next line for the available space and not wrapped for the actual source code. We will use this as a convention throughout our tutorial. If you enter ‘wrap’ in your code, you’ll get an error. (If you think I’m over-explaining this, you haven’t seen my email inbox.)
- From the Settings Designer form, click the Okay button and the Cancel buttons, and then in the Settings text editor window add the following DialogResults to the functions (in C#,):
 private void buttonOkay_Click(object<br />
        sender, EventArgs e)<br />
        {<br />
            DialogResult = DialogResult.OK;<br />
        }
        private void buttonCancel_Click(object<br />
        sender, EventArgs e)<br />
        {<br />
            DialogResult = DialogResult.Cancel;<br />
        }
These functions close the form and post the DialogResult message for the PortSettingsTest form which called the Settings form.
In the source code in Workshop19.zip, you will see #region and #endregion. The IDE uses #region and #endregion to show or hide code sections. When you click on the + or - to the left #region, the code section collapses or expands. We use these to simplify the code visually, making it easier to follow the overall code logic. Collapsing the regions looks like Figure 5.
 |
| FIGURE 5. Regions. |
Create data assessors and indexChanged functions by clicking the ‘SelectedIndexChanged’ event in the events section (lightning bolt) of the Properties window.
In C#, add:
#region Data Assessors<br />
// Data assessors and index changed functions<br />
// FT232R UART interface supporta<br />
//      7 or 8 data bits<br />
//      1 or 2 stop bits<br />
//      odd / even / mark / space / no parity.<br />
// So these will be the only options available
#region Port Name<br />
// Assessor for the selected port name<br />
private string SelectedPort = “”;<br />
public string selectedPort<br />
{<br />
    get<br />
    {<br />
        return SelectedPort;<br />
    }<br />
    set<br />
    {<br />
        SelectedPort = value;<br />
        labelPort.Text = “Selected Port =<br />
        “ + SelectedPort;<br />
    }<br />
}<br />
#endregion
#region Baudrate<br />
private int SelectedBaudrate;<br />
public int selectedBaudrate<br />
{<br />
    get<br />
    {<br />
        return SelectedBaudrate;<br />
    }<br />
    set<br />
    {<br />
        SelectedBaudrate = value;<br />
        comboBoxBaud.Text = value.ToString();<br />
    }<br />
}
private void comboBoxBaud_SelectedIndexChanged(object sender, EventArgs e)<br />
{         <br />
    selectedBaudrate = <strong>wrap</strong><br />
Convert.ToInt32(comboBoxBaud.Items[comboBoxBaud.<br />
SelectedIndex]);<br />
}<br />
#endregion
#region Parity<br />
private Parity SelectedParity;// = Parity.None;<br />
public Parity selectedParity<br />
{<br />
    get<br />
    {<br />
        return SelectedParity;<br />
    }<br />
    set
    {<br />
        SelectedParity = value;<br />
        comboBoxParity.Text = value.ToString();<br />
    }<br />
}
private void comboBoxParity_SelectedIndexChanged(object sender, EventArgs e)<br />
{<br />
    string temp = comboBoxParity.Items[comboBoxParity.SelectedIndex].ToString();
    switch (temp)<br />
    {<br />
        case “Even”:<br />
            selectedParity = Parity.Even;<br />
            break;<br />
        case “Mark”:<br />
            selectedParity = Parity.Mark;<br />
            break;<br />
        case “None”:<br />
            selectedParity = Parity.None;<br />
            break;<br />
        case “Odd”:<br />
            selectedParity = Parity.Odd;<br />
            break;<br />
        case “Space”:<br />
            selectedParity = Parity.Space;<br />
            break;<br />
        default:<br />
            selectedParity = Parity.None;<br />
            break;<br />
    }<br />
}<br />
#endregion
#region StopBits<br />
private StopBits SelectedStopBits = StopBits.One;<br />
public StopBits selectedStopBits<br />
{<br />
    get<br />
    {<br />
        return SelectedStopBits;<br />
    }<br />
    set<br />
    {<br />
        SelectedStopBits = value;<br />
        comboBoxStopBits.Text =<br />
        value.ToString();<br />
    }<br />
}
private void comboBoxStopBits_SelectedIndexChanged(object sender, EventArgs e)<br />
{<br />
    string temp = <strong>wrap</strong><br />
comboBoxStopBits.Items[comboBoxStopBits.Selected<br />
Index].ToString();
    switch (temp)<br />
    {<br />
        case “None”:<br />
            selectedStopBits = StopBits.None;<br />
            break;<br />
        case “1”:<br />
            selectedStopBits = StopBits.One;<br />
            break;<br />
        // case “1.5”: // not supported by<br />
                     // FT232R<br />
            // SelectedStopBits =<br />
            // StopBits.OnePointFive;<br />
            //break;<br />
        case “2”:<br />
            selectedStopBits = StopBits.Two;<br />
            break;<br />
        default:<br />
            selectedStopBits = StopBits.One;<br />
            break;<br />
    }<br />
}<br />
#endregion
#region DataBits<br />
private int SelectedDataBits = 8;<br />
public int selectedDataBits<br />
{<br />
    get<br />
    {<br />
        return SelectedDataBits;<br />
    }<br />
    set<br />
    {<br />
        SelectedDataBits = value;<br />
        comboBoxDataBits.Text =<br />
        value.ToString();<br />
    }<br />
}
private void comboBoxDataBits_SelectedIndexChanged(object sender, EventArgs e)<br />
{<br />
    if (comboBoxDataBits.SelectedIndex == 0)<br />
    selectedDataBits = 7;<br />
    else selectedDataBits = 8;<br />
}<br />
#endregion
#region Handshaking<br />
// We will only use None, Xon/Xoff, or Hardware (which is RTS/CTS)<br />
private Handshake SelectedHandshaking = Handshake.None;<br />
public Handshake selectedHandshaking<br />
{<br />
    get<br />
    {<br />
        return SelectedHandshaking;<br />
    }<br />
    set<br />
    {<br />
        SelectedHandshaking = value;<br />
        comboBoxHandshaking.Text =<br />
        value.ToString();<br />
    }<br />
}
private void comboBoxHandshaking_SelectedIndexChanged(object sender, EventArgs e)<br />
{<br />
    if (comboBoxHandshaking.SelectedIndex == 0)<br />
    selectedHandshaking = <strong>wrap</strong><br />
Handshake.None;<br />
    else if (comboBoxHandshaking.SelectedIndex<br />
    == 1) selectedHandshaking = <strong>wrap</strong><br />
Handshake.RequestToSend;<br />
    else if (comboBoxHandshaking.SelectedIndex<br />
    == 2) <strong>wrap</strong><br />
selectedHandshaking = Handshake.XOnXOff;<br />
    else selectedHandshaking = Handshake.None;<br />
}<br />
#endregion
- We will test the Settings dialog by displaying the data in the PortSetTest form.
- Open Form1 (PortSettingsTest) and add the following code (in C#,):
public partial class Form1 : Form<br />
{<br />
    private string portname = “Not Initialized”;<br />
    private string baudrate = “Not Initialized”;<br />
    private string parity = “Not Initialized”;<br />
    private string stopbits = “Not Initialized”;<br />
    private string databits = “Not Initialized”;<br />
    private string handshaking = “Not<br />
    Initialized”;
    // Instantiate the PortSettings class<br />
    PortSettings p = new PortSettings();
    public Form1()<br />
    {<br />
        InitializeComponent();
}
    private void clearSettings()<br />
    {<br />
        portname = “”;<br />
        baudrate = “”;<br />
        databits = “”;<br />
        stopbits = “”;<br />
        parity = “”;<br />
        handshaking = “”;<br />
    }
    private void buttonTest_Click(object sender,<br />
    EventArgs e)<br />
    {<br />
        if (p.ShowDialog() ==<br />
        DialogResult.Cancel)<br />
        {<br />
            // clear out settings<br />
            clearLabels();<br />
        }<br />
        else<br />
        {<br />
            // set labels to Settings values<br />
            setLabels();<br />
        }<br />
    }
    private void clearLabels()<br />
    {<br />
        labelPortName.Text = “PortName”;<br />
        labelBaudRate.Text = “BaudRate”;<br />
        labelParity.Text = “Parity”;<br />
        labelDataBits.Text = “DataBits”;<br />
        labelStopBits.Text = “StopBits”;<br />
        labelHandShaking.Text = “HandShaking”;<br />
    }
    private void setLabels()<br />
    {<br />
        labelPortName.Text = “PortName: “ +<br />
        p.selectedPort;<br />
        labelBaudRate.Text = “BaudRate: “ +<br />
        p.selectedBaudrate.ToString();<br />
        labelParity.Text = “Parity: “ +<br />
        p.selectedParity.ToString();<br />
        labelDataBits.Text = “DataBits: “ +<br />
        p.selectedDataBits.ToString();<br />
        labelStopBits.Text = “StopBits: “ +<br />
        p.selectedStopBits.ToString();<br />
        labelHandShaking.Text = “HandShaking:<br />
        “ + <strong>wrap</strong><br />
         p.selectedHandshaking.ToString();<br />
    }<br />
}
-
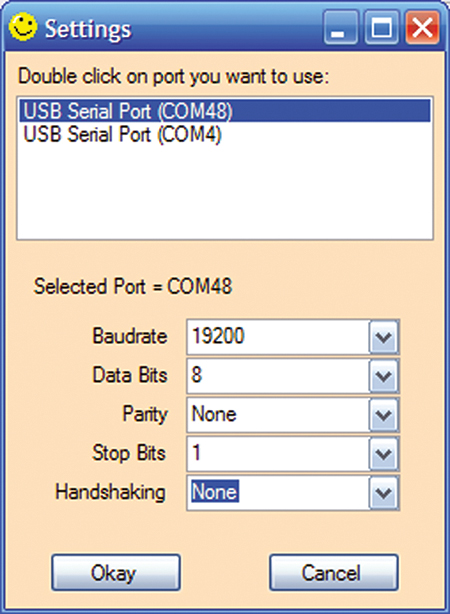 |
FIGURE 6. Settings Test.
|
 |
| FIGURE 7. Settings Test Result. |
In the IDE, click the Debug menu and select the ‘start debugging’ item. You should see the blank PortSettingsTest form shown in Figure 1.
- Click the Test button and you should see the Settings form as shown in Figure 6.
- The actual port names will, of course (barring a stunning coincidence), be different from those shown. By highlighting and selecting these items and clicking Okay, the settings will propagate back to the PortSettingTest form as shown in Figure 7.
We have covered a lot so far. In the last Workshop, we created a GUI for our Simple Terminal. Then in this workshop, we created and tested a Settings form. You may be a bit tired of PC GUIs by now, but I have some good news. We will be able to use the Settings object in future projects by simply copying the source code to the new projects directory and using the Add/Existing Item technique shown here to get this object into our code. So, the good news is: We never have to code this again! Now you see one of the values of object-oriented programming. You can build and test a useful software object, forget all about how it works, and just use it like a black box.
The Serial Port Class
You may have looked at some of the uses of the Serial Port Class in the source code for the Simple Terminal from Workshop 18. You may have even had one of those ‘what the …’ moments with some of the delegate stuff. Put simply, the code that is communicating with the serial port isn’t actually running with the code for the GUIs. This concerns ‘threads’ or bits of software that are running separately in Windows (each gets a part of each second to run so that all the threads seem like they are running at the same time to the user). When you want one thread to put stuff in another thread, you set a delegate that the first thread can call from the second thread. So, we have to create a delegate in our GUI that allows the serial port thread to set the text in our richTextBox. Yeah, it’s complex, but we don’t really have to go too deep at this point just to use the serial port. This is one of those cases where cookbook coding really comes in handy; you can just safely use the source code and move on until you have time to burn out a few more brain cells and learn the details. If you get to that point, you might consider the Cookbook I mentioned earlier.
Now that we have built and tested the portSettings class, let’s add it to the GUI that we built last month and get our Simple Terminal communicating between the PC and the Arduino.
Bringing It All Together
In Workshop 18, we built the Simple Terminal GUI. Now we want to add the portSettings stuff we just built so that we can make the GUI communicate using the serial port.
- Create a new Simple Terminal directory for your work and add these files (in C#) from the PortSetTest C# directory copy:
— Port Settings.cs
— Port Settings.Designer.cs
— Port Settings.resz
— DevInfo.cs
- Paste the files into your new directory.
- Following the Add/Existing Items instructions given earlier, add Port Settings and DevInfo to the project.
- In C# in the ‘using’ list, add:
using PortSet;
Now that you have added the PortSettings and DevInfo Classes to your Simple Terminal project, you are ready to use the .NET System.IO.Ports library that contains the SerialPort Class.
- Open the Form1 designer and from the Toolbox, drag and drop serialPort1.
- We will set the serial port properties according to the data we enter in the Port Settings class.
- In C#, add:
private void settingsToolStripMenuItem_Click(object sender, EventArgs e)<br />
{          <br />
    // Make sure the port isn’t already open<br />
    if (serialPort1.IsOpen)<br />
    {<br />
        MessageBox.Show(“The port must be closed<br />
        before changing the settings.”);<br />
        return;<br />
    }<br />
    else<br />
    {<br />
        // creat an instance of the settings<br />
        // form<br />
        PortSettings settings = new<br />
        PortSettings();
        if (settings.ShowDialog() ==<br />
        DialogResult.OK)<br />
        {<br />
            if (settings.selectedPort != “”)<br />
            {<br />
                // set the serial port to the<br />
                // new settings<br />
                serialPort1.PortName =<br />
                settings.selectedPort;<br />
                serialPort1.BaudRate =<br />
                settings.selectedBaudrate;<br />
                serialPort1.DataBits =<br />
                settings.selectedDataBits;<br />
                serialPort1.Parity =<br />
                settings.selectedParity;<br />
                serialPort1.StopBits =<br />
                settings.selectedStopBits;
                // show the new settings in the<br />
                // form text line<br />
                showSettings();<br />
            }<br />
            else<br />
            {<br />
               MessageBox.Show(“Error:<br />
               Settings form returned with wrap<br />
               no Serial port selected.”);<br />
                return; // bail out<br />
            }
        }<br />
        else<br />
        {<br />
            MessageBox.Show(“Error:<br />
            buttonSetup_Click - Settings wrap<br />
dialog box did not return Okay.”);<br />
            return; // bail out<br />
        }
        // open the port<br />
        try<br />
        {<br />
            serialPort1.Close();<br />
            serialPort1.Open();<br />
            menuStrip1.Items[1].Text =<br />
            “Close Port”;
showSettings();
        }<br />
        catch (System.Exception ex)<br />
        {<br />
            MessageBox.Show(“Error -<br />
            setupToolStripMenuItem_Click wrap<br />
Exception: “ + ex);<br />
        }<br />
    }<br />
}
// show the settings in the form text line<br />
private void showSettings()<br />
{<br />
    this.Text = “Smiley Micros - “ +<br />
        serialPort1.PortName + “ “ +<br />
        serialPort1.BaudRate.ToString() + “,” +<br />
        serialPort1.Parity + “,” +<br />
        serialPort1.DataBits.ToString() + “,” +<br />
        serialPort1.StopBits;<br />
    if (serialPort1.IsOpen)<br />
    {<br />
        this.Text += “ - Port is open”;<br />
    }<br />
    else<br />
    {<br />
        this.Text += “ - Port is closed”;<br />
    }<br />
}
- In the form designer, click on the ‘Open Port’ menu item.
- In C#, add:
private void openPortToolStripMenuItem_Click(object sender, EventArgs e)<br />
{<br />
    try<br />
    {<br />
        if (serialPort1.IsOpen)<br />
        {<br />
            serialPort1.Close();<br />
            openPortToolStripMenuItem.Text<br />
            = “Open Port”;<br />
        }<br />
        else<br />
        {<br />
            serialPort1.Open();<br />
            openPortToolStripMenuItem.Text =<br />
            “Close Port”;<br />
        }
        showSettings();<br />
    }<br />
    catch (System.Exception ex)<br />
    {<br />
        MessageBox.Show(“Error - openPortToolStripMenuItem_Click Exception: wrap<br />
                                     “ + ex);<br />
    }<br />
}
- In the form designer, select the richTextBoxSend component.
- In the properties window, click the ‘KeyPress’ event and to the event handler created in C#, add:
private void richTextBox1_KeyPress(object sender, KeyPressEventArgs e)<br />
{<br />
sendChar(e.KeyChar);<br />
}
private void sendChar(char c)<br />
{<br />
    char[] data = new Char[1];<br />
    data[0] = c;<br />
    try<br />
    {<br />
        serialPort1.Write(data, 0, 1);<br />
    }<br />
    catch<br />
    {<br />
        MessageBox.Show(“Error: sendByte -<br />
failed to send.\nIs the port open?”);<br />
    }<br />
}
- Our receive functions use a delegate to allow the serial port read thread to write to our receive text box. This is a bit complex, so for the time being just use it as-is.
- In C#, add:
#region receive functions
// We want to have the serial port thread report back data received, but to<br />
// display that data we must create a delegate<br />
// function to show the data in the<br />
// richTextBox
// define the delegate<br />
public delegate void SetText();<br />
// define an instance of the delegate<br />
SetText setText;
// create a string that will be loaded with the<br />
// data received from the port<br />
public string str = “”;
// note that this function runs in a separate<br />
// thread and thus we must use a<br />
// delegate in order to display the results in<br />
// the richTextBox.<br />
private void serialPort1_DataReceived(object sender, System.IO.Ports.SerialDataReceivedEventArgs e)<br />
{<br />
    // instantiate the delegate to be invoked<br />
    // by this thread<br />
    setText = new SetText(mySetText);
    // load the data into the string<br />
    try<br />
    {<br />
        str = serialPort1.ReadExisting();<br />
    }<br />
    catch (System.Exception ex)<br />
    {<br />
        MessageBox.Show(“Error –<br />
        port_DataReceived Exception: “ + ex);<br />
    }
    // invoke the delegate in the MainForm<br />
    // thread<br />
    this.Invoke(setText);<br />
}
// create the instance of the delegate to be<br />
// used to write the received data to<br />
// the richTextBox<br />
public void mySetText()<br />
{<br />
    // show the text<br />
    richTextBox2.Text += str.ToString();
    moveCaretToEnd();<br />
}
// This rigaramole is needed to keep the last<br />
// received item displayed<br />
private void richTextBoxReceive_TextChanged(object sender, System.EventArgs e)<br />
{<br />
    moveCaretToEnd();<br />
}
private void moveCaretToEnd()<br />
{<br />
    richTextBox1.SelectionStart =<br />
    richTextBox1.Text.Length;<br />
    richTextBox1.SelectionLength = 0;<br />
    richTextBox1.ScrollToCaret();<br />
}<br />
#endregion
So that will give you a working terminal program. Next time, we will use this code to create an Arduino voltmeter that shows ADC data on the PC monitor. NV
You can find the source code and supplements for this article in Workshop19.zip in the downloads section of the Nuts & Volts website and Smiley Micros website.
Downloads
Smileys Workshop 200911 (Workshop19.zip)