My wife and I like to travel in our small Rialta RV. We usually dry camp without connecting up to any services like power, water, or sewer, but sometimes we need to take showers or do laundry so we opt for a commercial campground. When we are in a commercial campground, we'll connect up to at least power which gives us the ability to watch movies or listen to music using a portable media center that I will describe in this article.
When we bought our RV, it had a TV/monitor that we really didn’t use. When I realized it had an HDMI input, I immediately thought of the Raspberry Pi. I started wondering what I could design that would enhance our RVing experience. Of course, playing movies first came to mind, but I didn’t want to use a DVD player because that would take up precious space in our already compact RV.
In researching how one might play digitized movies with a Rasp Pi, I came across OpenELEC which is an embedded Linux operating system built around Kodi: the open source entertainment media hub. Kodi describes itself this way:
“Kodi® (formerly known as XBMC™) is an award-winning free and open source (GPL) software media center for playing videos, music, pictures, games, and more. Kodi runs on Linux, OS X, Windows, iOS, and Android. It allows users to play and view most videos, music, podcasts, and other digital media files from local and network storage media and the Internet.”
OpenELEC (upon which Kodi runs) is different from other versions of Linux because:
“OpenELEC is built from the ground up specifically for one task: to run Kodi. Other operating systems are designed to be multi-purpose, so they include all kinds of software to run services and programs that won’t be used. OpenELEC, however, only includes software REQUIRED to run Kodi. Because of that, it is tiny (roughly 150 MB), it installs literally in minutes, and, it can boot extremely quickly in 5-20 seconds, depending on the hardware type used.”
OpenELEC can automatically update itself and can be managed entirely from within the graphical user interface (GUI) it presents. Even though it runs on Linux, you will never need to see a management console, use a command line, or have Linux knowledge to use it.
In the home environment, Kodi is generally controlled with a mouse and keyboard, but I didn’t want to carry those items around in our RV either. So, I found a free remote control application for my Android tablet called “Kore” which provides wireless remote control of Kodi for our media center. There are equivalent apps for controlling Kodi in the iTunes app store, as well as for iOS devices.
Of course, remote control requires Wi-Fi for communication between the tablet and the media center, but here also, OpenELEC comes to the rescue. With the correct Wi-Fi adapter connected to the RaspPi (more on this in a moment), OpenELEC can run as an AP, or Access Point (called Tethered Wireless Access Point in the OpenELEC user interface), thereby creating its own Wi-Fi network when no other Wi-Fi network is available. This way, we can use our tablet to control our media center while in a campground that doesn’t have Wi-Fi. Pretty slick if you ask me.
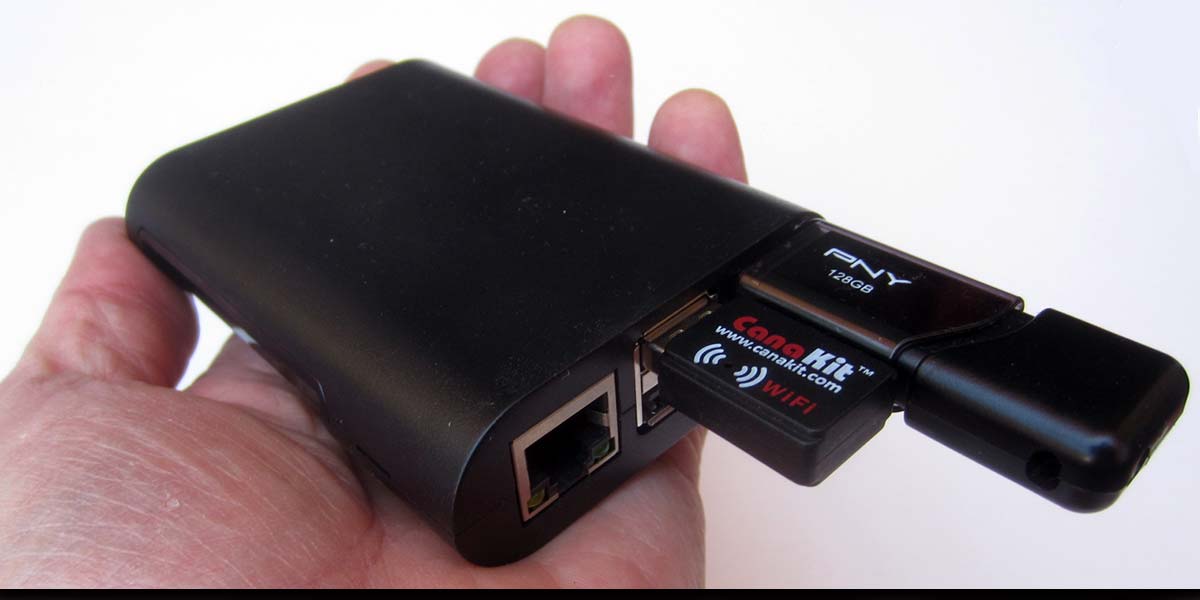
Unlike most of my articles for Nuts & Volts, this one doesn’t have any code you have to configure or compile, or hardware you have to wire up or solder. For this project, you collect the required parts, assemble the hardware, load the OpenELEC software, gather up your media, and you will be ready to go. I’ll give you detailed instructions on how to do this in the text that follows. First though, let me describe my system to show you what is possible for a media center you can literally hold in the palm of your hand.
In my system, I use a 128 GB Flash drive for holding all of my digital media files. On this drive, I have 34 full length movies, approximately 30 TV shows, and 500 CDs of music, and I still have 53 GB available for other things. I could load a bunch of our photos onto the Flash drive and use the slide show feature of Kodi, but I haven’t got around to that yet. As you can see, with this kind of content you could be entertained for weeks on end.
If you travel with a digital camera and a laptop, you could download all the pictures you took during the day and then copy them to the Flash drive of the media center to view them in the evenings and/or just to back them up.
On a final note, when we aren’t traveling, I use our portable media center in our living room with our large screen TV. It works just as well there as in our RV.
Software
Two pieces of software are required for the media center. First and most important is OpenELEC itself, and the second is Kore, the remote control application.
OpenELEC
The OpenELEC software can be downloaded from the link provided in the Resources section. The version at the time of this writing was 6.0.3, although a version 7 may now be available. Before downloading the software, make sure you identify the correct version for the RaspPi 2 and 3. Also get the one marked Diskimage instead of the one marked Update File. Once you have identified the correct version, download it to your computer.
The next step in the process is to decompress the downloaded file. How this is done depends on the computer platform you are using. On my Mac in the OSX environment, this is as simple as double-clicking the downloaded file; it decompresses automatically. In the Windows 10 environment, I had to first install 9Zip from the Microsoft app store and then use it to decompress the file. In either case, you end up with a file called OpenELEC-RPi2.arm-6.0.3.img which is the Linux disk image we need to put on a microSD card for the RaspPi in the media center.
Both my Mac and Windows 10 computer have a slot for reading and writing normal SD memory cards. The microSD card specified in the Parts List comes with an adapter allowing the microSD card to be used in a normal SD card slot. It doesn’t matter how you get the image file onto the microSD card; it’s only important that you do.
How one copies a Linux image file to an SD card also depends on the computer platform being used. Instructions for OSX (Section 3.3), Windows (Section 3.2), and Linux (Section 4.4) can be found at http://elinux.org/RPi_Easy_SD_Card_Setup. Because the OpenELEC image is so small, writing it to the microSD card happens quickly — much quicker than when writing a full-on RaspPi operating system image.
Remote Control
As mentioned, Kore is a remote control application for the media center that can be downloaded for free from the Google Play Store for Android devices. On my Nexus 7 tablet, I first click the icon for the Play Store from the home screen; then in the search bar, type in Kore. You will see numerous versions of it, but the one I use is called “Kore, Official Remote for XBMC Foundation” as it seems to have some kind of official sanction.
Once you have Kore installed, you execute it by tapping its icon. Kore will immediately try to identify all OpenELEC installations on the Wi-Fi network to which it is connected. If it finds your media center, click on it to indicate it is the one you wish to control. This process should only need to be done once unless connection parameters change.
After playing with Kore for a while, its operation should become second nature as using Kore is a lot like using a normal TV remote.
I should mention there are many different ways to control your media center, but Kore for Android is the method I have chosen. Google “Kodi remote control” if you would like to see what other options are available.
Hardware
Before assembling the media center, collect all of the items in the Parts List and what is shown in Figure 1.
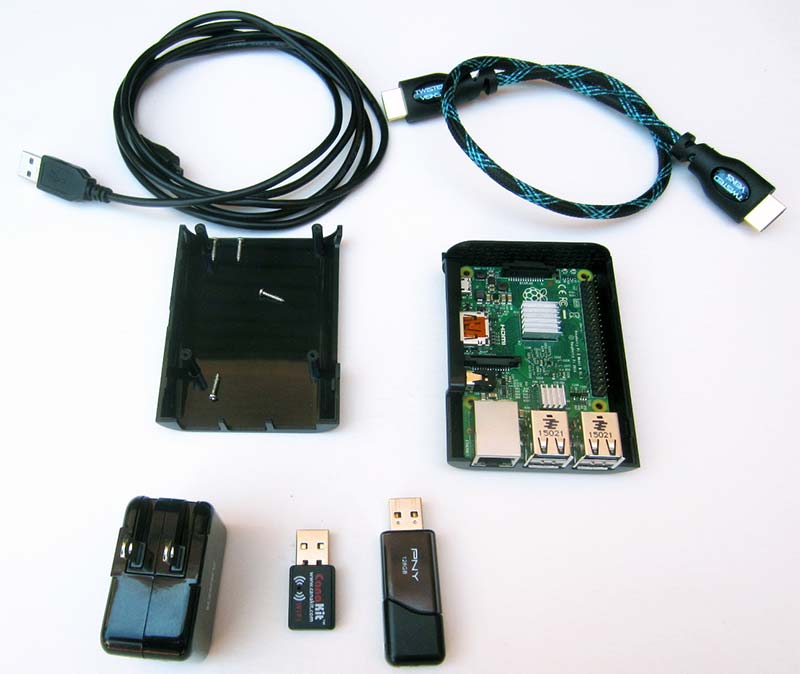
FIGURE 1. All of the required parts. The microSD card cannot be seen because it is inserted in the socket underneath the Raspberry Pi.
NOTE: Most of the parts specified are non-critical and other brands can usually be substituted successfully. My media center worked right out of the box with the parts listed here. Your mileage may vary if you substitute items.
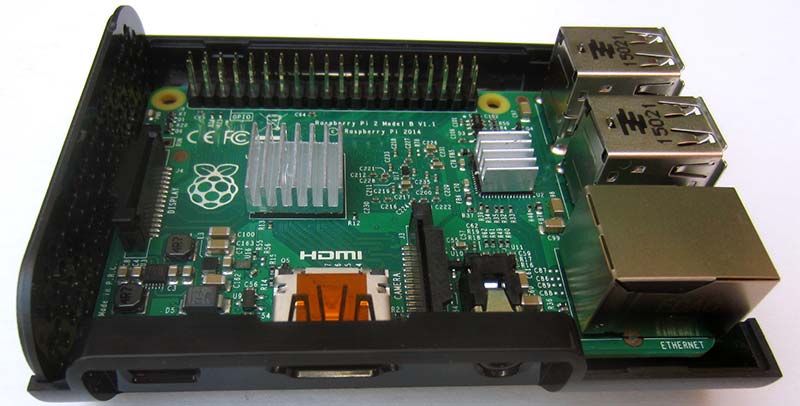
FIGURE 2. Raspberry Pi with heatsinks installed.
Almost any USB 2.0 Wi-Fi adapter can be used with OpenELEC. However, if you want to use the AP or tethered mode, you must have a Wi-Fi adapter that supports AP operation; many don’t. The adapter shown in the Parts List was chosen because it does. From my research, it seems any Wi-Fi adapter using the Ralink 5370 chipset can support AP mode. You can use whatever Wi-Fi adapter you have on hand if AP mode is not important to you.
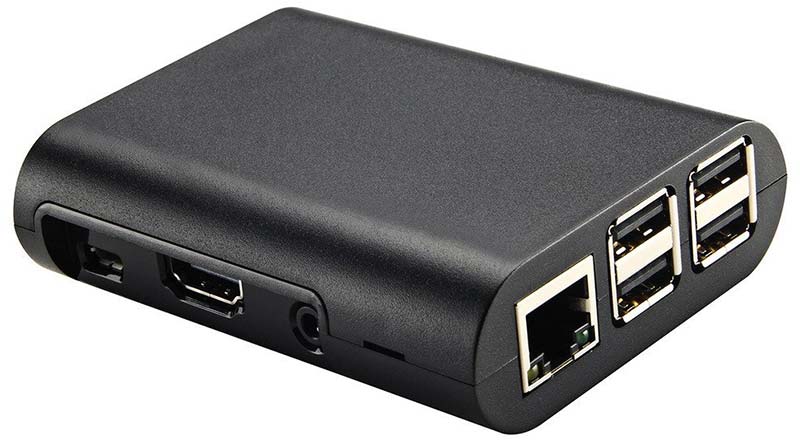
FIGURE 3. Raspberry Pi safe in its protective case.
In the Parts List, I specified that either a RaspPi 2 model B or a 3 model B can be used in the media center. I initially had a Pi 2 in mine and it worked for the most part, but every now and then I would experience pauses in the video that lasted up to about 20 seconds, making for difficult movie viewing. I have since replaced the Pi 2 with a Pi 3, and the video playback is now flawless. In researching this issue, I came across many people that don’t seem to have any troubles with the Pi 2, so it may have just been something amiss in my original installation. For now, I’ll leave the Pi 3 in my media center and use the Pi 2 for some other project.
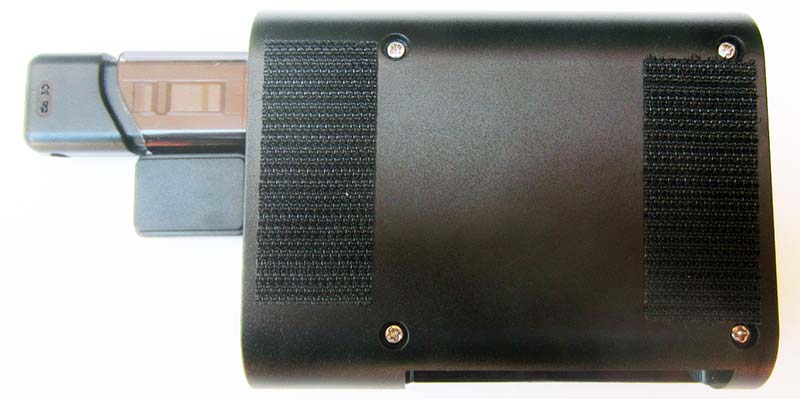
FIGURE 4. Bottom of the media center case. Note the Velcro strips which hold it to the back of the display in both our RV and home TV. Securing it to the back of the display means it takes up zero additional space.
Assembling the media center could not be easier and consists of the following steps:
- Copy the OpenELEC software image onto a 2 GB or larger microSD card.
- Insert the microSD card into the RaspPi.
- If heatsinks are available, pull off the adhesive backing and press them firmly onto the black chips on the RaspPi board.
- Place the Pi into the bottom of the protective case.
- Snap on the top of the case.
- Secure the two halves of the case together with the four included screws.
- Plug in the Wi-Fi adapter.
- Plug in the Flash drive containing your digital media files.
- Connect an HDMI cable from the Pi to your TV/monitor.
- Connect the USB cable from the RaspPi to the USB power adapter.
- Turn on your TV/monitor and plug the power adapter in.
If all is well, in mere moments you should see the OpenELEC user interface appear on the display as shown in Figure 5.
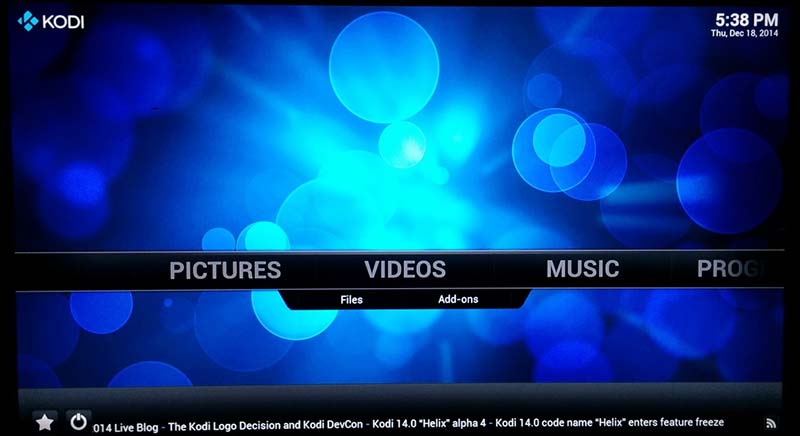
FIGURE 5. The OpenELEC user interface you will see upon successful installation (stock skin, but many others available).
After I verified the media center was working correctly, I put some Velcro® on the back of the case so I could attach it to the back of whatever TV/monitor I was using for display. That way, I can use it in the house when I want to and then easily move it to the RV for traveling.
Creating Media
Before discussing media creation, one first has to prepare the Flash drive for storage of the digital media. I did the following:
1. Formatted the 128 GB Flash drive with the Win32 format. This may not have actually been necessary, but it made sure no other files would be on the Flash drive other than the ones I put there.
2. I then created a directory called MUSIC and a directory called MOVIES in the root directory of the Flash drive.
I did this on my Mac, but it is easily done on a PC as well. Creating digital media (movies and music) for your media center takes much more time than building the media center itself. Luckily, in my case, I already had a large music library of about 500 CDs that I had ripped over time. I use iTunes to manage my music, so all I had to do was copy the entire iTunes library of aac (m4a) files to the MUSIC directory on the Flash drive. Now, that was easy!
Kodi can play many music formats, so if you have a collection of mp3 files, for example, you can copy them to the MUSIC directory. Also, Kodi doesn’t require all of the digital music files to be of the same format, so you can essentially load any music you have onto the Flash drive.
Video media, on the other hand, took some time to create. I have a rather large collection of DVDs, so I had to rip the movies I wanted to have on the media center into a format that Kodi can play. Being the frugal individual that I am, I searched the web for free DVD ripping software and came up with a program called HandBrake which does the job nicely (see the Resources section for a link for downloading HandBrake). Handbrake is available for OSX, Windows, and certain varieties of Linux.
HandBrake refers to itself as “The Open Source Video Transcorder.” This means it can convert from DVD format to many different output video formats, with one important exception. It cannot transcode videos that are protected with the Content Scramble System (CSS) which is a form of Digital Rights Management (DRM) meant to prevent illegal copying.
To get around this impediment, you can install a library called libdvdcss on the computer system you are planning on using to rip the DVDs and it will remove the DRM information during the transcoding process. See the Resources section for where you can acquire this library and how you go about installing it. As I understand it, I have the right to make a backup copy of any DRM protected media I personally own so I have no problem doing this.
Once you have HandBrake downloaded and installed, it's easy — though time-consuming — to rip a DVD for the media center. A normal length movie takes about 25 minutes to rip on my Mac, so it is best to start the process and go do something else.
I used all of the HandBrake defaults (except I named the output files with the name of the movie) to rip my movies and they play back great. HandBrake produces m4v video files which I initially stored on the Mac, and then I would copy the ripped movies in mass to the 128 GB Flash drive. This seemed to be faster than ripping the movies directly to the drive, though that can be done as well.
Conclusion
It's easy to create a very powerful media center that fits in the palm of your hand, and that can keep you entertained for hours on end. This is a great and useful project for someone getting into the Raspberry Pi for the first time. It's almost impossible to mess up because there isn’t any programming involved or Linux configuration necessary.
One advantage of going digital is that the media center is much smaller physically than the audio CDs and the video DVDs it replaces. All of those CD and DVD cases take up a lot of space.
Why don’t you build yourself a personal media center today? It only takes an hour or so! That way, you can carry around a collection of your best loved music and videos in the palm of your hand or even in your back pocket. NV
Resources
OpenELEC media center software is available for free at http://openelec.tv/get-openelec. Make sure you pick the Raspberry Pi 2 and Pi 3 [Model B+ 512 MB] disk image.
Information on how to copy a Linux image file to an SD memory card can be found at http://elinux.org/RPi_Easy_SD_Card_Setup.
In this article, I only briefly touched upon what Kodi is capable of. With Kodi, you can play games, get current weather conditions, have slide shows, re-skin the app to change it appearance, and much more. Look up Kodi add-ons to see what is available for customizing your media center. For more information, go to https://kodi.tv.
HandBrake software for Windows, OSX, and UBUNTU Linux is available for free at https://handbrake.fr.
Instructions for downloading and installing libdvdcss are available at www.winxdvd.com/resource/install-handbrake-libdvdcss-to-rip-dvd.htm.
| DESCRIPTION |
ITEM |
SOURCE |
| Raspberry Pi |
Pi 3 Model B or Pi 2 Model B |
adafruit.com |
| Single Board Computer |
Pi 2 Model B |
sparkfun.com |
| Protective Case |
Enokay Black Case for Raspberry Pi 2/Pi 3 Model B/B Plus |
amazon.com |
| USB 2.0 Wi-Fi Adapter |
CanaKit Raspberry Pi Wi-Fi Wireless Adapter or any Adapter with a Ralink 5370 Chipset |
canakit.com |
| microSD Memory Card |
Sandisk 2 GB microSD Memory Card with SD Adapter |
amazon.com |
| USB Power Module |
Any type capable of two amps at five volts |
amazon.com |
| USB 2.0 Flash Drive |
PNY Attaché 64 GB or 128 GB |
amazon.com |
| HDMI Cable |
High Speed HDMI Cable |
Anywhere |
| USB 2.0 Cable for Power |
Type A to micro B |
Anywhere |