The Anatomy of an Arduino IDE Program
In the previous column, we discussed the Five Program Steps and how we can use those five steps to organize our thoughts about writing programs. In this article, we’ll discuss the format that the Arduino Integrated Development Environment (IDE) requires for your program to execute in the IDE environment. We’ll then examine how the IDE allows us to easily organize a program using the Five Program Steps.
In this article, we’ll use the example ASCII Table program — also called a sketch — as the basis of our discussion. You can compare what we do here with what you did with your assignment from the first article, which was to describe the Blink program in terms of the Five Program Steps.
The ASCII Table sketch is provided with your IDE. You should load the ASCII Table sketch into the IDE using this menu sequence:
File → Examples → 04. Communication → ASCIITable
I’ve stripped out some of the comments from the program code, but you should see code similar to that in Listing 1. I’ve left some of the author’s comments in the code, but repositioned them and removed others to make the code shorter and easier to read.
// see [url=http://www.asciitable.com]http://www.asciitable.com[/url] and http://en.wikipedia.org/wiki/ASCII
void setup()
{
Serial.begin(9600); //Initialize serial object and wait for port to open:
while (!Serial) {
; // wait for serial port to connect. Needed for native USB port only
}
Serial.println(“ASCII Table ~ Character Map”); // prints title with ending line break
}
int thisByte = 33; // first visible ASCII character ‘!’ is number 33:
void loop()
{
Serial.write(thisByte); // Print the ASCII value as a character
Serial.print(“, dec: “); // Print a label for the next representation as
Serial.print(thisByte); // a decimal number
Serial.print(“, hex: “); // Print it again, but as a hexadecimal number
Serial.print(thisByte, HEX); // (base 16)
Serial.print(“, oct: “); // Print it again, but as an octal number (base 8)
Serial.print(thisByte, OCT);
Serial.print(“, bin: “); // One more time as a binary number (base 2)
Serial.println(thisByte, BIN);
if (thisByte == 126) { // The last visible ASCII character, table done
while (true) {
continue;
}
}
thisByte++; // Ready for next character
}
LISTING 1. The ACSCIITable source code.
ASCII Codes?
The program is designed to display all the printable characters that are part of the ASCII character codes. ASCII stands for American Standard Codes for Information Interchange. It was a character set formalized in 1963 by the American Standards Association (ASA) committee for use in electronic communications. (They changed their name to the American National Standards Institute, ANSI, in 1969.)
If you use the URLs given at the top of the program, you can see the complete ASCII table. The first 32 characters in the table are “non-printing” in the sense there is nothing visible to see when those codes are printed. Most of those codes are used to control the print head of the old pin printers. Therefore, Listing 1 has the following statement near the top of the code:
int thisByte = 33; // first visible ASCII character ‘!’ is number 33:
You can verbalize this C program statement as “Take the numeric value 33 and assign it to the integer variable named thisByte.” What this means is that we’re going to start to display the ASCII table starting with the character that has the value 33. (Well, technically character 32 is the space character and actually is a printing character. However, it’s kinda hard to see a space.) If you look at the ASCII table, you can see the value 33 translates to the ‘!’ character.
Suppose you press a lower case ‘a’ on your keyboard. What happens? Your keyboard codes your ‘a’ keystroke in the numeric value 97 (or 61 in hexadecimal, 141 in octal, or 01100001 in binary) and sends it at the speed of light to your PC. Your PC then decodes that numeric value to a printable character using the ASCII table and pops up the letter ‘a’ on your display.
Why the Variable Name thisByte?
The C programming language allows you to use almost any name you want for a variable, as long as it doesn’t start with a digit character (i.e., 0-9) or a “special” character (e.g., ‘#’, ‘?’, ‘^’, etc.). That said, the C programming convention is to use what’s called Camel Notation for variable names. Camel Notation starts all identifier (variable) names with a lower-case letter, and then capitalizes the first letter of any “subnames” within the identifier. Examples might be:
myHatSize maxSpeedLimit cupsOfMilk ptrSisters
There is no hard and fast rule for good variable names. To me, a good variable name is one that is long enough to give you a clue as to its purpose, but short enough you don’t get irritated when typing it over and over in a program. (The ANSI standard for C variables requires each identifier to be unique within the first 255 characters. Really? I’d get more than just a little cranky typing in any variable name that required 255 keystrokes!)
What Does int Mean in the Statement: int thisByte?
The C programming language gives you options as to the type of data you want to use. Table 1 shows some of these C data types, the amount of memory each requires, and their data ranges. There are other data types from which to choose, but the ones shown in Table 1 are the most common.
| C Data Type |
Storage Needed (bits) |
Range of Values |
| byte |
8 |
0-255 |
| char |
8 |
-128 to 127 |
| int |
16 or 32 |
-32768 to 32767 |
| long |
32 or 64 |
-2,147,483,648 to 2,147,483,647 |
| float |
32 |
1.2E-38 to 3.4E+38 |
| double |
64 |
2.3E-308 to 1.7E+308 |
TABLE 1. Partial list of C data types.
Also, you can use the double data type in your programs, but the IDE does not support double, so it demotes any double data types to a float. Therefore, our thisByte variable is defined as an int which means it can assume any of the values within its range, as shown in Table 1.
If you look near the bottom of the code in Listing 1, you’ll see the statement block:
if (thisByte == 126) { // The last visible ASCII character, table done
while (true) {
continue;
}
}
Without going into detail, this means we quit printing the ASCII table when thisByte has a value of 126. (The test for equality is the double equal sign, “= =”.) Therefore, if I were writing this program, I’d probably have used a byte data type for thisByte and saved one byte of storage in the process.
Does saving one byte make a difference? No, not in this program, but it could in others. The bigger difference might come when you start moving data between memory and the microcontroller. Some data buses are only eight bits wide, so a byte moves the data in one bus trip where an int may require two trips on the bus from memory to the microcontroller.
The setup() Function
First of all, what’s a function? A function is a piece of program code that is designed to perform a specific task. Every Arduino program must have a setup() and a loop() function. There are some additional rules about the setup() function:
- The setup() function must be present within an ino file.
- The loop() function must also be present in the same ino file as the setup() function.
- The name of the ino file must match the name of the directory which contains it.
For example, suppose you write a program that reads a temperature sensor and you wish to call the program, MyThermometer and you want to store it on your C drive. To do this properly, it would appear as:
C;//MyThermometer/MyThermometer.ino // setup() and loop() are in this ino file
Because MyThermometer.ino contains both the setup() and loop() functions, rules 1 and 2 are fulfilled. Because the directory name (in green) matches the ino’s primary file name (in blue), rule 3 is fulfilled.
Now that you have the file properly placed on your hard drive, we can take a closer look at the setup() function.
In Listing 1, the setup() function begins with:
void setup() // The setup() function signature
setup() is a special function in an Arduino program as it marks where the program begins execution. The purpose of the setup() function is to establish those things that need to be done before the program actually begins. In other words, setup() establishes the environment in which your program will run.
The statement line above is also called the function signature for setup(). In that signature, the C keyword void is called the function type specifier. The function type specifier tells the type of data that the function is designed to give back when the function is called. A void function type specifier means that setup() is not designed to return a value after it’s called.
The next thing in the signature is the name of the function; setup in this case. Function names have the same naming rules as variables. After the name comes an opening parenthesis followed by a closing parenthesis. Because nothing appears between the two parentheses, the setup() function does not need any “outside” parameters sent to it to do its thing. The closing parenthesis marks the end of the function signature.
On the other hand, you might write a square() function we talked about in the first session as:
int square(int number)
{
return number * number;
}
In this case, the square() function needs to know what number you want to square and, once it does square it, it needs to send that new number back to you. Anything that appears between the opening and closing parentheses in the function’s signature is called the function’s parameter list.
A function parameter list contains the list of information that the function needs to complete its task. In the square() function, its parameter list tells us it expects an integer number named number to be passed to it. The return keyword says that we’re going to send back a number that represents the square of number.
So, if number is 3, the value associated with the return statement is 9. How do you know what data type is associated with the return statement? The first word in the function signature for square() is int, so the number 9 is returned as an int value. If the function signature was:
float setup(int number)
the return value of 9.0 would be a floating-point number instead of an int even though the parameter list is unchanged.
Let’s repeat all of the setup() function’s code:
void setup()
{
Serial.begin(9600); //Initialize serial object and wait for port to open:
while (!Serial) {
; // wait for serial port to connect. Needed for native USB port only
}
Serial.println(“ASCII Table ~ Character Map”); // prints title with ending line break
}
First, note that because the function type specifier for setup() is void, there cannot be a return statement in the function; setup() cannot return a value when it’s called.
Wait a minute! The purpose of setup() sounds like Step 1 (Initialization) that we talked about in our first session. Yep! That’s exactly what it is; setup() establishes those things that need to be done before the program can properly begin its designed task.
The first statement in setup() establishes a Serial object for the program by calling the begin() method (i.e., function) of the Serial class. The parameter list for begin(), 9600, is the baud rate that we want to use when communicating between the microcontroller and your PC via the USB cable.
The next three lines in the while loop say: “We’re going to spin around in this while loop until the Serial object returns a non-zero value, at which time we know that the microcontroller can communicate through the Serial monitor with our PC.”
Once the Serial object is properly initialized, we use the Serial object to display a message on the PC using the println() method telling the user we’re about to display the ASCII table. You can think of class methods as being about the same as plain C functions. (Methods are housed within a C++ object, functions are not.)
Once the last line of the setup() function is displayed, its closing brace signals it has completed its task. The setup() function is never called again, unless we restart the program. Step 1 of the Five Program Steps is finished.
The loop() Function
The instant the end of the setup() function is reached, the program immediately begins execution of the code in the loop() function. Like setup(), every program must have a loop() function. (You can go to the IDE installation directory and look at hardware/arduino/avr/cores/arduino/main.cpp to find the reason why.) The loop() function code is reproduced here:
void loop()
{
Serial.write(thisByte); // Print the ASCII value as a character
Serial.print(“, dec: “); // Print a label for the next representation as
Serial.print(thisByte); // a decimal number
Serial.print(“, hex: “); // Print it again, but as a hexadecimal number
Serial.print(thisByte, HEX); // (base 16)
Serial.print(“, oct: “); // Print it again, but as an octal number (base 8)
Serial.print(thisByte, OCT);
Serial.print(“, bin: “); // One more time as a binary number (base 2)
Serial.println(thisByte, BIN);
if (thisByte == 126) { // The last visible ASCII character, table done
while (true) {
continue;
}
}
thisByte++; // Ready for next character
}
The first statement in loop() uses the Serial object’s write() method to display the value of thisByte on the PC display. Note that two lines later, we use the Serial object’s print() method to write the same variable to the display. What’s the difference?
The write() method is used to write binary data to the display, where print() is used to write the data as ASCII data. Also, println() is a variation that displays the data and then does a carriage-return/linefeed sequence, so the next line of output appears on a new line.
Okay, so where is Step 2 (Input step) in the program? Actually, the only data that is input for this program is the starting value for thisByte, which was set to 33 near the top of the program. Step 3 (Processing) is simply done by preparing the value of thisByte to display the data on the PC.
Note that we do use the Processing Step at the bottom of the loop() function with this statement:
thisByte++;
The statement above uses the post-increment operator (++) to increase the current value of thisByte by one (i.e., thisByte = thisByte + 1;). All the other Serial.print() method calls simply display the value of thisByte using the various base numbering systems. The method calls to Serial.print() are our Step 4 (Output step), so let’s exam the values of thisByte in different base numbering systems.
The final Serial.println(thisByte, BIN) method call displays the data but adds a carriage-return/linefeed pair, so the next value for thisByte appears on the next line. (Note the “ln” at the end of the method name.)
The second parameter in the Serial.print() calls (i.e., HEX, OCT, and BIN) causes the method to display the value in hexadecimal, octal, and binary instead of the default base 10 (DEC or decimal).
So, now what happens? The following code fragment:
if (thisByte == 126) { // The last visible ASCII character, table done
while (true) {
continue;
}
}
checks to see if thisByte equals 126. If thisByte is less than 126, the program loops back to the very first statement in loop() (Serial.write(thisByte);) and repeats all of the statements in loop() again. (Perhaps that’s why they call it loop.)
If thisByte does equal 126, there are no more ASCII codes to print, so the program enters an infinite while loop and spins around until the cows come home, or one of our three termination events happen (i.e., power removal, component failure, or program reset).
This is an unusual way to have a one-pass through the code. I would have placed all the code in setup() and not even used loop(). To each his own. It just reaffirms that there are multiple ways of doing the same thing in programming.
Assignment
Okay, you now know the basic construct of an Arduino program, or sketch. I want you to write a program that illustrates the Five Program Steps with the goal of the user entering a number on the serial monitor, and then your code uses that number to calculate and display the square of that number.
Your serial monitor should look something like the figure below.
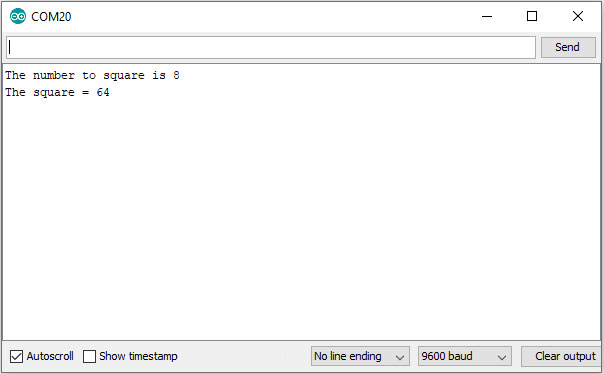
First, the program announces the purpose of the program (“My Square routine”). The user is then prompted to enter the number they want squared on the monitor’s input textbox at the top of the monitor (e.g., 8) and then presses the Enter key.
The program displays the input number and then the answer. It then makes the next iteration through loop() so the user can enter another number.
Because you may not have experimented with the serial monitor’s input functionality, I’m going to give you the code that lets the user enter a number from the PC keyboard. The input value code is presented in Listing 2.
/*****
Purpose: To accept a number from the keyboard
Parameter list:
void
Return value
int the number that was entered
*****/
int getNumber()
{
char buffer[10];
int count;
buffer[0] = ‘\0’;
while (Serial.available() > 0) {
count = Serial.readBytesUntil(‘\n’, buffer, sizeof(buffer) - 1);
buffer[count] = ‘\0’;
Serial.print(“The number to square is “);
Serial.println(buffer);
}
return atoi(buffer);
}
LISTING 2. Using the serial monitor to input a number.
The function begins with a function header as a comment to tell the user what the function does. The first statements in the function define a char array named buffer[] that is used to hold whatever keystrokes the user enters. The count variable is used to track how many keystrokes the user typed.
The while loop causes the program to wait for the user to type in the number; when they press the Enter key, the newline character (‘\n’) is read and the keyboard input ends. (You can find a complete description of the readBytesUntil() method online.)
We then add a null character (‘\0’) at the end of buffer[] so we can treat it as string (i.e., character) data. We next display what they entered using the print() method and then use the atoi() (i.e., ASCII to Integer) function to convert the digit characters to a numeric value. (The atoi() function is part of the standard library of functions that comes with the IDE.
This also means you don’t have to write, test, and debug an atoi() function.)
The final numeric value uses the return keyword to send that numeric value back to the caller. The type specifier in the function signature for getNumber() tells us the number being returned is an int.
The rest of the assignment is up to you. Try to make it conform to the Five Program Steps. I’ll present my solution in the next column, but you should write your own first. After all, it may be better than mine! NV
Downloads
What’s in the zip?
Code Listings
