When the trick-or-treaters reach your door, they may never be the same!
A powerful Van de Graaff generator can be a thing of wonder — producing both a number of strange looking and strange feeling effects! It's also always a chance to educate and inspire an eager mind to the wonders of our favorite hobby: electronic wizardry!
I first saw the plans for a wonderful Van de Graaff generator in a reprint of a 1955 publication by C.L. Stong entitled The Amateur Scientist. As I recall, what “sparked” my interest right away was that the article advertised that it was possible to create a 100,000 volt generator for $25. That was about my budget — throwing a paper route in high school — but I was quickly astounded by all the wonderful things the generator I built based on that article did!
I think one of the most amazing things about these generators today is that with a few surplus parts, you can still build one yourself for about $25! Better yet, with modern materials your generator will not only be simpler, but better!
How It Works
The basic workings of a Van de Graaff couldn’t be easier. Figures 1 and 2 shows the basic design/schematic of a Van de Graaff.
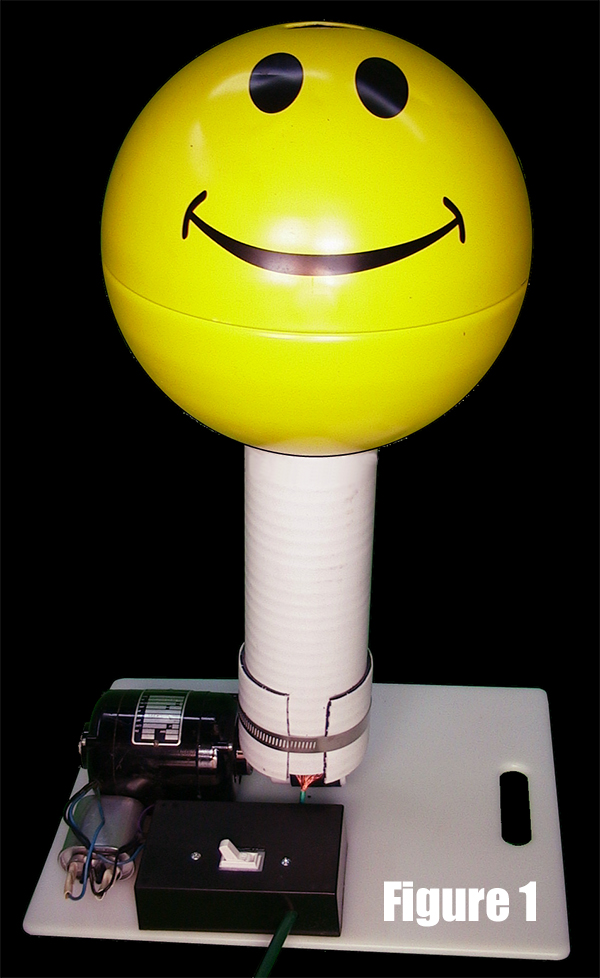

The generator consists of little more than a plastic wheel attached to a motor, an insulating column, a conductive top roller, two metal brushes, a rubber belt, and a metal sphere.
Even though these generators produce remarkable energy (on the order of several hundred thousand volts possible), the principle of operation is as simple as that of creating a charge by shuffling your feet on a carpet.
As the bottom roller (plastic) turns, friction between the roller and the rubber belt creates positive static charges on the belt. A small conductive brush mounted at the bottom of the belt is grounded, and serves to remove additional negative charges from the belt.
As the remaining positive charges ride the belt upward, they pass over a conductive metal roller and are collected and distributed on a metal sphere by a second brush.
In theory, the charge on your generator could build up indefinitely. In reality, though, leakage from the sphere to the air limits your maximum charge typically to 100,000–200,000 volts or so. (More on calculating and improving on this later.)
Basic Construction
Construction is very straightforward. Feel free to substitute any materials you choose, and feel free to experiment.
The generator outlined here has proven to be a very solid and simple design, and I’ve used the design in talks and presentations over the years without fail.
Built as described, this generator will produce a solid one inch (or more) spark to the finger every second or so, and can reach much higher charges if allowed to.
Long hair will stand on end if you touch the generator while standing on an insulator, and it will quickly run motors and all kinds of electrostatic gadgets; including stunts I’ll mention later.
Motor and Roller
The motor is a 1,700 rpm 1/40th hp motor which I found in a surplus store for about $15. Virtually any motor will work since the motor is running with almost no load.
I think the two most important parameters to consider in selecting a motor are: the motor rpm, and the diameter of the axle. Though I’ve built very good generators with motors as slow as 600 rpm, higher rpm motors will build up a charge faster and overcome leakage problems — especially on humid days when Van de Graaffs perform very badly in general.
In my personal experience, motors of over 5,000 rpm have caused my belts to “flap,” and required a speed control to work well. However, if you are out to build the optimum powerhouse of a generator, high-power commercial units generally try for belt speeds of up to 6,000 feet a minute! Interestingly, belts speeds above 6,000 feet a minute tend to blow electrons off the belt, and you wind up with diminishing returns.
With regards to the motor axle size, I used a plastic wheel from a furniture roller (Figure 3) for my lower wheel.
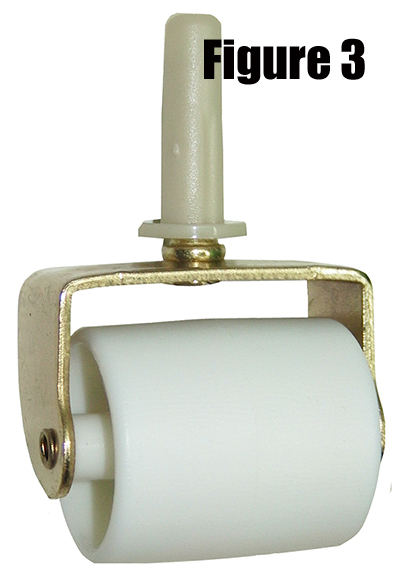
So, I simply looked for a motor with an axle slightly larger than the axle on the roller so that the wheel could be drilled and “friction fitted” on the motor axle with a few hammer taps.
Column
The insulating column is simply 3” PVC sewer pipe. ABS pipe is not optimum (though it will work) as the black coloring is slightly conductive. Acrylic or phenolic pipe might provide even better performance, and are handy being see-through.
Figure 4 shows a reverse view of my simple metal support for the column, and a PVC sleeve I sliced lengthwise and bolted to the support as shown.
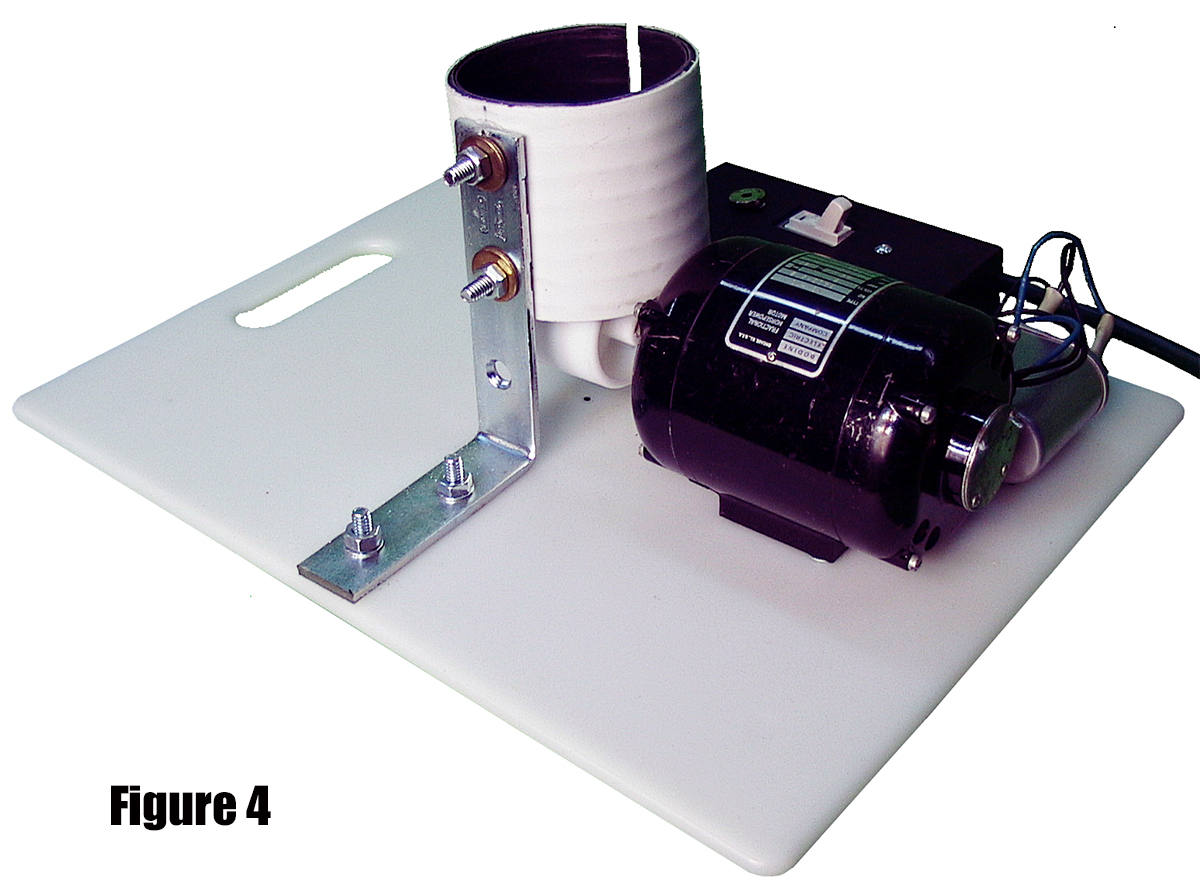
This sleeve — combined with a hose clamp — keeps the column ridged and straight, while also allowing you to slide the main column up and down to accommodate different belt sizes, and to adjust tension on your belt.
Top Roller and Brushes
Figure 5 shows the top roller and brush. For my top roller, I used an old bicycle hub being tossed out at the bike shop.
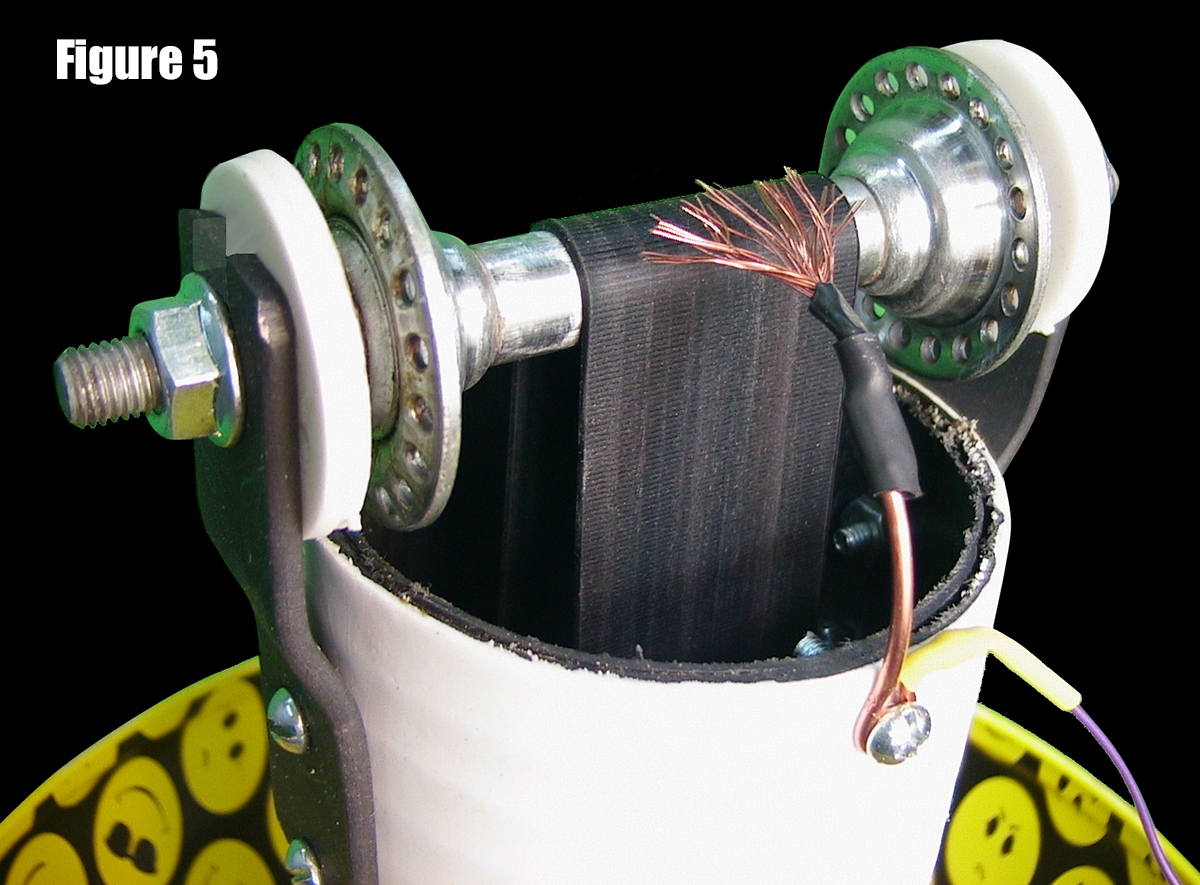
Ideally, it would be nice to use a bike hub with sealed bearings. Because a bike hub spins vastly faster in a Van de Graaff than it was designed to on a bike, if there is any light oil inside, it will be spun out and entirely ruin your Van de Graaff belt.
Important note: Any oil at all in your Van de Graaff should be avoided! The electrostatic charge will attract the oil to the belt, ruin the belt, and contaminate the rollers.
If using an older bicycle hub as I did, simply disassemble and degrease it before using it. I used only an extremely thin coating of heavy grease on the bearings internally, and have had no problems.
You’ll also note that the brackets holding the bicycle hub are slotted so that the hub can be easily slipped out for belt changes and even tweaked side to side a bit to center the belt if needed.
The top brush is nothing more than a tuft of wire as shown. A lead soldered to this tuft is connected to the outer dome. Optimal performance is gained if the brush makes very light contact with the belt (though the brush will still pick up charges a short distance from the belt) and will preserve belt life.
The lower brush is identical and easiest to see back in Figure 2. The lower brush should simply be connected to a ground source (such as the ground lead of your three-pronged electrical cord).
Top Sphere
I found my top high potential spherical terminal at Walmart, where it had been mislabeled as a “piggy bank.” (You can see the coin slot they mistakenly put in the top.) These pop up from time to time and are worth looking for, though it seems to be a seasonal or promotional item for them. If you hunt around, you’re sure to find other objects that will work.
In the past, I’ve used two stainless steel bowls (available everywhere) face to face to form an excellent and durable sphere. If you do this, be sure to coat all the sharp edges of the bowl with several heavy coats of corona dope, including the hole you cut to accept the Van de Graaff column before assembling. The easiest way to cut a large hole in a metal sphere is with a Dremel tool and cut-off disk; then, file and sand the hole to perfection.
Belt
Your belt can be made of nearly any insulator — Rayon, Dacron, neoprene, rubber. I’ve even used very wide rubber bands with “adequate” results. When looking for a belt, black rubber (such as used in tires) is usually not ideal, because carbon is added to get the black coloring and is conductive. Thin belts always seem to give the best performance, but the trade-off is that they take a beating and don’t last long.
Commercial belts (available from science supply stores) are usually neoprene and thick. A commercial belt may last 500 hours or more, and has become my belt of choice only because of durability/simplicity. However, homemade belts often outperform them.
Probably the best belts I made myself were cut from the wide exercise stretch bands available from Amazon and all over the Internet. You can get a pack for a few dollars that contains several sizes and thickness.
Simply cut out the length of belt you’d like, and super-glue the ends (a diagonal cut on the ends is strongest) to form a truly excellent belt.
Testing
Your generator has many points to help adjust the run of the belt, including the slots on the top roller (allowing you to adjust its tilt) and the hose clamp at the base (for belt length). It usually takes a few minutes the first time you run it to get everything positioned just right. Once you do, your generator should run for many hours without problems.
Keep your face clear of the top terminal while doing this setup, unless you’d like your generator’s first bolt to strike there. (Not that I would know, of course.)
A Few Classic Experiments
Figure 6 and Figure 7 show two electric motors that can be run from your Van de Graaff generator. Figure 6 is an ion motor.

A metal bar or wire is bent in the Z shape shown, and the ends are sharpened to a point. This assembly is balanced on a point, forming an easy spinning needle bearing. (I also coated all surfaces with corona dope, except the tips.)
When placed on top of your running Van de Graaff, the sharp points will have the highest electron density, and the electrons at this point will leak off into the air. Thanks to Newton’s Third Law, the motor will spin rapidly. Though the design of this motor is humble, used in frictionless space ion motors have already propelled large rockets such as NASA’s Dawn mission to visit asteroids, and at speeds and thrust durations chemical rockets cannot attain. This simple idea may be our best bet for future deep space exploration.
Figure 7 shows a Franklin motor. Invented by Benjamin Franklin, this is possibly the world’s first electric motor.

Construction is also simple. A set of metal spheres (I used sling shot pellets) are glued around a circle which is balanced on a needle bearing. When spinning, the metal spheres pass close to electrodes mounted at either side. One electrode is connected to your generator, and the other to ground.
Though the motor is not usually self-starting (mine has been for some odd reason), given a gentle push it will quickly spin up to high speed. Charges on the positive electrode are attracted to the grounded electrode and move the wheel at often remarkable speeds. It’s worth noting that Franklin motors have been made self-starting by adding a small ion motor to the platform.
A Leyden Jar
You can greatly increase the power of your Van de Graaff by storing its output in a large capacitor. Figure 8 shows a five gallon bucket configured as a leyden jar.
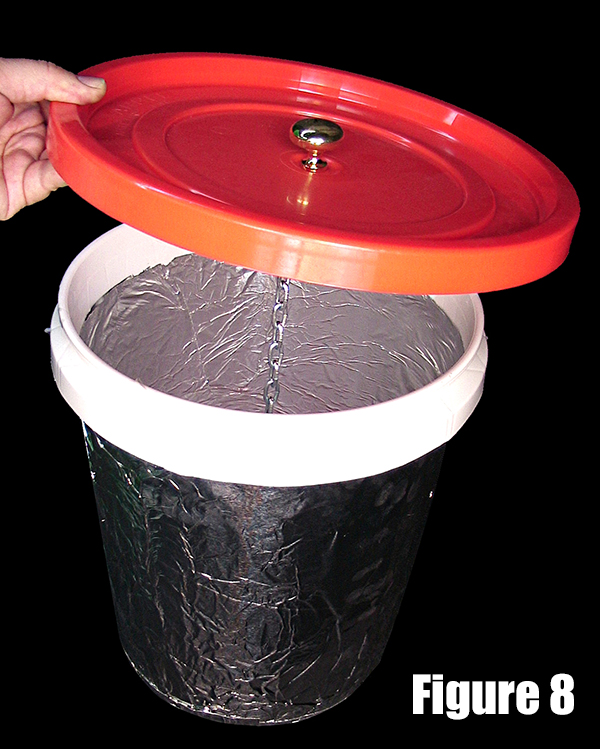
Construction is straightforward. Wrap aluminum foil around the outside and bottom of the bucket (as shown) and hold it in place with tape or contact cement. Do the same on the inside. A brass drawer pull on the lid is attached to a chain. The chain makes contact between the drawer pull and the foil inside.
When the lid is placed on the bucket, the outside foil should be connected to ground, and the drawer pull connected to the top of your Van de Graaff. After running your generator for a few minutes, the leyden jar will hold a large charge. To demonstrate this charge, you can short the drawer pull to ground with a discharge pole. Figure 9 shows a simple discharge pole.
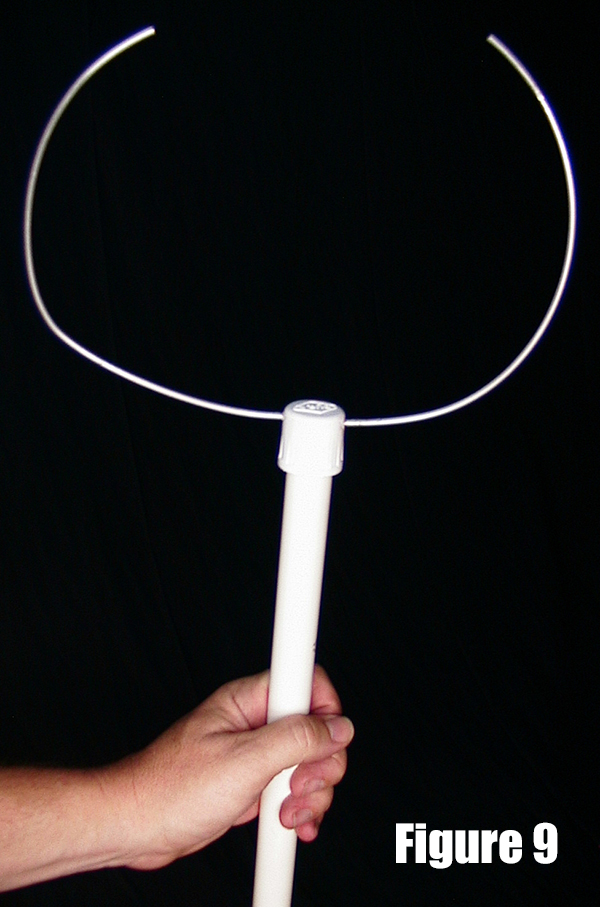
A heavy bare wire is attached to the end of a length of PVC pipe as shown. This allows you to stand some distance from the leyden jar holding only the plastic handle, and allowing the metal wire to short the connection between the drawer pull and the side of the jar.
The result will be a thick bright spark and a very loud CRACK. The leyden jar makes many higher energy experiments possible.
Note: Never — under any circumstances — touch a leyden jar without making certain it is fully discharged in this manner. Even if it is not connected to your Van de Graaff, leyden jars have been known to pick up a charge in proximity.
Halloween Magic Ideas
I’ve seen a very long string of freaky things happen when running my Van de Graaff, and you’ll discover these as you experiment. A number of great Halloween door tricks suggest themselves immediately.
For example, if you bring your arm within a couple feet of the generator all the hair will stand on end. The feeling this creates is hard to describe, but it’s quite odd. So, a hidden generator at a safe distance might demonstrate this for trick-or-treaters or party guests.
Of course, a classic piece of Van de Graaff magic is to stand on an insulator, keep your hand on the sphere, and let it gradually charge your body till your hair stands on end. Long dry hair works best.
Briefly running your generator can create endlessly entertaining short “pops” to a finger. There really is no limit to what will suggest itself. Just keep in mind when doing any stunt that you’ll want a plan to discharge yourself afterward without getting zapped.
A great way to discharge yourself is to hold a metal object at all times (keys are fine) and to then touch that object to a ground source when you are done to remove the charge from your person painlessly.
Remember, NEVER hook up any capacitors (or the leyden jar) to the generator if you or anyone else plans to touch it.
Wrap-Up
The question always comes up ... just how far can you “size up” a Van de Graaff?
I’ll wrap up with Figures 10 and 11, which are two of my favorite pictures.
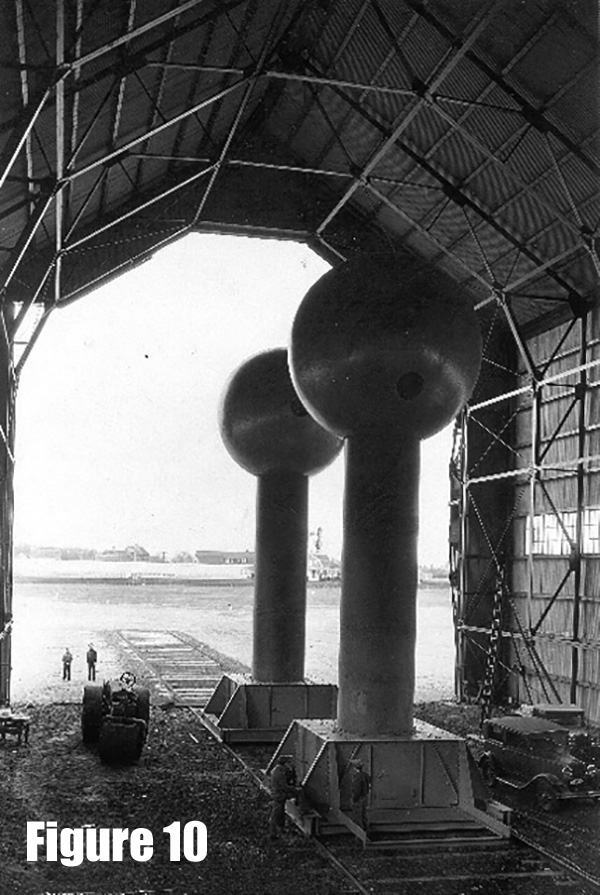
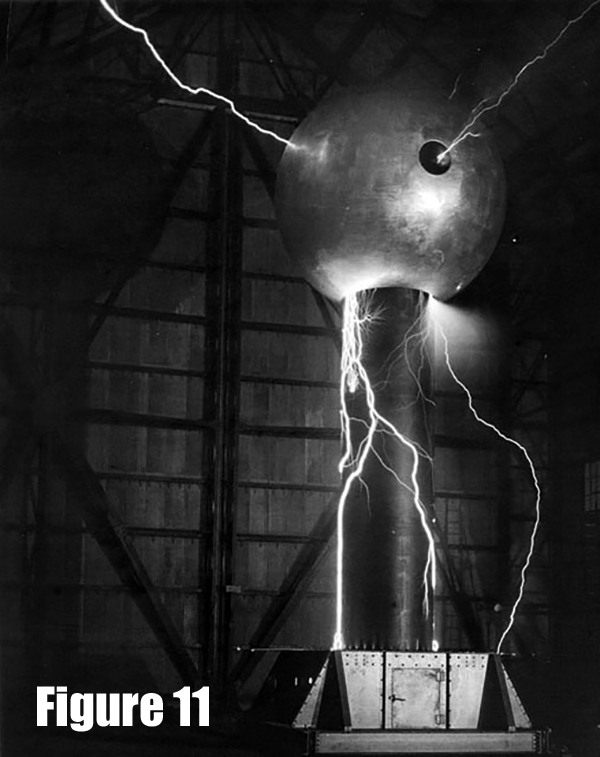
The enormous Van de Graaffs shown were so large that they were placed on railroad tracks and oppositely charged. Potentials of over 10 million volts were said to have been achieved.
I was lucky enough to know Larry White of the Boston Museum of Science. Larry told me that after hours, Dr. Van de Graaff himself used to come in and they would run a one million Van de Graaff (which is still at the museum) for their own pleasure long into the night ... just to watch the sparks and chat. It’s nice to know that even the inventor himself never tired of watching his sparks fly!
There are many ways to get more power and experiments from your generator, and some useful computer program calculations. I’ll be sure to feature those, and my favorite tips and tricks for Nuts & Volts readers on my page at www.noonco.com/van I hope you’ll send me photos of your high voltage Halloween! NV
Robert Jemison Van de Graaff was born at the Jemison-Van de Graaff Mansion in Tuscaloosa, AL from Dutch descent. In Tuscaloosa, he received his BS and Masters degrees from The University of Alabama where he was a member of The Castle Club (later became Mu Chapter of Theta Tau). After a year at the Alabama Power Company, Van de Graaff studied at the Sorbonne. In 1926, he earned a second BS at Oxford University on a Rhodes Scholarship, completing his PhD in 1928.

Van de Graaff was the designer of the Van de Graaff generator — a device which produces high voltages. In 1929, Van de Graaff developed his first generator (producing 80,000 volts) with help from Nicholas Burke at Princeton University. By 1931, he had constructed a larger generator, generating seven million volts. He was a National Research Fellow, and from 1931 to 1934 a research associate at the Massachusetts Institute of Technology (MIT). He became an associate professor in 1934 (staying there until 1960). He was awarded the Elliott Cresson Medal in 1936.
During WWII, Van de Graaff was director of the High Voltage Radiographic Project. After WWII, he co-founded the High Voltage Engineering Corporation (HVEC). During the 1950s, he invented the insulating-core transformer (producing high voltage direct current). He also developed tandem generator technology. The American Physical Society awarded him the T. Bonner prize (1965) for the development of electrostatic accelerators.
Van de Graaff died January 16, 1967 in Boston, MA.
Credit: http://en.wikipedia.org/wiki/Robert_J._Van_de_Graaff