In the March 2012 issue of Nuts & Volts, I wrote an article entitled "Build Your Own Wi-Fi Internet Radio" about how to build an Internet radio using a repurposed wireless router. While this project worked fine (and still does), it had limitations driven mainly by the small amount of RAM available on the router. After publication of that article, I continued to evolve the design so that it could also play MP3 files stored on a Flash/thumb drive, as well as function as an Internet radio player.
I liked the idea of having the music I was currently interested in on a Flash drive and being able to change it easily. Also, since the capacity of Flash drives was going up and the prices were going down, I could have a fairly large number of songs available at one time. Then, to put frosting on the proverbial cake, I could control the Internet radio/music file player with a new iPhone/iPod Touch app I was developing called MpdClient.
As time passed, I became frustrated with the fact I had to convert all of the songs I wanted to play on my Internet radio/music file player to MP3s to play them. So, I started looking for a better solution that would allow me to play many different types of music files. When the Raspberry Pi came on the scene, I figured out how to run a full featured version of MPD which solved all my problems. Now, while I’m sitting in my favorite chair, I can listen to Internet radio stations or play artists, albums, or individual songs from a Flash drive plugged into my Raspberry Pi.
In this article, I will show you step by step how to turn your Raspberry Pi into a remote-controllable Internet radio/music file player.
Hardware
With the high level of system integration on the Raspberry Pi (RPi), you can make an Internet radio/music file player with fewer parts than what would be required using a repurposed wireless router. Figure 1 shows a block diagram of the proposed system; Table 1 gives some specifics as to the components required. For our purposes here, I will assume your RPi will be connected to an existing audio system (through an appropriate stereo interconnect cable) or used with headphones, so we won't worry about discussing amplifiers or speakers.
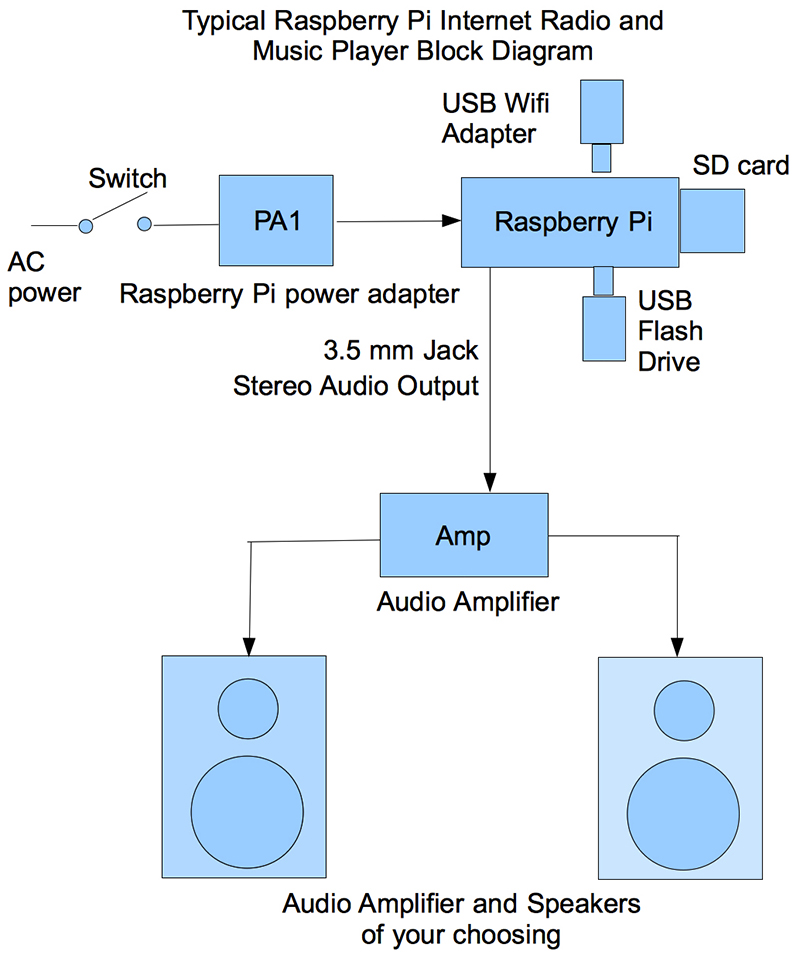
FIGURE 1.
I will show you how to connect the RPi to your local wireless network using an inexpensive (less than $6) USB Wi-Fi adapter. However, you could run an Ethernet cable from your RPi to your router and skip the Wi-Fi stuff altogether.
| Item |
Source |
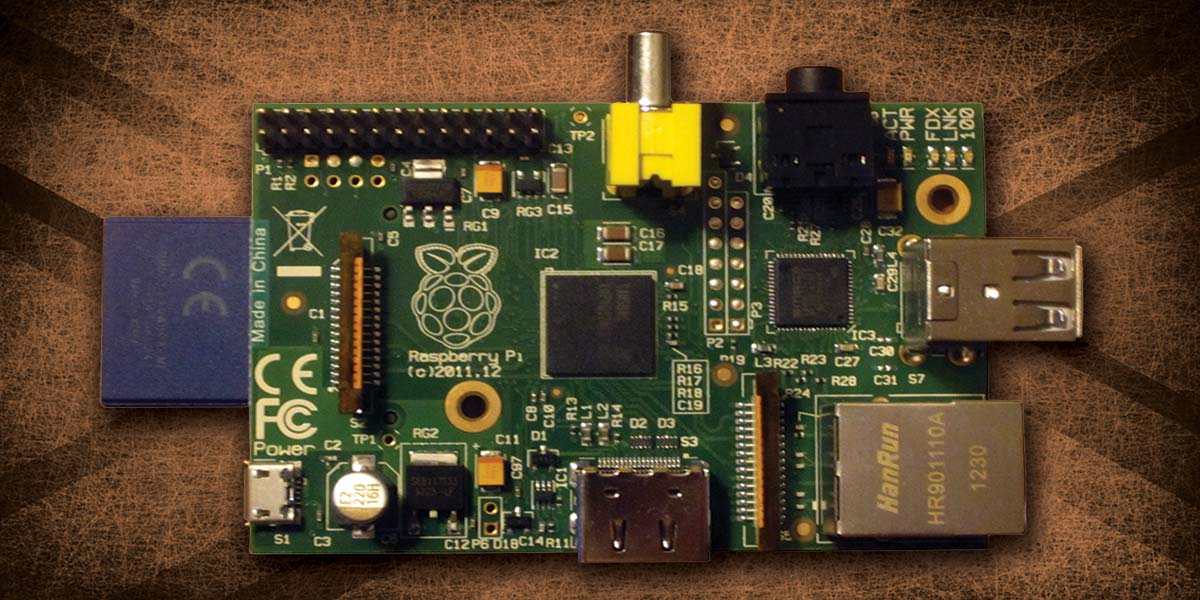
Raspberry Pi Model B
with power supply |
www.adafruit.com www.mcmelectronics.com
www.sparkfun.com www.newark.com |
SD Memory Card
4 GB or larger |
Everywhere |
Flash Drive
Bigger = More Songs
I used an 8 GB device. |
Everywhere |
| Mini 150 Mbps USB Wi-Fi Wireless N LAN Network Adapter 802.11n/g/b |
eBay |
Audio Output Cable
3.5 mm stereo cable to whatever input(s) your amplifier requires |
eBay, BestBuy, Amazon |
TABLE 1. Required Hardware.
The two USB ports on the RPi Model B fit our needs exactly with one port for the USB adapter and the other for a Flash drive containing music. The Model A RPi would not work for this application because it only has a single USB port (unless you want to incorporate a USB hub into your system). In any case, the increased amount of RAM (512 Mbytes) on the Model B probably makes the MPD server run better. The hardware connections to/from the RPi are as follows:
- Connection of the power adapter to the micro USB port on the card.
- Connection of the 3.5 mm audio output to the music system via the appropriate cable.
- Insertion of the 4 GB or larger SD memory card containing the operating system.
- Connection of the USB Wi-Fi adapter to one of the USB ports.
- Temporary connection of a USB hub to the other USB port. This will only be needed during the setup process and will be removed when setup is completed. Connect a USB keyboard and mouse to the hub at this time. The USB hub will be replaced with a USB Flash drive containing the music library when setup is finished.
- Connection to either an HDMI or composite video monitor. The RPi will run headless; that is, with no monitor required once the installation procedure is competed.
Software
When I first began using the RPi for Internet radio, it had a real problem with loud pops when changing stations. So loud, in fact, as to almost make this arrangement unusable. Recently, however, I reloaded my RPi with the 02-09-2013 version of the Raspbian operating system (available from raspberrypi.org); this problem seems to have been fixed.
If you have an older version of the operating system software on your RPi, I strongly suggest reloading it with this new version. You can follow the directions in my March 2013 article, "Raspberry Pi, Anyone?" All of the initial configuration described in that article is still appropriate and should be done before proceeding.
Assuming we are starting with a newly loaded RPi image, we will first get the Wi-Fi working, then update the OS software with all the newest packages. Next, we will update the RPi firmware and install a series of packages required to run MPD. Finally, we will configure MPD for our purposes.
To get started, insert the SD memory card with the operating system into the RPi and make all of the connections listed in the hardware section above. Once power is applied, your RPi should boot and take you into raspi-config automatically if you haven't done your initial configuration already, or to the command prompt if you have. At this time, please log in with the username of pi and the password of raspberry.
- At the command prompt, type startx to start up the Graphical User Interface (or GUI).
- Click on the Wi-Fi Config icon to configure your RPi for wireless operation. If you are going to use a wired network connection, skip to step 6.
- From the app's menu, click Network and then Add.
- Input the SSID or name of your wireless network, and select the appropriate Authentication method for your network, if any. My wireless network uses WPA2 — Personal authentication, but yours may be different. Finally, type your network password into the PSK field.
- Click the Add button and if all is well, your RPi should connect to your wireless network. If it doesn't, check to see that you have the correct SSID, Authentication, and PSK values set.
- Click on the LXTerminal icon on the desktop to bring up a shell window.
- Type sudo apt-get update to allow your RPi to determine all of its OS packages that are out of date.
- Type sudo apt-get upgrade to install all of the new OS packages.
- Once the upgrade is complete, type sudo reboot to restart your system. A reboot is necessary to utilize all of the new software you just installed.
- Log back in and run startx again. This time, click the Midori icon to bring up the browser. Type github.com/hexxeh/rpi-update into the location bar.
- Also click on the LXTerminal icon to bring up a shell window.
- In the shell, type sudo apt-get install git-core to load some more software we will need.
- We will now download and install the RPi firmware updater so that our system can be completely updated, both in terms of its firmware and its OS software. In the Midori window, scroll down to the Installing section and highlight the long command that begins with sudo wget … Once highlighted, copy it to the clipboard and then paste it into the LXTerminal window to execute it.
- To run the firmware updater, type sudo rpi-update.
- After this process completes, reboot your system again and log back in.
- Next, we will install software that will automount any USB Flash drives plugged into the RPi. This means that if you plug in a new Flash drive, the system will recognize it automatically without you having to do anything. Type sudo apt-get install usbmount. When completed, type sudo service udev restart to make the system begin using the usbmount software.
- To test that automounting is working, list the content of the directory /media/usb0 using the command ls /media/usb0. The directory should be empty. Plug in a Flash drive with some files on it into the USB hub and run the command again. This time, the content of the Flash drive should be visible in the directory listing. If not, reboot and try again.
- Finally, install MPD and MPC using the command sudo apt-get install mpc mpd. We install MPD because we need it; we install MPC to help in testing the MPD server.
- Next, we need to edit the MPD configuration file that was just installed. We will invoke the vi program editor with the following command line: sudo vi /etc/mpd.conf. You can use another editor if you are more comfortable with it.
- Find the music_directory line in the file and change its value in double quotes to "/media/usb0." This tells MPD where to look for music files. Next, find the bind_to_address line and replace "localhost" with "any." This allows us to interact with the MPD server remotely. Next, find the line #mixer_type "software" and remove the # sign. Finally, find the line #autoupdate "yes"; first remove the # sign, and then change "yes" to "no." Save the changes to the file with the command :wq if using vi.
- Reboot once more so MPD will read its new configuration.
- Log in and type alsamixer on the command line. This will bring up a GUI with a slider in the middle of the screen. Raise the value three quarters of the way up and then click the Esc key to terminate this program.
- To make sure the kernel modules necessary to output sound from the RPi are loaded, type the following command in a shell window: sudo modprobe snd_bcm2835.
- Lastly, type amixer cset numid=3 1 to route sound to the 3.5 mm jack on the RPi.
- Reboot one more time and look closely at the messages that stream by on the monitor. Make sure you don't see any errors when the MPD server automatically starts up. If you do, something is wrong and you will need to figure out what that is and fix it.
Now, it’s time to find out if our Internet radio/music file player is working. For this test, make sure there are music files on the Flash drive which is plugged into the USB hub. Then, plug some headphones into the 3.5 mm jack on the RPi. Type the following command in a shell window: mpc add [url=http://64.40.99.2:8088]http://64.40.99.2:8088[/url]. Then, type mpc play. If all is well, you should hear the Beatles Internet radio station.
Next, type mpc clear to stop the server from playing the Internet radio station. Then, type mpc update to force the MPD server to build a database of the songs on the Flash drive. Type mpc listall and you should see all the songs listed that are on the Flash drive.
Then, type mpc add followed by one of the file names you saw with the listall command. Finally, type mpc play and you should hear the song you just added.
If these tests are successful, you are ready to go. You can power-down your RPi and remove the USB keyboard, mouse, and the USB hub. Remember to plug your USB Flash drive containing your songs back into the RPi and connect the audio cable to your stereo system.
To control your MPD server remotely, you can use my iPhone/iPod Touch app (MpdClient) or any other MPD client application you have available.
Songs On A USB Flash Drive
The MPD server used in conjunction with the RPi can play many different audio file formats. If you would like a complete list of supported files, type mpd --version at a command line prompt. This means you can put a variety of audio file types on your Flash drive, and MPD should have no trouble indexing and playing them all.
MPD does not require any kind of directory structure for music file storage like some other music library programs do (like iTunes). All files can be placed in the root directory of your Flash drive and MPD will sort things out. This is possible because MPD extracts song information from metadata stored in the music files themselves.
When MPD is commanded to do an update, it extracts information from the song files and stores it in its private database. This allows for some very powerful searching and sorting capabilities. Using the MPC client we installed on the RPi for testing, we can list all the available songs by typing mpc listall. Type mpc list artist to see a list of all the artists with songs on the Flash drive. Type mpc list album to see the albums the songs on the Flash drive are associated with. Finally, type mpc list genre to see the genres covered by the songs on the Flash drive.
While these capabilities might not seem all that powerful, consider the following example. Say you execute mpc list genre and get the following list retuned:
- World
- Rock
- Unclassifiable
- Holiday
- Alternative & Punk
Say you only feel like listening to World music. You can do so using the following series of commands:
- mpc clear — This clears the server's playlist of all songs which stops playback.
- mpc findadd genre World — This creates a World music playlist on the server.
- mpc play — This starts the playback of World music.
Of course, I only used genre here as an example, but you could use these same techniques to select songs from a specific album or to play back all songs by a specific artist. Pretty powerful stuff, really.
Conclusion
Having a remote-controllable Internet radio/music file player is very convenient. Building one yourself inexpensively makes it all that much sweeter. NV
| Feature |
Model A |
Model B |
| Suggested Retail Price |
$25.00 |
$35.00 |
| CPU |
700 MHz ARM11 with hardware floating point |
| GPU |
Capable of 1080p video |
| Memory |
256 MB shared with GPU |
512 MB shared with GPU |
| USB Ports |
1 |
2 |
| Video Outputs |
HDMI and composite video |
| Audio Outputs |
Stereo 3.5 mm jack + HDMI |
| Onboard Storage |
SD memory card up to 128 GB |
| Networking |
None |
10/100 Ethernet |
| Connectivity |
3.3” x 2.1” |
| Size |
3.3” x 2.1” |
| Power Requirement |
300 mA – 1.5W |
700 mA – 3.5W |
| Official OS |
Raspbian version of Linux |
TABLE 2. Raspberry Pi Specs.